-
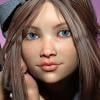
Random question. Which (Genesis) character would you use as a starting point for Ronnie James Dio?
Still plugging away at this.

I had hoped to have it wrapped up by today, but the morph dial nudging thing is taking longer than anticipated. More adjustments are needed (need food first), but I feel like I'm in the ballpark at least.
The middle of the lower lip & the top of the forehead needs higher. Pretty impressive work you've done.
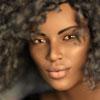
Show Us Your Iray Renders. Part VIPlaying around with my iridescent shaders.
In this image, there are existing Bump and Cutout maps, and the eyelashes/eye moisture is untouched. Other than that, all surfaces use my Iridescent shaders.
Morph is Jordynne at about 50%, gem hair, one piece swimsuit (I hid the straps). Lighting is https://www.daz3d.com/painter-s-lights , which I use very often.
New Terradome 3 terrain?You need a tool that edits geometry by moving the verticies around (Hexagon, Carrara, Blender, etc.) and then loading the morph in DAZ Studio using morph loader.
New Terradome 3 terrain?Couldn't find any documentation on this. Does anyone know how to make new 'terrain morphs' for Terradome 3?
(Essentially, what I would really love to do is create a height map image in something like photoshop, and then use that in TD3. But I am sure thats not how everything works. So the follow on question is once a morph is made for TD3, how can I export it to a heightmap? Or, put another way, how can I get a useful image out of TD3 to then photoshop around on for UltraScatter maps?)
Thanks in advance for what I am sure will be a long explanation!
Random question. Which (Genesis) character would you use as a starting point for Ronnie James Dio?Still plugging away at this.
I had hoped to have it wrapped up by today, but the morph dial nudging thing is taking longer than anticipated. More adjustments are needed (need food first), but I feel like I'm in the ballpark at least.
Struggling to properly rig Fibermesh Hair propHello all,
I'm working on hair prop, and created fibermesh hair with Zbrush, with multiple polygroups to separate surface groups when importing into Daz.
I created the figure with rigging bones, and got one figure including the whole geometry, separated with groups.
Now I'm block at the morph steps ; I brushed each sub-part in Zbrush to make separate movement dials for each strand, to pose them separately in DAZ, but I'm probably not going the right way...
I exported each morphed sub-part (strand, right, center, left etc) in a OBJ, but when importing the morph with the loader, I couldnt assign each of them to separate part of my geometry (my poly groups clearly referenced in DAZ), because it want to get the whole geometry matching each time.
Question is : do I have to play with weight influence and duplicate the entire morphs to move each part separately ?
For example do I need to export the whole posed geometry for each "global" movement, then assign wheight maps to each part, for each morph (a control dial triggering the same morph, but only for the designated face group I presume) ?
I you know the exact procedure, I'm eager to know it, being complete beginner in morphing... ^^
Thanks for your kindly help !
Novica & Forum Members Tips & Product Reviews Pt 11Good afternoon, glad to see folks jumped ship and over to the new thread.
I saw this thread over in Commons that Ikyoto posted. It's a remarkable day regarding a health issue and thought you might like to post your thoughts to a very helpful person.
Regarding chained doors, I think of dungeons. The Dungeon has some dangling chains (don't know how they morph) and some formidable-looking doors. Sickleyield's Shackled also has chains that if you scale down so they're not "deep" may appear to be across a door instead of around someone. (or just embed in the door so the back half doesn't show.
GENERAL FREEBIE REQUESTS Part 2Here's another SW species I need a Genesis morph (or original figure) for. The Sathari:
 Looking for high polygonal female models
What you see isn't always what you get. While the HD characters don't appear to be higher resolution in the viewport, they do render at higher detail. This extra detail is actually from subdivisions in the mesh, which are applied at render time. The HD packs you find in the store are morphs which use the subdivided mesh rather than the base mesh to add this extra level of detail.
Now, at the present time this option is only available to published artists, so it is not possible to simply create your own HD morph. That said, it is a nice way of adding substantial detail to your characters if you need it.
Lara is Freaking Adorable, Thorne...I have too many already, from Gen3 to even G3F (Mika7). Considering I now can simply create my own just using morph sliders, merchant resources and some gene pool mixing, it was much easier to not get captivated by those big eyes and droopy ears....this time (also not working with G8).
Getting priced out of this hobbyBut then we're going around in speculative 'good business practices' circles.
Griffin: You are putting forth speculation, I'm pointing out the consensus and theory on that speculation.
If there's smaller demand for male content, BUT among the fewer choices you have an excellent product, then you get most of the sales from there being less competition.
So does it make sense to make what everyone else is making and just hope to do it better?
Yes, if the market is much bigger. Which it is. And there's a lot of room to make stuff that stands out as distinct from others (like Thorne figures or Aeon Soul clothing)
Now there's a combination of less competition and folks just wanting to do stuff that's not necessarily the most profitable, but there's only so far you can push it.
Thankfully it's not even more tilted; we DO see a lot of male content, and monsters, and animals. If those markets were much weaker, we wouldn't. I'm very happy the market is stronger.
(I mean, look at me. My one figure morph so far is 'dragons that look like snakes')
Melt .... like chocolate! (SOLVED ... say so)FSMCDesign, they are the first things I turn on. If I use it as base mesh nude, do the same thing. The mistake start from Daz Studio.Obviously without any morph (I test my morphs 3 or 4 times before freeze and save, is my procedure). Look at pic, pose like that happen this. So before cloth, defect start from the software, that is the same in the world, Impossible it happen just at my copy. I found seveal defects on Daz Genesis, one of this is the collision with itself.
Thank you
How do I convert female poses to male?Agent unawares offers a nice transgender morph from their patreon/deviantart account which also could be fun to play with.
Most poses for the same generation will work regardless of gender with the opposite sex. You can also get earlier poss to work but they may require adjustments.
Mika 8With all this talk about "over the top" makeup for Mika 8, I think it may be time to resurrect an old thread on "stealing" makeup. While it's true there are many G8F figures/characters with LIE or Diffuse Layer makeup now that can be used interchangably, there are still many that use face texture maps for the makeup options. And using this technique, you can also use makeup from any of the G3 base females on your G8 and vice-versa.
I've even used the Transfer Map Utility converting G2F face textures to a G3 template first to convert G2 makeup for use on G3. (I used the "Genesis 2 Female" UV provided by Cayman Studio's Legacy UVs product for G2F on G3F.)
With the Diffuse Overlay layers, it's now MUCH easier to "steal" makeup. No need to transfer maps. Just load a Diffuse Overlay makeup onto your character and then change the "Diffuse Overlay Color" image to a face texture that has the makeup you want to use.
If you have Aiko 8, Edie 8, or Monique 8 you can load their makeup onto any G3 or G8 character - you can then switch out the Diffuse Overlay Color map for any face map with makeup on it. It also tends to work better if you switch the white color out for a medium gray color:

Great tip - thanks!!
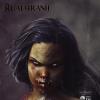
Superheroes Rebooted - Ready to Rrrrrender?Unfortunately I never heard back from Sixus1 on whether or not they will be selling their Mad Titan morph and outfit after it got pulled from Rendo awhile ago, so here is my shoddy attempt at kitbashing Thanos myself. Oh well.
Looks good! The color might be a tad dark, but the face is great! If you don't mind me asking, who was your base for this one?
Yeah, my son said I should make him darker cause that was how he was in the comics. But I thought it was too dark as well. Will probaby lighten him up. I am not entirely sure who I used for base. Either Scott 6 or Gianni maybe. I did a few version trying to get the face close and had to turn off a lot of the limits in parameter settings to get the chin to come out enough. Still not perfect. But as close as I could get with what I am capable of.
How to get fine displacement skin details on Genesis, dynamic SubD ?The editing in Hexagon removed the UVs. What exact settings did you have in Transfer Utility?
Could you not use a normal map to add the detail? It doesn't appear to be high relief.
How to get fine displacement skin details on Genesis, dynamic SubD ?Hello all,
While being relatively new to this, I'm currently trying to find a way about fine displacement details on skin, and the current SubD engine is far too geometry heavy because it affects all the figure at once.
I'm working with custom characters for Genesis 3, wich got deep scars and naevus (beauty spot), and I found the geometry wasn't dense enough to efficiently use displacement mapping. I found the bump mapping visually disappointing, and wanted to get better use of displacement mapping (before figuring out Disp. SubD level is tied to entire figure SubD instead of being dynamic).
My goal is :
- Keep morphs and base figure working, for obvious reasons
- Add more geometry on small localized skin zones only (finger/elbows/knees joints, deep scars and naevus on the present case), to allow precise details for displacement map like creases and folds
- Avoid GPU getting overloaded by the SubD level of 4-5 on the entire figure, wich is not even enough to achieve precise enough results.
So what I did so far, and didnt work :
- Loaded custom Genesis 3 model with desired morphs and textures, and sent it to Hexagon 2.5
- Selecting polygons on localised zones (the ones wich receive scars and beauty spots displacement), then square-tessellated them at least twice.
- Send the model back to Daz Studio, before getting error message about morphs not working (because geometry changed). I got a white model (Hexagon for some reason correctly read textures, surface groups and so on, but refused to send back the figure with texture on).
- After some minutes trying to figure out that "update base geometry" and "add level of details" are not working either, tried the "tranfert utility", and managed to transfer the entire figure AND new geometry with "Replace source with target" option, and pretty much all other options checked.
- Now I got a posable model with all surface details on geometry as I planned, but ALL morphs are not working (despite being present on the final figure), and for some reason I appears I lost UVs in the process (despite option checked as well), leaving me with a white figure and unable to load preset materials from the library to the new figure. Entire figure correctly added detailed geometry to surface groups, without creating additional information, so it should be okay to work with textures and morphs ?
Is there a correct way to do this without losing informations in the process, or from my current state, a way to restore correct textures, and optionally working morphs (wich may be useful to correct some posing). And if I have to correct UVs, please explain precisely how to do this, provided I have near to zero experience in there ; I do know how to create different mapping but not how to warp them on the figure, and I'm not aware of the original UV mapping as well, so it could be tricky for me.
I also own Zbrush if it's more convenient than hexagon (tried it and Hex is awful working UVs).Basically speaking, consider me as a total newbie, in auto-formation on both zbrush and Daz... ;)
Alternatively, if anybody know how to achieve dynamic SubD/displacement in Daz, I'm all ears... ^^ Maybe with geometry editor, a hidden parameter or something similar ?
Thanks for any help and/or information I certainly missed !
The end result with SubD 1, wich should achieve far better results with level 2-3 on the entire mesh, without adding too much polys :
Novica & Forum Members Tips & Product Reviews Pt 11********** TUTORIALS**********
Tutorial: Bus, Noggins- Converting from Bryce to Daz Studio (RGcincy) Here
Tutorial: Breast Gone- In Hexagon (Smoothing Zev0s Grow Up product even more)
Tutorial: Clothing, Making in Blender SickleYield's tutorial on Deviant Art.
Tutorial: Converting G3 and G8 Clothing by SickleYield on Deviant Art Added June 2018
Tutorial: Create Categories Using Gen2F, I showed how to Create Categories and Export to save your custom categories. (Here's WHY you may want to do that with your characters.)
Tutorial: Custom Actions In Toolbar How to Create Custom Actions In Toolbar
Tutorial: Customizing Morphs Using Morph Loader Pro
Tutorial: D Former D Former Tutorial D Former tutorial and links
Tutorial: Depth of Field Flipmode provides a good depth of field tutorial for you.
Tutorial: Fisty's Shaders & Getting Rid of Gooey Lips This one shows you Fisty's shaders. Get rid of the overly gooey lips.
Tutorial: Fur Brushes Download and Video (Kathryn Loch)
Tutorial: Garibaldi Hair Doing a cat with Garibaldi Hair- Tutorial
Tutorial: GenX links on "how to use."
Tutorial: Generation 4 Materials on Genesis 2 This one put Generation 4 materials on Genesis 2 using Victoria 4 for Genesis 2 Female.
Tutorial: Geometry Shells How to do Geometry Shells (video tutorial the3dwizard) and doing makeup for different characters
Tutorial: Hair Shaders (Slosh, his product) explaining how to use them.
Tutorial: Iclone Iclone videos
Tutorial: Images- How To Put Them In Forum Posts Here's Putting Images in Posts
Tutorial: Instances: Using Ultrascatter
Novica & Forum Members Tips & Product Reviews Pt 11*******TIPS I-W *********
Tip: Iray Organized References This thread links to the threads, but also categorized some of the topics within the thread so you can look things up quicker.
Tip: Iray Section Plane TabascoJack shows you how to use the Iray Section Plane
Tip: Lighting: Lampshades TobascoJack shows you how to prevent losing detail when lighting lampshades
Tip: Madelyn Ears- How to remove those elf ears.
Tip: Manual Downloads in Product Library How to find them ultra-quick
Tip:/Info: Materials and Shaders: Difference in Materials and Shaders (from Commons)
Tip: Mermaid Top Family friendly suggestion.
Tip: Metallicity and Metallic Flakes Add More Sheen to your characters
Tip: Millenium Cat- Free Persian Head
Tip: Mocap Animations FREE Here (Mixamo)
Tip: Multiplane Cyclorama Use Modern Museum Lighting for realistic results!
Tip: Nobiax Free Iray Daz Textures
Tip: OOT Hair Steps
Tip: Photoshop Postwork Postwork Photoshop Tips (Laticis) and my example
Tip: Photoshop Plugins From Thread 6: Examples
Tip: Portrait Lighting Novica's XYZ Dome Orientation Quick Guide (Portrait Tweaks)
Tip: Pose Converter (Genesis 2 to Genesis 3) Where to find files (Scroll for discussion)
Tip: Combining Poses by locking body parts
Tip: Postwork The Postwork thread has a lot of good information!
Tip: Putting Prop On Top Of Prop (Align Pane)
Tip: RDNA How to find your purchases
Tip: Rigging How to import OBJ and rig in Daz Studio
Tip: Rigging Basic Rigging Preparation then Adding Bones for Rigging
Tip: Section Planes How To Use (by TabascoJack)
Tip: So Wet Bundle Examples
Tip: Skies of iRadiance Which are for high / low altitudes? Answer
Tip: Spectural Rendering tests for the studio
Tip: Spotlights: (Iray) How to Hide Them and Still Emit Light
Tip: Studio Crashing: Script by Taoz to save last render
Tip: SubD: How To Add It (Darwins Mishap)
Tip: Texturing With DestinysGarden (DestinysGarden)
Tip: The Briefing Room Lighting with Iray (V3Digitimes)
Tip: Ultragenesis: Faces of G has a variety of older faces.
Tip: Weight Maps: How To Remove or Change (Thomas Windar)
Tip: White Point Changing it- Examples
Tip: Walls- Sets Which Are Easier To Use- or Not. Sets that don't have separate walls and handy notes on a few sets
Mika 8With all this talk about "over the top" makeup for Mika 8, I think it may be time to resurrect an old thread on "stealing" makeup. While it's true there are many G8F figures/characters with LIE or Diffuse Layer makeup now that can be used interchangably, there are still many that use face texture maps for the makeup options. And using this technique, you can also use makeup from any of the G3 base females on your G8 and vice-versa.
I've even used the Transfer Map Utility converting G2F face textures to a G3 template first to convert G2 makeup for use on G3. (I used the "Genesis 2 Female" UV provided by Cayman Studio's Legacy UVs product for G2F on G3F.)
With the Diffuse Overlay layers, it's now MUCH easier to "steal" makeup. No need to transfer maps. Just load a Diffuse Overlay makeup onto your character and then change the "Diffuse Overlay Color" image to a face texture that has the makeup you want to use.
If you have Aiko 8, Edie 8, or Monique 8 you can load their makeup onto any G3 or G8 character - you can then switch out the Diffuse Overlay Color map for any face map with makeup on it. It also tends to work better if you switch the white color out for a medium gray color:
Daz 3D is part of

Connect
DAZ Productions, Inc.
7533 S Center View Ct #4664
West Jordan, UT 84084Licensing Agreement | Terms of Service | Privacy Policy | EULA
© 2026 Daz Productions Inc. All Rights Reserved.