How to "steal" makeup (a tutorial)
 j cade
Posts: 2,310
j cade
Posts: 2,310
Have you ever wanted to take the Makeup off of one character and put it on another? Maybe it's just me. In any case, I have found a surprisingly easy method to do just that. It transfers makeup perfectly, and requires no painting skill whatsoever. All it requires is GIMP (I imagine Photoshop would also work) and the Layered Image editor in DazStudio to combine them (again, you could also combine them in your photo-editing software, but I find the LIE more versatile)
1. Find the makeup you want to steal. In Gimp, open the base (makeup-less) texture of the character whose makeup you're stealing and the texture with the makeup you want.
2. Copy your makeup texture and paste it, as a layer, on top of your base texture.
3. Set the layer mode for your makeup layer to Subtract. The image should now be primarily black with some ugly colored makeup shaped splotches. This is exactly what you want in the file menu select export to save the file as a .jpg (Gimp has an odd setup, I know) save it somewhere you'll remember and layer it fairly clearly depending on the style of makeup it may have another image it goes with, so be sure to make it easy to identify as part of a pair.
4. In layer mode scroll back and forth between Difference and Subtract. If they are exactly the same, Hooray! Your makeup only darkens the skin and you only need one image to replicate it perfectly, you are now done in GIMP and can skip steps 5 and 6. If there are any differences the makeup lightens the skin as well as darkening and we need a second image to replicate this.
5. Set your makeup layer's layer mode to lighten and duplicate your base layer. You should now have 3 layers: the base layer, its duplicate and the makeup layer.
6. Merge the makeup layer and duplicate layer together, and set this new layer to difference. Once again you should have something primarily black with some makeup-y splotches export this image the same way you did the other one and give it a similar name so you can find both later. You are now done in GIMP.
7. Apply whatever texture you want to whatever character you want. The only limitation is that it does have to be the same UV map as the texture you took the makeup from (or convert the textures you made to the UV you want using the map transfer tool)
8. In the surfaces editor select the lip, nostrils, and face. Open the LIE for the diffuse texture.
9. In LIE Create 2 layers and open the textures you created (obviously if the makeup only needed one image you only need one layer). Set the first image you created's blend mode to subtractive, and the second to additive. Hit accept, your makeup should be fully transferred.
The image below is Zev0's Skin Builder with makeup kiboshed from Girl6.
If you have any questions, please ask ; I'm sure there's something here I've explained terribly,
Daz 3D is part of 
Connect
DAZ Productions, Inc.
7533 S Center View Ct #4664
West Jordan, UT 84084
Licensing Agreement | Terms of Service | Privacy Policy | EULA
© 2026 Daz Productions Inc. All Rights Reserved.
Comments
Thanks for bumping.. I was trying something similar a month or 3 back...will have to read this further in daylight.
I would reccomend saving as .png instead of .jpg as .jpg adds compression artifacts to the image.
I'm working on this, but I'm finding that the different ways artists are handling Translucency Color is causing me problems.
I started with Teen Josie 7 materials. I went through the Photoshop saving of the dark and light diffuse images and map transfer to Base Female UV. I then tried to apply the makeup files with LIE to Amandla. The resulting makeup on Amandla had discolored areas that should have been black. I blame the different handling of Translucency. Teen Josie 7's makeup face uses a dark red Translucency Color map with green areas by the eye makeup. Amandla uses gray Translucency Color maps with saturated color in the color picker area. This will take some more thought...
Yeah, this tutorial is so old it predates all those Iray translucency maps. (Just for fun, I absolutely hate those red translucency makeup maps, they make it an absolute PITA to change to my preferred skin settings. So I have been slowly going through and converting the maps to kill the red, I haven't figured out a 100% foolproof method yet though. Currently its a bit more artistic and less scientific, but it actually uses some of the same methods as the makeup stealing)
Thanks. I spent an hour or so looking at all those portraits by the James Sargent painter you meentioned and he gives a better sense of what those people look like than even photography.
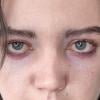
I find the easiest way to "steal makeup" is just to find a lovely high res makeup photo and cut it out. I use a layer mask to do it in Photoshop but an eraser works too, you just have to be careful.
Start out with the photo:
Cut it out:
Position it over your face texture map over one eye - you'll need to use warp and/or transform to get it to line up with the eye of your face texture map. Once you have it in place and the way you like it make a copy of it and flip it horizontally and place that copy over the other eye. Merge the two cut out eyes to one layer then paint small black dots in the four corners of that layer (this will help Layered Image Editor place it correctly) then save it as a PNG with no background.
And there you go - new makeup. :D You're welcome to use it if you'd like - click on it for the high res file. Feel free to use it as it is or edit the color/shape/etc in Gimp or Photoshop.\
Here it is on G3F and V7:
I suppose it would be even easier to "steal" the makeup from already made face textures of your other characters. Just cut out the makeup from that texture, paint four dots in the corners of the layer that has the cut out makeup, and save it as a PNG with no background. You can then use L.I.E. to place it over the face texture of any of your other characters.
OK, I'm trying something else, and thought I was scaling back my ambitions. I am now transferring a tattoo from one G2F to another. Of course I would pick ones that used different UVs and had different sized image maps.
 That made it a little harder. I had to use map transfer again and adjust the scaling so that the images aligned properly in LIE. In the end, I think it was fairly successful. I transferred the torso tattoo from Kori (on viewers left) to Mauree. Both models were converted to Iray with the V3Digitimes converter. The tattoo on Kori looks a little reddish and on Mauree it looks a little greenish. Again, I blame Translucency settings. Things are simpler without Iray surfaces, I guess.
That looks good! Nicely done! :) Did you follow j cade's tutorial or is there an easier way you've found? The tutorial sounds a tad complicated to me. I will give it a try though to see if I can figure it out. :)
I followed the tutorial. It is very well written. It is not hard. You have to take into account differences in UV maps and differences in map sizing, but those can be overcome with Map Transfer and image scaling. The Iray Translucency Color is causing more trouble than anything else. I haven't mastered that yet.
I tried this out, and the additive layer works great but when I try to use a subtractive layer it changes the color of the face.
Try using a geometry shell with only the face active and a tiny, tiny amount of offset, and create masks for the opacity/cutout. You can have completely different materials for your makeup without worrying about translucency issues, and (with iray at least) it mimics the real world by having a layer of slap sitting on top of the skin.
Yeah, I've been experimenting with geoshells over the past few days thanks to this thread: http://www.daz3d.com/forums/discussion/comment/1463231/#Comment_1463231
It works pretty well. I've found a fast and easy way to do makeup if you have like zero painting skills - you can just grab the makeup texture that you like and use "invert" in PS and then make it black and white by upping the contrast until the image is mostly black with only the "makeup" part being white. Then put it in as your opacity/cutout map and you can add colors and what not. Works really well. I did makeup with a geoshell here:
I followed the tutorial, using Photoshop CS6 and Hinky Punk's Build-A-Babe. Modified the process slightly to create layers I left in the file. (Instead of saving as a separate image, I merged the two layers and set that layer to subtractive. Works fine. :)
I moved the fight makeup from Brothers for Growing Up 2 to Colin and Ryze. I've always wished I could use those bruises and blood on other models.
Edit: Images updated. I had forgotten to add the "makeup" layer to the Lips surface.
@barbult
Oh NICE! That looks great - I mean, painful, but it looks really realistic. That converted really well!
I'm finding that this is working really well if I A) Stick to the subtractive layers and B) adjust the contrast and brightness until all of the face is totally black except the area where the makeup is - which would be white. Painting over any area that isn't the makeup part with black if need be.
I just updated by "fight" face images above. I had forgotten to add the "makeup" layer to the Lips surface. They look even better now.
If you can save at maximum quality, it's fine, although it increases the file size to similar to a png.
Plus a ping has an alpha channel, so makes it useful for the LIE.
edit: nvm
Sorry for bumping a very old thread, but can anyone confirm whether this process makes them L.I.E. and compatible with ALL figures of the same generation or only the target on you use to convert?
@newoski, You can use the results with LIE on any figure. The limitation is going to be the UVs. For example, starting with a generation 4 character, applying to a generation 8 figure, (Genesis 8,) is going to be problematic, without going through other hoops. But the G3/G8 figures use the same UVs, so any makeup for from a Genesis 3 character will apply directly to Genesis 8 and vice-versa. (The UVs for the G3/G8 male face and those for the G3/G8 female have slight differences though, so cross-gender make take a bit of finagling.)
I did an updated How To, if you're interested. You can find it here.
I've done this, basically using Divamakeup's technique. I put some eyeliner from A4 Bell onto the V4 Leena texture. Tricky, given the difference in skin color! Using the eraser brush, I rough out the part I want then dial the opacity of the eraser down more and more as I get closer to the part I want to keep. LIE can dynamically update the image after saving a new edit to the source too. The render is a bit old...
Awesome! I'm glad that what I said helped, though "my technique" was probably just a modified version of what others had done. lol
If you render in Iray you might try using the makeup on a Diffuse Overlay layer - as I find it gives easier control over color and opacity and it loads faster than L.I.E. as well. If you have a Genesis 8 character that uses Diffuse Overlay for the makeup, you can take a look at how that's done and just plug your own makeups into the Diffuse Overlay channels on the Face Surface and Lip Surface. There are quite a few G8F characters that use Diffuse Overlays for their makeup. I did a quick look and characters like Aiko 8, Alexandra 8, Babina 8, Bridget 8, CJ 8, Darcy 8, all have Diffuse Overlay makeup. I think many, if not most of the "Official 8 Daz Original" females probably have Diffuse Overlay makeup. Having makeup on those layers gives a lot more flexibility and control, imo. :)