How to Use dForce: Creating a Blanket, Draping Clothes on Furniture, and Much More [Commercial]
 RGcincy
Posts: 2,862
RGcincy
Posts: 2,862
In October 2017 I started to use dForce. I shared my first tutorial, thinking it was a one-time effort, but then I kept discovering new things and this thread is the result. The tutorials are accessible within this thread as well as in downloadable PDF files and videos in the Daz store. I hope these help you learn how to better use dForce.
TUTORIALS IN PDF FORMAT
This collection of tutorials is available in PDF format. It is now split into parts as it was too large to upload to the forum.
Part 1 - Sections 1 to 25 - 91 pages
Part 2 - Sections 26 to 50 - 94 pages
Part 3 - Sections 51 to 75 - 92 pages
TUTORIALS IN VIDEO FORMAT
In late 2018 Digital Art Live invited me to do a dForce webinar and since then two more. Videos from these webinars are available in the Daz store. Although many of the examples are similar to what's been posted here, there are documents and examples exclusive to the videos. These will be helpful for those who learn better by seeing than just reading.
Video 1: Powerful dForce Discoveries and Solutions
Video 2: New dForce Discoveries
Video 3: dForce Tutorial Set : Fantastic Voyage!
ACCESSING THE ONLINE TUTORIALS
Table of Content (sequential listing of tutorials as they were published)
Subject Index (found in next post)
- Using dForce to Create Objects or Effects
- Creating/Using Clothing
- Simulation Parameters & Tools
- Weight Nodes and Map
- Surface Properties
- Helper Objects
- dForce Add-on Modifier
- UI Tips
- Other Daz Studio Tools
Table of Content
- Creating and Draping a Blanket Over a Figure
- dForce Global Environment and Duration Settings (Gravity, Air Resistance, Stabilization Time, Negative Air Resistance)
- Cast Off Blanket
- Adding a Smoothing Modifier
- Using dForce Surface Smoothing Settings (Velocity Smoothing and Velocity Smoothing Iterations)
- Draping Clothes on Furniture
- Friction
- Creating a Clothes Pile
- Various Methods to Correct Poke Through (including Push Modifiers)
- Getting a Figure’s Head to Sink into a Pillow
- Hanging Towel (introduces use of dForce influence weight map)
- Wind Node
- dForce Surface Parameter Tests
- Creating a Foot Stool
- Animated Posing for the Foot Stool
- Head Scarf and Telephone Wires
- Creating Blowing Curtains
- Creating a Tablecloth and Napkin
- Exploring Influence Weight Maps
- Short-cut Key to Clear Simulation on Selected Item(s)
- Dropped Papers
- Banner Flag
- Effect of Surface Properties Using Simple Sheet Drop - Part 1
- Effect of Surface Properties Using Simple Sheet Drop – Part 2
- Effect of Surface Properties Using dForce Primitive Flag Test
- Dropping an Object onto a Surface
- Creating a Kite from Primitives - Part 1 Part 2
- Creating a Bag of Fruit
- Deflated Soccer Ball
- Explorations of a Half Sphere
- Creating a Round Floor Cushion with Negative Gravity
- Footsteps in the Snow, Sand, or Mud
- More Footprints
- Sand Trap (footprints)
- Creating Icicles
- Creating a Cape
- Mummy Wrappings
- Create a Skirt from a Cone
- Create a Bandeau from a Cylinder
- Create a Dress with Gathered Waist
- How Resolution Affects Simulation Results
- Using Silo 2.5 to Create a Shirt
- Another Shirt Made with Silo
- Flying Cape
- Cylinder Helpers - Creating a Shawl
- Cylinder Helpers - Part 2
- Spherical Helper - Pulling a Cloth through a Ring
- Cylinder Rigidity
- Rotating Cylinder Helper - Wrap Up a Rope
- Creating a Necklace Creating a V in the Necklace Chain
- Dog Leash
- Effect of Density on Rotating and Horizontal Ropes
- Effect of Density on a Rotating Cloth
- Tie a String
- Using a Dynamic Surface Add-on
- Finding Vertex Coordinates within Daz Studio
- Button and Collar Add-ons
- Creating a Seat Belt
- Polyline Add-On
- Script to Quickly Add Dynamic Modifier to an Object
- dForce Menu Addition (Updated Version)
- More About Pillows
- Momentum Transfer
- Chair Cushions
- Men's Underwear
- Shorts and Swim Trunks
- More Momentum Transfer
- Loose and Rumpled Clothing
- dForce Magnets
- Making Caves
- Fantastic Voyage: Making Artery and Blood Cells
- Skin Indentation
- Blindfold
- Making a Breast Helper for Clothing
- Skin Indentation: Punch to Face
- Socks
- Puffy Sleeves
- Creating Mountains
- Creating Rocks
- Adding Wrinkles to Couch Cushions
- Plowed Field
- dForce Companion
- Making a Sash for a Dress
- The Problem with Buttons
- Sphere to Shirt
- Making Waves
- Another Look at Waves
- Making Waves 3 - Rings
- Making Mountains 2
- Rigid Follow Nodes
- Cling Wrap
- Putting Goggle Straps On Over Hair
- Putting a Hat Over Hair
- Creating and Using a Face Mask
- New! A Veil Covering the Face and Hair


Daz 3D is part of 
Connect
DAZ Productions, Inc.
7533 S Center View Ct #4664
West Jordan, UT 84084
Licensing Agreement | Terms of Service | Privacy Policy | EULA
© 2025 Daz Productions Inc. All Rights Reserved.
Comments
Subject Index (some topics appear more than once)
Using dForce to Create Objects or Effects
Creating/Using Clothing
Helper Objects
Simulation Parameters & Tools
Weight Nodes and Map
Surface Properties
dForce Add-On Modifier
UI Tips
Other Daz Studio Tools
1. Creating and Draping a Blanket Over a Figure.
Back in June I posted a tutorial on using a push modifier to create a blanket to cover a reclining figure (see How to Use a Push Modifier: Creating a Blanket). Although it works, the push modifier approach has a number of issues: (1) it's fairly labor intensive, (2) the results rely on the skill of the artist, (3) the artist has to interpret how gravity and cloth properties affect the draping, and (4) it grows the polygons of the mesh so that the edges of the blanket do not pull in as they naturally would.
With the new dForce simulator available, I decided to revisit the idea of a simple blanket. The default settings of dForce didn’t give a good result but a few simple parameter changes make it work well.
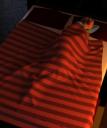
Here’s a render of the final result:
Compare it to the result from using a push modifier:
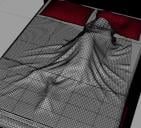
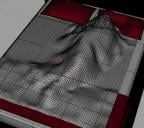
As you can see, dForce gives much more natural draping of the blanket and instead of the mesh polygons growing, the edges of the blankets pull in. Using dForce, all the polygons remain square:
Using a Push Modifier, the polygons above the figure have stretched to become rectangular and the edges of the blanket remain extended and do not pull in as a real blanket would do:
a. I used the bed from Modern Room Bedroom. It comes with a blanket at the foot of the bed and two pillows (combined as one prop) at the head of the bed. The actor is G3F in a sleeping pose on her side with her left arm tucked behind her head.
b. Create a flat plane by going to the main menu and selecting Create/New Primitive… and set the primary axis to Y-positive, size to 5 feet, and divisions to 100.
c. Resize the plane to a Scale of 120%, X-Scale of 110% and Y-Scale of 105%. Position it above the sleeping figure (I used a Y-translate value of 97.3) and move it down the bed so the upper end is over the shoulders and not the face of the reclining figure. Add whatever mateiral or fabric shader you'd like to the plane.
d. Next you need to add a dForce modifier to the plane. Select the plane in the Scene Tab, then from the main menu select Edit/Object/Geometry/Add dForce Modifier: Dynamic Surface. This will allow the plane to be modified during the simulation.
e. To start a simulation, click on the Simulate button at the upper right of the Simulation Settings pane. If the dForce pane is not already open, go to Window/Panes (tabs) and select Simulation Settings.
f. Using the default settings, the simulation will start by moving the figure to the T pose with the head projecting through the blanket. As the simulation progresses and the figure’s pose is transformed to the reclining pose, it will wrap the blanket around the figure, not drape it over the top as desired.
g. In the Simulation Settings pane, click on the Editor tab at the top then click on Simulation/Initialization. Set Start Bones From Memorized Pose to Off. This skips the step of starting from the T-pose and lets the blanket drape over the figure.
Here’s a render of the final result from just this one change. If you wanted, you could stop here.
2. dForce Global Environment and Duration Settings.
Notice that the blanket in the image above drapes nicely over the figure but lays very flat on the mattress around her. Changing some other parameters can add character to those flat regions. The following shows how changing Gravity, Air Resistance, and Stabilization Time affect the draping. To view the changes (which can sometimes be subtle), it helps to open the images in new browser tabs and click between them.
a. Gravity. The default setting is 1. Here is the result at 0.5, 1.0, and 1.5. Air Resistance and Stabilization Time are at the default settings of 0.15 and 1.0 respectively. Note that with 0.5 gravity and the Stabilization Time of 1 that the blanket on the far left does not drop down and wrap around the mattress as it should.
0.5 Gravity:
1.0 Gravity:
1.5 Gravity:
b. Stabilization Time. The default setting is 1. If set lower, the simulation will not last as long and you will get a looser draping. In the following image, the time is set to 0.5 with Gravity at its default value of 1. Because there is less time, the parts of the blanket extending past the mattress remain suspended unrealistically in mid-air:
By raising gravity to 1.5 and leaving Stabilization Time at 0.5, the edges of the blanket will drape over the mattress edge but note that the higher gravity causes the draping by the figure to be greater than even the default settings:
c. Air Resistance. The default setting is 0.15. When set higher, there is an upward force countering the downward force of gravity. With Air Resistance set to 0.6 and Gravity at the default value of 1, the blanket will hover in mid-air:
Increase Stabilization Time to 2 and the blanket will drape:
Two things to notice: (1) compared to the default settings, there are more ridges in the blanket in the areas that were flat against the blanket before, and (2) the left edge of the blanket is not fully laid down. To correct, increase Gravity slightly to 1.1 and you get this result:
So the settings I used for the final render posted at the start of this tutorial are:
You may have noticed there were a few images where the matress poked through the blanket edges. If your final version has this happening, just raise the blanket on the Y-axis by one unit and it will disappear.
Shouldn't you have applied the dForce modifer - Dynamic Surface to the plane around step 4?
Yes! I'll have to add that in (all fixed including the PDF).
Hey, this is a nice intro to the simulation! I hope it will help lots of people. :)
2 Thumbs Up! I haven't played with the Air and Gravity settings yet so this is a very nice explanation of what they do.
Thanks SickleYield and erostew! Hope it does help people.
very nicely done. thank you.
--ms
I did some more experimentation this afternoon. Here's two additions to what I wrote above.
d. Negative Air Resistance. Decreasing Air Resistance below 0 has an interesting effect. It causes a billowing during the simulation which results in the blanket being pulled in more tightly to the front of the figure (as if it was cold and someone grabbed the blanket to snuggle in tight). I did increase Gravity to 2 to counter the lower air resistance and set Stabilization Time to 2 to give it enough time to settle.
Air -0.10:
Air -0.25:
I did not change the starting Z-Translate at first so the result is that the blanket gets pulled off the shoulders. By moving the blanket further over the head, it wraps around the shoulders and keeps them covered as shown below.
Air -0.25 +Z-Translate:
3. Cast Off Blanket.
Removing the figure and setting the blanket at an angle allows it to fall as if someone cast it off when getting out of bed.
a. Rotate the plane around the X and Y axis so a point is aimed at the lower left part of the mattress. Use trial and error to move it around, as if too close to the corner the blanket slides mostly off the bed. I used default Gravity and Air Resistance and a Stabilization Time of 2 so there was enough time to settle.
Side View:
Top View:
b. Using default Gravity and Air Resistance with a Stabilization Time of 2 so there is enough time to settle, after simulation you get:
4. Adding a Smoothing Modifier.
You'll note that there's some jaggedness to the ridges in the image above. To remove, add a Smoothing Modifier. Select the blanket in the Scene pane, then go to the main menu and select Edit/Object/Geometry/Add Smoothing Modifier.
Go to the Parameters pane and set Smoothing Iterations to 6 and Collision Iterations to 2.
A finished render of the smoothed and tossed aside blanket:
real helpful, its a thorough and concie, well written tutorial.
thanks FirstBastion! I'm trying out surface parameters next
I started testing the simulation surface parameters. Sometimes it's easier to see what a parameter does when it's applied to a simple object like a plane. In this case, I'm using the falling blanket from step #11 to test various surface settings.
5. Using dForce Surface Smoothing Settings. In step 3.c I added a smoothing modifier after the simulation to remove jaggedness along some of the ridges in the blanket. The Simulation Surfaces tab offers a smoothing option as well. It differs from the smoothing modifier in that it is applied as the simulation occurs, so it affects the simulation results.
a. Select the surface of the blanket and go to the Surfaces pane. Then select the Simulation Tab. For now, we are only changing the Velocity Smoothing and Velocity Smoothing Iterations parameters. Gravity and Air Resistance are at default values and Stabilization Time is 2.
b. The result using the default values for Velocity Smoothing (a value of 0). You can see the jaggedness in the texture in the lower middle.:
The result after setting Velocity Smoothing to 0.1 and Velocity Smoothing Iterations to 1. Notice that there is no jaggedness but the blanket is not as gathered.
Increasing Velocity Smoothing to 0.25 spreads it out even more:
And at 0.5 even more:
At a value of 1, the blanket is hardly gathered:
c.To test changes to Velocity Smoothing Iterations, here’s the image again for Velocity Smoothing of 0.25 and Iterations 1:
At iterations 2:
At iterations 3:
As you can see from the image series above, increasing the Velocity Smoothing value or increasing the number of Velocity Smoothing Iterations will spread the blanket out. You can get it almost flat with just a bit of folding by setting Velocity Smoothing to 0.5 Velocity Smoothing Iterations to 3:
This is a really helpful thread -thank you! It will save me a lot of time trying to figure out what all those parameters do for myself (or at least give me a start). I'm loving dForce but it is not all that speedy on my aging GPU.
thanks Melanie!
I've changed the title of the discussion as I went farther than I originally intended and will add more as I explore further. I'll update the PDF sometime soon.
6. Draping Clothes on Furniture.
There’s only occasional use for a cast off blanket like in step 3, but the same idea can be applied to clothing items which are frequently found thrown about on beds, chairs, floors and other spots in a scene.
a. Load the shirt from 70's Gym Uniform for Genesis 3 Females and add a striped shader to better show the folding of the item. Position it at an angle over the bed and run the simulation using the default dForce parameters except turn off Start Bones from Memorized Pose. (Note that the left image is from the viewport and the right is a render. Same shader but for some reason two looks.)
The starting position is shown in the first image below and the result is shown in the second:
b. Move the starting position so part of the shirt extends beyond the mattress. It will now fold over the mattress:
c. Replace the bed with a chair from The Chair Collection so the shirt drapes over the corner. Result is shown below:
d. Using a different chair from Simple Living - Living Room:
e. A lot of clothing causes crashes – the screen goes black and Daz Studio closes. The shirt used above did not cause a crash when over the bed. It had one crash when using the first chair and several when using the second chair. At this time, it’s not always clear what it is about a clothing item or it’s interaction with other props that causes a crash. Switch to another item or reposition
f. You’ll find that using various clothing items is hit or miss. Some work, others don’t. One shirt even flew up into the sky. I did try an experiment with a shirt (Everyday Casual Outfit for Genesis 3 Males) a.that caused a crash every time. I exported it as an object then reimported it. I was then able to drape the shirt over a chair without a crash. To get the arms to hang straight, increase Stabilization Time to 1.5 otherwise they remain curved in space. Here is the result:
Exporting as an object doesn’t work for every clothing item that causes crashing but it can help on some.
g. Another example using the t-shirt, pants, and boots from Air Defender for Genesis 2 Males. This clothing simulates without crashing:
Hi. Trying to repeat the blanket test RGcincy kindly provided us. Is there any reason anyone can think of why dForce menu items found Edit>> Object>>Geometry would not show up. I don't have those options in my Daz 4.10. Thanks for any advice.
Did you run the "Update and Merge Menus" in Scripts->Utilities?
jaxprog, you'll need to do what DaWaterRat said to get the menu items to show. You can find the script by going to the Content Library and in the folder DAZ Studio Formats/My DAZ 3D Library/Scripts/Utilities you'll find the script. Double-click to run it. Close and reopen Daz Studio so it remains intact if Daz Studio were to crash while using dForce (otherwise, you'll have to repeat running the script as happened to me).
This looks very cool. I downloaded the pdf. I'll have to try this out. Thanks for putting this tutorial together.
Window > Workspace > Update and Merge Menus
Or there. Same script, two different ways to get there.
7. Friction
Friction is an obvious parameter to test as some fabric have low values (silk) while others have high values (coarse wool). When two objects interact, there are two frictions to consider: that of the item being simulated (which has a dynamic surface) and that of the item being collided with (which has a static surface).
a. The static surface will use default values unless you add a static modifier by selecting the item in the Scene pane and then going to the main menu and choosing Edit/Object/Geometry/Add dForce Modifier: Static Surface. Friction is one of the few values you can adjust on a static surface. In this series of images, I varied the friction of the blanket and the mattress to see how it affected the result.
b. The starting point for the blanket was the same as sused in section 3. Here is the outcome when using the default friction values of 0.4:
c. Blanket friction of 0.4 (default) and mattress friction of 0.1 (silk or satin sheet). More of the blanket has slid off the bed::
d. Blanket friction of 0.1 and mattress friction of 0.1. The blanket has slid further off the mattress:
e. Blanket friction of 0.01 and mattress friction of 0.01. Whoops! The blanket slides all the way off:
f. Blanket friction of 0.6 (higher than default) and mattress friction 0.4 (default). Not much change from the default result shown in 7.b above:
g. Blanket friction of 0.8 and mattress friction of 0.4. Only a slight change:
h. Blanket friction of 1.0 and mattress friction of 1.0 has relatively little additional effect. The lower left corner of the blanket stays about where it landed instead of sliding a bit along the blanket:
i. Based on these results, lowering friction below the default of 0.4 had a large effect whereas higher values did not change much at all.
A new version of the PDF is availble. Click here to go to the first page to get the most recent version.
Thanks Chohole. That worked. I consequently found the same menus by right clicking the Simulations Setting tab. There is a menu item dForce and it expands with the same menus.
@jaxprog I'm glad you pointed that out. Fewer clicks and faster to access then through the main menu.
8. Creating a Clothes Pile.
Section 6 showed clothes being draped over furniture. The items of clothing interacted with either the bed or the chair but not with any other clothing item. In this section we’ll discuss stacking clothing on top of other clothing.
a. Since many clothes can cause a crash, make sure to save your last working simulation so you can quickly get back to it. This is not as important if you already know that each clothing item will simulate successfully.
b. Also, in all of these simulations, Start Bones from Memorized Pose is turned Off.
c. I started with the Air Defender shirt, pants and boots as shown in step 6.g above. The shirt was positioned horizontally halfway over the chair’s back. The pants were positioned horizontally halfway over the chair’s seat. The boots were just set on the floor AFTER the pants were simulated (otherwise the pants leg would catch on the boots).
d. After running the simulation, select the pants and shirts in the Scene pane. Go to the Parameters pane, select Simulation, and turn Freeze Simulation to On. Now when you run the Simulation, these two items will be frozen in their simulated state and will not participate in future simulations, so a new clothing item can be draped over the already simulated forms. Be sure to save your scene so you can go back to it if any added clothing item causes a crash.
e. Next simulate the shirt from 70’s Gym Uniform that was used in 6.a. Position this to overlap the pants on the chair and one of the boots so it will hang on the boot top. After simulation, turn Freeze Simulation to On for this item.
f. Next I used the Leotard for Genesis 3 Females to overlay the pants, the gym shirt, and the corner of the chair. After simulation, turn Freeze Simulation to On.
g. After doing the above, I thought it would look nice to render some socks stuffed into the boots. This takes some rework as the gym shirt is covering one of the boot holes. The socks are from Uniform Dress for Genesis 3 Females.
h.Hide the gym shirt by clicking on the eye in the Scenes pane. This keeps if from participating in the simulations and interfering with the socks. If the socks don’t fully line up with the boots, move the leg bone of the one of the socks side-to-side so both socks are over an opening. Also, bend the ankle of the socks so the toes point down, otherwise they’ll end up just laying over or sliding off the boots.
After simulation, turn Freeze Simulation to On for the socks.
i.Since the gym shirt covered the boots, and now the socks do as well, the gym shirt needs to be re-simulated. Hide the leotard since it overlays the gym shirt. Then turn Freeze Simulation to Off for the gym shirt and re-run the Simulation. Afterwards, turn Freeze Simulation back to On.
j. Repeat step f for the leotard since it overlays the gym shirt.
k. Steps g-j would not have been needed if I had done everything in order at the start, but since I decided to insert the socks, it turned into a good demonstration of how you can place an item in between already simulated items.
Here’s a render of the final stack of clothing:
l. The image below shows the starting position of the various clothing items. You could simulate them all at once from this setup but the boots would catch the pants legs and the pants legs would block one of the socks from going into the boots. I find it easier to do each item one by one, freezing the simulation for each item as I go. This way I can also make adjustments if they don’t drape quite the way I like them.
m. When simulating multiple items, you may be tempted to click on the Clear button on the Simulation Settings pane. Don’t!! This clears ALL objects and you’ll end up with what is shown at the right.
If you want to clear just a single item to change its positions, select the item(s) in the Scene pane, then left-click on the Simulation Settings sub-menu (the stacked lines icon in an upper corner) and choose dForce and then Clear dForce Simulation from Selected Item(s).
I'm gobsmacked! This is amazing tutorial and shows that a blanket on a bed isn't just a blanket on a bed. It's the whole enchilada of how the settings work, how things interact and how to use it for more than just a posed figure. So fascinating. Thank you so much for this!
These are such comprehensive and well illustrated tutorials.
Thank you so much RGcincy for taking the time, and having the patience for working this all out. You have given us amazing examples of how to use dForce so it really shines for useful, realistic and believable material draping.
Kind regards
Well using the tutorial I was successful at making a blanket and some clothing piles . But after a while Daz decided it wasn’t going to allow me to use props any longer and started crashing. And refusing to simulate. Very buggy software.