UltraScenery Experiments and Experiences

barbultbarbult Posts: 23,132
edited March 2022 in Art Studio

I decided to create a thread to house my UltraScenery experiments so I don't monopolize the commercial thread.. This is analogous to my thread on UltraScatterPro.

Lessons Learned/Tips:

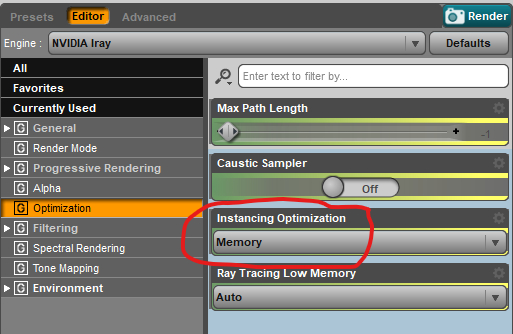
  1. Before I ever use instances in an Iray scene, the FIRST thing I do is change Render Settings Instancing Optimization to Memory. You find this setting on the Editor tab in the Render Settings pane. This is documented in the UltraScenery manual and is very important. If you set it to Speed and create a lot of instances, Daz Studio will either become unresponsive or crash. Recent versions of Daz Sudio have an Auto setting. I don't know whether it is good enough to leave it on Auto or not. I've preferred to be safe and explicitly change it to Memory.
    • ​​​
  2. ​TIP (Thank you, memcneil70, for this important reminder!) Don't use Iray Preview when working with UltraScenery, unless you have a super powerful configuration like a Titan RTX (or these days, RTX 3090). Iray preview doesn't seem to respect the Instancing Optimization setting of Memory, Using Iray Preview with the huge number of instances in UltraScenery will be incredibly slow and will most likely crash Daz Studio. Use Texture Shaded viewport preview instead. The downside is that you can't preview what the lighting and instances will look like in your render. Instead of Iray Preview, try the Spot Render tool or try rendering a normal Photoreal render, but in a very small size, for a quick preview of what you final large render will look like.
    I don't have an RTX 3090 to even attempt Iray Preview, so for me there are two better ways to help place characters or objects in UltraScenery without trees interfering:
  3. The ONLY script you need to run for UltraScenery is UltraSceneCreator.dse​. You can find it in your content library in Environments/Landscapes/UltraScenery. All the other scripts in the product are resources used internally by the UltraSceneCreator script. Leave them alone.
  4. UltraScenery comes with an Iray Render Setting Preset that is a very quick and easy way to get good lighting to render your scene. You can find it in your content library in Environments/Landscapes/UltraScenery/Render presets. It is called USC Late Morning.duf.
  5. TIP (Provided by Artini) If you are just starting out and are not sure how your computer will handle UltraScenery, or you jumped right in and it seems incredibly slow, try this suggestion. In the Build tab, uncheck all the small items, like pebbles, grass, daisies, litter, etc. Maybe go as far as unchecking everything except the trees. See how your computer handles that scene, and then expand from there on the next build. 
  6. When defining the terrain for an UltraScene, the (optional) Height Map is combined with the Noise terrain settings. If you don't want the Noise setting to affect your Height  Map, set the Noise brightness control to the minimum value (-100) and leave contrast at 0, so the noise preview is black.
  7. TIP (Provided by TangoAlpha for using Notepad++ to edit JSON files) To make it easier to find your way around, type Alt-0 (zero). This will collapse everything to a single red box with a + in it. Click on the + box to start peeling back the layers. First click, you'll see the header. Then you can open up the actual layers and delve into them. Only open up the layers as you need them, and the file stays manageable, and (hopefully) you won't get lost.
  8. Lesson Learned: Props that have other props as children will not work in an UltraScenery Ecology file. Here is a way to modify them to make them work.
  9. Lesson learned: When you rename a layer in an ecology JSON file, you need to find and rename all other references to that layer.
  10. Lesson Learned: "alignnormal" : true can help make short things hug the ground, but it is not good for tall things that should be growing straight up, unless they are on fairly flat ground.
  11. Lesson Learned: Big wide props are never going to sit properly on top of curved ground. They are not the best choice for use in UltraSceneCreator.
  12. TIP The camera headlamp can help make the UltraScenery terrain more visible in the Texture Shaded viewport preview. I listed my preferred headlamp settings here.
Post edited by barbult on
«13456710

Comments

  • DiomedeDiomede Posts: 15,073

    Great, will be watching with interest.  smiley

  • barbultbarbult Posts: 23,132
    edited June 2020

    I am using Daz Studio 4.12.2.6 Public Beta and UltraScenery 1.0.2

    Experiment: High Contrast Terrain

    Today I stumbled upon a surprise. When the terrain has high contrast areas, UltraScenery did not place any instances in that area. It left bare terrain spots.
    The question is: Why are these areas left bare? Is if by design, or is it a bug? UPDATE: HowieFarkes has confirmed this as a script bug in version 1.0.2 and he will fix it in a future update. UPDATE: This has been corrected in UltraScenery 1.1.0.

    Let's see what is going on:

    1) Use high contrast Noise Terrain settings (no Height Map used)

    1.  Set the Terrain settings as shown in the image. Notice that there are white areas in the terrain. White is high, and black is low. Solid white would be a high flat area, like a mesa. In this test case, the maximun height is only 5, so the whole terrain is not very "high".
    2. Set the Features tab to No Feature.
    3. Set the Ecology tab to Grassland 1.
    4. Build the scenery. 
    5. Render a top down view of the whole UltraScene.
    6. Render an angled view of the whole UltraScene to get an idea of the terrain contours.
    7. Observe that areas corresponding to the white areas on the Terrain Noise did not get any plant instances. Bare terrain texture is vsisble.

    2) Push contrast Noise Terrain settings to the max (no Height Map used)

    1.  Set the Terrain settings as shown in the image. Notice that there are black areas and white areas in the terrain with no gray in between. White is high, and black is low. Solid white would be a high flat area, like a mesa. Solid black wouid be low flat areas like the ground. In this test case, the maximun height is only 5, so the whole terrain is not very "high", but the exteme difference between black and white will be very visible.
    2. Set the Features tab to No Feature.
    3. Set the Ecology tab to Grassland 1.
    4. Build the scenery. 
    5. Render a top down view of the whole UltraScene.
    6. Render an angled view of the whole UltraScene to get an idea of the terrain contours.
    7. Observe that areas corresponding to the white areas on the Terrain Noise did not get any plant instances. Observe that areas corresponding to the black areas on the Terrain Noise did not get any plant instances.Bare terrain texture is vsisble almost everywhere. there are only a few grass instances on the slope between the low and the high areas.

    Screenshot 2020-05-17 12.01.11.png
    756 x 558 - 95K
    No Feature Grassland 1 on high contrast noise terrain.jpg
    2000 x 1500 - 2M
    No Feature Grassland 1 on high contrast noise terrain angled view.jpg
    2000 x 1500 - 2M
    Screenshot 2020-05-17 19.10.27.png
    756 x 558 - 90K
    No Feature Grassland 1 on extremely high contrast noise terrain top view.jpg
    2000 x 1500 - 2M
    No Feature Grassland 1 on extremely high contrast noise terrain angle view.jpg
    2000 x 1500 - 2M
    Post edited by barbult on
  • barbultbarbult Posts: 23,132
    edited May 2020

    I am using Daz Studio 4.12.2.6 Public Beta and UltraScenery 1.0.2

    Experiment: High Contrast Terrain (Continued)

    3) Use high contrast Height Map file

    1. First, create a Height Map. I used Photoshop, but any image editing software will work. I created a gradient from black to white, with some all black area in one corner and an all white in the opposite corner. Then I set my brush to a mid gray value of 128 and drew a squiggle in the middle of the gradient. So now my Height Map has solid black, gray, and white and a gradient in between. I saved my image three different ways: RGB, grayscale, indexed color, because SURPRISE - the results differ depending on how you save the Height Map file. Read on...The grayscale version of my height map is attached.
    2. In UltraScenery, set the Terrain Noise settings as shown in the attached image. Contrast is set to the minimum value to make the noise a flat mid gray. (When defining the terrain for an UltraScene, the (optional) Height Map is combined with the Noise terrain settings. If you don't want the Noise setting to affect your Height Map, set the Noise contrast control to the minimum value (flat mid gray).) Height is set to 20 to make the terrain shape more pronounced.
    3. In UltraScenery, set the Height Map settings as shown in the attached image. Load the RGB version of the height map.
    4. Set the Features tab to No Feature.
    5. Set the Ecology tab to Grassland 1.
    6. Build the scenery. 
    7. Render an angled view of the whole UltraScene to get an idea of the terrain contours.
    8. Observe that terrain corresponding to the black area on the height map got a few plant instances. The terrain area corresponding to the white area is completely bare. The flat mid gray squiggle area is also bare. The large area corresponding to the black to white gradient is covered with plant instances. This is puzzling. What do flat solid color areas of a height map result in bare or almost bare areas?
    9. In UltraScenery, set the Height Map settings as shown in the attached image above. Load the grayscale version of the height map.
    10. Set the Features tab to No Feature.
    11. Set the Ecology tab to Grassland 1.
    12. Build the scenery. 
    13. Render an angled view of the whole UltraScene to get an idea of the terrain contours.
    14. Observe that terrain corresponding to the black area on the height map are now completely bare. The terrain area corresponding to the white area is also completely bare. The flat mid gray squiggle area is densly, but not completely, covered with plant instances this time. The large area corresponding to the black to white gradient is also covered with plant instances. This is puzzling. What do flat black and white color areas of a height map result in bare or almost bare areas? Why does a grayscale map behave differently than an RGB map?
      • ​​
    15. Repeat steps 9-13 but load the Indexed Color height map instead of the grayscale map. Observe that the results look similar to the grayscale height map results.


    UltraScenery Gradient Plus Gray Terrain Grayscale.png
    2048 x 2048 - 837K
    Screenshot 2020-05-17 20.01.20.png
    756 x 558 - 78K
    Screenshot 2020-05-17 20.01.15.png
    756 x 558 - 79K
    Min contrast and Gradient Height Map Plus Gray RGB Height 20.jpg
    2000 x 1500 - 2M
    Min contrast and Gradient Height Map Plus Gray Grayscale Height 20.jpg
    2000 x 1500 - 2M
    Min contrast and Gradient Height Map Plus Gray Indexed Color Height 20.jpg
    2000 x 1500 - 2M
    Post edited by barbult on
  • barbultbarbult Posts: 23,132
    edited May 2020

    Experiment: Create a "new" Ecology with other props I own

    First some caveats and disclaimers:

    • This will not be a new ecology. This will be derivative work for personal use only, based on purchased UltraScenery assets and HowieFarkes' permission for us to "hack" the JSON files. I will not show entire file contents here.
    • I write up these experiments as I go along. They are truly experiments. I document what works, problems I discover along the way, and lessons learned. There may be blind alleys and U-turns.
    • It is work (but fun work) to make an ecology. It is a lot faster and easier to buy a pack in the store! 
    • I use Windows 10 on a PC. If you use a Mac, you might have to do some things in a different way.
    • I use DIM. If you use Daz Connect, this may not work.

    EDIT: Yup, I ran in to a problem. U-Turn ahead! The theory and steps are sound, but Willow Creek was a poor choice because of the complexity of the props. frownThe props I chose are problematic. This is corrected in step 6).

    1) Pick out some plant props that you want to use with UltraScenery. Let's use plants from Willow Creek, because it recently became free, so anybody reading this can follow along. It has some trees and some tree stumps. Looking at the trees and stumps, I can see that these might present a challenge, because their wide bases may not fill well on sloped terrain. We'll see what happens and what we can do about that.

    2) Make a copy of an existing ecology folder, so the original is not destroyed. We will modify the copy to make our version. I'm going to copy \Environments\Landscapes\UltraScenery\Ecologies\USC Woodland 02 and name it "USC Willow 01 BV". BV are my initials; use your own. I like to add my initials to the ecology name, because I can easily see which are ones I modified, and the name I choose won't conflict with other ecologies that might be released in the store. I chose a woodland ecology to modify, because it has trees, and the props I chose to use are trees. It seems like a logical choice.

    3) Open the ecology folder copy you created (USC Willow 01 BV). Change the name of all the files with the ecology name in them to use the new ecology name instead. For example, change USC Woodland 02 MAT.duf to USC Willow 01 BV MAT.duf. The only file in the folder that should not be renamed is info.json. TIP: Use a file naming utility to make the renaming easier and faster and more accurate. I use Bulk Rename Utility.

    4) Edit the files to change the ecology name inside of them:

    1. Update info.json:
      • Open info.json in a text editor. I use Notepad++.
      • Change all the lines with the ecology name to use your new ecology file names.
      • Change the package name to something unique. I will use "My Ecologies BV" for ones that I create. I'm not aware of any function that this line performs, but maybe in the future there will be a way to sort or group ecologies by "package".
      • Change the author to indicate the you have changed this file. I left HowieFarkes name there, because 99.9% of this work is his, and added my initials to indicate that any errors are mine LOL.
      • Change the "title" line to put in the name that you want to appear inside UltraScenery. "Willow 01 BV" sounds good to me. Again I use my initials, so I can easily see that it is an ecology I modified and it will avoid name conflict with other ecologies.
      • TIP: Use the text replace feature of your text editor to make the ecology name change faster and more accurate. 
      • Save the changes to info.json.
    2. Update the main JSON file:
      • Open the other JSON file (USC Willow 01 BV.json) in a text editor. This is the main file that controls what props are used and where they are placed. It is easy to mess this up!  Be careful but not afraid! Remember, you are working on a copy of the original files. You can always delete this and start over - no harm done.
      • Change all instances of the original ecology name to your new ecology name. Watch out for tricky places, like the material path name on line 5, where you have to change the folder name and the file name!
      • TIP: Use a JSON validator to check your work.
      • Save the changes to the file.
    3. See if your ecology appears in UltraScenery. ​So far, we haven't changed anything to make this ecology different than the one we started with. We only changed the name and file references, but it is a good time to verify that it shows up in UltraScenery. Then we can move on.
      • Open Daz Studio
      • Run the UltraSceneryCreator script
      • Clcik on the Ecology tab
      • Scroll through the alphabetical list until you come to your ecology name (Willow 01 BV for me). Since we only changed internal names, we still see the old ecology's preview image and thumbnail. If we run the ecology, we will.still get all the old ecology's plants. So far, we've only made a COPY of the old ecology with a new name. 
      • Select the ecology and open the Build tab. You should see the build layers listed. Don't click build Scene at this point; we didn't even select a feature. We only want to quickly check that the new ecology is present in the script.
      • Troubleshooting: If your ecology does not appear in the UltraSceneryCreator interface, you probably made an error in the renaming steps above. Double check all that work. Did you change the name in info.json? Did you change both the folder and file name in the path in the main JSON file?

    Continued below

    Post edited by barbult on
  • TangoAlphaTangoAlpha Posts: 4,584

    Here's a little tip, particularly for people that may be new to or unfamiliar with Notepad++.

    Once you've opened the JSON file, you'll be presented with a mass of . . . well, 2000+ lines of . . . stuff. To make it easier to find your way around, type Alt-0 (zero). This will collapse everything to a single red box with a + in it. Click on the + box to start peeling back the layers. First click, you'll see the header. Then you can open up the actual layers and delve into them. Only open up the layers as you need them, and the file stays manageable, and (hopefully) you won't get lost.

    Here's one I did earlier:

    (I used one of my ecologies cos, well, I gave myself permission!)
    Now, back to the experimenting :)

    Screenshot_20_05_19_20_56.jpg
    911 x 718 - 270K
  • barbultbarbult Posts: 23,132
    edited May 2020

    Experiment: Create a "new" Ecology with other props I own (Continuation 1)

    5) Change the props used in the ecology

    1. Locate the props you want to use:​​
      • ​​This example will use the Willow Creek product, which is now free.
      • Open Daz Studio.
      • Locate the Willow Creek product inside Daz Studio, either in Smart Content or the Content Library
      • Right click on one of the trees (Willow Creek Tree01 Iray, for example) and choose Browse to File Location.
      • A file explorer window will open, showing where the file is located on disk (i.e. the path of the file). Leave this window open. We will use it soon.
    2. Replace existing props with new props
      • Open your new ecology JSON file in a text editor. (This is the JSON file with the ecology name, not the info file. Mine is named USC Willow 01 BV.json).
      • The file is organized by the Layers that you are accustomed to seeing in the Build tab of UltraSceneryCreator. Each Layer has a Type. Trees are a forest type, Base Grass is a field type, etc. Some ecologies have more layers and more types than other ecologies.
      • Since we modified the Woodland 02 ecology, it will have Aspen trees. Search the file for "Aspens".
      • Change the word "Aspens" on that line to "Willows".
      • Don't be scared of all the { and } and [ and ], but be respectful of them! One accidental deletion of one of those will make the file not work until you fix it. This is where the JSON validator comes in handy - to help find where you made a syntax error.
      • Scroll a few lines down from "Willows" until you see the section with the prop path and filenames. I see "path": "/environments/landscapes/ultrascenery/plants/USC Tree 01.duf",
      • Replace that path with the path shown in your file explorer for the willow tree. I type in "path": "/Props/Stonemason/Willow Creek/Iray/Willow Creek Tree01 Iray.duf",
      • It is critical that you maintain the quote marks in the right place and the comma at the end of the line. If you decide to cut and paste the path instead of typing it in, be sure to change \ to / every place in the path.
      • Replace the next two paths with two other Willow Creek props. I used Willow Creek Tree02 Iray and Willow Creek Tree Stump02 Iray. (The small stump looked like it would blend in easier than the large stump.)
      • Copy the entire JSON file contents and past it into the big blank area in the JSON validator. Click the Validate JSON button. If it comes back with a greed Valid JSON, congratulations! yesIf it comes back with a red list of errors no, work through them and repeat until it is valid. In the worst case, start over and be very careful. I almost always make at least one error.crying
    3. Build your new ecology
      • ​​Open Daz Studio
      • Run the UltraSceneryCreator script
      • For now, just use the default Terrain.
      • Click on the Features tab and select a Feature. I'm going to use Pond 1.
      • Click on the Ecology tab and select your new Ecology (Willow 01 BV for me)
      • Click on the Build tab. You will see lot of layers. Most are left over from the original Ecology we copied, because we didn't change those layers. You will see that the "Aspens" layer is gone. (Aspens (seedlings) and Aspens (young) are still there). Scroll to the end of the list (alphabetical by default) and there is Willows!!!!!! 
      • For now, to get a quick test, uncheck all of the layers except Willows (only Willows checked).
      • Click the Build Scene button
      • Apply the USC Late Morning.duf Render Settings Preset. This will give good default lighting and set the Instancing Optimization to Memory.
      • Adjust your camera in the viewport to see the terrain. You should see the same kind of tree proxies that the Aspens used to use, because we only changed the actual props. We did not change the proxy for those props.
      • But, Oh Oh! What are those willow trees doing in the middle of the pond?! Why are there some lone tree props in the Scene pane? (tdfTree01_Prop (2) and tdfTree02_Prop (2) and they both expand to have children). 
      • Zoom in on some the the tree proxies and render the scene. 
      • Hmmmm.... It looks like we got willow tree leaves instances but not their trunks. I think I just learned a new lesson! There are problems with using a prop with children props in an UltraScenery Ecology. (This was not preplanned. This is something I just found out while trying this in realtime. I warned you. U-Turn ahead!)

    Continued below

    Post edited by barbult on
  • barbultbarbult Posts: 23,132

    Here's a little tip, particularly for people that may be new to or unfamiliar with Notepad++.

    Once you've opened the JSON file, you'll be presented with a mass of . . . well, 2000+ lines of . . . stuff. To make it easier to find your way around, type Alt-0 (zero). This will collapse everything to a single red box with a + in it. Click on the + box to start peeling back the layers. First click, you'll see the header. Then you can open up the actual layers and delve into them. Only open up the layers as you need them, and the file stays manageable, and (hopefully) you won't get lost.

    Here's one I did earlier:

    (I used one of my ecologies cos, well, I gave myself permission!)
    Now, back to the experimenting :)

    Thanks for the Notepad++ tip!

    I see you already created a Willows 01 environment and you also use your initials in it. I promise I did not steal your idea! I haven't purchased those products yet. Good minds think alike, etc.

    Well, I bet your Willows works a lot better than my experiment. Willow Creek was a bad choice for this experiment, as you can see above. I have successful created several ecologies for myself since UltraScenery first came out. This is the first time I stumbled upon a prop that didn't work. Wouldn't you know, it was while I was trying to document the steps to help other experimenters. Public embarrassment goes with the territory in these experimental threads.blush Others can learn from my mistakes.

  • barbultbarbult Posts: 23,132
    edited May 2020

    Experiment: Create a "new" Ecology with other props I own (Continuation 2 - The U-Turn)

    6) Change the props used in the ecology to props that WORK with UltraScenery!

    1. Use simple props instead of complex parent/child props
      • ​​In step 5) 2. above, use the following simple Willow Creek props
        • Willow Creek Tree03 Iray.duf
        • Willow Creek Tree Stump01 Iray.duf
        • Willow Creek Tree Stump02 Iray.duf

    Continue with steps 5) 3. to build the corrected ecology. That works as expected! We get a scattering of dead trees and tree stumps. (Remember, at this stage we have only the Willows layer checked in the Build tab of UltraScenery.) Also as anticipated, the tree stumps are not sitting nicely on the sloped ground.

    Continued Below

    Willow 01 BV Top View.jpg
    2000 x 1500 - 2M
    Willow 01 BV Pond View.jpg
    2000 x 1500 - 3M
    Post edited by barbult on
  • MelanieLMelanieL Posts: 7,133

    Well that was certainly "an experience"!

    Kudos to you for attempting to document all this. I'll be reading with interest...

  • barbultbarbult Posts: 23,132

    MelanieL said:

    Well that was certainly "an experience"!

    Kudos to you for attempting to document all this. I'll be reading with interest...

    Yes it was! Wouldn't you know I'd pick something troublesome right off the bat. I'm sorry it made a mess out of something the should have been more straightforward. People can see that not all experiments are successful. Then when they fail, they know they are not alone and should keep trying. I hadn't planned on that being the lesson, but I guess it is.

  • barbultbarbult Posts: 23,132
    edited May 2020

    Experiment: Create a "new" Ecology with other props I own (Continuation 3 - Fixing More Errors)

    6) Test the full Ecology

    1. Rebuild the UltraScene using all layers
      • ​​Select the UltraScene item in the Scene pane.
      • Run the UltraSceneryCreator script. Running it with the existing UltraScene selected will lets us tweak settings without starting over - a nice feature!
      • In the Build tab, check all of the layers.
      • Click the Build Scene button
      • Hm...... no tree proxies are visible. What happened?
      • Expand UltraScene in the Scene pane. We see that UltraScene Instances 1 group is empty. No instances were created. We have only Willows Objects and Aspens (seedlings) Objects, no other layer objects. Something failed.
      • Check the log file (Help/Troubleshooting/View Log File...)
      • Sure enough, there is an error reported there.
        • 2020-05-19 20:10:05.641 WARNING: Script Error: Line 1839
          2020-05-19 20:10:05.641 WARNING: TypeError: Result of expression 'oLayer' [null] is not an object.
      • We have no insight into what script line 1839 is, because the script is encrypted. This will take detective work!
      • We see that last thing that was processed was Aspens (seedlings) layer, because that is the last thing in the Objects list in the Scene pane.
      • Open the ecology JSON file in the text editor again.
      • Search for "Aspens (seedlings)".
      • Sroll through the "Aspens (seedlings)" section to look for anything that might be wrong. We didn't change anything in that layer. Something we did to the "Aspens" layer must have caused a ripple effect error. Remember, we renamed "Aspens" to "Willows".
      • Aha, when we come to the affinity section of "Aspens (seedlings), we see that it is referencing layer "Aspens", but we renamed that layer to "Willows". We need to fix that every place the layer "Aspens" is referenced in the JSON file! Lesson learned: When you rename a layer in an ecology JSON file, you need to find and rename all other references to that layer.
        • I found two places where "Aspens" needed to be changed to "Willows".
          • Change "Aspens" to "Willows" in the affinity section of "Aspens (seedlings)"
          • Change "Aspens" to "Willows" in the affinity section of "Aspens (young)"
      • Save the additional changes you just made to the ecology JSON file. (Validate first if you feel unsure of your editing.)
      • Delete the UltraScene (the one that failed) from the Scene pane. We'll start fresh after the error.
      • Run the UltraSceneCreator script, select the Pond 1 Feature and your new Ecology. Verify that all layers are selected in the Build tab and press the Build Scene button. 
      • OK! That's better! Tree proxies are appearing on the terrain in the viewport. The objects for all layers and 138,265 instances are shown in the Scene pane. The log file doesn't report any errors.
      • Now our scene should have our "Willows" (which are just dead willow tree trunks and branches and tree stumps), instead of the large Aspens of the Woodland 2 ecology we started with. All other parts of the Woodland 2 ecology should appear just as in the original ecology.

    In retrospect, after learning that I cannot use the nice willow trees in Willow Creek with UltraSceneCreator and learning that TangoAlpha already has a Willows 01 ecology, I regret my ecology name choice. I could go back and rename everything again to something else, and that might be a good exercise for later. We have bigger fish to fry, as they say. What's in a name?

    Continued below

    Willow 01 BV Top View 2.jpg
    2000 x 1500 - 2M
    Willow 01 BV Pond View 2.jpg
    2000 x 1500 - 3M
    Post edited by barbult on
  • barbultbarbult Posts: 23,132
    edited May 2020

    Experiment: Create a "new" Ecology with other props I own (Continuation 4 - Optimizing Instance Placement)

    This section will investigate the alignnormal setting of a layer.

    Because we changed the props that were used, some of the instance placement parameters in the ecology JSON file may not be optimum for our props. Let's take a critical look at our scene. I see these things I would like to improve"

    • The trees and stumps are not sitting flat on sloped ground. They seem to be partially floating
    • Stumps and trees are too close together and are overlapping at their base
    • The trees do not vary much in size

    7) Make things sit flatter on the ground.

    1. Make a backup copy of your new ecology file, before we change it again!
    2. Open the ecology JSON file in the text editor
    3. Find the "Willows" layer section. (It will say "name" : "Willows",)
    4. Look over the various settings for the layer. If you have used UltraScatter or UltraScatterPro a lot, you will recognize some parameters. Others you can guess at, and other remain a mystery for future experimentation.
    5. Down in the rotation section we see "alignnormal" : false. Let's change that to true so that the instances align with the normal vector of the ground they are sitting on instead of always pointing straight up. I anticipate that this is going to make the tall trees point off in unrealistic growth angles on very sloped ground. 
    6. Save the JSON file. (Validate first if you feel unsure. This was a trivial change, but even that can result in failure if, for example, you delete the comma after the value)
    7. If you still have Daz Studio open and your UltraScene in the Scene pane, select the UltraScene so it can be modified. Otherwise start Daz Studio again.
    8. Run the UltraSceneCreator script.
    9. Verify that you have Pond 1 Feature selected and your new ecology selected.
    10. In the Build tab, uncheck everything but Willows again. It will be easier to see the changes if other layers are not in the way. With only one layer selected, it will build quickly.
    11. Press the Build Scene button
    12. Render the scene to evaluate the changes.
    13. The stumps look better overall. Some of the large stumps are still partially floating above the curved ground. (A flat thing does not conform to a curved surface.) The trees, as suspected, are going off at a rakish angle.
    14. Let's see how this looks with a steeper terrain. Rebuild the UltraScene with a Max Altitude of 10 meters instead of 5 meters (on the Terrain tab).
    15. Render the scene.
    16. The trees are really going at a bad angle now.
    17. Lesson Learned: "alignnormal" : true can help make short things hug the ground, but it is not good for tall things that should be growing straight up, unless they are on fairly flat ground.
    18. Lesson Learned: Big wide props are never going to sit properly on top of curved ground. They are not the best choice for use in UltraSceneCreator.

    Continued below

    Willow 01 BV Pond View 3 alignnormal true.jpg
    2000 x 1500 - 3M
    Willow 01 BV Pond View 3 alignnormal true max alt 10.jpg
    2000 x 1500 - 3M
    Post edited by barbult on
  • DaventakiDaventaki Posts: 1,621

    I am currently working step by step through your tutorial and going to post my image (coming soon).  Have you successfully added a prop to a ecology instead of replacing an existing prop?  I have for the most part had success replacing props but have had issues just adding additional props in.  In part because its been a really really long time since I coded anything and I don't remember alot of that either LOL.

  • barbultbarbult Posts: 23,132
    Daventaki said:

    I am currently working step by step through your tutorial and going to post my image (coming soon).  Have you successfully added a prop to a ecology instead of replacing an existing prop?  I have for the most part had success replacing props but have had issues just adding additional props in.  In part because its been a really really long time since I coded anything and I don't remember alot of that either LOL.

    @Daventaki welcome to the thread!

    I have successfully added a whole new layer by copying an existing layer and renaming it and then changing the props it contains. I don't remember whether I have added additional props to an existing layer, though. It seems like that should work, unless there is something hard coded to look at only a certain number of props in a set. It sounds like a good idea for a separate small experiment.

    If you are stumbling over the JSON syntax, the JSON validator is your best bet to be sure you aren't missing a comma or brace or something.

  • DaventakiDaventaki Posts: 1,621
    edited May 2020

    I'll have to play more and see what I can figure out to add additional props, I had just started playing with that aspect then became sidetracked with other things.  I would welcome another experiment! 

    I did used the validator and it would give me a green light but I think it had something to do with reading the file.  I can't remember for sure but im definitely going to get back into it. Going to use TangoAlpha's trick of collapsing the sections see if that helps too.

    Ok this has the Maple tree, Cherry tree and Laurels from World Gardens- Japan.  I did not realize at the time the maple's were nearly the same height.

    Testing001TM.jpg
    1884 x 1023 - 1M
    Post edited by Daventaki on
  • barbultbarbult Posts: 23,132
    edited May 2020

    I am using Daz Studio 4.12.2.6 Public Beta and a pre-release version of UltraScenery 1.1.0

    Experiment: Create a "new" Ecology with other props I own (Continuation 5 - Optimizing Instance Placement - Part 2)

    This section will investigate copying a layer to make a new layer and removing some props from a layer.

    Since the trees need to stand vertically (not aligned with the ground normal) and the stumps look better when they are aligned to the ground normal, I am going to split them into two separate layers, so they can have separate "alignnormal" values in the JSON file.

    8) Make things sit flatter on the ground by splitting the trees and stumps into separate layers so they can have separate settings.

    1. Make another backup copy of your new ecology file, before we change it again!
    2. Open the ecology JSON file in the text editor.
    3. Layers are delimited by a leading brace and trailing brace. Braces are the { and } characters. Layers are separated by a comma. Copy the entire Willows layer from the { on the line above "name": "Willows", to the matching } and comma at the end of the layer, right before the line "name": "Aspens (young)", 
    4. Paste the copied lines into the JSON file right above the { on the line before the line "name": "Aspens (young)",​
    5. Validate the JSON code now, selecting, cutting and pasting in the right place is so easy to mess up. Work at it until you get it right. It is easy to forget the comma between layers.
    6. Change the name of the layer you just pasted in from Willows to Stumps.
    7. In the Stumps layer, delete the Willow Creek Tree03 Iray.duf prop, so that only the two stump props remain. This is tricky, because you have to recognize and select the correct delimited section. A single prop is delimited by {} and the set of props is delimited by []. Props have commas between them, but no comma after the last one before the trailing set ]. Clear as mud? It should look like this:
      •             "props": [
                    {
                        "path": "/Props/Stonemason/Willow Creek/Iray/Willow Creek Tree Stump01 Iray.duf",
                        "proxy": "/environments/landscapes/ultrascenery/plants/USC Tree 02 Proxy.duf",
                        "materials": []
                    },
                    {
                        "path": "/Props/Stonemason/Willow Creek/Iray/Willow Creek Tree Stump02 Iray.duf",
                        "proxy": "/environments/landscapes/ultrascenery/plants/USC Tree 03 Proxy.duf",
                        "materials": []
                    }]
    8. Validate the JSON.
    9. In the Stumps layer, alignnormal is true, because that is how we had set it in Willows before copying it. Leave it set to true, because that worked best for stumps.
    10. Go back to the Willows layer and set alingnormal back to false, because that worked best for trees.
    11. Now, delete the two stumps props from the Willows layer, again, being careful of the {} and the commas. You should have only one prop in Willows now. There should be no comma between the ) and ] at the end of the propsets section, because there is only one prop. The comma is only needed to separate a list of props. It should look like this:
      •             "props": [{
                        "path": "/Props/Stonemason/Willow Creek/Iray/Willow Creek Tree03 Iray.duf",
                        "proxy": "/environments/landscapes/ultrascenery/plants/USC Tree 01 Proxy.duf",
                        "materials": []
                    }]
    12. Validate the JSON. Fix any errors
    13. Save the ecology JSON file.
    14. If you still have Daz Studio open and your UltraScene in the Scene pane, select the UltraScene so it can be modified. Otherwise start Daz Studio again.
    15. Run the UltraSceneCreator script.
    16. Set the Max Altitude to 10, so we get a good test of the trees and stumps on sloped ground.
    17. Verify that you have Pond 1 Feature selected and your new ecology selected.
    18. In the Build tab, uncheck everything but Stumps and Willows. It will be easier to see the changes if other layers are not in the way. With only two layers selected, it will build quickly.
    19. Press the Build Scene button
    20. Render the scene to evaluate the changes.
    21. OK, the trees are straight up again, like trees should be, and the stumps are aligned with the normal of the ground, so they look pretty good.
    22. But, my oh my, we have way too many trees and stumps crammed together and overlapping. It is worse than before, because we added a whole layer and didn't change any spacing yet.
    23. Trees are still floating too high above ground. We'll have to deal with that later. When we render all layers, some of the grass and fowers might hide some of that problem.

    Continued below

    Willow and Stumps separate layers.jpg
    2000 x 1500 - 3M
    Post edited by barbult on
  • barbultbarbult Posts: 23,132
    edited May 2020

    Experiment: Create a "new" Ecology with other props I own (Continuation 6 - Optimizing Instance Placement - Part 3)

    We need to adjust the spacing and quantity of trees and stumps, because there are just too many and they are too close together. This section will investigate spacing, seed, affinity, and repel settings for layers.

    9) Adjust the spacing of the trees and stumps

    1. Make another backup copy of your new ecology JSON file, before we change it again!
    2. Open the ecology JSON file in the text editor.
    3. Find the "Willows" layer section. (It will say "name" : "Willows",)
    4. Look over the various settings for the layer. If you have used UltraScatter or UltraScatterPro a lot, you will recognize some parameters. Others you can guess at, and other remain a mystery for future experimentation.
    5. In the "distribution" section we see "spacing". I am guessing that this is like UltraScatterPro and will control the minimum distance between instance center points. Edit: I guessed wrong. HowieFarkes explains how spacing in UltraSceneryCreator differs from UltraScatterPro in this message. It is set to 175. Lets change it to 300 to space them much further apart. I'm assuming these are standard Daz Studio units of Centimeters.
    6. Make the same spacing change in the Stumps layer. (Change 175 to 300.)
    7. Save the JSON file. (Validate first if you feel unsure. This was a trivial change, but even that can result in failure if, for example, you delete the comma after the value).
    8. If you still have Daz Studio open and your UltraScene in the Scene pane, select the UltraScene so it can be modified. Otherwise start Daz Studio again.
    9. Run the UltraSceneCreator script.
    10. Verify that you have Pond 1 Feature selected and your new ecology selected.
    11. In the Build tab, uncheck everything but Stumps and Willows again.
    12. Press the Build Scene button.
    13. Render the scene to evaluate the new spacing.
    14. They are further apart now. Hence there are fewer of them.
    15. We still have trees overlapping with stumps. I think if we change the JSON file to use different random seeds for the two layers, that might help that. Let's give them different spacing, too.
    16. Change the spacing of Stumps from 300 to 350.
    17. Change the Stumps "seed" from 2000 to 2100.
    18. Validate if you are unsure and save the JSON file.
    19. Return to Daz Studio and run UltraSceneCreator to build the scene again (You know how to do this now; I'm not going to list all the individual steps.)
    20. Well, that helped, but it wasn't enough. We need to keep the stumps some distance away from the trees. That is where affinity and repel can help. Affinity is attraction; it will make instances tend to gather around the target. Repel will make instances stay away from the target.
    21. Scroll to the "Aspens (young)" layer to see an example of how affinity and repel are used. Affinity is at the very end of the layer settings. We see that affinity is set to a distance of 300 and repel is set to a distance of 30. That means that the young aspens instances will tend to be place within 300 units (centimeters?) from a Willow but not closer than 30 units. Let's copy this whole affinity block and paste it into the affinity for the Stumps layer. Be sure to copy everything between [ and ] in the affinity section. Paste that in to the Stumps layer affinity in place of the simple empty [].
    22. Stumps are a lot bigger in X and Z dimensions than young aspens, so I am going to change the Stumps affinity to 400 and the repel to 200. I want to keep them more than 30 units away from the trees, because some of those stumps are very large. We'll see how those values work and adjust if necessary.
    23. Validate the JSON and save the file when you have no errors.
    24. Return to Daz Studio and and run UltraSceneCreator to build the scene again.
    25. I don't see trees overlapping with stumps anymore. Affinity and repel helped.
    26. The trees still look very close together, though. I'm going to increase the "Willows" spacing to 400.
    27. Validate if you are unsure and save the JSON file.
    28. Return to Daz Studio and run the UltraSceneCreator to build the scene again.
    29. The spacing of trees and stumps is looking good to me. I'm satisfied with the changes we've made to spacing, seed, affinity and repel.

    Top down view

    Continued below

    Willow spacing 400 and Stumps spacing 350 different seeds affinity and repel.jpg
    2000 x 1500 - 3M
    Willow spacing 400 and Stumps spacing 350 different seeds affinity and repel Top view.jpg
    2000 x 1500 - 2M
    Post edited by barbult on
  • barbultbarbult Posts: 23,132
    edited May 2020

    Experiment: Create a "new" Ecology with other props I own (Continuation 7 - Varying Instance Size)

    The trees don't vary in size much. I would like more variety of sizes. This section will investigate the scale setting.

    10) Adjust the scale of the trees to add more variety of sizes

    1. Make another backup copy of your new ecology JSON file, before we change it again!
    2. Open the ecology JSON file in the text editor.
    3. Scroll to the "Willows" layer and locate the  "scale" section. The scale type is variance and the value is 20. I don't know the exact definition of variance, but I know that bigger numbers cause more variation is instance sizes. 
    4. Change the "scale" "value" from 20 to 50.
    5. Validate if you are unsure and save the JSON file.
    6. Return to Daz Studio and run the UltraSceneCreator to build the scene again.
    7. OK, now there is a little more variation in tree size.
    8. Enable all the layers in the Build tab of UltraSceneCreator and build the entire scene with all layers.
    9. Try a few different camera angles to see how it looks.
    10. It looks pretty nice to me, except for those darn floating tree bases. The grass and young aspens don't hide it enough. I chose props with wide bases, and I've learned that those just don't work well with UltraSceneCreator. With flatter terrain, the trees will not float as much. But an ecology should be flexible enough to work with many different terrains. In the next section I will look at a way to work around the floating tree problem.

    Continued Below

    Willow spacing 400 and Stumps spacing 350 different seeds affinity and repel scale variance 50 all layers.jpg
    2000 x 1500 - 3M
    Post edited by barbult on
  • barbultbarbult Posts: 23,132
    edited May 2020

    Experiment: Create a "new" Ecology with other props I own (Continuation 8 - Dealing with floating props)

     I chose tree props with wide bases, and I've learned that those just don't work well with UltraSceneCreator. This section will investigate the slope setting and other ways to work around the floating prop problem.

    11) Prevent the trees from being placed on steep terrain

    1. Make another backup copy of your new ecology JSON file, before we change it again!
    2. Open the ecology JSON file in the text editor.
    3. Scroll to the "Willows" layer and locate the  "distribution" section. That section contains a "slope" section. The min and max slope control the the steepness of the terrain that the instances will be placed on. Currently the Willows are set to a min slope angle of 0. That is flat horizontal ground. That is fine. The max slope angle is set to 90. That is 90 degree vertical straight up slope. It is pretty clear to see that these trees with their wide base are going to look ridiculous with the base sticking straight out of a vertical hillside. But we can see that even with a gentle slope (maybe 20 or 30 degrees), the tress still float some. If we constrain the max slope to a very small value that would not show much floating, we will get very few trees on a hilly terrain. Hmmm... we will need something more than just slope to deal with this problem. The only thing I have found so far is the workaround of translating all the tree instances (not tree objects) in the negative Y direction AFTER building the scene. Unfortunately, this has to be done after every build. It is cumbersome and error prone. I hope some future UltraSceneCreator version devises some way to deal with this problem, but for now, that is what we have. I would love to hear any better ideas you have!
    4. Change the slope max angle from 90 to 45, in an attempt to keep the floating tree base problem to a manageable state. This change will only affect very steep terrain, with an angle over 45 degrees.
    5. Validate if you are unsure and save the JSON file.
    6. Return to Daz Studio and run the UltraSceneCreator to build the scene again.

    12) Move the floating props down so the bases are below ground

    After you have built your UltraScene, it you still have floating prop bases try these steps.

    1. Open the Scene pane in Daz Studio
    2. In the search box in the Scene pane, type tree
    3. Expand UltraScene and UltraScene Instances below that.
    4. Select all Instance groups with the tdfTree03_Prop in the name. Don't select the USC Tree instances, those are the aspens.
    5. Open the Parameters pane. 
    6. Set the Y translate value to a negative number. The required value will depend on the slope of the terrain. I am going to try -25 for my terrain.
    7. Render the scene. If the tree bases are still floating, modify the Y Translate value. 
    8. If tree stumps are floating, select the tree stump instances in the Sene pane and adjust their Y Translate values to a negative value. They shouldn't need much if any adjustment, because they are already aligned to the ground normal.
    9. Render the scene. Continue adjusting the Y Translate of the floating instances until you are satisfied with their appearance in the render. Remember that you will have to do this again every time you rebuild the UltraScene.

    Continued below

    Willows 01 BV Experiment Default Camera.jpg
    2000 x 1500 - 3M
    Post edited by barbult on
  • barbultbarbult Posts: 23,132
    edited May 2020

    Experiment: Create a "new" Ecology with other props I own (Continuation 9 - Creating Ecology Thumbnail and Preview)

    Up to this point, our new ecology has reused the thumbnail and preview images of the ecology we copied in the beginning. Lets create some more representative image to replace those.

    13) Create the Thumbnail image and Preview image for the new ecology

    1. The ecology thumbnail image is in the folder with the ecology JSON file that we have been editing all this time. My ecology thumbnail image is named "USC Willow 01 BV.thumb.png". It is 128 pixels by 128 pixels. Either render an image of the new ecology in that size, or use an image editor to crop and scale a render you already have. Save it in the ecology folder, overwriting the old one.
    2. The ecology preview image is in the folder with the thumbnail image. My ecology preview image is named "USC Willow 01 BV.preview.png". It is 400 pixels by 320 pixels. Either render an image of the new ecology in that size, or use an image editor to crop and scale a render you already have. Save it in the ecology folder, overwriting the old one.
    3. In Daz Studio, run UltraSceneCreator script and check the new ecology thumbnail and preview image. They should show the images you just saved. If not, maybe you saved them to the wrong location or named them incorrectly.

    Continued below

    USC Willow 01 BV.preview.png
    400 x 320 - 184K
    USC Willow 01 BV.thumb.png
    128 x 128 - 44K
    Post edited by barbult on
  • barbultbarbult Posts: 23,132
    edited May 2020

    Experiment: Create a "new" Ecology with other props I own (Continuation 10 - Creating Representative Proxies)

    Up to this point, we've been using the tree proxies that were part of the ecology we copied. They aren't very representative of the props we are using, especially the stumps! It has made visualizing the scene before render difficult. I should have made proxies early on. But better late than never. They will be useful in the future when the new ecology is used. Proxies are generally displayed only for large trees, as far as I can tell. I chose to also make proxies for the stumps.

    14) Create simple low-poly props to represent the size and shape of the props added to the ecology; these will be our proxies

    1. In Daz Studio, start a new empty scene.
    2. Load the Willow Creek Tree03 Iray prop from the original Willow Creek product.
    3. Measure the size of the tree using whatever means you have available. I use a freebie script that is unfortunately no longer available. You can use Measure Metrics, or a measurement wall prop, or create a primitive object and scale it until it is the size of the tree and use that scale factor to determine the tree height. I determined that the tree is about 1500 CM tall and the wide base has a diameter around 285 CM.
    4. I will use a primitive cone as a proxy shape for this tree. In Daz Studio go to the Create menu and select New Primitive... When the dialog opens select Cone in the first drop down box and set the rest of the values as shown below. Click Accept. The cone will appear in the scene. Verify that it is about the size of the tree.
    5. Select the Cone in the scene pane. Click on the name Cone again to get it into edit mode so you can rename it. I'm going to change the name of my Cone to USC Dead Tree Proxy BV, following the naming convention of the other UltraSceneCreator proxy files and tacking my initials on. Hit the Enter key to confirm the name change.
    6. With the USC Dead Tree Proxy BV still selected in the Scene pane, open the Surfaces pane.
    7. Change the Base Color of the proxy to a brown, to represent the dead tree trunk.
    8. In the File menu. select Save As then Support Asset then Figure/Prop Assets.
      • When Filtered Save window pops open, select a place within your content library to save the tree proxy file. You can save it in the UltraScenery/Plants folder with other proxy props, or you can save it someplace else and leave the UltraScenery folder pristine for purchased items. Your content library probably already has a Props folder. You can create a subfolder with your name and save your new proxy there. The important things are that the location is within a Daz Studio content library and that you remember where you saved it! Give the file the same name as the name you used in the Scene pane. Click the Save button.
      • When the Figure/Prop Assets Save Options dialog opens, verify that the Asset Directory is set to your content library. Do NOT let it select Daz Connect. Your name should appear as the vendor and you can enter any product name you choose. The item name should be the same proxy name you used for the object in the Scene pane. Set Content Type to Prop. Optionally, also Set Category to Default/Props/landscape/Plants. Click the Accept button.
    9. Follow the steps above create a proxy for the tree stump. I used a cylinder instead of cone for the stump proxy. I made it about the size of the small stump. It doesn't have to match the exact dimensions of the object it represents, but it is nice for it to have the general shape and size. I chose to use the same proxy for both stumps, because I was feeling lazy. You can create a separate larger proxy for the large stump if you wish. You know how to do that now.

    15) Edit the ecology JSON file to use the new proxies

    1. Make another backup copy of your new ecology JSON file, before we change it again!
    2. Open the ecology JSON file in the text editor.
    3. Scroll to the "Willows" layer and locate the  "propsets" section. 
    4. For the tree prop we see the "path" to the actual tree prop and on the line below that we see the "proxy" with the path to the proxy to be used for that prop.
    5. Change the proxy value to the place where you saved your proxy and the name you gave it. If you paste in this information, be careful to change an \ to /.
    6. Repeat this process for the Stumps layer prop proxies. I was lazy and used the same stump proxy for both stump props.
    7. Validate and save the JSON file.

    16) Build an UltraScene with the new ecology and verify that the new proxies are displayed.

    I was bored with the pond, so I tried the new ecology with Dirt Track 1.

    A rendered view

    We are done! We have created an ecology that we can use with UltraSceneCreator. But it can be improved. See below.

    This was quite an effort. Now you can appreciate the value you receive when you buy a whole pack of ecologies from the Daz Store PAs for a few dollars! 


    Screenshot 2020-05-22 13.29.34.png
    249 x 364 - 15K
    Screenshot 2020-05-22 14.00.18.png
    249 x 364 - 15K
    Proxies in USC.jpg
    2664 x 1989 - 543K
    USC Dirt Path 1 dead trees.png
    2000 x 1500 - 5M
    Post edited by barbult on
  • richardandtracyrichardandtracy Posts: 5,046

    Been reading this experiment with interest, Barbult. Most impressed with what you've been able to do & the clarity of what you've written. I shall have to experiment when I get the chance, unfortunately it's much less often than I want as I rarely get the chance to play with DS for more than a couple of hours a week.

    I do a certain amount of programming in C++ (never once tried scripting in DS) and my initial thought on seeing the base pad problem was to tackle it this way:

    Go through the vertices on the tree model & find out the maximum base radius from below nominal ground to possibly as high as 10cm above the nominal ground level. Call this radius 'r'. Then, when placing the instances, lower the Y position dependant on the slope angle at the instanced tree position so the nominal zero is lowered from the local ground level by the amount: r*sin(slope). That should be OK as the slope should remain sufficiently constant within the radius of a tree base pad. It'll be fine if the slope gets shallower away from the centre of the tree because the pad will just be a little deeper than it needs, and if the slope gets steeper, other vegetation at the base will probably largely cover any small amount of ground pokethrough by the pad. Having one value for the radius probably means the tree will sit a bit deep with some rotations relative to the slope, but it's probably not worth the extra computation to find the significant base radius for each instance dependant on local slope and instance specific rotation.

    I have to admit I haven't the faintest idea whether any of this is possible in the DS scripting language, but it almost certainly will be, and what I suggested above might be an approach to consider.

    Regards,

    Richard.

  • barbultbarbult Posts: 23,132
    Thanks for the detailed suggestion, Richard. I am guessing that you are proposing this as a post processing step after building the UltraScene. The UltraSceneCreator script is an encrypted script that we cannot modify. It reads those JSON files that we can modify. I don't think the defined structure of those JSON input files have a way to add calculations like that. But it seems feasible that a user could write a separate Daz script to post process the instances in the way you described. Unfortunately, I am not adept enough with the Daz script language to do that myself. It is a very interesting idea, though!
  • HowieFarkesHowieFarkes Posts: 584
    edited May 2020

    Hi Barb - love all the work you're doing on this. Just a note on the "spacing" value. How spacing works in UltraScenery is very different to how it works in UltraScatter.

    UltraScatter actually scatters points around then tests whether each one is within the set distance from any other points and culls it if it is. This gives a very nice random distribution but takes a very long time to compute (as you'll find out if you do a 20,000 instance scatter with a distance set). UltraScenery on the otherhand takes a more pragmatic approach by laying out the points in a hexagonal grid with each point set at the "spacing" distance away from each other. Then some randomization is added to remove the orderliness of it all (that's the "random" value usually set just under the "spacing" property). This results in a much faster and "good enough" distribution for the vegetation in UltraScenery.

    I quickly knocked up this diagram when explaining it to TangoAlpha during the development of his ecologies.

    spacing.png
    1200 x 1200 - 138K
    Post edited by HowieFarkes on
  • barbultbarbult Posts: 23,132

    Hi Barb - love all the work you're doing on this. Just a note on the "spacing" value. How spacing works in UltraScenery is very different to how it works in UltraScatter.

    UltraScatter actually scatters points around then tests whether each one is within the set distance from any other points and culls it if it is. This gives a very nice random distribution but takes a very long time to compute (as you'll find out if you do a 20,000 instance scatter with a distance set). UltraScenery on the otherhand takes a more pragmatic approach by laying out the points in a hexagonal grid with each point set at the "spacing" distance away from each other. Then some randomization is added to remove the orderliness of it all (that's the "random" value usually set just under the "spacing" property). This results in a much faster and "good enough" distribution for the vegetation in UltraScenery.

    I quickly knocked up this diagram when explaining it to TangoAlpha during the development of his ecologies.

    Thank you, that's really helpful to understand "spacing". I'll reference this post where I discussed it above. Please drop in and offer tips and corrections when you have a chance!

  • RGcincyRGcincy Posts: 2,806

    Great work barbult! Helpful to have your tutorials to learn from. I have the product and the new expansion but have only given the original one try so far. 

  • richardandtracyrichardandtracy Posts: 5,046
    barbult said:
    Thanks for the detailed suggestion, Richard. I am guessing that you are proposing this as a post processing step after building the UltraScene. The UltraSceneCreator script is an encrypted script that we cannot modify. It reads those JSON files that we can modify. I don't think the defined structure of those JSON input files have a way to add calculations like that. But it seems feasible that a user could write a separate Daz script to post process the instances in the way you described. Unfortunately, I am not adept enough with the Daz script language to do that myself. It is a very interesting idea, though!

    Ahh. So the JSON file is not the bit determining the height offset. Not possible then. What a shame.

  • barbultbarbult Posts: 23,132
    edited July 2020

    Experiment: Change the name of an ecology I built

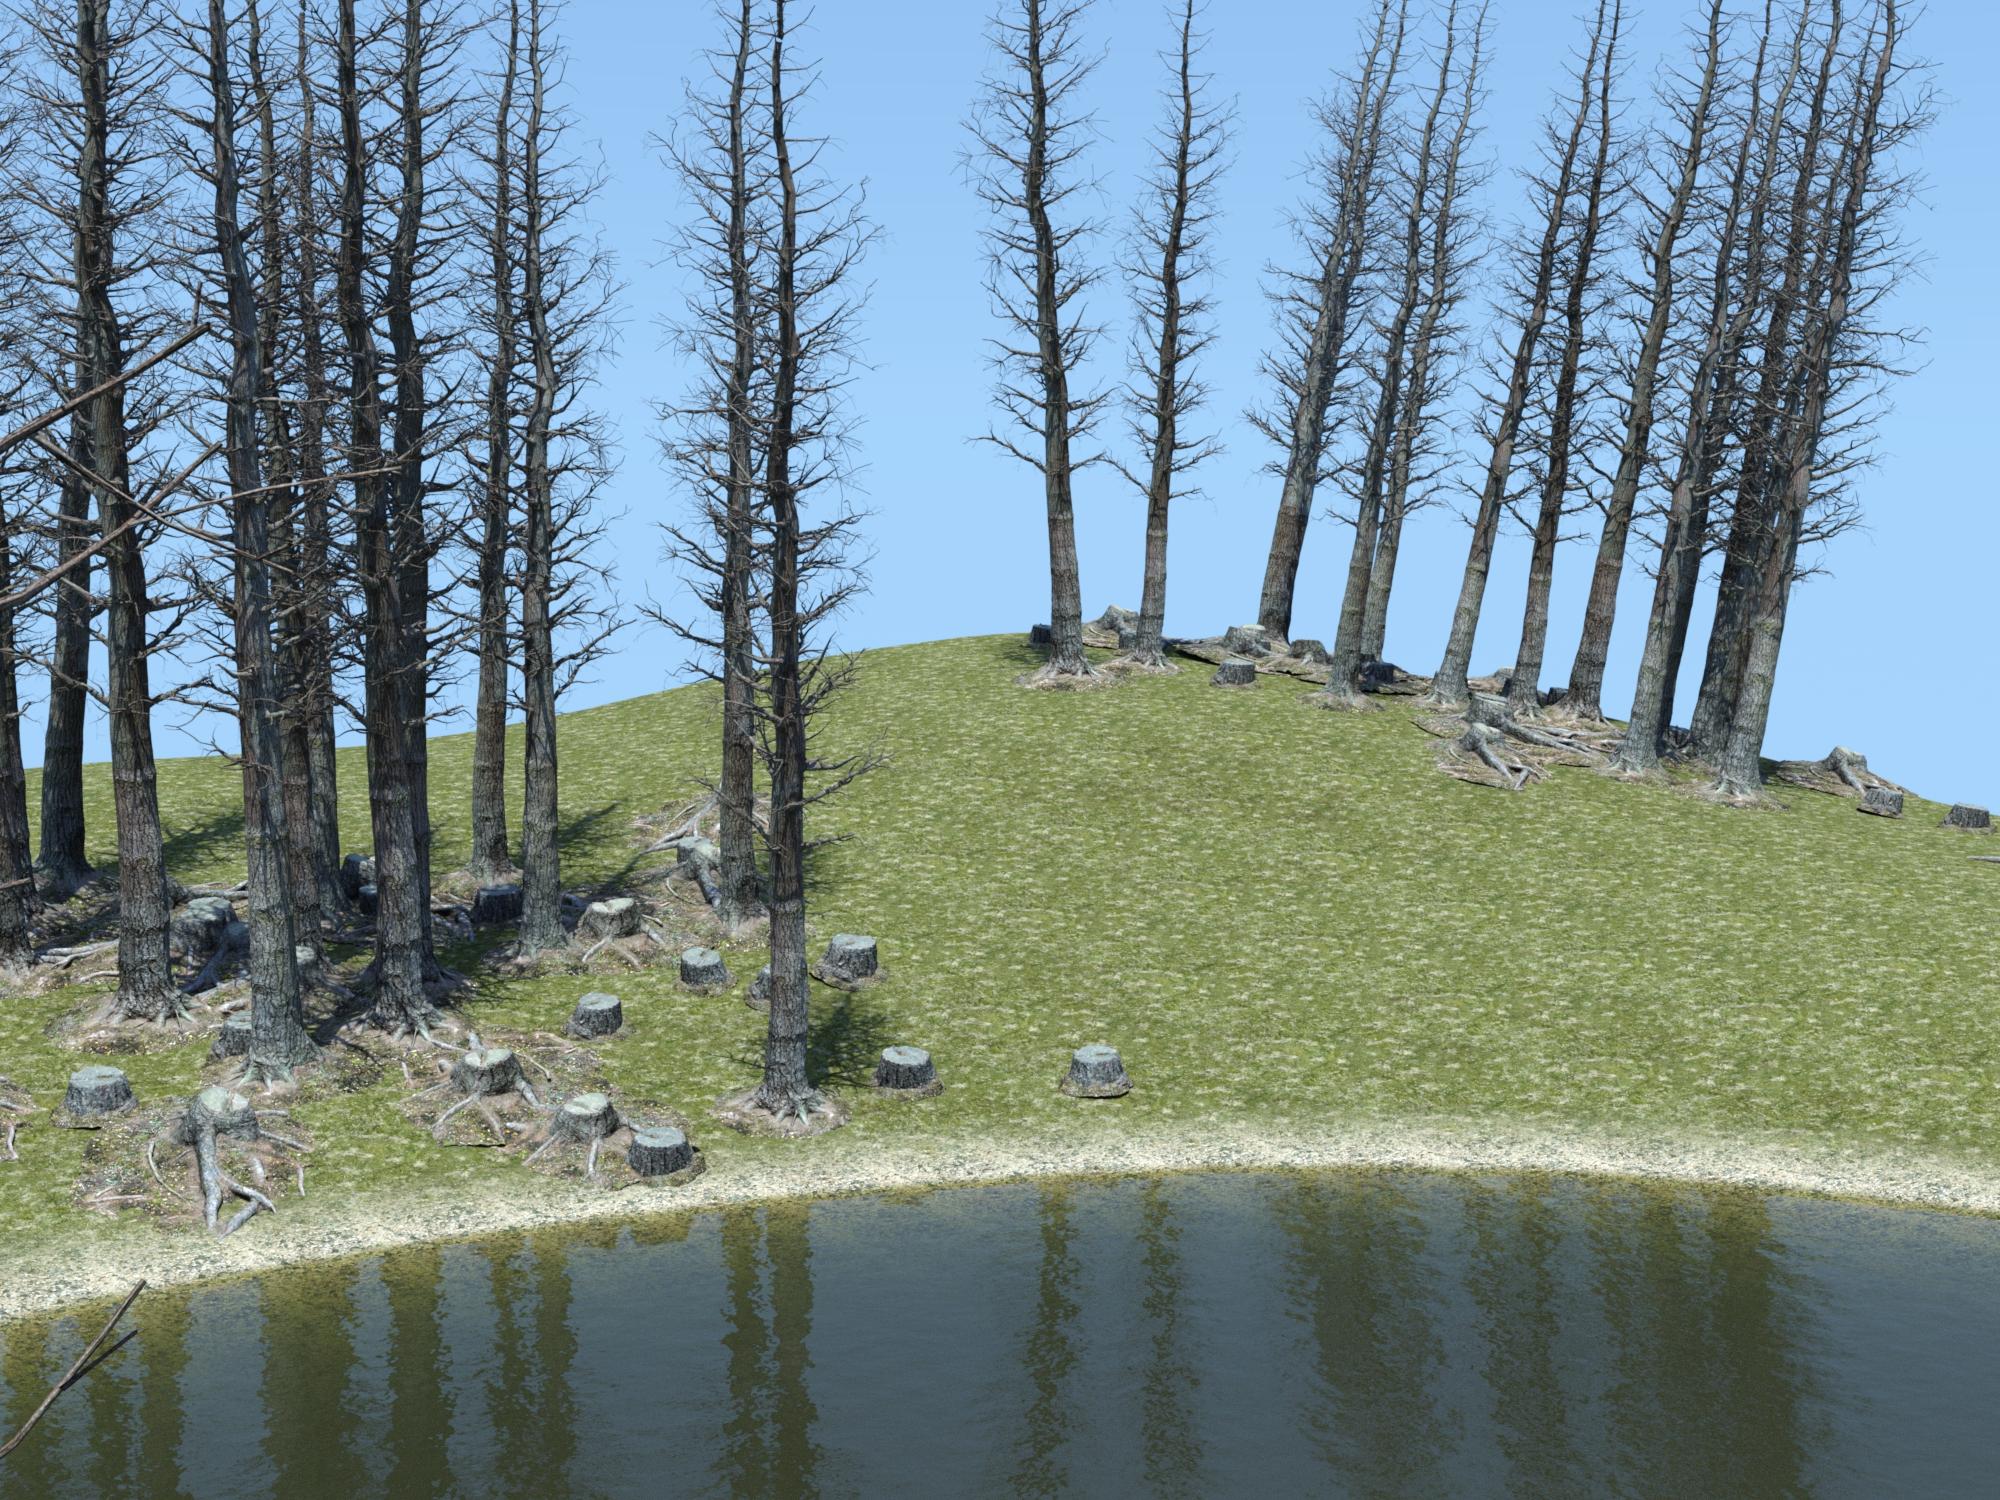
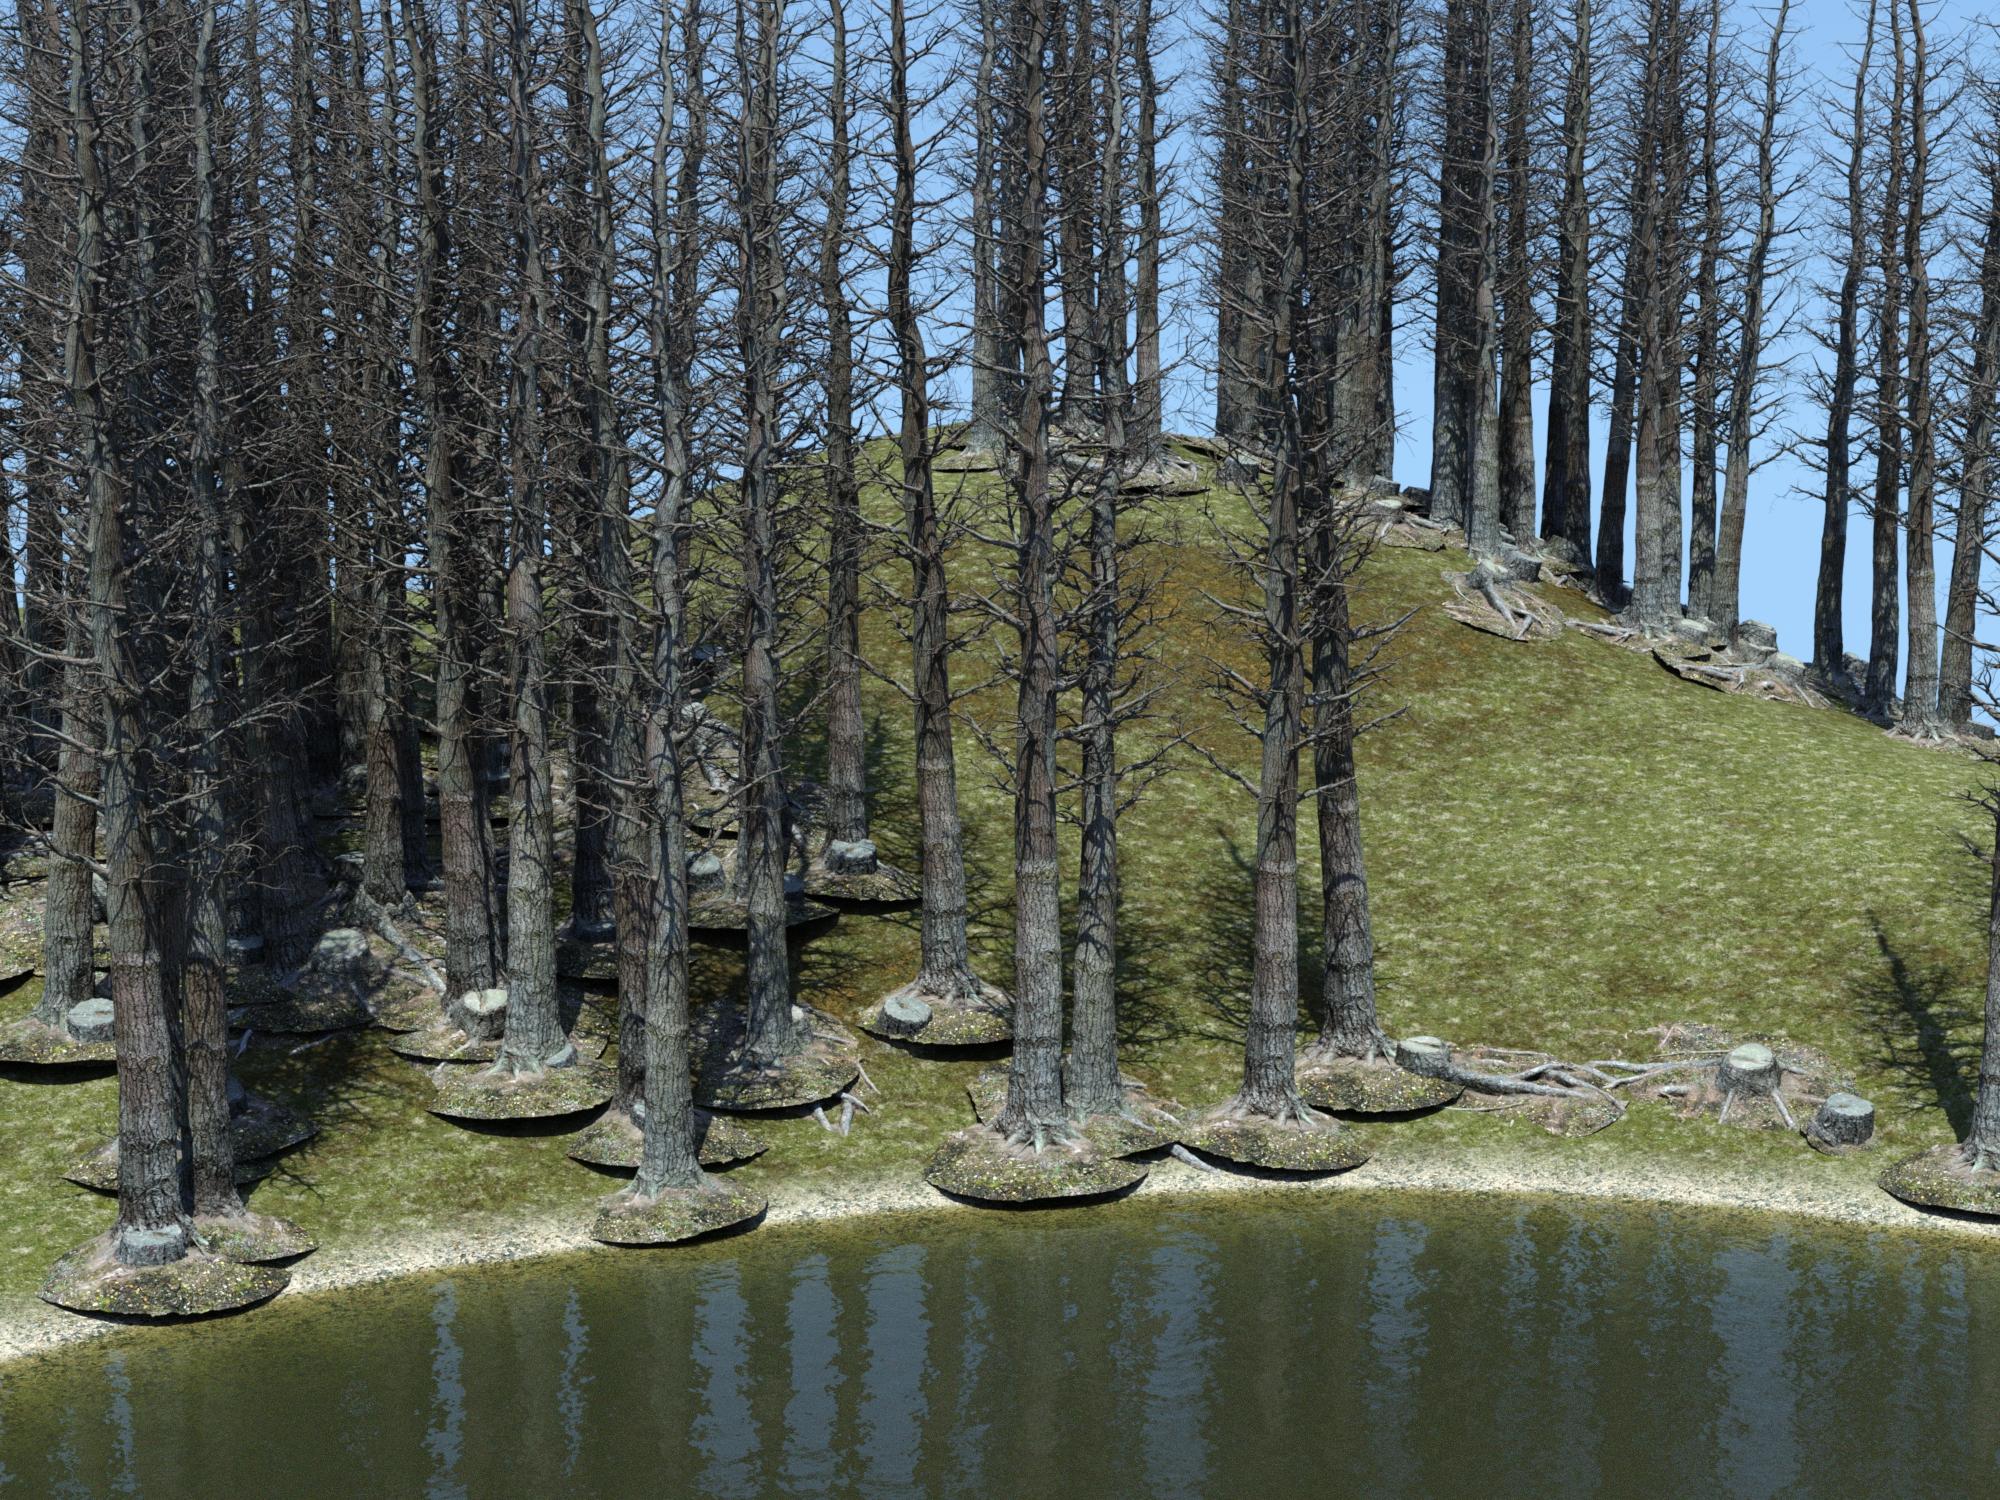
    It is pretty clear to see that there aren't any willows in the ecology that I built and named "USC Willow 01 BV". I want to rename it "USC Dead Trees 01 BV". This should be very similar to creating a new ecology from another one. Let's see if this is as easy as it seems like it should be. In fact, just to be safe and not accidently destroy my new ecology, I think I will follow exactly that process by making a copy and working on that. The description of these steps will be briefer, since we just went through all this in the previous experiment.

    1. Make a copy of the ecology folder and work on that copy.
    2. Change the name of the copied folder to change Willow to Dead Trees.
    3. Modify the name of all the files to change the old ecology name, Willow, to the new ecology name, Dead Trees.
    4. Open the info.JSON file in the text editor.
    5. Edit the info.JSON file to change the old ecology name, Willow, to the new ecology name, Dead Trees.
    6. Save the modified info.JSON file.
    7. Open the ecology JSON file in the text editor
    8. On line 2 of the ecology JSON file, change the ecology "name" to change Willow to Dead Trees.
    9. On line 5 of the ecology JSON file, change the ecology folder and file name from Willow to Dead Trees. (There are two places to change on line 5.)
    10. Change the name of the Willows layer to Dead Trees, and change all references to the Willows layer in affinity settings to Dead Trees. This can be done with search and replace, to be sure they are all found and changed.
    11. Validate and save the modified JSON file.
    12. Move the old ecology folder "USC Willow 01 BV" to a safe place outside of the content library, so we can be sure that none of those files get used when we test the new Dead Trees ecology (in case some necessary changes were overlooked and files still refer to the old ecology).
    13. Open Daz Studio and run the UltraSceneCreator script.
    14. Select a Terrain, a Feature and the new Dead Trees Ecology and build it.
    15. In the Daz Studio Sene pane, examine the UltraScene that was built, to be sure all selected layers were built and have objects and instances in the scene.
    16. Success - this was as easy as it seemed like it would be, and I feel much better about the new ecology name.
    17. Hang on to that old-new ecology "USC Willow 01 BV" that you moved to a safe place. I had an inspiration about how to use the Stonemason Willow Creek willow trees after all. See the experiment below.
    Post edited by barbult on
  • barbultbarbult Posts: 23,132
    edited July 2020

    Experiment: Modify complex props with parent/child hierarchy so they can be used in UltraSceneCreator

    In suddenly hit me a couple days ago, that there is a way to modify those complex props, like the Stonemason Willow Creek willow trees with parent/child hierarchy, to work with UltraSceneCreator. It amounts to exporting the whole tree hierarchy as an OBJ and importing it back in to Daz Studio. I'll flesh out the details when I actually do it. I'm pretty sure that should work. We'll see...

    1. Start with an empty scene.
    2. Load the hierarchical prop, in this example, Willow Creek Tree01 Iray.duf from the Stonemason Willow Creek product.
    3. Export the tree to OBJ format. (In Daz Studio, File>Export then choose Wavefront OBJ as the exported file type). I'm calling my exported object Willow 1 All.OBJ.
    4. Import the exported OBJ file. (In Daz Studio, File>Import then select the file you exported.) Import with the same scale setting you used to export the original file.
    5. Select the imported object in the Scene pane.
    6. Save the imported object as a Prop: (In Daz Studio, File>Save As>Support Assed>Figure/Prop Assets... Select a place in your Content Library to save it and give it a name. Fill out the dialog and click Accept.)

    I performed this process on both Willow Creek Tree01 Iray and Willow Creek Tree02 Iray.

    That now creates a prop that you can use with UltraScenery in an ecology that you create. But, it can be improved.

    1. The OBJ import/export will not retain all of the material settings of the original prop. To restore those, copy the surface settings from the original prop to the corresponding surface of your newly created prop and resave the prop.
    2. If desired, modify the prop origin and shape of the wide base as I did for the dead tress example and resave the prop.
    3. Update the failed USC Willow 01 ecology we created and abandoned before, to use the newly saved Willow Tree prop(s).

    This is a scene I created with my USC Willow 01 BV ecology.

    Willows by a Pond_002 camera view.jpg
    2560 x 1440 - 3M
    Post edited by barbult on
Sign In or Register to comment.