UltraScenery Experiments and Experiences

2456710

Comments

  • chris-2599934chris-2599934 Posts: 1,762

    I wonder how it decides where the bottom of the tree is? Is it the lowest point in the bounding box, or is it its origin? If it's the latter (as I would expect) maybe you can make versions of trees for sloping ground where the origin is a suitable number of centimetres above the original ground level, having the effect of pushing the tree that far below ground?

  • barbultbarbult Posts: 23,018
    edited May 2020

    I wonder how it decides where the bottom of the tree is? Is it the lowest point in the bounding box, or is it its origin? If it's the latter (as I would expect) maybe you can make versions of trees for sloping ground where the origin is a suitable number of centimetres above the original ground level, having the effect of pushing the tree that far below ground?

    Chris!!!! I bet it is the origin and I bet this will be the fix we need. Thank you. It will require saving a new version of the original props and I just never thought of that at the time. I won't be able to try it for several hours, but I am very hopeful. I just had another thought too. If I'm going to edit the prop, why not chop off some or all of that base? Then it won't stick out from underground.
    Post edited by barbult on
  • richardandtracyrichardandtracy Posts: 4,962

    That is a really logical way of doing it.

  • nonesuch00nonesuch00 Posts: 17,890

    very nice thread

  • barbultbarbult Posts: 23,018
    edited May 2020

    Experiment: Change origin of a prop to control its height on the UltraScenery terrain

    Updated to move the tree to center trunk on X and Z axes.

    chris-2599934 suggested here, that the height of a prop on the UltraScenery terrain might be controlled by the origin of the prop, and that by modifying the origin, we may be able to prevent those dead tree bases from sticking out of the ground. I think this is a great idea and very promising! It gave me the additional idea of modifying the shape of the base of that tree, too. At first I thought of just deleting some polygons. After some thought, I decided maybe I could just reshape the base to drag some of the roots "underground". I am going to use Mesh Grabber (Wow, half price today May 23, 2020) to do these tasks, but you could export to an external modeling tool and reimport instead, I guess. Mesh Grabber lets you do it all inside Daz Studio.

    Caveat: I am not an expert at this at all. There may be easier and better ways, so as always, I am open to suggestions for improvement.

    If this works well, the stumps can be modified in a similar way, since those large stumps are still somewhat problematic, even when aligned to the ground normal.

    1) Modify the origin of the original Willow Creek dead tree prop

    1. Open Daz Studio
    2. Create a new empty scene
    3. Load the original Willow Creek dead tree prop, Willow Creek Tree03 Iray.duf.
    4. Change the Viewport Draw Style to Wire Shaded to see the polygon structure of the tree and avoid being distracted by the texture map.
    5. Set the viewport camera to Front View (Don't just leave it in Perspective View or a camera view and click on the Front face of the cube. That still gives a perspective camera view with the associated perspective distortion. We want the genuine orthographic Front View camera, so use the drop down camera selector to choose Front View.)
    6. If you don't already have Show Floor enabled in your viewport, use the viewport context (hamburger) menu to turn Show Floor on. You should now see a line on your screen representing the ground (Y=0) level of the scene.
    7. Observe that a little bit of the tree base is already below ground (below Y=0). We are going to move more of it below ground.
    8. Select the tdfTree03_Prop in the Scene pane.
    9. Zoom in on the tree base area in the viewport, to make it easier to see what to change.
    10. Select the Geometry Editor tool.
    11. Right click in the viewport. A Geometry Editor context menu will pop up. Choose Selection Type>Polygon Selection. It is probably already selected by default, unless you changed it,
    12. Right click in the viewport. Choose Geometry Selection>Select All.
    13. Don't click on the tree in the viewport, or you will lose your polygon selection. If you accidently do this, just select all again.
    14. Change to the Mesh Grabber tool.
    15. Open the Tool Settings pane.
    16. Set the Mesh Grabber settings as follows:​
      • Selection type = Face
      • Gizmo  = be sure that Move has a check in the box
      • Gizmo Orientation = World
      • Gain = 50%, to make it not move too fast to control; use a lower value if you have trouble controlling it
      • Falloff radius (doesn't matter, because we are going to use constant falloff)
      • Falloff Type = Const
    17. In the viewport, with the Mesh Grabber tool still selected. CAREFULLY click and hold on the green arrowhead of the Mesh Grabber Gizmo. (When you click the green arrowhead it turns yellow to indicate that it is active.) Drag the Gizmo downward so more of the tree base is under the line representing the ground. Do not click outside of the green arrowhead, or you will lose your tree polygon selection. I moved the tree down so that some of the root ares is still above ground. (This might turn out to be an iterative procedure, to find the best height for the tree origin. The best height really depends on the terrain slope, but we want it to be used on lots of terrains, so we have to make some compromises in choosing "best".)
    18. Set the viewport camera to Bottom View.
    19. With the Mesh Grabber still selected and all of the tree polygons still selected, use Mesh Grabber to move the tree so that the trunk is approximately centered over the 0,0 point where the red and blue axis lines cross.
    20. Save a Scene file at this point, so we can return to this state if we totally goof up after this.
    21. Be sure the tdfTree03_Prop is still selected in the Scene pane, or select it again.
    22. Select the Joint Editor tool.
    23. Open the Tool Settings pane.
    24. Set the Center Point X Position, Y Position, and Z Positions to 0.
    25. Set the End Point X Position and Z Position to 0. Leave the Y Position unchanged.
    26. Change the viewport camera to Front View again and zoom in on the base of the tree.
    27. Observe that the green center point thing with the two arrows is visible. It looks like it is in about the center of the trunk from left to right. The height of the green thing is at the level of the ground. 
    28. Save a Scene file again at this point, so we can return to this state if necessary.

    2) Reshape the base of the dead tree

    1. I'm going to use Mesh Grabber again. The idea is to grab some polygons at the base of the tree below ground and drag or rotate (if you have that addon to Mesh Grabber) them to pull them lower and toward the center to they don't stick out so far. I'm not going to try to do a full Mesh Grabber tutorial here.
    2. Change the viewport camera to the Perspective View.
    3. Be sure the tree is selected in the Scene pane.
    4. Select the Mesh Grabber tool.
    5. Open the Tool Settings pane.
    6. Adjust the Gain to achieve a comfortable working speed. I'd start around 50%.
    7. Adjust the Falloff radius so that tree base polygons move, but the trunk is not distorted too much.
    8. Iteratively select some tree base polygons near the edge of the base and move and/or rotate them downward. Continue until the tree base looks more like a root ball. Wow, this was tough. I think this could have been done much easier with Blender, in retrospect. I hope this works!
    9. Save a scene again for good measure.

    3) Save the modified dead tree as a "new" prop

    1. Please remember that this "new" prop is just derivative work based on Stonemaosn's Willow Creek product. It is for personal use only. It cannot be shared with anyone or, heaven forbid, sold!
    2. Select the tree in the Sene pane.
    3. Change the name of the tree prop in the scene pane to indicate that it is now a modified version. I called mine tdfTree03_Prop_mod_BV.
    4. Select File>Save as>Support Asset>Figure/Prop Assets.
    5. Select a folder location within the content library and enter a name for the "new" tree prop. I chose the name Willow Creek Tree03 Mod BV. Remember the folder you chose! Click the Save button.
    6. When the Figure/Prop Assets Save Options dialog pops up:
      • Verify that the Asset Directory is your content library, or change it if it is wrong. Don't select a Daz Connect data folder!
      • I add my initials after Stonemason's name on the Vendor Name line to indicate that this is not his original tree and I have changed it.
      • For item name I chose  tdfTree03_Prop_mod_BV again.
      • Set Content Type to Prop
      • Optionally Set Category to Default/Props/Landscape/Plants
      • Click the Accept button.
      • Note: After updating the shape of the tree, I updated my tree proxy, too, to be more representative of the new tree shape. I found I was confused and misled by the wide base on the original proxy.

    4) Update the Dead Trees ecology JSON file to use the modified tree prop

    1. Make backup copy of the Dead Trees ecology JSON file, before we change it, just in case.
    2. Open the Dead Trees ecology JSON file in the text editor.
    3. Scroll to the "Dead Trees" layer and find the "props" section.
    4. Substitute the folder path and name of your new tree for the old path and tree name.
    5. Let's keep the proxy the same. We could go through this whole effort to change the proxy origin, too, but honestly, it seems like a lot of work for little benefit, at least until this is a proven success.
    6. Validate and save the JSON file.

    5) Build an UltraScene and evaluate the results

    1. In Daz Studio, create a new empty scene.
    2. Run the UltraSceneCreator script
    3. Create a steep terrain so we can evaluate the performance of the new dead tree on the steep slope.
    4. Select No Feature. (We don't want Features changing the slope of our terrain for this test.)
    5. Select the Dead Trees Ecology.
    6. Build only the Dead Trees layer so we can clearly see the bottom of the trees against the bare terrain.
    7. Apply the USC Late Morning Render Settings preset.
    8. Render the scene.
    9. Well, well, well, Chris is a hero! I'm no t sure my"root ball" idea was the best approach, but it looks much better than the flat base poking out. The orign modification Chris suggested is definitly worth while.
    10. Build the UltraScene again with all layers selected.
    11. It looks pretty good. Now those stumps look like they could use a similar treatment, especially those very large stumps. They won't need much modification, though, because they are aligned to the ground normal.

    tdfTree03_Prop_mod_BV.jpg
    859 x 1914 - 202K
    Willow Creek Tree03 Mod BV on steep terrain dead trees only.jpg
    2000 x 1500 - 2M
    Willow Creek Tree03 Mod BV on steep terrain build all layers.jpg
    2000 x 1500 - 3M
    Post edited by barbult on
  • SixDsSixDs Posts: 2,384

     "I'm no t sure my"root ball" idea was the best approach"

    In my opinion, barbult, the ideal would be to have an actual root system (or at least the upper part of one) that would allow varying degrees of the root system to show close to the root collar above ground, as they often do in the real world. But there is a tendency for many tree models to focus on the overtly visible trunk and crowns, with the result that the ground/tree interface appears like someone drove the tree into the ground like a stake. But the real world is a complicated place.

  • barbultbarbult Posts: 23,018
    SixDs said:

     "I'm no t sure my"root ball" idea was the best approach"

    In my opinion, barbult, the ideal would be to have an actual root system (or at least the upper part of one) that would allow varying degrees of the root system to show close to the root collar above ground, as they often do in the real world. But there is a tendency for many tree models to focus on the overtly visible trunk and crowns, with the result that the ground/tree interface appears like someone drove the tree into the ground like a stake. But the real world is a complicated place.

    Thanks for sharing your ideas. That is what I was trying to accomplish (some roots showing above ground) by modifying the mesh to drag the root area partially below ground and leave some above ground, rather that just delete the polygons of the wide root base all together. I think it was somewhat successful. I'm just not sure the shape I ended up with was optimum or that the amount above and below ground was optimum. Maybe time and experience using the trees will help me determine that. I think I will try some other shapes on future trees to see if I stumble on something I like better.

  • DiomedeDiomede Posts: 14,997
    barbult said:

    I wonder how it decides where the bottom of the tree is? Is it the lowest point in the bounding box, or is it its origin? If it's the latter (as I would expect) maybe you can make versions of trees for sloping ground where the origin is a suitable number of centimetres above the original ground level, having the effect of pushing the tree that far below ground?


    Chris!!!! I bet it is the origin and I bet this will be the fix we need. Thank you. It will require saving a new version of the original props and I just never thought of that at the time. I won't be able to try it for several hours, but I am very hopeful. I just had another thought too. If I'm going to edit the prop, why not chop off some or all of that base? Then it won't stick out from underground.

    Great thread.  I've begun making some sample props to use to create a base ecology for myself.  However, I should have read through the whole thread instead of jumping in after seeing the steps on page one.  I haven't even completed a full ecology yet, and I already know some of my grass clumps will not sit well on sloped ground.

    Thanks for these and other tips.

  • barbultbarbult Posts: 23,018
    Diomede said:
    barbult said:

    I wonder how it decides where the bottom of the tree is? Is it the lowest point in the bounding box, or is it its origin? If it's the latter (as I would expect) maybe you can make versions of trees for sloping ground where the origin is a suitable number of centimetres above the original ground level, having the effect of pushing the tree that far below ground?


    Chris!!!! I bet it is the origin and I bet this will be the fix we need. Thank you. It will require saving a new version of the original props and I just never thought of that at the time. I won't be able to try it for several hours, but I am very hopeful. I just had another thought too. If I'm going to edit the prop, why not chop off some or all of that base? Then it won't stick out from underground.

    Great thread.  I've begun making some sample props to use to create a base ecology for myself.  However, I should have read through the whole thread instead of jumping in after seeing the steps on page one.  I haven't even completed a full ecology yet, and I already know some of my grass clumps will not sit well on sloped ground.

    Thanks for these and other tips.

    Welcome to the thread, @Diomede. I'm glad you found it helpful, even though you got caught by the same  wide-base prop problem I had. I write these experiments as I do them, so I don't realize all the pitfalls when I start. It was a learning experience! I'm going to get back into it soon and finish working on the conversion of the parented props to single, objects so they can be used in UltraScenery ecologies.

    I look forward to seeing examples of your finished creation. You can post here, or over in the commercial thread where you'll get more viewers, or both.

  • DMaxDMax Posts: 637

    Just purchased this and it is simply impossible to use... I have a 2019 Macbook Pro with 16GB RAM... not the best but not the weakest as well but this product took 20 minutes to load the instances and after an hour, my hourglass is still flipping and DS is frozen. I can't even close the scene and am trying to avoid force shutting the program. And I did have my optimization as "Memory". Am I doing something wrong? Am terribly disappointed as I was so looking forward to using this.

  • DaventakiDaventaki Posts: 1,620

    @DMax you should post this in the commerical thread so HowieFarkes and others can help trouble shoot.  I know next to nothing about Mac's but I do know that some scenes take 20-30 minutes to generate.

  • richardandtracyrichardandtracy Posts: 4,962

    I have a 2013 PC with 16Gb RAM and it does take 15-20 mins to create the scene. On rendering the scene uses around 3Gb of VRam + whatever needed for any figures. It is possible yours has dropped to CPU from GPU and is taking a fair time. Rendering of 1.5-2 hrs is the average I've had with a scene when rendering in GPU. Considering the complexity it's.. understandable. I was going to say 'Not Bad' but no, I won't say that. Howie has made it as fast as he can.

    Regards,

    Richard.


  • barbultbarbult Posts: 23,018
    I also know next to nothing about Mac computers but I believe Howie Farkes developed UltraScenery on a Mac. He should be able to advise you. I agree, you should post in the commercial thread, too, where he will be more likely to see your message.
  • DMaxDMax Posts: 637

    Thank you, I will look for and post on the commercial thread.

    To be precise, it took 20 mins for it to "create the 100,000 instances" and after an hour the scene still did not appear. So I didn't even get a chance to see the scene on my screen, let alone work with it and render. I would have had been well pleased with a 2h render but this was taking longer even just to load the scene... and I had selected the most minimal options even (without rivers or other extras).


  • GreybroGreybro Posts: 2,448

    Amazing work

  • sandmanmaxsandmanmax Posts: 992
    barbult said:

    Experiment: Modify complex props with parent/child hierarchy so they can be used in UltraSceneCreator

    In suddenly hit me a couple days ago, that there is a way to modify those complex props, like the Stonemason Willow Creek willow trees with parent/child hierarchy, to work with UltraSceneCreator. It amounts to exporting the whole tree hierarchy as an OBJ and importing it back in to Daz Studio. I'll flesh out the details when I actually do it. I'm pretty sure that should work. We'll see...

    Coming Soon Later... But first and investigation of a promising suggestion from chris-2599934 to keep those dead tree bases below ground

    Yep, Export works perfectly to convert either groupings, cr2, or pp2 files.  Then save as Figure/Prop Asset.

  • barbultbarbult Posts: 23,018
    barbult said:

    Experiment: Modify complex props with parent/child hierarchy so they can be used in UltraSceneCreator

    In suddenly hit me a couple days ago, that there is a way to modify those complex props, like the Stonemason Willow Creek willow trees with parent/child hierarchy, to work with UltraSceneCreator. It amounts to exporting the whole tree hierarchy as an OBJ and importing it back in to Daz Studio. I'll flesh out the details when I actually do it. I'm pretty sure that should work. We'll see...

    Coming Soon Later... But first and investigation of a promising suggestion from chris-2599934 to keep those dead tree bases below ground

    Yep, Export works perfectly to convert either groupings, cr2, or pp2 files.  Then save as Figure/Prop Asset.

    Thanks for the confirmation. I've been distracted and haven't gotten back to this.

  • nonesuch00nonesuch00 Posts: 17,890
    edited July 2020

    I instanced 100K of the old esha's Grassy Grounds Megapack (the short medium density grass clump) on my AMD Ryzen 7 2700 with 32GB RAM and Radeon RX 570 8GB (which does not factor into the UltraScatter Pro.) Oops, I just realized this is for Untra Scenery Creator, not Ultra Scatter Pro.

    I did wind up deleting though and reinstancing at 50K & 35K in two seperate obnjects instanced.

    Post edited by nonesuch00 on
  • sandmanmaxsandmanmax Posts: 992

    Barbult, I really want to thank you for all the work you've done here.  It's been really helpful.  So.. on my latest project, I've got a lot of objects (they'll be replacing the trees, basically) and they have big, fat bottoms.  Some actually have open roots, so they may be fine. I was wondering if it's worth playing around with UltraScatter first, just to get an idea how these things will perform on a ground plane?

  • barbultbarbult Posts: 23,018

    Barbult, I really want to thank you for all the work you've done here.  It's been really helpful.  So.. on my latest project, I've got a lot of objects (they'll be replacing the trees, basically) and they have big, fat bottoms.  Some actually have open roots, so they may be fine. I was wondering if it's worth playing around with UltraScatter first, just to get an idea how these things will perform on a ground plane?

    UltraScatter has different options for object origin that give you more flexibility in vertical position of scattered objects. I'm not sure it would accurately predict how UltraScenery would position the objects. Perhaps if you simply left the UltraScatter origin settigns at default, it would be representative. I haven't tried that method as a prediction of UltraScenery positioning. It seems like it could be a good idea, though.

  • sandmanmaxsandmanmax Posts: 992

    One thing I learned pretty quickly was that one of my plant sets had the pivot points all set in the middle of the plant.  This caused it sink into the terrain up to the pivot point.  Once I moved it down toward the roots, I found out I could control how deeply the plant would sit.  Now that is UtlraScatter, of course, so it will be interesting if UltraScenery exhibits the same behavior.

  • barbultbarbult Posts: 23,018

    One thing I learned pretty quickly was that one of my plant sets had the pivot points all set in the middle of the plant.  This caused it sink into the terrain up to the pivot point.  Once I moved it down toward the roots, I found out I could control how deeply the plant would sit.  Now that is UtlraScatter, of course, so it will be interesting if UltraScenery exhibits the same behavior.

    If by pivot point you mean the geometry origin. Yes, that is how UltraScenery works. https://www.daz3d.com/forums/discussion/comment/5658011/#Comment_5658011
  • barbultbarbult Posts: 23,018
    edited July 2020

    Experiment: Use Negative Altitude to Create Interesting Terrains

    I learned from HowieFarkes that max altitude in the UltraSceneCreator dialog can be a negative value. Let's see what happens when we do that.

    1) Try the default noise terrain settings with a negative max altitude

    1. Open Daz Studio
    2. Run the UltraSceneCreator script
    3. Scene tab: Let's just use the default noise settings for the first attempt, but change the default Max altitude from 5 to -5.
    4. Features tab: I think negative altitude will be interesting with water features, because the top of the water is always forced to be at altitude 0. So, I am going to select River 2 for the Feature.
    5. Ecology Tab: I think any ecology will work. I'll start simply and select Grassland 1.
    6. Build tab: I'm going to uncheck all vegetation layers and build just the terrain, until I see if I get an interesting terrain. I won't check Extend forest, since Grassland 1 doesn't have trees anyway. I won't restrict the instances to a camera, because I want to explore this whole scene to find interesting views.
    7. Click the Build Scene button.
    8. Looking at a top view of the whole UltraScene in the viewport, I see that I got a bunch of small islands in a big area of water. Using a negative max altitude completely changed what the River 2 feature looks like. It is like I have a whole new feature to play with.
    9. Looking at the front view of the whole UltraScene in the viewport, I see that there is a lot of terrain deep under water. That is kind of interesting. 
    10. Select the UltraScene in the Scene pane and run the UltraSceneCreator script, to build again with all of the ecology vegetation layers checked in the Build tab.
    11. Move the camera to an interesting angle and render.

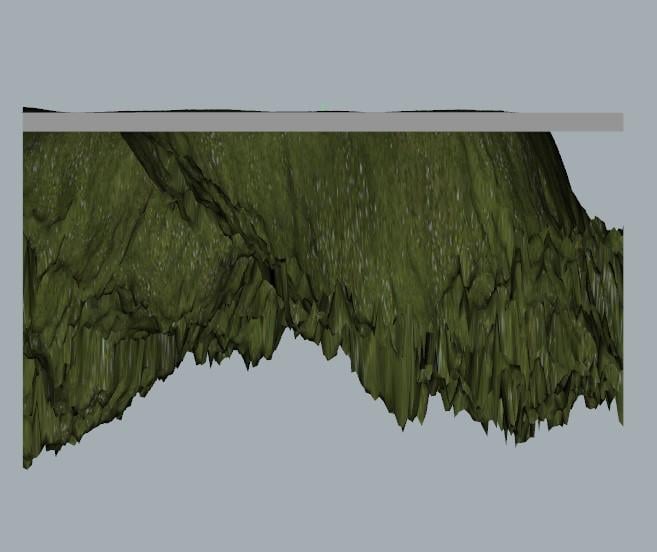
    2) See what changing the contrast of the noise does to the terrain generated with negative max altitude

    1. Select the previously generated UltraScene in the Scene pane and run the UltraSceneCreator script again.
    2. Scene tab: Drag the Contrast slider all the way to 100. The noise preview is just black and white blobs now.
    3. Features tab and Ecology tab, leave the previous settings of River 2 and Grassland 1.
    4. Build tab: Uncheck all of the vegetation layers to quickly build just the terrain.
    5. Click the Build Scene button.
    6. Looking at the top view of the whole UltraScene in the viewport shows much more land area now. Run the UltraSceneCreator script again, to compare the noise preview with the top view of the UltraScene in the viewport. Observe that dark areas of the noise preview become raised land areas and light areas of the noise preview become water areas. The River 2 area is water and cuts through the land like normal.
    7. Looking at the front view of the whole UltraScene in the viewport, we see that the land sticks up much higher above the water now. It looks like very steep cliffs off the edge of the land.
    8. Select the UltraScene in the Scene pane and run the UltraSceneCreator script, to build again with all of the ecology vegetation layers checked in the Build tab.
    9. Move the camera to an interesting angle and render.
    10. I don't like those sharp steep cliffs. I'm going to try contrast 25 instead of contrast 100. That will avoid the abrupt transition from black to white.
    11. Yes, that looks better. It is similar to the default noise with contrast 0, but adds a bit more land mass to the scene. 

    Contrast 100

    Contrast 25

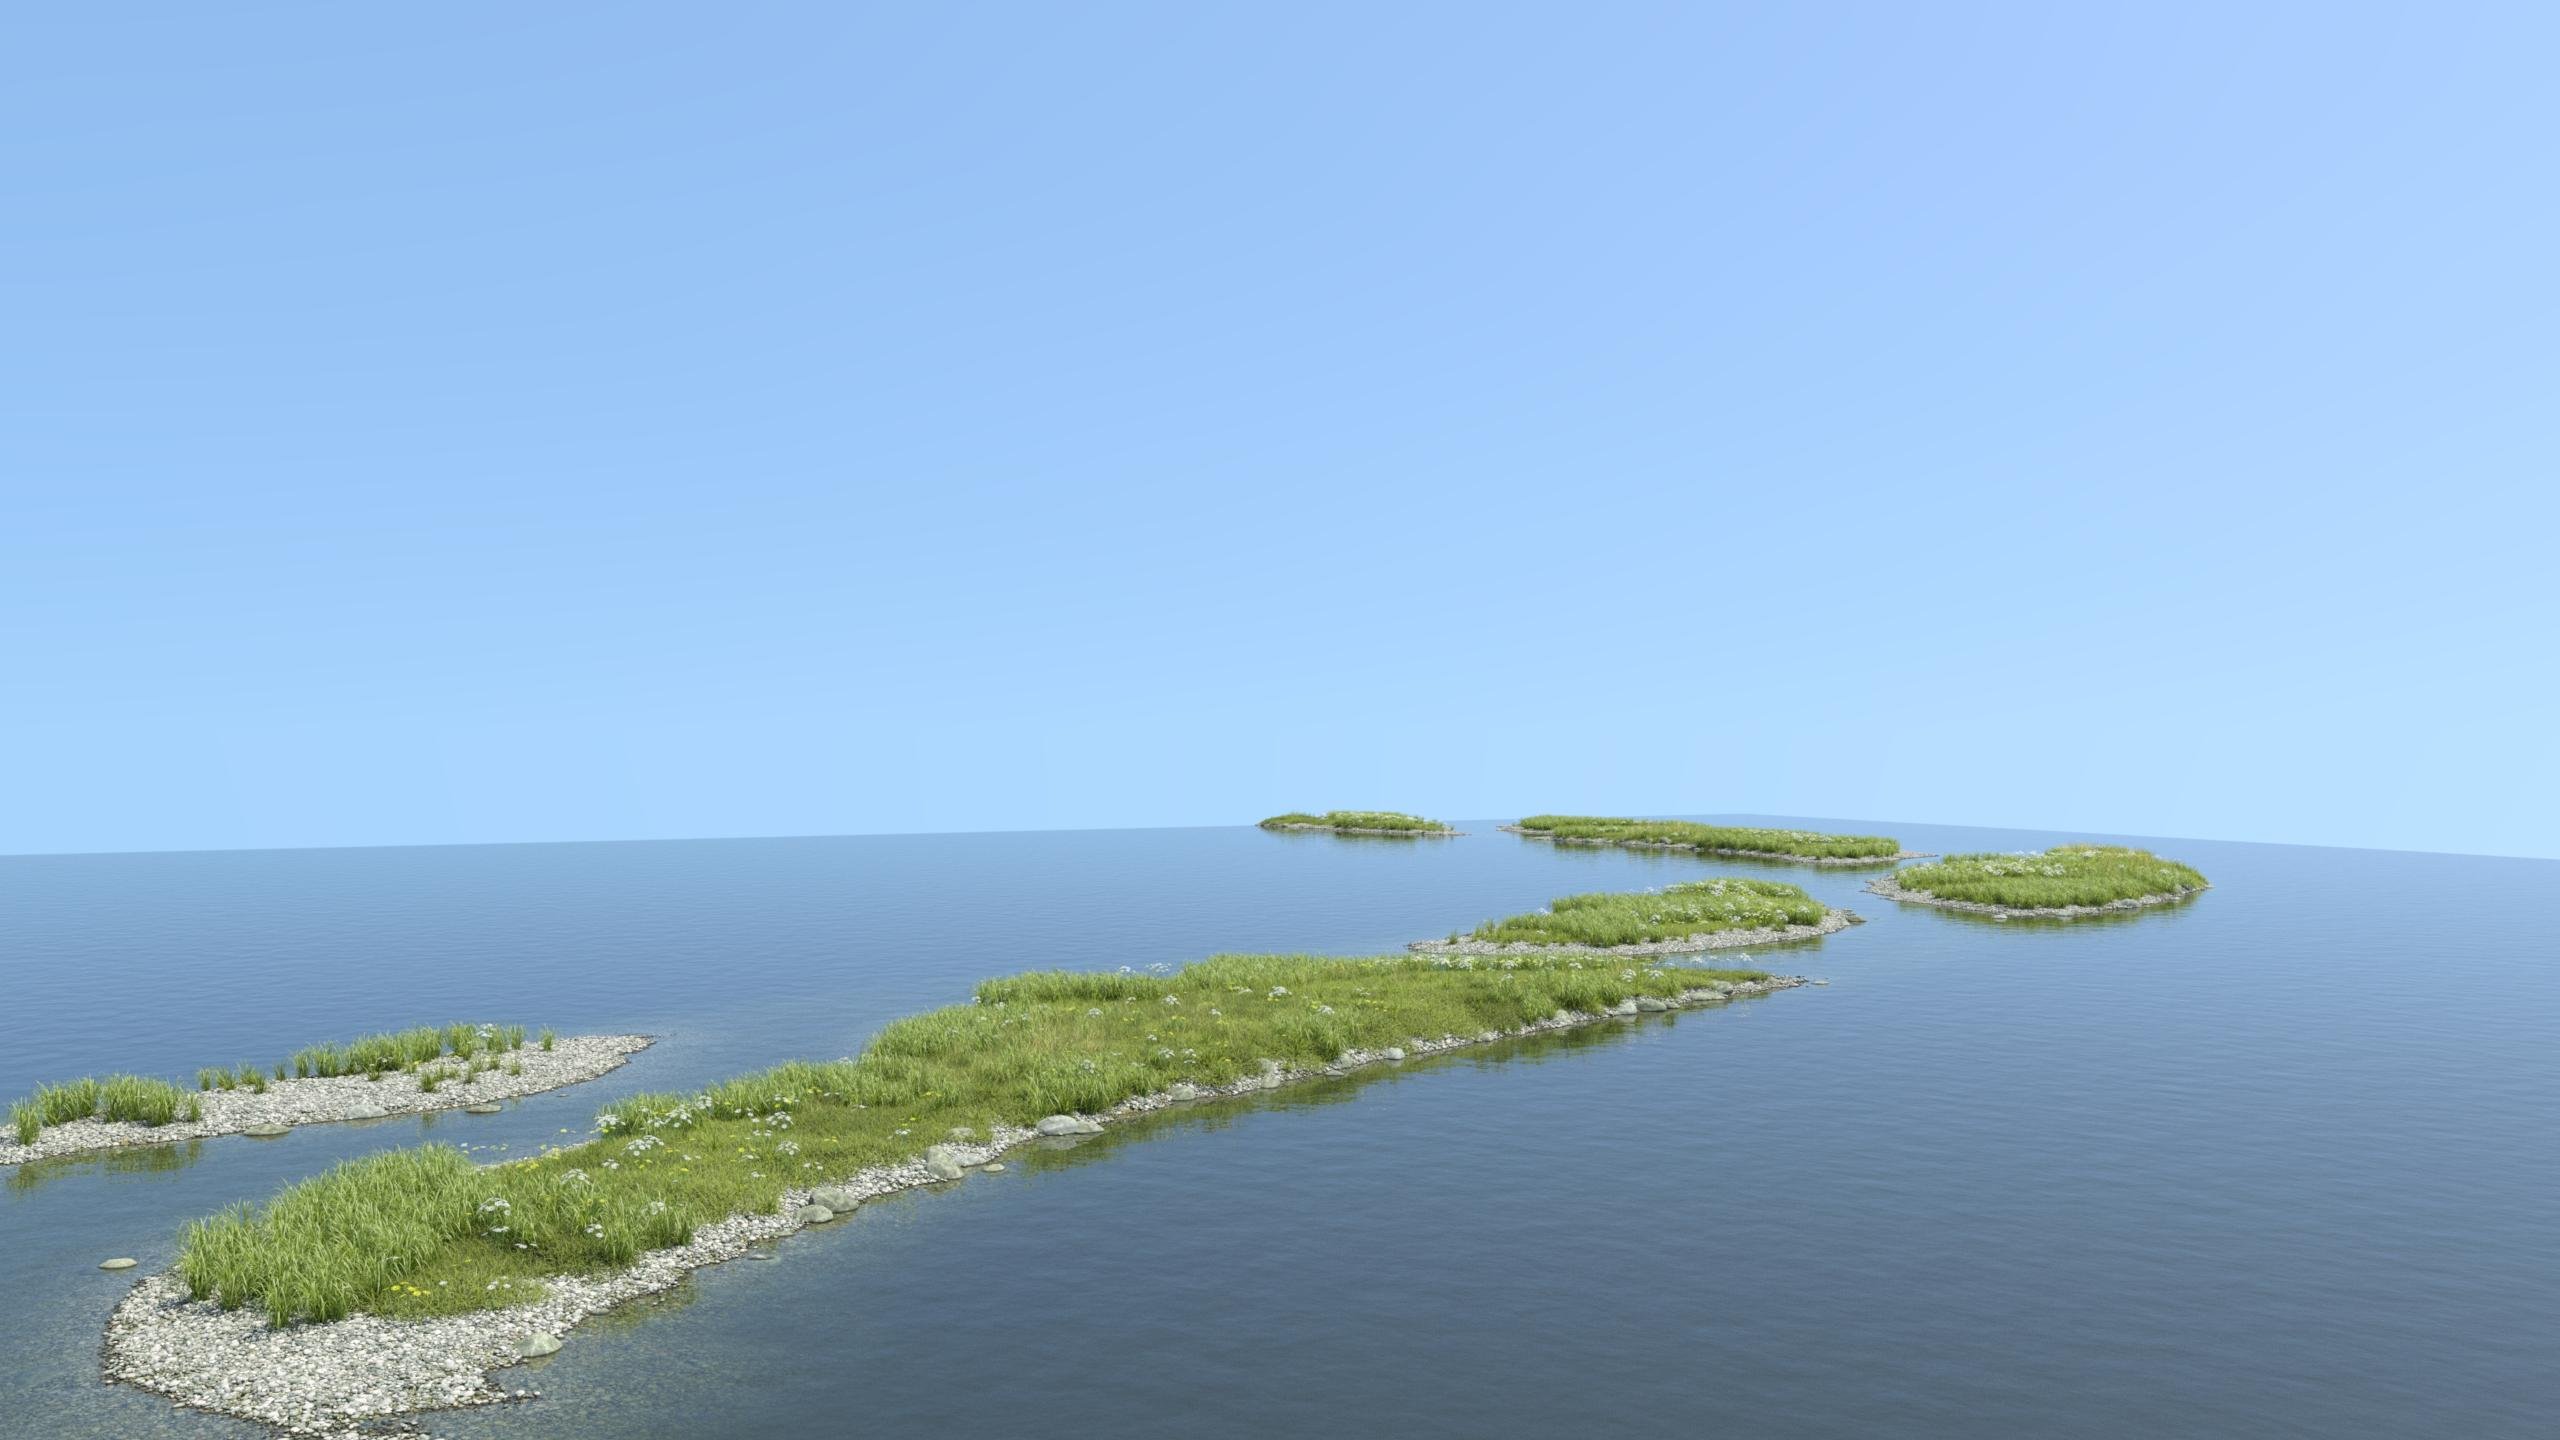
    Same terrain with Mossy Hollow ecology

    Top View negative altitude.jpg
    842 x 837 - 46K
    UltraScenery Negative Max Altitude -5 River 2 Grassland 1.jpg
    2560 x 1440 - 1M
    Front View negative altitude.jpg
    657 x 552 - 56K
    Top View Contrast 100 negative altitude.jpg
    624 x 621 - 87K
    Front View Contrast 100 negative altitude.jpg
    647 x 615 - 39K
    UltraScenery Negative Max Altitude -5 Contrast 100 River 2 Grassland 1.jpg
    2560 x 1440 - 2M
    Top View Contrast 25 negative altitude.jpg
    625 x 623 - 46K
    Front View Contrast 25 negative altitude.jpg
    671 x 599 - 35K
    UltraScenery Negative Max Altitude -5 Contrast 25 River 2 Grassland 1.jpg
    2560 x 1440 - 1M
    UltraScenery Negative Max Altitude -5 Contrast 25 River 2 Mossy Hollow 2.jpg
    2560 x 1440 - 3M
    Post edited by barbult on
  • RGcincyRGcincy Posts: 2,804

    Great experiments Barbult - your explanations are very clear and easy to follow. I like the look of the one with Mossy Hollow vegetation.

  • barbultbarbult Posts: 23,018
    RGcincy said:

    Great experiments Barbult - your explanations are very clear and easy to follow. I like the look of the one with Mossy Hollow vegetation.

    Thanks, Rich. I'm glad to hear that the exlanations are easy to understand.

  • nonesuch00nonesuch00 Posts: 17,890

    In my use of the aspen trees outside the USC enviroment I found they were 40% - 60% too small. And that would imply the scale of the noise height map is about 60% too small too. The palm trees I didn't try though yet as I've not got that add-on.

  • sandmanmaxsandmanmax Posts: 992
    edited July 2020

    Oooh!  I need some tropical plants....  nice work, Barbult.  How did you get the ocean in the back?  Is that just the US water plane extending out?

    Post edited by sandmanmax on
  • barbultbarbult Posts: 23,018

    Oooh!  I need some tropical plants....  nice work, Barbult.  How did you get the ocean in the back?  Is that just the US water plane extending out?

    Yes, with the negative max altitude and a feature containing water, like the River 2 that I used, the majority of the UltraScene is water. All the water you see in the negative max altitude images above is just the standard USC water. I didn't add any water or extend or scale anything to get that.

  • barbultbarbult Posts: 23,018
    edited September 2020

    Experiment: Modify Iray Surface Settings to Get More Color Variety in an UltraScene

    Some of the ecology sets contain ecologies with trees that have different colored leaves. For example, one ecology might have green summer leaves and another might have yellow and orange autumn leaves. Still, I want more variety in a single ecology. I don't care whether my choice of colors is scientifically accurate, I just want a pretty picture! I could modify an ecology and change the surface colors of the leaves on some of the trees, but that I want to experiment with a different method. 

    This is the approach I am going to take:

    • Limit the experiment to tree leaves
    • Combine UltraScenes to create one that has all of the tree and leaf options available for that tree type.
    • Use texture maps included in the product - don't modify any images with Photoshop or create any new texture images.
    • Modify settings in the Surfaces pane.
    • Save a hierarchical materials preset that I can later apply to any UltraScene using the same kind of trees. Oops: I later discovered that when many more feature choices were added to UltraScenery, my previously saved Hierarchical Materials Presets didn't work as expected on all UltraScenes.I think what is happening is that when the scene objects are built on the fly with the script, they end up with different scene IDs, depending on what layers the feature adds to the scene, like river or track related layers or both. The preset is looking for the scene ID that the particular tree or leav had when the preset was built. I think individual Materials Presets will work, but convenient Hierarchical Materials Presets will not work reliably. sad

    1) Select a type of tree to experiment with.

    1. I'm going to select the beech trees from the Harpwood Trail addon.

    2) Create a composite UltraScene that contains all of the tree and leaf objects available for the selected tree type. I want to do this so I can eventually create a single hierarchical materials preset that will cover any of the ecology selections for that tree type. For Harpwood Trail, I have 4 ecology options available. To save build time, and since I am limiting my experiment to trees and leaves, I will build only those layers. Warning - U-Turn ahead. I discovered an oversight described here.

    1. Run the UltraSceneCreator script and select the default terrain, _NoFeatures, and Harpwood 1.  On the Build tab, turn off visibility to Base Violets and Ferns, to build only layers with Beech in the name. Check the box for Extend Forest, because the extended forest is made up of trees. Don't restrict the build to a camera (leave it none). Click the Build Scene button.
    2. Unselect UltraScene in the Scene pane. We want to build a second UltraScene, not rebuild the current one. Run the UltraSceneCreator script and select the default terrain, _NoFeatures, and Harpwood 2.  On the Build tab, turn off visibility to all layers that don't have Beech in the name. Check the box for Extend Forest. Don't restrict the build to a camera (leave it none). Click the Build Scene button.
    3. Unselect UltraScene in the Scene pane. Run the UltraSceneCreator script and select the default terrain, _NoFeatures, and Harpwood 3.  On the Build tab, turn off visibility to the Ferns layer. Base leaves layer and all layers that have Beech in the name should still be visible. Check the box for Extend Forest. Don't restrict the build to a camera (leave it none).Click the Build Scene button.
    4. Unselect UltraScene in the Scene pane. Run the UltraSceneCreator script and select the default terrain, _NoFeatures, and Harpwood 4.  On the Build tab, turn off visibility to the Base Grass, Ferns, Grass Tufts, and Long Grass layers. Keep visibility on for the Leaf litter layer and all layers that have Beech in the name. Check the box for Extend Forest. Don't restrict the build to a camera (leave it none). Click the Build Scene button.
    5. Select the first UltraScene in the Scene pane. Right click and select Expand>Expand All. Now we can see all of the objects and instances in all 4 UltraScenes. (See screenshot below)
    6. Compare the second expanded UltraScene with the first expanded UltraScene, to see if there are any object in the second one that aren't in the first. I don't see any differences in the included objects.
    7. Compare the third expanded UltraScene with the first expanded UltraScene, to see if there are any object in the third one that aren't in the first. Right away I see the the Base Leaves Layer group that has three Fallen Leaves objects in it. Change the parent of the Base Leaves Layer group from the third UltraScene to the first UltraScene, either by drag and drop or by right click Change Parent. Continue to compare the third and first UltraScenes. I don't see any other differences.
    8. Compare the fourth expanded UltraScene with the first expanded UltraScene, to see if there are any object in the fourth one that aren't in the first. I see the the Leaf Litter (forest) Layer group that has one Fallen Leaves objects in it. Change the parent of the Leaf Litter (forest) Layer group from the fourth UltraScene to the first UltraScene.
    9. The first UltraScene now has all of the unique objects. This is the UltraScene that I will make a hierarchical materials preset from later. The other UltraScenes still have trees with materials different than UltraScene 1, and those will probably be useful, so I will not delete them yet.
    10. In the Scene pane, hide the second, third and fourth UltraScenes. (Hold the Ctrl key while clicking the eye icon next to the UltraScene name to hide the entire UltraScene tree. Do this for each of the three UltraScenes to be hidden.) We only want to see and render the first (our composite) UltraScene. (See screenshot below)
    11. Save the scene so you have a scene with all of the Harpwood Trail objects in it. I'll name my scene UltraScenery Harpwood Composite Step 1.
    12. Render the scene to get an idea of what it looks like now. I'm using the UltraScenery USC Morning Light render settings preset and 3DOutlaw's SkyCam Angled S camera (get it here). My render shows a very dense green forest with yellow/orange leaves on the ground. (See attached render below)

    All four Harpwood Trail Ecologies

    Composite UltraScene created by reparenting Base Leaves Layer and Leaf Litter (forest) Layer to the first UltraScene. Other UltraScenes have visibility turned off.

    Render of composite Harpwood Trail UltraScene

    3) Modify the trees to include both green and yellow trees. This part will be pretty easy. I'll just copy the surface settings from a yellow tree and past it to the surface settings of a green tree to make it yellow.

    1. In the Scene pane, expand the third UltraScene (one of the yellow ones). In the Beech Layer and select the Beech Large 02. (Be sure the select the tree object and not the proxy.)
    2. In the Surfaces pane, expand the Beech Large 02 to show the surfaces.
    3. Select the Leaf surface.
    4. Right click and select Copy Selected Surface(s).
    5. In the Scene pane, expand the first UltraScene (our composite) and select Beech Large 02.
    6. In the Surfaces pane, expand Beech Large 02 to show the surfaces.
    7. Select the Leaf surface.
    8. Right click and select Paste to Selected Surface(s). We can see the green tree image maps change to yellow and other surface settings, such as Translucency Weight change, too.
    9. In the other Beech tree layers of the first UltraScene, select a tree or two and paste the yellow leaf surface material to the leaf surface of those trees. Be sure to include the Beech BG objects in this process. Those are the extended forest. I chose to paste the yellow leaf surface to Beech Medium 01 (2), Beech Medium 02 (2), Beech Small 02, and Beech Large 02. It doesn't matter exactly which trees you select to change to yellow. The important part is to leave some green and change some to yellow in each layer. Don't do anything to the Base Leaves Layer or the Leaf Litter (forest) Layer.
    10. Save the scene so you have a scene with all of the Harpwood Trail objects in it. I'll name my scene UltraScenery Harpwood Composite Step 2.
    11. Render the scene to get an idea of what it looks like now. It is a very dense forest with some green tres and some yellow trees. There are yellow/orange leaves on the ground. (See attached render below)
    12. Once I've confirmed that I have both green and yellow trees in my composite UltraScene, I no longer need the other UltraScenes. To simplify things, I am going to delete the other three UltraScenes (the ones that I previously hid).
    13. Save the scene again with only the composite UltraScene in it.

    Render of composite Harpwood Trail UltraScene with some green and some yellow trees

    Continued Below

    4 Harpwood UltraScenes.jpg
    533 x 679 - 73K
    4 Harpwood UltraScenes Consolidated.jpg
    532 x 661 - 72K
    Copy leaf surface.jpg
    530 x 1978 - 490K
    UltraScene Harpwood Composite Step 1.jpg
    2000 x 1500 - 3M
    UltraScene Harpwood Composite Step 2.jpg
    2000 x 1500 - 4M
    Post edited by barbult on
  • barbultbarbult Posts: 23,018
    edited July 2020

    Experiment: Modify Iray Surface Settings to Get More Color Variety in an UltraScene (Continuation 1)

    4) There are many more ways to modify surface settings to get increased variety in the tree and leaf colors. Some suggestions are:

    1. Add or delete a color in the Base Color (Diffuse Color). This can tint the color of the image map in that channel.
    2. Delete the image map in the Base Color (Diffuse Color) channel and use only a color. This will completely replace the color of the leaf in the image map, but you will lose the subtle tone changes within the image and end up with a solid color leaf. 
    3.  Add (or delete) a color or add (or delete) an image map in any of the other channels (Translucency, Glossy Color, etc.) The result will depend on the channel modified. Experiment.
    4. Tip: When a tree comes with several different image maps for the tree leaf, it is interesting to change one or more of the maps on the surface to one of the other image maps. For example, put the Translucency Color image map in the Base Color channel, or vice versa. You will get a slightly different colored tree. Try a green leaf in the Base Color and a Yellow leaf in the Translucency Color. Then on a different tree, swap those. Soon you will have much more variety in your materials.
    5. Use the built in Image Editor function to make changes to the way the image map is interpreted. To do this, click on the little square image map thumbnail in the Surfaces pane and select Image Editor... There are several options to experiment with:
      • Image Gamma
        • 0 means use the default gamma of the image type. For an RGB image, like in Base Color, 0 = 2.2. For a grayscale image, like in a bump map. 0 = 1.
        • A lower number results in a lighter image, with less contrast, kind of washed out
        • A higher number results in a darker image
        • An image gamma change affects every instance of that image map in the surface. If you change image gamma on the Base Color, and Translucency Color uses the same image map, Translucency Color gamma is also changed automatically. The other controls in the Image Editor affect only the single image map being edited.
        • Lesson Learned a long time ago: Changes to Image Gamma will not be saved and applied in a materials preset. I bug reported this years ago. It has not been fixed. Image Gamma changes are saved in a scene file, so you can use this to affect the colors in a particular scene, but since my goal here is to create a hierarchical material preset for resuse, sadly, I will have to avoid image gamma changes. It is too bad, too, because it does a great job.
      • Instance Color Scale
        • I haven't been able to find an explanation of what this is supposed to do. Experimentation shows:
          • Unlike Image Gamma, Instance Color Scale affects only the single instance of the image map that is being modified. Other usages of that map in the same material are not changed automatically, and must be changed manually if you want them to be the same.
          • Default value is 1.
          • A higher number (above 1) makes the image lighter. It may be adjusting saturation??? Maybe some of the image lightness with a large value is the result of saturation overkill turning to white???
          • A lower number (below 1) makes the image darker.
          • A value of 0 or negative makes the item look black
      • Instance Color Offset
        • I haven't seen an explanation of this either. Experimentation shows:
          • Unlike Image Gamma, Instance Color Offset affects only the single instance of the image map that is being modified. Other usages of that map in the same material are not changed automatically, and must be changed manually if you want them to be the same.
          • Default value is 0.
          • Only make very tiny changes. A small change between -0.1 and 0.1 can tone down some of the drastic impact of a large Instance Color Scale value. Even 0.01 has an affect. I really don't know what this control is doing, but it interesting to experiment with.
          • Try Instance Color Scale of about 0.75 with an instance Color Offset of about 0.1 to lighten and desaturate an image map, so a color value added to the channel can change the overall surface color more significantly.
      • Invert
        • This changes the color of the image map to the inverse. I don't completely understand how the inverse is determined. The result is not the same as inverting the image map in Photoshop.
        • Unlike Image Gamma, Instance Color Invert affects only the single instance of the image map that is being modified. Other usages of that map in the same material are not changed automatically, and must be changed manually if you want them to be the same.
        • If you invert the Base Color, you probably need to invert the Translucency Color, too, so they don't tend to cancel each other out.
        • Inverting some maps seems to bleach them almost to white. This can be useful as a starting point to completely change the color with a color value in the channel.

    For "extra credit" you can try changing the color of the tree proxies to approximate the color of the actual tree changes. I changed the proxy color by changing the Diffuse Color swatch to a color similar to the tree color. It made for a nice preview, because I can tell how the different colored trees will be distributed. It makes no difference in the final render, though.

    Continued Below

    Recolored Proxies.jpg
    1693 x 1269 - 413K
    Post edited by barbult on
Sign In or Register to comment.