Another render of Sakura 8, this time in colour. This was originally supposed to be just a quick test trying out Sakura 8's facial rigging, but it kinda got out of hand.
Postwork was done to combine the LineRender9000 passes with the main render, remove some rendering artifacts, and to add the background and effects. The background and effects come with Clip Paint Studio.
P.S The pose in my last render was a reference to the game Doki Doki Literature Club. It's the same pose Sayori has in the promotional art.
EDIT: Forgot to mention, the lights used in this render are some of the default lights from StudioMaya's Anime Doll Kit.
Another render of Sakura 8, this time in colour. This was originally supposed to be just a quick test trying out Sakura 8's facial rigging, but it kinda got out of hand.
I definitely don't like the pinched Sharp creased look. It is a shame there aren't more shots advertising their other look because this is a HUGE deterrent to me.
Another render of Sakura 8, this time in colour. This was originally supposed to be just a quick test trying out Sakura 8's facial rigging, but it kinda got out of hand.
Postwork was done to combine the LineRender9000 passes with the main render, remove some rendering artifacts, and to add the background and effects. The background and effects come with Clip Paint Studio.
P.S The pose in my last render was a reference to the game Doki Doki Literature Club. It's the same pose Sayori has in the promotional art.
Nice work! The shaders work really well in this image — nailed it :)
Another render of Sakura 8, this time in colour. This was originally supposed to be just a quick test trying out Sakura 8's facial rigging, but it kinda got out of hand.
Postwork was done to combine the LineRender9000 passes with the main render, remove some rendering artifacts, and to add the background and effects. The background and effects come with Clip Paint Studio.
P.S The pose in my last render was a reference to the game Doki Doki Literature Club. It's the same pose Sayori has in the promotional art.
Would you be willing to hold my hand and explain how you got the skin to look the way you did? Love it!
Another render of Sakura 8, this time in colour. This was originally supposed to be just a quick test trying out Sakura 8's facial rigging, but it kinda got out of hand.
Postwork was done to combine the LineRender9000 passes with the main render, remove some rendering artifacts, and to add the background and effects. The background and effects come with Clip Paint Studio.
P.S The pose in my last render was a reference to the game Doki Doki Literature Club. It's the same pose Sayori has in the promotional art.
EDIT: Forgot to mention, the lights used in this render are some of the default lights from StudioMaya's Anime Doll Kit.
Can anyone try mixing her with Dolly and/or Josie? Curious to see what that looks like...
She mixes pretty poorly with the default eyes she comes with IMO. I haven't tired those two shapes you mentioned as I haven't purchased them. But in general her new eyes aren't working well other faces. which is abnormal even for a toon character.
I'm going to try not using her character preset with the new eye sockets. going to see how bad it is using her head witha normal set of eyes.
someone said they were going to sell spherical eyes for her, can't wait for that.
It's too bad she is not more of a team player. Her eyes are too much and the fact that her face looks like it could cut butter better than a knife has me sitting on the watching the fence.
Ok I just had to play a little bit... Sakura, eyes tweaked a bit (texture and material setup), my broom freebie and hair shaders... Precious Dragon wings on her back ;) Oh yeah and Ama hair for star, just parented and posed. looks lovely on Sakura :)
Another render of Sakura 8, this time in colour. This was originally supposed to be just a quick test trying out Sakura 8's facial rigging, but it kinda got out of hand.
Postwork was done to combine the LineRender9000 passes with the main render, remove some rendering artifacts, and to add the background and effects. The background and effects come with Clip Paint Studio.
P.S The pose in my last render was a reference to the game Doki Doki Literature Club. It's the same pose Sayori has in the promotional art.
Nice work! The shaders work really well in this image — nailed it :)
WOw this render is just superb and i hadn't heard of that linerender9000 either... pwToon hasn't worked for me in ages and i don't know what works for Iray anymore but thats adorb!
It's one of the dForce outfits. Free Spirit maybe? Anyway searching on dForce ought to bring it up.
Hmm yeah its Free Spirit, used in scorpio 's Render. But darn it doesn't seem to be the same one used in Japanese Anime Poses. It has differnt neck line and side / hip frills.
Thank you. :)
You're right. Lokking at the promos again, the Anime poses dress is definitely a conforming item. And it looks familiar, but I'm not placing it. Something that loose-fitting is not typical, so it's pretty distinctive.
Another render of Sakura 8, this time in colour. This was originally supposed to be just a quick test trying out Sakura 8's facial rigging, but it kinda got out of hand.
Postwork was done to combine the LineRender9000 passes with the main render, remove some rendering artifacts, and to add the background and effects. The background and effects come with Clip Paint Studio.
P.S The pose in my last render was a reference to the game Doki Doki Literature Club. It's the same pose Sayori has in the promotional art.
EDIT: Forgot to mention, the lights used in this render are some of the default lights from StudioMaya's Anime Doll Kit.
Love this :D And nailed Sayori's pose perfectly lol
Aight... Anybody want to test this out and make sure I have this all working
2 morphs, both found under head>face>eyes>stylized edit: they are named Sakura Use Default eyes and Sakura Default Eyes Iris Oval
1st sticks the default eyes where they should be (I set it up all proper so it should be at a value of either 0, or 1 you shouldn't need to set it at any intermediary values it will automatically blend with however strong you have Sakura)
2nd morph makes the iris shape oval, its optional, but gives a better look. Set it at what strength looks good to you.
There is one other thing you will probably want to do, but that I cannot share so you'll have to do yourself:
To make the iris properly big you are going to need to set the limits of the iris size morph to something more than 100%
click the gear to the left of the morph slider
select "parameter settings" and set the max limit higher to something like 200
now you can set the slider higher, but wait! the iris still seems to stop growing at 100% what is this?
Iris Size is actually a controller morph that controls 2 secret hidden morphs rather than moving the mesh itself. We need to change the limits on a secret hidden morph as well; luckily this isn't actually hard, in fact its actually pretty much the same thing we just did.
make sure you have the normal Iris Size morph dialed in a bit (this will make it much easier to find the morph its secretly controlling)
In th top left of the parameters tab click the properties (triangle and 4 lines) and make sure "Show Hidden Properties" is on
in the top of where all the morphs are go to currently used, provided you don't have a bunch of other morphs applied you should quickly find a greyed out morph called PHMEyesIrisSize_pos (alternatively you can just search for this directly)
Do the same thing with the limits you did for the Iris size morph
since you only adjusted the positive max for the iris size you only need to change the positive secret morph the other one you don't need to worry about
go to file>save as>support asset>save modified asset so these changes will be saved to the figure and you can continue dialing bigger eyes going forwards.
Another render of Sakura 8, this time in colour. This was originally supposed to be just a quick test trying out Sakura 8's facial rigging, but it kinda got out of hand.
Postwork was done to combine the LineRender9000 passes with the main render, remove some rendering artifacts, and to add the background and effects. The background and effects come with Clip Paint Studio.
P.S The pose in my last render was a reference to the game Doki Doki Literature Club. It's the same pose Sayori has in the promotional art.
EDIT: Forgot to mention, the lights used in this render are some of the default lights from StudioMaya's Anime Doll Kit.
What even!? This totally looks like a still frame from an anime! Amazing!
Ok I just had to play a little bit... Sakura, eyes tweaked a bit (texture and material setup), my broom freebie and hair shaders... Precious Dragon wings on her back ;) Oh yeah and Ama hair for star, just parented and posed. looks lovely on Sakura :)
Another render of Sakura 8, this time in colour. This was originally supposed to be just a quick test trying out Sakura 8's facial rigging, but it kinda got out of hand.
Postwork was done to combine the LineRender9000 passes with the main render, remove some rendering artifacts, and to add the background and effects. The background and effects come with Clip Paint Studio.
P.S The pose in my last render was a reference to the game Doki Doki Literature Club. It's the same pose Sayori has in the promotional art.
EDIT: Forgot to mention, the lights used in this render are some of the default lights from StudioMaya's Anime Doll Kit.
This looks so nice, that plugin definetly works well with this.
OK, I am home and I can give more detail on brightening her eyes.
Sakura 8 eyeballs has two surfaces, 'JA EYES' and 'JA LENS'.
I went through JA LENS and set cutout opacity to 0.
On JA EYES, you need to do a few things, and all of these can be variable. First, go to base color and click the color bar, and set it to full white. Scroll down to Emission Color, click the color and slide the bar up to about 3 quarters to white. You can go all white, too. But note there is a balance between how white you go here and the luminance values you will need below. Also, click the texture and locate the texture that Sakura's eyes you have in use. It will show up in the drop down menu.
I didn't mess with emission temp. You can if you wish. Remember how light color works, you want a high color temp for whiter light that matches her eyes. So the default 6500 is ok.
Next is the "Luminance" value. This is tricky, because few people understand how the cd/m^2 values work. The value needs to be very high to even be noticeable. In my render, it was 15,000. The result is actually VERY subtle compared to not having any emission value. To really see the light pop, crank it really high. Like 70,000. Again, this value depends all on the lights you have in your scene. My scene is using the free winter sky hdri, which is fairly bright outdoor light. That means my emission values need to be pretty high or the light will be overpowered by the sky. If this was a dark scene, then the luminance value needed would not be as high.
To demonstrate the 70,000 luminance I made a new render. This makes her eyes pop like you expect an anime character to do. It also disables any uncanny valley effect that people may have (which I believe is where the people who commented how horrifying Sakura 8 looks came from.) Since most people are going for less realism here, this can help.
For reference, the old one with 15,000 Luminance
Also, on a final note, I wanted to say that I believe a great skin for Sakura is Belle 6. I baked Belle's skin to conform to Genesis 2, and then I used Blacksmith3D's Texture Transformer to transfer them all to Genesis 3. Thank goodness G8 can use G3 textures, because I really didn't want to do this again, LOL. At any rate, if you have the ability to convert Belle 6 to Genesis 3, I think the effort is totally worth it (and not just for Sakura.) Belle 6 is worth it just for her skin.
IMO Belle 6 is the Brett Hart of Daznyland. The Best there is, the Best there was, and the Best that ever will be!
Excellent! Thank you for explaining what you did - it's much appreciated! I'm really looking forward to trying this out! :)
Aight... Anybody want to test this out and make sure I have this all working
2 morphs, both found under head>face>eyes>stylized
1st sticks the default eyes where they should be (I set it up all proper so it should be at a value of either 0, or 1 you shouldn't need to set it at any intermediary values it will automatically blend with however strong you have Sakura)
2nd morph makes the iris shape oval, its optional, but gives a better look. Set it at what strength looks good to you.
There is one other thing you will probably want to do, but that I cannot share so you'll have to do yourself:
To make the iris properly big you are going to need to set the limits of the iris size morph to something more than 100%
click the gear to the left of the morph slider
select "parameter settings" and set the max limit higher to something like 200
now you can set the slider higher, but wait! the iris still seems to stop growing at 100% what is this?
Iris Size is actually a controller morph that controls 2 secret hidden morphs rather than moving the mesh itself. We need to change the limits on a secret hidden morph as well; luckily this isn't actually hard, in fact its actually pretty much the same thing we just did.
make sure you have the normal Iris Size morph dialed in a bit (this will make it much easier to find the morph its secretly controlling)
In th top left of the parameters tab click the properties (triangle and 4 lines) and make sure "Show Hidden Properties" is on
in the top of where all the morphs are go to currently used, provided you don't have a bunch of other morphs applied you should quickly find a greyed out morph called PHMEyesIrisSize_pos (alternatively you can just search for this directly)
Do the same thing with the limits you did for the Iris size morph
since you only adjusted the positive max for the iris size you only need to change the positive secret morph the other one you don't need to worry about
go to file>save as>support asset>save modified asset so these changes will be saved to the figure and you can continue dialing bigger eyes going forwards.
Than you so much for doing this for us, j. cade! :D
I downloaded and installed, the only morph I could find though was "Sakura Default Eyes Iris Oval" the other isn't showing up for me.
I think I might have found the culprit! Are you using the shaping tab? I just checked and I hadnt actually set it up so it was visible in that, whoops. I only ever use the the parameters tab, so it never even occured to me.
no what else didn't occur to me? listing the morph names. woo.
This version should work.
I'll update the original post as well (and list the morph names)
This is fantastic! They work quite well! Now one can really mix Sakura 8 in with other characters and not have the eye issue. Thank you, j cade!
Another render of Sakura 8, this time in colour. This was originally supposed to be just a quick test trying out Sakura 8's facial rigging, but it kinda got out of hand.
Postwork was done to combine the LineRender9000 passes with the main render, remove some rendering artifacts, and to add the background and effects. The background and effects come with Clip Paint Studio.
P.S The pose in my last render was a reference to the game Doki Doki Literature Club. It's the same pose Sayori has in the promotional art.
EDIT: Forgot to mention, the lights used in this render are some of the default lights from StudioMaya's Anime Doll Kit.
So anyone has an idea what's the deal with all those clothes/items that shown in promotion images? Namely the Techno backpack, Musketeer, Nurse, Jensen arms lookalike along with Short Pigtails? I imagine that they will be released soon right?
Some wonderful images in this thread, and I really enjoy looking at the different styles used.
I've probably spent more time in Daz Studio in the past two days than I have in the past month because Sakura is such a lovely figure, with so many possibilities.
Comments
Another render of Sakura 8, this time in colour. This was originally supposed to be just a quick test trying out Sakura 8's facial rigging, but it kinda got out of hand.
Postwork was done to combine the LineRender9000 passes with the main render, remove some rendering artifacts, and to add the background and effects. The background and effects come with Clip Paint Studio.
P.S The pose in my last render was a reference to the game Doki Doki Literature Club. It's the same pose Sayori has in the promotional art.
EDIT: Forgot to mention, the lights used in this render are some of the default lights from StudioMaya's Anime Doll Kit.
Excellent.
Nice work! The shaders work really well in this image — nailed it :)
Here's Sakura at about 40%, skin, G8F -> G3M morph, Toon Generation 2 hair, Arashi eyes, and a bunch of other stuff.
If I were going to do a more pure toon look I'd probably go with PWToon + LineRender9k
Would you be willing to hold my hand and explain how you got the skin to look the way you did? Love it!
Lol I like the background action more
Here is one, I used a random skin on her, Deliah G8. This character is fun.
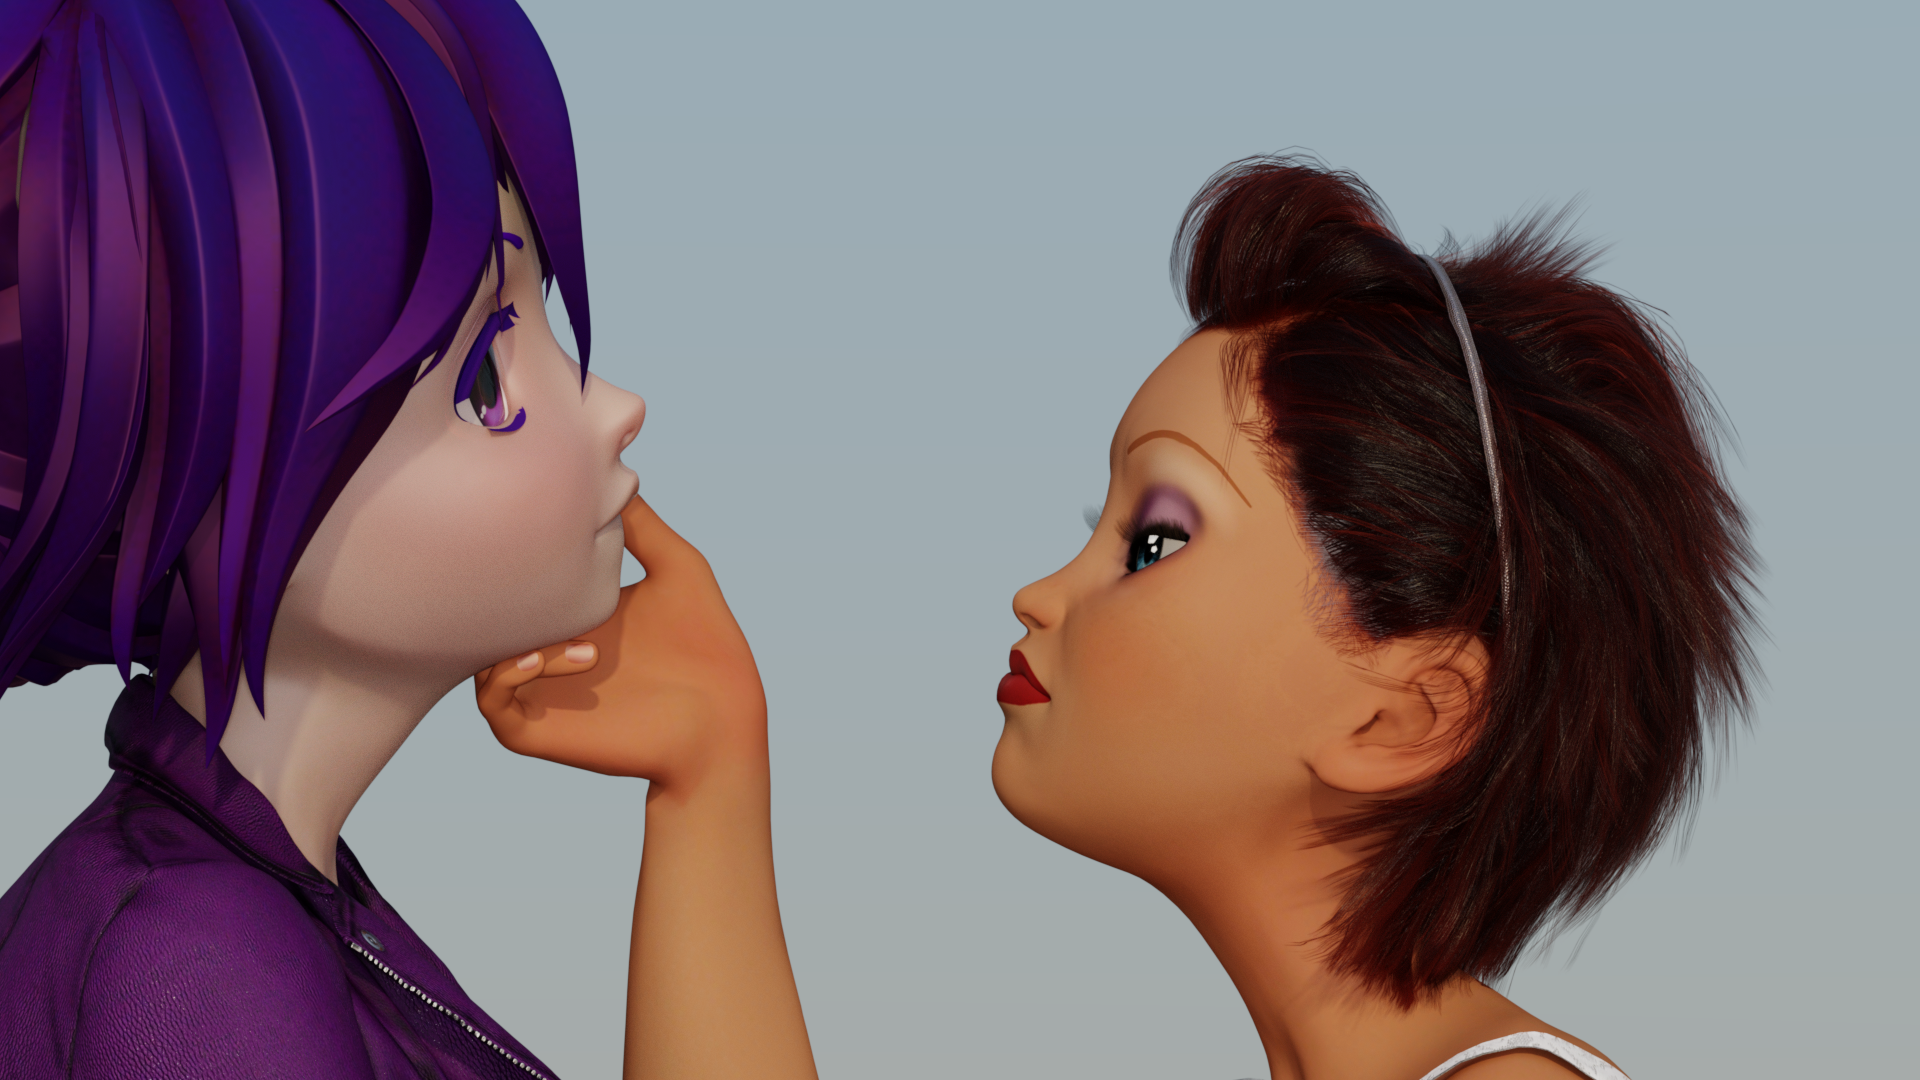
Here's a little render of Callie trying to figure out how Sakura is a replacement for her. :P
Wow. Nice. Great job. I dig it.
It's too bad she is not more of a team player. Her eyes are too much and the fact that her face looks like it could cut butter better than a knife has me sitting on the watching the fence.
Ok I just had to play a little bit... Sakura, eyes tweaked a bit (texture and material setup), my broom freebie and hair shaders... Precious Dragon wings on her back ;) Oh yeah and Ama hair for star, just parented and posed. looks lovely on Sakura :)
WOw this render is just superb and i hadn't heard of that linerender9000 either... pwToon hasn't worked for me in ages and i don't know what works for Iray anymore but thats adorb!
You're right. Lokking at the promos again, the Anime poses dress is definitely a conforming item. And it looks familiar, but I'm not placing it. Something that loose-fitting is not typical, so it's pretty distinctive.
Its this one :) https://www.daz3d.com/country-girl-outfit-for-genesis-3-female-s
Love this :D And nailed Sayori's pose perfectly lol
Aight... Anybody want to test this out and make sure I have this all working
2 morphs, both found under head>face>eyes>stylized edit: they are named Sakura Use Default eyes and Sakura Default Eyes Iris Oval
1st sticks the default eyes where they should be (I set it up all proper so it should be at a value of either 0, or 1 you shouldn't need to set it at any intermediary values it will automatically blend with however strong you have Sakura)
2nd morph makes the iris shape oval, its optional, but gives a better look. Set it at what strength looks good to you.
There is one other thing you will probably want to do, but that I cannot share so you'll have to do yourself:
To make the iris properly big you are going to need to set the limits of the iris size morph to something more than 100%
What even!? This totally looks like a still frame from an anime! Amazing!
So cute! Nicely done!!
This looks so nice, that plugin definetly works well with this.
Excellent! Thank you for explaining what you did - it's much appreciated! I'm really looking forward to trying this out! :)
He looks great, Will! :D
Than you so much for doing this for us, j. cade! :D
I downloaded and installed, the only morph I could find though was "Sakura Default Eyes Iris Oval" the other isn't showing up for me.
Here is a recent render I did with Pix Charu for Sakura 8.
I think I might have found the culprit! Are you using the shaping tab? I just checked and I hadnt actually set it up so it was visible in that, whoops. I only ever use the the parameters tab, so it never even occured to me.
no what else didn't occur to me? listing the morph names. woo.
This version should work.
I'll update the original post as well (and list the morph names)
. Can't try it now, I'm tired and computer is tied up with rendering some stuff for me. I took note of all of this thank you
This is fantastic! They work quite well! Now one can really mix Sakura 8 in with other characters and not have the eye issue. Thank you, j cade!
that honestly looks like it came straight from an anime cartoon! fantastic!!!!
So anyone has an idea what's the deal with all those clothes/items that shown in promotion images? Namely the Techno backpack, Musketeer, Nurse, Jensen arms lookalike along with Short Pigtails? I imagine that they will be released soon right?
Some wonderful images in this thread, and I really enjoy looking at the different styles used.
I've probably spent more time in Daz Studio in the past two days than I have in the past month because Sakura is such a lovely figure, with so many possibilities.