Show Us Your Iray Renders. Part VI
This discussion has been closed.
Daz 3D is part of 
Connect
DAZ Productions, Inc.
7533 S Center View Ct #4664
West Jordan, UT 84084
Licensing Agreement | Terms of Service | Privacy Policy | EULA
© 2026 Daz Productions Inc. All Rights Reserved.
Comments
welcome back to rendering :)
Isn't playing with shaders fun ?:)
gummies worked without a hitch, the hard plastic shaders require a bit of tweaking or the darker colors come out grey.
You have to eliminate diffuse because the default when you load the hard plastics is white, it greys out when you go to render. I just set the strength to 0 OR set it to like 5% and chose a lighter shade of the subsurface color (probably easier to eliminate it altogether as I didn't see any improvment by havinng diffuse strength active on these surfaces)
http://www.daz3d.com/subsurface-gummy-plastic-shaders
Thanks, Ivy! She's a great figure with which to play. :)
@Brugan Playing with shaders is uber cool! I love seeing what I can with them. :) Gummie pink looks good on The Girl!
Yeah I did
I used one from TerraDome 3
..when I tried using HDRI's I felt on a number of occasions, the "sun" provided was not strong enough. For example, the sky looks vibrant and bright like it is around 3:00 - 4:00 in the afternon, but lighting on the scene looks rather dark as if it was more around dusk. What are your tonemapping settings?
I don't recall changing anything but here's the list
Exposure value 13.00
F/Stop 8.00
Film ISO 100.00
cm^2 Factor 1.00
Vignetting 0.00
White Point Scale 1.00
White Point 1.00 1.00 1.00
Burn Highlights Per component on
Burn Highlights 0.25
Crush Blacks 0.20
Saturation 1.00
Gamma 2.20
Haven't used Iray a lot as I'm more familiar with Reality and Lux
The best way to adjust your HDRI in DS for iray is on the environment tab for iray.
Hi Matty
I learned that too increasing or decreasing the environment intensity or the environment map level can change the brightness for HDRi map . but I also found its not good for results for lighting the whole scene if you have a dark HDRi map,. i found I get much better result using the gamma settings, the more I up the gamma the brighter the whole scene becomes with out change the color spectrum of your scene or washing out your HDRi map , I use the environment settings pretty much for just custom lighting. when I'm not using HDRi for a light source. But I also will / would use the environments tab not found in the render settings but in the windows tab & place my back ground maps there and adjust lighting settings accordingly to match the background using the render settings /environment settings tab .. that has been how i got my best results using iray anyway.. , I just use the map intensity for brighten my HDRi map if it was a little dark it saves post work. but I hardly ever use the environments setting to brighten up my scene for that I still would use the gamma settings found under the tone map settings.
Good to know Ivy, thanks to sharing. I dont use HRDI much and the ones I do are well done so other then environment intensity, I have never had to mess with it.
Sharing information is the best way to learn.
The way I learned about the gamma settings was, I am always looking for a short cuts to rendering animation and was experimenting with some HDRi resources,& making my own HDRi scenes in Photoshop and was having issues with getting the sun dialed in right at first., So in reading some info I found on HDRilabs,.com on creating HDRi & adjusting the tonemapping. I was reading how gamma is used in vray in Maya. when using hdri to light your scene. which lead me to explore the render settings in daz. & i noticed the gamma settings and started fooling around with it. and found i can change my scene colors using the tone map settings and brighten my scenes using the gamma setting to light the scene without washing out my homemade Photoshop hdrI in my daz renders it was all trial and error..really..lol but helpful to know.
I like using HDRi they do saves a ton of resources & set up time and allow more room for props and etc.. so that why i was learnings how to make HDRi in Photoshop myself. so I could make running match scenes for animation.
...what about the environment settings?
...as I mentioned here and elsewhere I rarely use HDRIs save for the ambient one that Mec4D created which is great for photo studio settings. As I am unable to work in Iray View mode, I have no Idea how the dome is rotated and sun is positioned in relation to the subjects in the scene without doing a bunch of time consuming test renders.
For outdoor daytime scenes I use settings for ISO 64 as I worked a lot with Kodachrome and Ektacrhome 64 in RL which was my usual "go to" outdoor film for scenery and "beauty" shots.
Enviroment Settings
Enviroment Mode Dome and Scene
Dome Mode Infinite Sphere
Draw Dome Off
Enviroment Intensity 1.00
Enviroment Map 2.00
Enviroment Lighting Resolution 512
Enviroment lighting Blur off
Dome xyz and rotation all at 0.00
Ground Texture Scale 100.00
Ground Position Mode auto
Draw Ground On
Ground Shadow Intensity 1.00
Architectural and Caustic sampler are both on
Rendering Quality is 10.00 and Rendering Converged Ratio is 100%
Hey KK!!
The easiest way I have found to get proper sun/dome rotation if you can't do a lot of render testing is to put a chrome ball in your scene and have the camera positioned high and looking down on it and do a quick render. This will tell you where the sun is in the sky, and how diffuse it is (any clouds). For a chrome ball just put a sphere primitive in your scene, then put the silver or platinum DAZ Uber Iray shader on it. I used to do this all the time when using HDRI's in Carrara because the HDRI only shows in the render, not in preview. This can also help to determine how sharp the shadows might be from the HDRI.
Often the sun is actually quite diffuse in HDRI's due to haze/clouds, even though just looking at the image it looks very focused. The chrome ball helps to see this as well as determine orientation of the sun (which is often at an odd angle).
Nothing spectacular scene-wise. Just my latest attempt at trying to create a mature character that is identifiably older than the standard Victioria clone, yet doesn't look like your great great grandmother, or someone that life rode hard and spit out.
Got the Zev0 vascularity bundle, but need to dial it up a bit more.
Nice work nelsonsmith, you achieved what you set out to do, great character, very unique. Did you use post, it has a grainy look to it that I like.
Awesome character nelsonsmith ! Looks like the wise scientist, also would make a great sci-fi general or starship captain :)
FYI, Wear Them All for G3M & G3F are in the new sale, I'm finding pre-Iray clothes look surprisingly good with a little tinkering and help fill in the gaps in the current G3 lineup ;) Will post some screens tonight if I can stay awake after work o_O
No Post work.
I rendered several times with different light and ISO settings to try to get rid of it, but that's the way it kept coming out. LOL. I guess it's serendipity :)
I'm assuming that is http://www.daz3d.com/sci-fi-lab from petipet. His work is amazing, my only complaint is that his emissive light settings are incredibly low. I got this to help and it works wonders http://www.daz3d.com/iray-light-manager-pro You can fine-tune all the built in lighting on Iray shaded models, it has saved me a lot of frustration. Add in an emissive light set (my current favorite is http://www.daz3d.com/jm-proper-emissive-lights ) which can also be adjusted from inside light manager pro and you'll be all set :)
All the shots in my galleries use these two add-ons, even outdoor sun renders.
Yes, that is the set I used.
Thanks. I've got Iray-light-manager-pro, but I forget to use it a lot of the time.
Here's another render I did while testing out Solange, the new character @DarwinsMishap is working on. I really like how it turned out. No postwork.
Slaying the Dragon
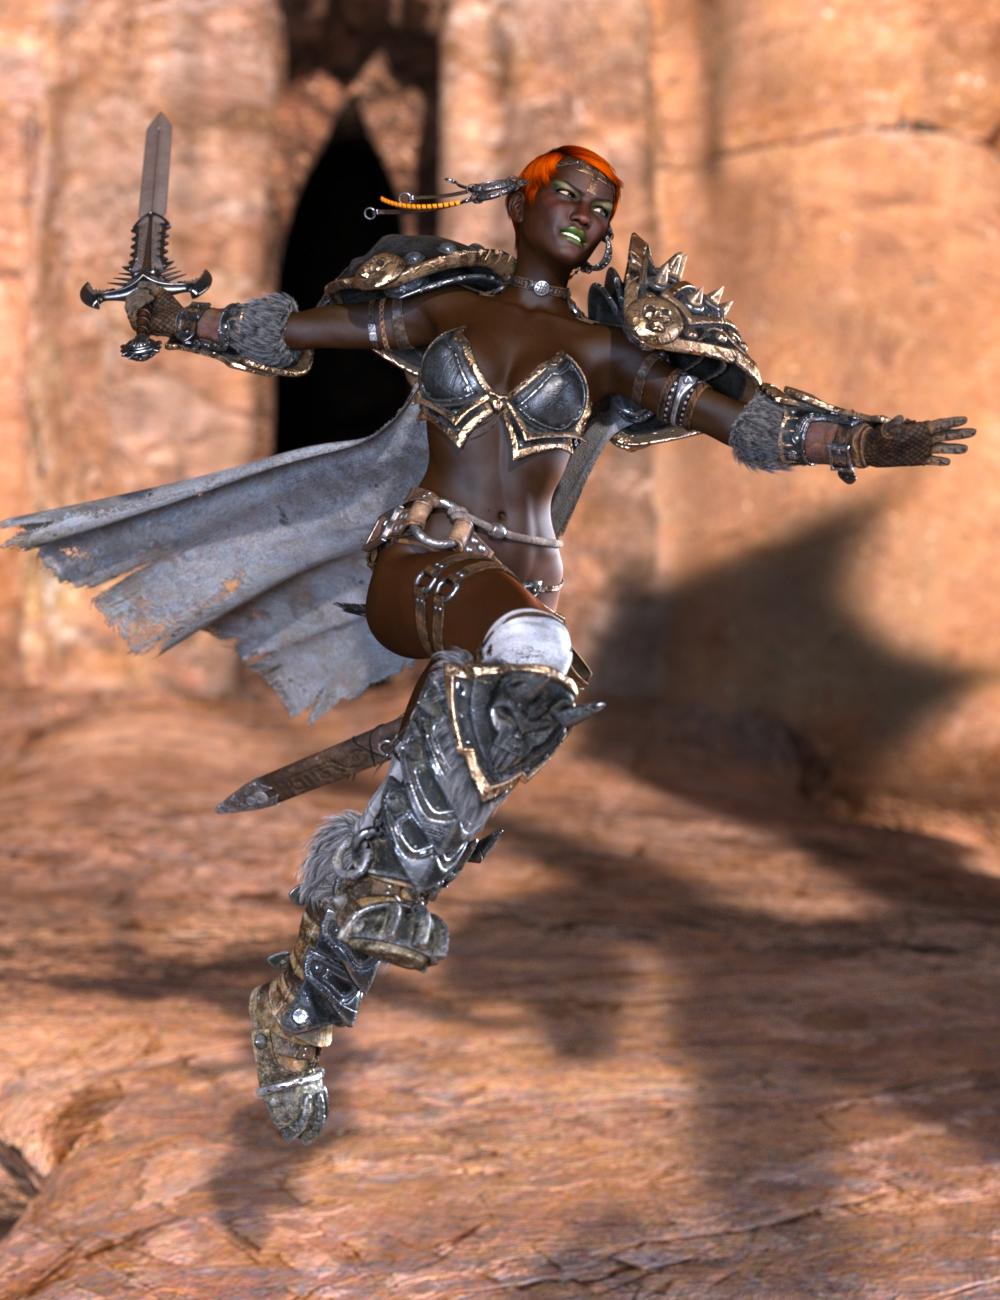
Nice pic and I like the looks of that character
Wow, the colors really pop, and the sharpness and detail of the render are fantastic!
Thanks. Yeah, DarwinsMishap has done a great job with her. I'm not sure when she'll be submitted to DAZ, but hopefully she'll be available to everyone soon. I've had a blast testing her out.
Thank you! I played with the Saturation a little bit in Tone Mapping as well as the Crush Blacks and the Burn Highlights until I got the look I wanted. I love that hair which has 3Delight textures and hit it with the Uber shader. I just couldn't match that color with anything I had for Iray. Luckily, the uber shader worked great with this one.
@Knittingmommy That is a gorgeous render, very dynamic.
Thank you!
Bring it on!
@nohiznguyen She looks ready for battle! Nice! I love her expression and the camera angle.
...those settings all look good so I'm not sure why the lighting on the foreground subjects seems so dark. Maybe try with Draw Dome turned on? Also since this is an outdoor scene I would turn Architectural Sampling <off> and since there is nothing that creates caustics, turn off the Caustic Sampling as well. That should reduce rendering time.
Maybe someone else who has worked with HDRIs more might be able to help metter than I with the lighting