-
OT, Mornington Crescent: Round 8 :- (Tudor Court Rules)
Introduction:
If you already know how to play this should be easy. Simply read the 'For players' section below to see how the game has been adapted for play on a forum.
If you don't know how to play, then it may be best simply to lurk for a while until you think you understand, at which point you're welcome to join in.Scoreboard:
In charge of the scoreboard is the lovely Samantha. I couldn't find her piano intro, so this will have to do for now
Round 1 (Original modern rules): Elephant And Castle > Holborn > Goodge Street > Chalfont & Latimer > Aldwych > Kew Gardens > Golders Green > Baker Street > Maida Vale > Dollis Hill > Upminster > St Pauls > London Bridge > Morden > Bank > Holborn > Highbury & Islington > British Museum > Mornington Crescent ... winning move played by Matt_Castle
Round 2 (Windsor abridged rules, with Lord Incent's amendment): Ruislip Gardens > Shepherds Bush Market > Cutty Sark for Maritime Greenwich > Seven Sisters > Baker Street 221b > Elephant and Castle > Kentish Town > High Street Kensington > Earl's Court > Angel > Bank > Waterloo > Mornington Crescent... winning move played by Ascania
Round 3 (Lord Knaresborough's Yorkshire variation): Blackstone Lane > Lebreton Flats (False start called due to forum auto(in)correction, restart required) Blackhorse Lane > Kentish Town > Oxford Circus> Shepards Bush > Northfields > Ealing Broadway > Cyprus > Watford Junction >Dollis Hill > Wembley Park > Kensington Olympia > Mornington Crescent ... winning move played by droidy001
Round 4 (Bog Standard rules): Hyde Park Corner > Cockfosters > Waterloo > Canada Water > Crossness > Poplar > Wembley Central > Looisham > West Kensington > East Ham > Turnham Green > White City > St John's Wood > Walthamstow Central > White Chapel > Waterloo > Sloane Square > Kings Cross > South Kensington > Pimlico> Victoria > Twyford>Paddington > Harrow and Wealdstone > Ealing Broadway > West India Quay > Uxbridge > Great Portaloo Street > Barking > Swiss Cottage > Seven Sisters > Mornington Crescent ...winning move played by Chohole
Round 5 (Marquess of Tunsberry rules, abridged, with the Highland Corollaries): Vauxhall > Acton Town > Cowcaddens > Ibrox > St Enoch > Harrow & Wealdstone > Gorbals > Barbican > Sloane Square > Victoria > Mornington Crescent ...winning move played by Richard Haseltine
Round 6 (Crwssynt Morgantonio LLwdiu variation): Tower Gateway > Euston > Banc > Charing Cross > Harlesden > Eliffant a Castell > Capel Gwyn (Whitechapel) > Baching > Llanfairpwllgwyngyllgogerychwyrndrobwllllantysiliogogogoch > Shepherd's Bush > B(r)econ[tree] (Beacons) > Pontarfynach (Devil's Bridge) > Angel > Heathrow Terminal 5 >Llandudno Junction > Amersham > Clogwyn> Beddgelert > Pontrhydyfen > Llanwrtyd Wells > Caerdydd Canolog [Cardiff Central] > Hobbs End > Hickory Road >Timbuktu > Darjeeling > Earl's Court > King's Cross > Mornington Crescent ... winning move played by 3DCheapskate
Round 7 (Calvin's Presbyterian version, 23 June 1907 edition): Archway > Holborn > Arsenal > Tufnell Park>Hyde Park Corner> Hounlsow Central>Archway>Monument>Archway>Stepney Green>Morden...
(somewhere around the Stepney Green>Morden move we seem to have slipped onto an alternate timelime due to the quantum meddling)
Round 7 (Calvin's Presbyterian version, 23 June 1907 edition) alternate timeline:Pimlico > Ickenham > Elm Park > Arnos Grove > Ladbroke Grove > Dagenham East > Oval > Ruislip Manor > Stepney Green > Morden > Plaistow > Wembley Central > Lyon Park Avenue > Alperton > Tooting Bec > Regents Park > King's Cross > Oxford Circus > Elephant And Castle > Monument > Barbican > Farringdon > Archway > Mornington Crescent ... winning move played by ChoholeRound 8 (Tudor Court rules): Tower Gateway >Tooting Broadway > West Croydon> > Lambeth North > Maidenhead > Earl's Court >Park Royal > High Street Kensington > Parsons Green > Regents Park > ...
Guidelines (not rules) for players:
0) We're probably playing by the original modern rules now Different rulesets may be used for each round. Details of the ruleset(s) in use will (probably) be found in (or near) the post containing the first move for that round
1) The major change to the standard original modern any rules is that there is no particular sequence in which players make their moves.
So basically whoever posts next is considered to have made the next move (Rule Guideline (3) (4) is intended to resolve conflicts in this regard, but probably won't)
However, no player is allowed to make two consecutive moves.2) Discussion and comment is encouraged, but not mandatory. For this purpose both players and non-players are welcome to post without making any move.
3) When making a move, please include the full sequence of preceding moves in your post (to counter the problem of two or more people posting responses to the same moves), and ensure that your actual move stands out in your post. I suggest a separate line using the 'Heading 1' format (from the drop-down above the edit box that has 'Normal' as the default), but maybe bold, a bright colour, or anything that clearly differentiates it from normal, humdrum, everyday text will suffice. This is so that moves can be easily picked out from general chit-chat. Here is an example move:
~ ~ ~ ~ ~ ~ ~ ~ ~ ~ ~ ~ ~ ~ ~ ~ ~ ~ ~ ~ ~ ~ ~ ~ ~ ~ ~ ~ ~ ~
Elephant And Castle > Aldgate > South Harrow > Marylebone
Liverpool Street
I bet you weren't expecting that !
~ ~ ~ ~ ~ ~ ~ ~ ~ ~ ~ ~ ~ ~ ~ ~ ~ ~ ~ ~ ~ ~ ~ ~ ~ ~ ~ ~ ~ ~4) If two or more people post responses to the same move, then the one that appears first in the thread (after any thread turbulence has settled) is counted and the others are ignored. If you have posted a move that is ignored according to this rule guideline, please do not delete it - simply use the strikethrough format (the 'S' button next to the bold 'B' and italic 'I' buttons above the post editing box at the left) on your move.
4a) (The 'fait accompli' amendment to guideline (4)) If two or more people post responses to the same move, thus invoking guideline (4), but somebody posts a follow-on to one of the aforementioned multiple responses to the same move that would not have been considered the legitimate next move, then that illegitimate next move forthwith gains legitimacy.
5) Invalid moves must be challenged before anybody makes a follow-on move. If a follow-on move has already been made then the challenged move stands, regardless of its validity. If a move is successfully challenged then play is paused until a nominated 'responsible adult' rules makes a decision on the validity of the move. Discussion of the validity of a challenged move is highly encouraged, and sufficient time should be allowed for the cases both for and against the challenge. Invalid moves will be redacted in the same way as ignored moves in rule guideline (5), i.e. by using strikethrough on the move, not deleting it.
6) All guidelines are purely guidelines and can be ignored at will.
So let's get started. I'll kick us off with a classic opening move...
Elephant And Castle
[Released] ManFriday's Mesh Grabber [Commercial]I've got another example for the thread. This is the Vintage Leather Jacket, and the changes took me about an hour to do, but this was my first real test of the tool, and there were a lot of little tweaks… and some do-overs. These images were created for this thread, with before and after comparisons in both viewport Smooth Shaded draw mode and Iray renders. All image link to the full-size image and open in a new window/tab.
Here are the Before images:


And here are the After images:


The original image is here, and the followup image is here.
In the original scene, I added a dark gray to the shirt materials, but left it off for these comparisons, so it's easier to see the changes. The three biggest problem areas were
- the right bottom of the jacket where it intersected the leg instead of bending with it. I used MG to move it to the side. (Where it looks awful, to be honest, but isn't in the camera view.)
- the left side where the jacket intersected the weapon, rather than conforming to the shape.
- and on both sides, where the arms of the jacket intersected with the sides of the jacket.
One of the reasons it took so long to make changes with MG is I had to raise the arms in order to move just the sleeve or just the side of the jacket. So I'd move the arm up, tweak, then move it back down. I did that repeatedly until they didn't intersect. I also had to make very small adjustments to remove any stretching/contracting of the zipper. Had this been the central character of the original scene, I probably would have spent twice as much time, doing a lot more small tweaks.
This jacket is a perfect example of something that will be faster and easier to modify when rotate and scale are part of the tool.
[Released] Props & Poses Converter from Genesis 3 Female to Genesis 8 Female [Commercial]I got a problem. The script runs but it doesn't convert anything.
Here's what appears in the script log:
07:53:44 GMT-0600 (Central Standard Time): Executing Script
07:53:44 GMT-0600 (Central Standard Time): Selecting Preset: D:/!PROJECTS & INSPIRATION/!Projects/Project 7 - Random Action Adventure/People/Genesis 3 Female/Clothing/Darkshade/Hand Poses/Darkshade Sai Hand Pose L.duf
07:53:44 GMT-0600 (Central Standard Time): Converting prop or pose from D:/!PROJECTS & INSPIRATION/!Projects/Project 7 - Random Action Adventure/People/Genesis 3 Female/Clothing/Darkshade/Hand Poses/Darkshade Sai Hand Pose L.duf to D:/Converted Daz Content/!Converted Props/G3 to G8/Darkshade/Hand Poses/Darkshade Sai Hand Pose L.duf
In the DAZ Studio log, I noticed this at the end:
2020-02-11 07:53:45.828 WARNING: ..\..\..\..\..\src\sdksource\general\dzscript.cpp(1178): Unhandled error while executing script.
2020-02-11 07:53:45.828 WARNING: QScriptEngine::popContext() doesn't match with pushContext()My output folder is empty. Any thoughts?
Could you post the full log of the conversion? Something went wrong but it is hard to tell from this.
How to change the background color?Something interesting happened yesterday. The central screen, the one with the grid and where you work on your image, is usually grayish in color. Now it's bright white and it bothers my eyes. How can I change it back? I have no idea how it got itself changed.
[Released] Props & Poses Converter from Genesis 3 Female to Genesis 8 Female [Commercial]I got a problem. The script runs but it doesn't convert anything.
Here's what appears in the script log:
07:53:44 GMT-0600 (Central Standard Time): Executing Script
07:53:44 GMT-0600 (Central Standard Time): Selecting Preset: D:/!PROJECTS & INSPIRATION/!Projects/Project 7 - Random Action Adventure/People/Genesis 3 Female/Clothing/Darkshade/Hand Poses/Darkshade Sai Hand Pose L.duf
07:53:44 GMT-0600 (Central Standard Time): Converting prop or pose from D:/!PROJECTS & INSPIRATION/!Projects/Project 7 - Random Action Adventure/People/Genesis 3 Female/Clothing/Darkshade/Hand Poses/Darkshade Sai Hand Pose L.duf to D:/Converted Daz Content/!Converted Props/G3 to G8/Darkshade/Hand Poses/Darkshade Sai Hand Pose L.duf
In the DAZ Studio log, I noticed this at the end:
2020-02-11 07:53:45.828 WARNING: ..\..\..\..\..\src\sdksource\general\dzscript.cpp(1178): Unhandled error while executing script.
2020-02-11 07:53:45.828 WARNING: QScriptEngine::popContext() doesn't match with pushContext()My output folder is empty. Any thoughts?
Critique, please.Images, just like stories, tend to work better when they have a central focus. In a story, it is the protagonist, in an image, its the subject. The disparate characters in your current image lack a focus. And as you explained that's exactly the intent, but what it is missing, it the main character, which may actually be the writer overseeing the scene or scribbling or typing intensely within the scene.
Endlessly ongoing... playing cards/casino chips/coins/banknotes scatter... hiatus time (still)Just a quick proof of principle for a simple stack of chips - 96 vertices. The thickness of the intermediate chips is wrong (the central texture was done manually, quickly, and sloppily). The top and bottom map as per a single lo-res chip. There's also a simple bump map for the central texture to make it look more like astack of discsrather than a solid cylinder.
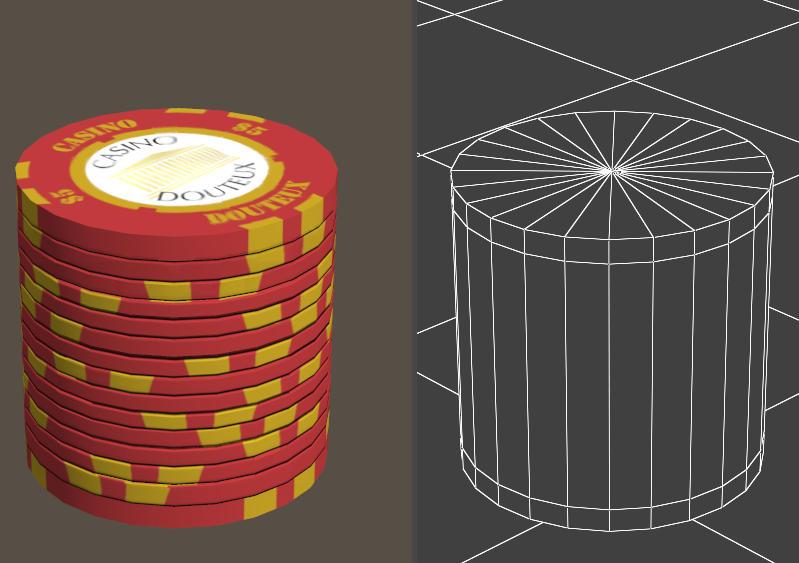
And if I added a morph to raise all the vertices for the top chip, then you could use it as a stack of however many chips you wanted simply by scaling and tiling the central texture vertically to match the morph.
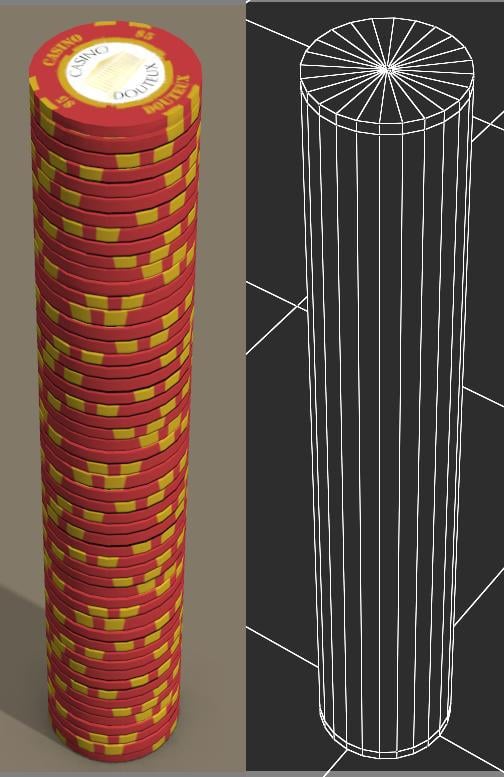
Yes, that works.

And I don't really notice the texture repeating four times up the side of the stack,which it does since my scale factor was 0.25.
And I recall from my books project that in a DS prop I can slave a Surfaces value to a Parameters value, so this can probably be automated, assuming it applies to morph sliders too. In a Poser prop I'd have to resort to Parmatic.Of course, for a less tidy stack with chips offset from centre it's probably best/easiest to use separate chip meshes and a constrained Blender physics simulation. But I like this idea.And I should be able to get the vertex count down further to juse just 50 vertices, i.e. a simple 24 vertex cylinder, exactly the same as the lo-res chip.
Endlessly ongoing... playing cards/casino chips/coins/banknotes scatter... hiatus time (still)Google found some more Casino de Montreal chips for me and I've used them as a basis for Casino Douteux...
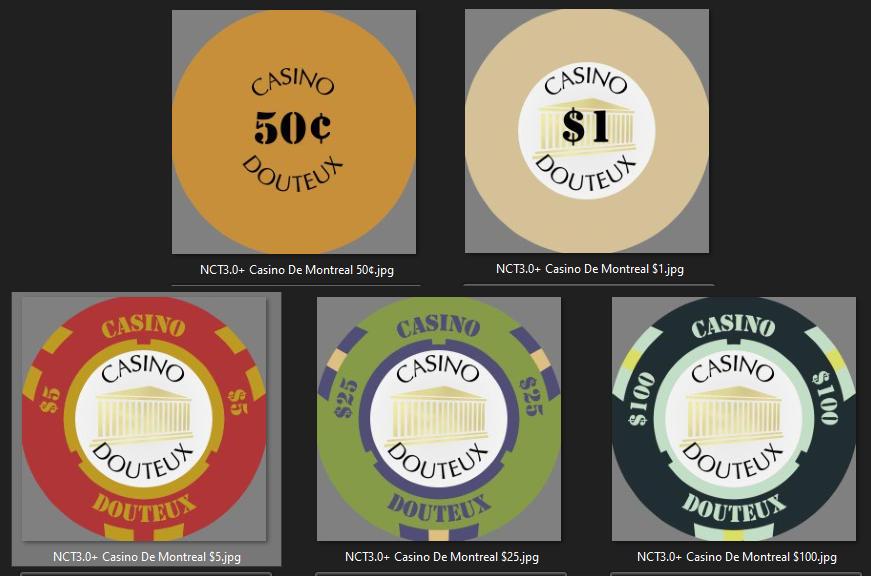
These are the only values I've found images of (except for a $2.50 which I'll be doing a version of as Ilike the colours). The colours were mostly picked from images with GIMPs eyedropper thingy. I've attached a screenshot of thumbnails of the reference photos for comparison.
Question (for Casino-goers): Would the different value chips for a specific casino at a specific point in time all have the same label design (as I've done for the Casino Douteux - except the 50¢ one),or would you see a mix of different ones, like in the reference photos?
I think I also need a bump map since the central label is distinctly depressed (not much, but it's obvious),and the 50 cent chip has six four-leaf clovers embossed around it
What if Blender could seamlessly render Iray materials?Blenders shader node system is central to it's renderer..... Those unwilling /unable to use it, should not attempt to use blender for rendering IMHO. ...my new Genesis 2 /FBX to blender pipeline won't involve any third party single point of failure plugins.... I LOVE the powerful Blender node editor.Obscure question regarding a robot I'm working on.Hey!
I've been taking a stab at building a 'retro' robot of sorts for Daz Studio that is sort of a homage to 50's sci-fi, although it's more of a true robot than a man in a robot suit. I'm actually fairly far along already, with a few motors and assocated gearing placed internally on the arms and hip joints I've designed so far.
Anyways, one of the things I'm focusing on is having working gears that rotate with the joint movement. 4/1 ratio on the gears to keep the math simple, so 'pairing up' the morphs to move in unison, with 4 revolutions to 1, shouldn't be that hard to do, from what I've read. I've personally never attempted to pair two morphs before, but the instructions I've read seem to indicate it's not all that hard, as people do similar with car steering wheels vs front wheels, etc.
So my question is related to how I'm putting together the robot. Right now, I'm just parenting the various limbs/parts manually using a tree structure, as opposed to building a single figure. Using the Joint Editor, it's pretty easy to 'zero in' the pivot points, and it's working quite well. Of course, this means that we aren't talking a single figure, rather an assortment of parts in a 'tree' structure, but I don't want the parts to deform as they move, I want them to be fully rigid. It's pretty easy to rename x/y/z controls to appropriately descriptive titles, and to 'lock' parameters that normally shouldn't be adjusted once the limbs have been placed. It's also pretty easy to 'limit' the range of motion for the parameters, so that you don't have elbows embedding inside of shoulders and such.
Most of the time the gearing won't be fully visible, so it should be fairly easy to hide the parts that aren't visible to keep unnecessary raytracing to a minimum. I'm thinking that people might want to use semi-transparent materials occasionally as the limb shell material, which would make the gearing visible, plus I'm planning on including a few removable access panels into the design. This would be useful for say animation purposes.
I also want to encourage disassembly to a degree, say if someone wants to work with an arm separated from the rest of the robot, on a separate workbench in a repair/maintenance type of scene, or maybe if someone wanted to show a robot assembly line or something.
Wiring may prove to be a bit of a challenge, but I'm not that far along yet. Thinking along the lines of Molex connectors for the joints, with separate male/female connectors when disassembled, or maybe a kludge along those lines. The wiring will be mostly fixed to the shell, and passing through the fairly rigid pivot point to get to the central power source and such. As I noted, the joint interactions will be the challenging part to work out wiring wise.
I suppose I could create a 'Landmate' style implementation of this idea in the future, for those that are familiar with the Landmate concept from Appleseed, but one thing at a time...
Anyways, kack to my question:
Are there significant downsides to the 'tree' approach with multiple parts as opposed to a siingle model that I may be missing? Most figures I've seen are based on a single .obj in most cases, with various morphs applied, but I'm not seeing any particular upside to that in this particular instance. Fitting clothing to said robot, if someone wanted to do that, would be one downside I can think of, but as a metal automaton I don't see people dressing him up a lot. Scaling translating to sub-tree items on the heirarchy tree could be another, for those that want to tweak things, but as the parts need to stay 'rounded' for rotation purposes, individual x/y/z scaling might be problematic in any case.
On the flipside, modding for example a limb part in say Hexagon, in order to stretch an arm length without deforming the pivot point, might be easier if the parts are separated already. Also, I want to make it easier to swap out say an elbow for a weapons attachment, or feet for treads, or to allow people to design their own attachments to use with this robot. Moddability is something that I want to encourage with this robot.
Thoughts? Suggestions?
Dain 8I... acutally... LIKE this bundle.
The core character? Solid as a rock.
The secondary characters? Diverse enough that with the three of them you can do a lot. They're entirely different characters not just different takes on the same theme. Outstanding.
The hair is good and solid. The Samurai cut is a bit of a strange choice I'll admit but still has a military feel I guess. The military cut is perfection.
The clothing is also spot on and the only complaints I could have are ones of personal taste. Not too hip on Mass Effect/Halo armor asthetic , but again that's a matter of taste not a complaint about workmanship. The bouncer suit is a strange choice IMHO as the rest of the pack seems rather military, it isn't entirely out of theme (tough guy) and I can see a dozen or so practical uses for a big-guy suit so no complaints here.
The poses are... poses. I tend to glaze over those. There are so many that they tend to blur into eachother over time (no offense to our pose gurus!) but they fit thematically.
As a whole... this is the best Pro bundle I've seen in a good long time and a gold standard of what bundles should look like: Everything is clearly made to top standard with nothing that looks lazy, very well set around a core central theme rather than just tossing together what seems like a random set of outfits, and with a diverse set of characters that completely avoid looking... samey.
A+++
Yeah
 and I did get excited when I spotted the uniform on https://www.daz3d.com/griff-hd-for-dain-8 until I realised it's the old https://www.daz3d.com/military-dress-uniform-for-genesis-3-male-s-and-genesis-2-male-s which I already have
Easily converted to Genesis 8 Male so all it means is you don't have to buy something new! ;)
I haven't even looked at the bonus items. The clothes and characters sold me immediately. A polynesian character??? A flight suit that actually looks like something in practical use today? The Bouncer suit WITH wired earpiece and matching poses?? Oh yes, this one is going in the cart..
There's a reason I was gushing over the secondary characters. ;)
And I really didn't notice the earpiece... noice.
Ollie is the only male with somewhat normal proportions.
What.
Contest~~ Winners Announced! Because I Said So! ~~ Dec 2019 / Jan 2020 OOPS!@LaPartita I laughed out loud! Glad you made it into the contest in time.
There's about an hour and a half before Daz Midnight (1pm Central, my time.) Deadline strictly enforced, to be fair to those who entered on time.
Helpful Blender Scripts - shapekey transfer and material slot combinerHi, thanks for this contribution. If I understand correctly, the first script would be extremely useful with the way that the Diffeomorphic plugin works, which sometimes results in many identical materials with the same same, e.g. material.001, .002, etc...
That's great! The original idea of the script was to just combine material slots, remove the unused ones, and rename some annoying long ones, but you are right. You should be able to enter the names of the material slots with the .002 on them and instruct the script what you would like them to be named instead. Save and run the script anytime you need these changed.
Will you put this somewhere like GitHub? I have some scripts I use to re-texture objects imported via Alembic; we could grow this into a suite of useful Daz-To-Blender tools...
I was originally thinking Github but I wasn't sure anyone would bother going there, downloading or copying the scripts, and trying them so I put it right in the forum to make it as easy as possible.
Having a central place for these little helpful little scripts and fixes would be great, maybe with a link back to the Daz forums for discussion and updates.
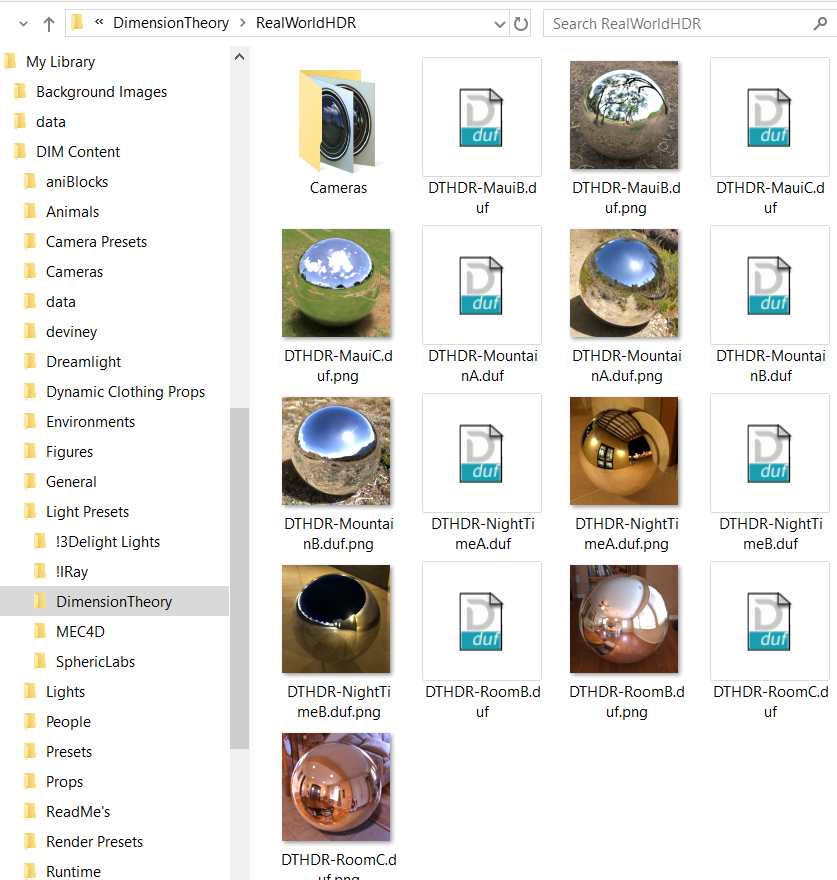
Setting New Default Render SettingsIt's not just the icons that are missing (central !), the files themselves are missing (! at lower left). Either the fles have been moved or their content directory s no longer selected as a current content directory. What s the path to the actual files on disc, and what are your content directories?
They are still in the folders where DIM installed them. The odd thing is that a couple of them are recognised but the rest aren't (in this example). The screenshots are not big enough to show all my presets but there are many more where it shows a couple but not the rest of the files in the folder.
 Setting New Default Render Settings
It's not just the icons that are missing (central !), the files themselves are missing (! at lower left). Either the fles have been moved or their content directory s no longer selected as a current content directory. What s the path to the actual files on disc, and what are your content directories?
GPU to CPU, (it's not going away anytime soon)compared to my small and humble setup with a 2080 Ti in it.
LOL, is that setup in your very modest and humble four bedroom, five bathroom Central Park penthouse too? ;)
I haven't read this whole discussion, but has anyone mentioned the workaround we talked about in another thread?: do not adjust surface settings while in Iray preview mode, that will revert even a humble 2080ti to CPU.
Nix 8what's the best way to fix Nix's nipples. They seem a bit too flat and large.
Maybe substance painter?
If it's just the texture, you could edit it with Photoshop or any other image editor that can use layers like GIMP. The nipple texture is in the central part of the torso map, there's no need to worry about seams. You also have to edit the SSS, bump, and normal maps too.
I've not used Substance Painter, but I have edited textures similarly with GIMP.
39th Bryce Render Challenge Theme is "At this Time of the Year"i live on the south coast of Australia the central point where the fires are....it is not as bad as the media are making it out to be, sure there are fires....but! ...not even close to the danger level it has been portrayed as :) ...we have these kind of fires every single year!!! :)
New rig almost ready but wondering about the benefits for DSA Ryzen 7 3700x with my already purchased not-so-long-ago gtx 1070ti. I plan to add DDR4 ram frm 16go to maybe 32. I know that, of course, the graphics card is central to this and that to make a real leap I'd need to get something more powerful than the 1070ti, but knowing that I am already using that same card on my current intel i72600K with 32go of DDR3, am I likely to still feel a really noticeable improvement in rendering speed with this new configuration?
ingenuities?For a quasi-eliptical orbit, let's say you begin with the sun:
With the sun in the center of the scene, insert a target helper
- Drag Mercury out to where you want it to orbit and parent it to the target helper
- with Mercury parented, move the target helper slightly away from center
- Add a new target helper and parent Mercury's target helper to that
- Repeat these step for each planet you want to add, giving each planet's main (center) target helper a bit of rotation to spread them out in orbit
- Begin having them orbit the sun by selecting all of the central target helpers and rotating them together at the last keyframe
- Deselect the furthest planet's target and rotate a little more and repeat for each planet's target, so that Mercury (or the closest planet to the Sun) orbits a little faster than the next, but quite a bit faster than the last.
While not true-to-science, it still should look pretty cool, and have a slight off-center to each orbit. Using the target helpers, you can exaggerate the wobble if you wish
Use these same steps to set up any moons you want orbiting their planets
TIP: Never use glow channel for the actual surface of a planet. It's just wrong. The sun... definitely. Then set the sun to not recieve or cast shadows and place a bulb light in the center - make it really bright for a vast distance. Maybe start with 330 brightness and adjust from there.
This will give a fair representation of how it actually works, but sometimes we don't truly want how things really are, which is when we start enhancing things. But try setting the Sun's bulb light to do everything on its own and see what happens. Depending on the scale of things, I'd also give the bulb some soft shadow and find a place to render where a moon is casting a shadow onto its planet to adjust the radius of the soft shadow. The soft shadows should be set small enough to still allow a moon to cast a shadow on its planet, but large enough so it's not casting onto any other planets.
Good luck with your experiment!
Daz 3D is part of

Connect
DAZ Productions, Inc.
7533 S Center View Ct #4664
West Jordan, UT 84084Licensing Agreement | Terms of Service | Privacy Policy | EULA
© 2026 Daz Productions Inc. All Rights Reserved.