July, 2021 - Daz 3D New User Challenge - Portrait Rendering and LIE
 Kismet2012
Posts: 4,252
Kismet2012
Posts: 4,252
New User's Challenge - July, 2021
Sponsored by DAZ 3D
Are you new to the 3D World? Are you at the beginning stages of learning 3D rendering? Have you been around for a little bit but feel you could benefit from some feedback or instruction? Have you been around awhile and would like to help other members start their creative journey? Well then come and join the fun as we host our newest render challenge!
New this year, we are breaking down each month into 2 different challenges. A Beginner Challenge and then also an Intermediate Challenge.
So which "Challenge" should you choose?
Follow the Beginner Challenge if you are:
- New to the New User Challenges
- New to Daz Studio
- Newer to 3D Rendering in General
- Or if you have not participated in the February Lighting Challenge
Follow the Intermediate Challenge if you have:
- Participated in the New User Challenge for awhile
- Know the basics of Daz Studio and would like to learn more in depth topics
- Been using 3D Rendering Applications for awhile and feel comfortable with learning Intermediate Topics
- Or if you have all ready participated in the February Lighting Challenge
*Please be sure to list in your post which Challenge you are participating in*
Closing date for both is July 31, 2021
For a list of the current challenge rules, please see this thread: Challenge Rules
They apply for both versions of the challenge.
Daz 3D is part of 
Connect
DAZ Productions, Inc.
7533 S Center View Ct #4664
West Jordan, UT 84084
Licensing Agreement | Terms of Service | Privacy Policy | EULA
© 2026 Daz Productions Inc. All Rights Reserved.
Comments
Beginner Challenge - July, 2021
"Portrait Rendering (Expressions and Lighting)"
This month's focus will be Portrait Rendering, with an emphasis on the character's expression and lighting. Portraits are the way we show off the unique aspects of each individual. Expressions should convey their personality. Good lighting will enhance your portrait and set the mood. Portraits don't have to look like yearbook headshots. Get creative, hone your skills, and have some fun in this months contest.
A portrait is a representation of a person, group of people, or even a pet, that displays the expression, personality, and mood of the subject. The focus of a portrait is usually the subject's face, although the entire body and the background or context may be included. Depth of Field is often used to blur the surrounding environment to draw the eye to the subject.
Inspiration:
Portrait Tips and Examples:
Tips for good portrait photos
Google Search - Portrait Expressions
Lighting:
Portrait Lighting Patterns
Mastering Lighting in Blender (The first 25 minutes of the video are basic lighting theory and insights.)
Other Helpful Links:
When following tutorials, be cognizant of the different applications (Bryce, Daz Studio, Poser, Carrara, Blender, etc.) and different render engines (3Delight, Iray, Reality, etc). Techniques for one may not apply directly to another. If you have some favorite portrait lighting and composition tips, please share them in this thread.
Composition Golden Ratio helpers:
Bryce
DAZ Studio (Also, DS has a built in Rule of Thirds guide; just select Show Thirds Guide in the Viewport context menu)
Rule of Thirds Guide in Daz Studion
Lighting Tutorials:
Tutorials by Szark (Credit is given to Szark for this wonderful thread with links to many tutorials.)
6 Tips for Better Lighting - Blender Guru (Most is general lighting tips, not Blender specific)
Creating And Lighting A Scene With Iray In DAZ Studio
Dreamlight Lighting Video Tutorial (currently free in Daz Store)
Creating Eye Reflections with Reality Poser Edition Part 1
Creating Eye Reflections with Reality Poser Edition Part 2
Carrara Chapter 14: Setting Lights
Bryce Artist’s guide page 123
Great Lighting for Dark Backgrounds
Perfect Lighting for a White Background
High Key Portraits: Take and Make Great Photography with Gavin Hoey
Low Key Portraits: Take and Make Great Photography with Gavin Hoey
Laws of Light: 5 Portrait Lighting Setups
Some good information on useful portrait cropping
https://digital-photography-school.com/good-crop-bad-crop-how-to-crop-portraits/
The Rule of Thirds in 5 minutes | Creating More Dynamic Framing
And of course its always a good idea to check the portraits contests from the last years:
July, 2020
July, 2019
July, 2018
July, 2017
July, 2016
July, 2015
Intermediate Challenge - L.I.E. (Layered Image Editor)
What is the Layered Image Editor?
The Layered Image Editor (LIE) allows you to create, open, edit, and save DAZ Studio Layered Image (DLI) sets (*.dsi). A DLI is a composite of image layers into a single Studio material file which can then be applied to an object's material zone in Studio via the Surfaces tab. DLIs can be composed of any image file format supported in Studio (i.e., TIFF, PNG, JPEG, etc.). In addition, DLIs can contain other DLIs as part of its composition. The images composing the layers are not modified as the DLI file contains the pathname to the files and the opacity and blending information.
The DLI format provides a way of combining images without modifying the original images. For example, a tattoo could be available as an option on a figure. Usually, this might require separate texture maps for each skin color plus an extra set of maps with the tattoo. Using the LIE, a DLI file could be built layering the tattoo over the skin maps and the resulting .dsi file added to the material file to load via a MAT pose file. The original skin map can then be applied to the figure without the tattoo or with it, all without having to create two texture maps.
L.I.E. Video Tutorials
Caution: Nudity
German Language Tutorials
( uses GIMP )
Creating a LIE Overlay Preset in DAZ Studio PDF Tutorial
Using LIE (Layers Image Editor) in DAZ Studio 4.5
Forum Threads
https://www.daz3d.com/forums/discussion/19670/how-do-i-use-layered-image-editor-lie
https://www.daz3d.com/forums/discussion/191661/how-to-save-a-layer-image-editor-l-i-e-preset
Intermediate Challenge (LIE)
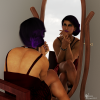
Title: Ignition
First entry for this month; feedback appreciated!
NAE
I just realised it had been one year since I started posting in the new user contests (having had Daz a month longer.) The first images I did were of a pair of school friends. As I wanted to see how I had improved on my journey, I decided to create a new scene with a similar theme. Not really intended as an entry at all, but wanted to show the two here. Partly for my own sake and partly to encourage other people to have a go at these contests if they are new. They really help and I feel I have learned so much. Now, let me look into this L.I.E. thing...
Togetherness (Gallery Image)
Hi, great start to the month! I do love the colour scheme of the whole work here. Only thing for me is that I feel the background lighting effects somewhat over power things. It makes it harder with the brightness of that to pick out the L.I.E. work on the character, so maybe alittle tweaking of that?
@aprilshowers2065 I agree with Alias52, the background is distracting; I think adding depth of field will do the trick and make the character stand out more. The sqare-ish thing he's sitting on also doesn't blend in too well, I'd replce it with a round base if it isn't part of the environment. As far as the character goes, it turned out great.
@Alias52 Re-doing an old work is always a good idea to gauge your progress; haven't been in this hobby long enough to do it yet, but it's something I enjoyed doing in other areas. I hope your example inspires others to join in and persevere.
Ryker Tattoo
This is the first version of my entry for the Intermediate challenge. I used a Zodiac Font to make the tattoo
This is a great start. I am guessing you used the LIE on the floor? Or is it his skin?
Great intensity in his eyes.
It is amazing how quickly the time flies by. And how far we progress without realizing. You have created a wonderful 2nd portrait.
Just an FYI. When posting an example image in a challenge or contest thread it is a good idea to mark it NAE (Not An Entry).
Ah, apologies. I had not made that clear enough!
This is a great start sueya. Are you planning on adding more tattoos?
Not sure where I'll go with this, but here's my start.
Thank you for all the suggestions and comments! @ioonrxoon the square 'base' he's on is actually part of the texture I was using for the floor; I've tweaked it a bit so it's rounder. Also added the flame to his hand because I thought it looked neat. @Alias52 I've tried toning down the brightness of the background and using DOF like ioonrxoon suggested to lower the intensity; I've included both versions. @Kismet2012 I used LIE on his skin; the floor pattern is actually an emissive map I added to the original texture, so I'm not sure if that counts as LIE.
This is my first time using the LIE. I feel like I'm struggling getting my skin to be lit properly, though. I've done a tattoo and also did a second layer of wet skin (basically downloaded a rain texture and applied it onto the G8F templates), but the light just isn't showing it as glossy enough. In fact, it just makes her look like she's wearing glitter. Or maybe it's the render settings? Any pointers/tips (or places I can find)? (Ignore the baldness and the shirt/bench pokethrough, I'm working on that still)
This is a great start. The figure's front is lit up nicely. The DOF helps him to stand out.
Suggestions would be to add some rim lighting to help separate the figure from the background.
His armour looks like it has some wear in spots. However, it has a shiny surface that seems a little out of place. Perhaps adding some grime or scratches using the LIE or turning down the glossiness in the Parameters tab.
Not sure how his target is but that gattling gun means business.
Not LIE but I found this useful for water droplet skin. Get a wet and a oily looking skin for figure with anagenesis shader added - Page 2 - Daz 3D Forums I used it on my Walker in the Rain picture to get an idea of what even a first try looked like.
I do know what you mean about the LIE...
Toning down the background light is reducing the blur on the symbols in the floor. Is the floor emissive the only source of light? I see a highlight on the arm raised for the eagle and a brighter spot of light on the knuckles of the fisted right hand. This makes me think there is a light source off to our right?
A soft light or reflector might bring out the details of the great LIE work.
Worth knowing about - thanks! I'll check into this.
I see some noise in the image. Are you using an HDRI for lighting?
This video tutorial on Tone Mapping could be helpful.
This is an older video tutorial by SickleYield:
This is a written tutorial that goes with SickleYield's video tutorial: https://www.deviantart.com/sickleyield/journal/Tutorial-Lighting-and-Tone-Mapping-In-Iray-531864617
This tutorial on render settings could be helpful: https://renderguide.com/daz3d-render-settings/
Hopefull some of these will be helpful.
I AM using an HDRI. Thanks for the tutorials. I'll check those out!!!
Version B here. Converted the textures on his outfit to IRay going for a used steel look on most of it, the rest were converted to leather. I also located some serfaces that could be used as light sources and converted them to try and help the lighting.
On a differant note, my laptop that I use for my rendering has started acting up this week, things like shutting down by itself and things like that. Hopefully that'll not get in the way of me working on this more this month, but we'll see what happens.
Oh no. I hope the laptop doesn't cause you too many problems.
I didn't notice the bullet casings falling from the gun in your first image.
Some rim lighting will help your figure stand out from the background.
All the emissive lights are working quite well.
You are welcome. Hopefully something in there will help.
Skirmishing Fire
Intermediate Entry. I used the L.I.E. editor to apply camo to the face, lips, ears, hands, and neck. This is the result of attempt #3.
Version C here.
Added some glowing sludge for light, and did some editing of the walkway so the light from the sludge would show through.
As for the laptop, I'm thinking it was a case of overheating, it's been hot where I live the last few day.
Mind if I return? I'm not exactly 'New' -- refresher for dual lobe settings, bump & normals. Close up some parts will have a 'grapefruit' look if that makes any sense.
--Bruce
OK, so I did a few updates here:
1. I ditched the HDRI lights and used point lights. This made a big difference, I think. I didn't realize that using HDRI would create so many fireflies.
2. I rendered it for quite a lot longer - it actually took about 10 hours versus the 1 from before.
3. I created a cut opacity map for the shirt (actually, the shirt was a free one so I had to create a new map for it in UVmapper).
4. I gave her hair.
5. I used SquarePeg3D's rain system.
I have added a second tattoo and a point light to improve the lighting. I'm not sure that it's succeeded.
perlk said:
>>> perlk said
OK, so I did a few updates here:
1. I ditched the HDRI lights and used point lights. This made a big difference, I think. I didn't realize that using HDRI would create so many fireflies.
2. I rendered it for quite a lot longer - it actually took about 10 hours versus the 1 from before.
3. I created a cut opacity map for the shirt (actually, the shirt was a free one so I had to create a new map for it in UVmapper).
4. I gave her hair.
5. I used SquarePeg3D's rain system.
<<<
Super impressed by your lady in the rain.
There are only two things I might try and get into that. One would be droplets on her shoes and the other would be running make up, but niggles both.
I especially like the partially opaque, clingy top. It really does look wet!
Great job. It looks convincing. I like the use of DOF as well.