July, 2021 - Daz 3D New User Challenge - Portrait Rendering and LIE

245

Comments

  • Kismet2012Kismet2012 Posts: 4,252

    Shinji Ikari 9th said:

    Version C here.

    Added some glowing sludge for light, and did some editing of the walkway so the light from the sludge would show through.


    As for the laptop, I'm thinking it was a case of overheating, it's been hot where I live the last few day.

    I have had computers complain when the weather is extremely hot...even with the air conditioner running they seem to feel the heat.

    The added "sludge" is lightening the image and helping to allow your character stand out from the background.

  • Kismet2012Kismet2012 Posts: 4,252

    Tynkere said:

    Mind if I return?  I'm not exactly 'New' -- refresher for dual lobe settings, bump & normals.  Close up some parts will have a 'grapefruit' look if that makes any sense.

    --Bruce

    You certainly can.  We all have areas where we would like to learn more and receive some feedback.

  • Kismet2012Kismet2012 Posts: 4,252

    perlk said:

    OK, so I did a few updates here: 

    1. I ditched the HDRI lights and used point lights. This made a big difference, I think. I didn't realize that using HDRI would create so many fireflies.

    2. I rendered it for quite a lot longer - it actually took about 10 hours versus the 1 from before. 

    3. I created a cut opacity map for the shirt (actually, the shirt was a free one so I had to create a new map for it in UVmapper).

    4. I gave her hair.

    5. I used SquarePeg3D's rain system.

    Generally speaking Iray likes lots of light.  Darker images can take longer to render and adding in the reflections from the rain can add to that.  HDRI's are not created equal.  Some are better sources of light than others.  

    When running test renders you can shorten the render time but you definitley want to let it "cook" longer when creating that final image.

    Is she supposed to be resting her chin in her hand?  There is a slight gap between her fingers and chin.  If that is the case you could just "open" the fingers on the hand a bit until they just make contact with the skin.  This way you do not have to adjust the head and change the shadows falling on her face, which are lovely.

    The opacity map you created for the shirt works.  It helps to reinforce the fact that she is sitting in the rain.

    My only quibble.  And it might increase render times, but the wood does not give the impression of being wet from the rain.  Maybe trying to make the surfe a bit glossy will give the impression of being wet.  Or perhaps a different colour to the wood will help.

    This is your image and you need to do what you feel is best.


  • Kismet2012Kismet2012 Posts: 4,252

    sueya said:

    I have added a second tattoo and a point light to improve the lighting. I'm not sure that it's succeeded.

     I like the additional tattoo but I am personally finding the point light distracting.  It is drawing my eye away from your character.  I cannot see where the point light is adding any new shadows or light to the image.

    A light coming in from from just to the right of the camera might help to lighten the shadows on his arm and allow those tattoos to be a bit more visible.

  • perlkperlk Posts: 847

    Kismet2012 said:

    perlk said:

    OK, so I did a few updates here: 

    1. I ditched the HDRI lights and used point lights. This made a big difference, I think. I didn't realize that using HDRI would create so many fireflies.

    2. I rendered it for quite a lot longer - it actually took about 10 hours versus the 1 from before. 

    3. I created a cut opacity map for the shirt (actually, the shirt was a free one so I had to create a new map for it in UVmapper).

    4. I gave her hair.

    5. I used SquarePeg3D's rain system.

    Generally speaking Iray likes lots of light.  Darker images can take longer to render and adding in the reflections from the rain can add to that.  HDRI's are not created equal.  Some are better sources of light than others.  

    When running test renders you can shorten the render time but you definitley want to let it "cook" longer when creating that final image.

    Is she supposed to be resting her chin in her hand?  There is a slight gap between her fingers and chin.  If that is the case you could just "open" the fingers on the hand a bit until they just make contact with the skin.  This way you do not have to adjust the head and change the shadows falling on her face, which are lovely.

    The opacity map you created for the shirt works.  It helps to reinforce the fact that she is sitting in the rain.

    My only quibble.  And it might increase render times, but the wood does not give the impression of being wet from the rain.  Maybe trying to make the surfe a bit glossy will give the impression of being wet.  Or perhaps a different colour to the wood will help.

    This is your image and you need to do what you feel is best.

    Thanks for the feedback! It's supposed to look like she just looked up from resting her chin on her hand but I see your point - now that I look at it, it looks a bit weird. I'll work on that.

    Damn that wood. I'm struggling here and maybe it's the prop texture. I can't seem to get the surface to look glossy with this particular texture. I've got the reflectiveness turned up, and the thing still looks too dry. I tried doing LIE with this but it doesn't look shiny enough (same problem I had with her skin initially). I couldn't figure out the geoshell thing. Can you do it with props or does it only work with people? I haven't played with it at length. I'll fool with it some more but I might mean disregarding the original object texture and going for something that can actually look wet.

  • perlk said:

    Kismet2012 said:

    perlk said:

    OK, so I did a few updates here: 

    1. I ditched the HDRI lights and used point lights. This made a big difference, I think. I didn't realize that using HDRI would create so many fireflies.

    2. I rendered it for quite a lot longer - it actually took about 10 hours versus the 1 from before. 

    3. I created a cut opacity map for the shirt (actually, the shirt was a free one so I had to create a new map for it in UVmapper).

    4. I gave her hair.

    5. I used SquarePeg3D's rain system.

    Generally speaking Iray likes lots of light.  Darker images can take longer to render and adding in the reflections from the rain can add to that.  HDRI's are not created equal.  Some are better sources of light than others.  

    When running test renders you can shorten the render time but you definitley want to let it "cook" longer when creating that final image.

    Is she supposed to be resting her chin in her hand?  There is a slight gap between her fingers and chin.  If that is the case you could just "open" the fingers on the hand a bit until they just make contact with the skin.  This way you do not have to adjust the head and change the shadows falling on her face, which are lovely.

    The opacity map you created for the shirt works.  It helps to reinforce the fact that she is sitting in the rain.

    My only quibble.  And it might increase render times, but the wood does not give the impression of being wet from the rain.  Maybe trying to make the surfe a bit glossy will give the impression of being wet.  Or perhaps a different colour to the wood will help.

    This is your image and you need to do what you feel is best.

    Thanks for the feedback! It's supposed to look like she just looked up from resting her chin on her hand but I see your point - now that I look at it, it looks a bit weird. I'll work on that.

    Damn that wood. I'm struggling here and maybe it's the prop texture. I can't seem to get the surface to look glossy with this particular texture. I've got the reflectiveness turned up, and the thing still looks too dry. I tried doing LIE with this but it doesn't look shiny enough (same problem I had with her skin initially). I couldn't figure out the geoshell thing. Can you do it with props or does it only work with people? I haven't played with it at length. I'll fool with it some more but I might mean disregarding the original object texture and going for something that can actually look wet.

     Have you tried playing around with the Top Coat? That's another way of making something look wet. You can switch the layering mode from Reflectivity to Fresnel, then play around with the settings. I know it works for skin and clothing, but I'm not sure about something like wood.

  • perlkperlk Posts: 847

    aprilshowers2065 said:

    perlk said:

    Kismet2012 said:

    perlk said:

    OK, so I did a few updates here: 

    1. I ditched the HDRI lights and used point lights. This made a big difference, I think. I didn't realize that using HDRI would create so many fireflies.

    2. I rendered it for quite a lot longer - it actually took about 10 hours versus the 1 from before. 

    3. I created a cut opacity map for the shirt (actually, the shirt was a free one so I had to create a new map for it in UVmapper).

    4. I gave her hair.

    5. I used SquarePeg3D's rain system.

    Generally speaking Iray likes lots of light.  Darker images can take longer to render and adding in the reflections from the rain can add to that.  HDRI's are not created equal.  Some are better sources of light than others.  

    When running test renders you can shorten the render time but you definitley want to let it "cook" longer when creating that final image.

    Is she supposed to be resting her chin in her hand?  There is a slight gap between her fingers and chin.  If that is the case you could just "open" the fingers on the hand a bit until they just make contact with the skin.  This way you do not have to adjust the head and change the shadows falling on her face, which are lovely.

    The opacity map you created for the shirt works.  It helps to reinforce the fact that she is sitting in the rain.

    My only quibble.  And it might increase render times, but the wood does not give the impression of being wet from the rain.  Maybe trying to make the surfe a bit glossy will give the impression of being wet.  Or perhaps a different colour to the wood will help.

    This is your image and you need to do what you feel is best.

    Thanks for the feedback! It's supposed to look like she just looked up from resting her chin on her hand but I see your point - now that I look at it, it looks a bit weird. I'll work on that.

    Damn that wood. I'm struggling here and maybe it's the prop texture. I can't seem to get the surface to look glossy with this particular texture. I've got the reflectiveness turned up, and the thing still looks too dry. I tried doing LIE with this but it doesn't look shiny enough (same problem I had with her skin initially). I couldn't figure out the geoshell thing. Can you do it with props or does it only work with people? I haven't played with it at length. I'll fool with it some more but I might mean disregarding the original object texture and going for something that can actually look wet.

     Have you tried playing around with the Top Coat? That's another way of making something look wet. You can switch the layering mode from Reflectivity to Fresnel, then play around with the settings. I know it works for skin and clothing, but I'm not sure about something like wood.

    I have not! I'm seeing how it'll look with Geoshell, if it looks dumb, I'll try Top Coat and see how that looks!

  • @Kismet2012 I do have another spotlight on the character to brighten up his skin. I've tried changing it to three lower intensity lights and tweaked the DOF. Not sure it made the LIE much clearer, but it did brighten his skin a little.

    Ignition8.png
    1600 x 1920 - 3M
  • TynkereTynkere Posts: 834
    edited July 2021

    Kismet2012 said:

    You certainly can.  We all have areas where we would like to learn more and receive some feedback.

    Thanks.  This isn't for a contest or anything.  I just made a quick closeup to show everything I need help with.


    1.) Lower eyelid or maybe G8 eyelashes.  Why is it a purple color?  How do I get it more pink or natural looking?

    2.) Sometimes light will reflect off white of eye.  Leads to a spotty render no matter how long I let it run.  

    Settings for eye moisture & lashes?  

    3.) Teeth can also have reflection that will render spotty.  
    Surface settings for teeth?

    4.) Fingernails look kind of odd too.  They wouldn't be that pink/red?  

    Surface settings for fingernails to a more natural flesh-tone?

    Hopefully all this is just things I've forgetten in iRay.


    crappyEyeReflections.png
    1080 x 810 - 1M
    Post edited by Tynkere on
  • katywhitekatywhite Posts: 414
    edited July 2021

    Title: The Shadow

    Software: Daz 3D

    Challenge: Beginner

    Still toying around with this, here's a couple of versions already. Would appreciate some feedback at this point though since I'm still experimenting. :)

    Person Pose Challenge.png
    2000 x 2000 - 6M
    Portrait Entry Lighting 2.png
    2000 x 2000 - 7M
    Post edited by katywhite on
  • kerrykerry Posts: 74
    edited July 2021

    katywhite said:

    Title: The Shadow

    Software: Daz 3D

    Challenge: Beginner

    Still toying around with this, here's a couple of versions already. Would appreciate some feedback at this point though since I'm still experimenting. :)

    I feel the background is working against the mood I think you're trying to portray here. Like the character is supposed to be fearsome and mysterious but coming out into this level of lighting with such as wide open poses ends up coming across as more comical than intimidating. I would suggest adding more shadow to the scenefor the character to hide in and posing the character from a more side-on stance so it's harder to make out just how she is coming after her target - so to speak.

    Edit: also just wanted to add I think your character has a lot of potentials, especially those nails.

    Post edited by kerry on
  • sueyasueya Posts: 826
    edited July 2021

    This is version 3. I removed the point light and added a side light to make the tattoos more visible. 

    Post edited by sueya on
  • vamokvamok Posts: 238

    sueya said:


    This is version 3. I removed the point light and added a side light to make the tattoos more visible. 

    This is a marked improvement over version 2. The distracting light is gone and the arm is more visible. Nice! 

  • vamokvamok Posts: 238

    katywhite said:

    Title: The Shadow

    Software: Daz 3D

    Challenge: Beginner

    Still toying around with this, here's a couple of versions already. Would appreciate some feedback at this point though since I'm still experimenting. :)

    If I had to choose between one of your images, I would go with the top one. The second render has the same red light, but the green light on the door is getting a little to "Christmasy". I agree with  kerry, I think some shadow would benefit too.

    Other random thoughts:

    • She is standing at the top of a flight of stares so...the viewer should be looking up at her (camera angle) and she should be looking down (eyepoint) at someone below.
    • Cool outfit.
    • Maybe she should have more anger in her face (eye squint an brows down).

    Looking forward to seeing where you take this.

  • kerrykerry Posts: 74
    edited July 2021

    Title: Spirit in Motion
    Software: Daz 3D / Photoshop
    Challenge: Beginner
    Feedback very welcome

    Another challenge that stretches me. I followed some of the videos and decided to try a low-key portrait but I didn't want to be all white so tried to achieve a rose gold scheme with a soft, natural and feminine feel.


    image

    This portrait uses the Babina G8 model. I wanted to portray a happy and free-spirited character, also the Z photoshoot builder and all lighting from HDRI Photo Shoot

    The hardest part was getting a lighting effect that created a blended effect with the hair to the background without washing out the skin. Somehow I got there with speed ISO and aperture settings but I won't pretend I know what that means.

    Problems I see

    1. Strange shading near the visible ear so will need to investigate the hair to figure out what it is.

    2. The shadows below the neck may be too harsh, unsure. I may need to add a light to the front but as I'm already unhappy with how over-exposed the right breast and shoulder look I can only see adding a light as making things worse.

    Please add to my list if you think there is anything else that would make the image better.

    babina8portrait1.jpg
    2000 x 2098 - 2M
    Post edited by kerry on
  • Kismet2012Kismet2012 Posts: 4,252
    edited July 2021

    perlk said:

    Kismet2012 said:

    perlk said:

    OK, so I did a few updates here: 

    1. I ditched the HDRI lights and used point lights. This made a big difference, I think. I didn't realize that using HDRI would create so many fireflies.

    2. I rendered it for quite a lot longer - it actually took about 10 hours versus the 1 from before. 

    3. I created a cut opacity map for the shirt (actually, the shirt was a free one so I had to create a new map for it in UVmapper).

    4. I gave her hair.

    5. I used SquarePeg3D's rain system.

    Generally speaking Iray likes lots of light.  Darker images can take longer to render and adding in the reflections from the rain can add to that.  HDRI's are not created equal.  Some are better sources of light than others.  

    When running test renders you can shorten the render time but you definitley want to let it "cook" longer when creating that final image.

    Is she supposed to be resting her chin in her hand?  There is a slight gap between her fingers and chin.  If that is the case you could just "open" the fingers on the hand a bit until they just make contact with the skin.  This way you do not have to adjust the head and change the shadows falling on her face, which are lovely.

    The opacity map you created for the shirt works.  It helps to reinforce the fact that she is sitting in the rain.

    My only quibble.  And it might increase render times, but the wood does not give the impression of being wet from the rain.  Maybe trying to make the surfe a bit glossy will give the impression of being wet.  Or perhaps a different colour to the wood will help.

    This is your image and you need to do what you feel is best.

    Thanks for the feedback! It's supposed to look like she just looked up from resting her chin on her hand but I see your point - now that I look at it, it looks a bit weird. I'll work on that.

    Damn that wood. I'm struggling here and maybe it's the prop texture. I can't seem to get the surface to look glossy with this particular texture. I've got the reflectiveness turned up, and the thing still looks too dry. I tried doing LIE with this but it doesn't look shiny enough (same problem I had with her skin initially). I couldn't figure out the geoshell thing. Can you do it with props or does it only work with people? I haven't played with it at length. I'll fool with it some more but I might mean disregarding the original object texture and going for something that can actually look wet.

    According to a comment by Richard in this thread they can be applied to props.  I haven't used a geoshell in quite some time but I do remember a trick, to reduce the offset from 0.1 ( the default I believe ) to 0.01.

    @daz_ann0314 confirmed for me.  There are less options on props but it is doable.  She also suggested creating a specular/gloss map for that part.


    Post edited by Kismet2012 on
  • Kismet2012Kismet2012 Posts: 4,252

    aprilshowers2065 said:

    @Kismet2012 I do have another spotlight on the character to brighten up his skin. I've tried changing it to three lower intensity lights and tweaked the DOF. Not sure it made the LIE much clearer, but it did brighten his skin a little.

    I can see the reflections on his skin.  Lighting can be tricky.  Too much and it overpowers everything.  Not enough and you cannot see the subject.


  • Kismet2012Kismet2012 Posts: 4,252

    Tynkere said:

    Kismet2012 said:

    You certainly can.  We all have areas where we would like to learn more and receive some feedback.

    Thanks.  This isn't for a contest or anything.  I just made a quick closeup to show everything I need help with.


    1.) Lower eyelid or maybe G8 eyelashes.  Why is it a purple color?  How do I get it more pink or natural looking?

    2.) Sometimes light will reflect off white of eye.  Leads to a spotty render no matter how long I let it run.  

    Settings for eye moisture & lashes?  

    3.) Teeth can also have reflection that will render spotty.  
    Surface settings for teeth?

    4.) Fingernails look kind of odd too.  They wouldn't be that pink/red?  

    Surface settings for fingernails to a more natural flesh-tone?

    Hopefully all this is just things I've forgetten in iRay.


    1.  Which model are you using? I am guessing the purple is makeup.  There might be a "natural" or no makeup option.

    2.  The 8.1 characters have a "tear" preset.  I believe this is designed to make the eyes look moist which could be causing the reflections.  I think this can be turned off.  Reducing the glossiness of the cornea might also help.

    3.  Adjusting the glossiness on the teeth may help.

    4.  When I google images of fingernails some are rather pink and others have a paler hue.  This may be an area that falls into personal preference.

  • Kismet2012Kismet2012 Posts: 4,252

    katywhite said:

    Title: The Shadow

    Software: Daz 3D

    Challenge: Beginner

    Still toying around with this, here's a couple of versions already. Would appreciate some feedback at this point though since I'm still experimenting. :)

    I prefer the 2nd orangey/yellow image.  The light in the first image is reflecting off the metal on her boots which is drawing the eye away from her face.  In the 2nd image these reflections are more subdued and there is a bit of light on her upper face.  

    The 2nd image also has reflections appearing along the weapon she is carrying which also draws the eye to the character's face.

    I am not a sword fighter so I am not sure about the posing.  But when I am not sure I like to Google similar poses.  You have done a great job with the grip.  Getting a hand to grip anything can be tricky and you have the added challenge of the claws on her hands.  Nicely done.

  • Kismet2012Kismet2012 Posts: 4,252

    sueya said:

    This is version 3. I removed the point light and added a side light to make the tattoos more visible. 

    Much better.  Just enough shadow to add some interest but the tattoos are much easier to see. 

    I think your character is missing his eyebrows?

  • Kismet2012Kismet2012 Posts: 4,252

    kerry said:

    Title: Spirit in Motion
    Software: Daz 3D / Photoshop
    Challenge: Beginner
    Feedback very welcome

    Another challenge that stretches me. I followed some of the videos and decided to try a low-key portrait but I didn't want to be all white so tried to achieve a rose gold scheme with a soft, natural and feminine feel.


    image

    This portrait uses the Babina G8 model. I wanted to portray a happy and free-spirited character, also the Z photoshoot builder and all lighting from HDRI Photo Shoot

    The hardest part was getting a lighting effect that created a blended effect with the hair to the background without washing out the skin. Somehow I got there with speed ISO and aperture settings but I won't pretend I know what that means.

    Problems I see

    1. Strange shading near the visible ear so will need to investigate the hair to figure out what it is.

    2. The shadows below the neck may be too harsh, unsure. I may need to add a light to the front but as I'm already unhappy with how over-exposed the right breast and shoulder look I can only see adding a light as making things worse.

    Please add to my list if you think there is anything else that would make the image better.

    1.  Strange shading:  Are you refering to the triangle?  It might be part of the skull cap for the hair.

    2.  You could try adding a plane to act as a reflector for the light.  It will soften the shadows without needing to add another light.  This tutorial is a guide for using a reflector in photography but the principles still apply.  With the addition of a reflector you may be able to turn down the light intesity a bit.

    I think her fingers are intersecting her face.  Especially the middle fingers and the pad on the pinky finger.  I would reduce the bend at the base of the pinky until it is just touching the face.  The ring finger may require adjusting both the base of the finger and the large knuckle ( first up from carpal ).  The middle finger I think can be adjust at the large knuckle. 

    You have a really soft, etherial feel to this image.  I am looking forward to seeing your next version.


  • katywhitekatywhite Posts: 414

    kerry said:

    katywhite said:

    Title: The Shadow

    Software: Daz 3D

    Challenge: Beginner

    Still toying around with this, here's a couple of versions already. Would appreciate some feedback at this point though since I'm still experimenting. :)

    I feel the background is working against the mood I think you're trying to portray here. Like the character is supposed to be fearsome and mysterious but coming out into this level of lighting with such as wide open poses ends up coming across as more comical than intimidating. I would suggest adding more shadow to the scenefor the character to hide in and posing the character from a more side-on stance so it's harder to make out just how she is coming after her target - so to speak.

    Edit: also just wanted to add I think your character has a lot of potentials, especially those nails.

    Makes sense :) I'll toy around with the lighting some more

  • katywhitekatywhite Posts: 414

    Kismet2012 said:

    katywhite said:

    Title: The Shadow

    Software: Daz 3D

    Challenge: Beginner

    Still toying around with this, here's a couple of versions already. Would appreciate some feedback at this point though since I'm still experimenting. :)

    I prefer the 2nd orangey/yellow image.  The light in the first image is reflecting off the metal on her boots which is drawing the eye away from her face.  In the 2nd image these reflections are more subdued and there is a bit of light on her upper face.  

    The 2nd image also has reflections appearing along the weapon she is carrying which also draws the eye to the character's face.

    I am not a sword fighter so I am not sure about the posing.  But when I am not sure I like to Google similar poses.  You have done a great job with the grip.  Getting a hand to grip anything can be tricky and you have the added challenge of the claws on her hands.  Nicely done.

    Thank you! :)

  • katywhitekatywhite Posts: 414
    edited July 2021

    Second Entry

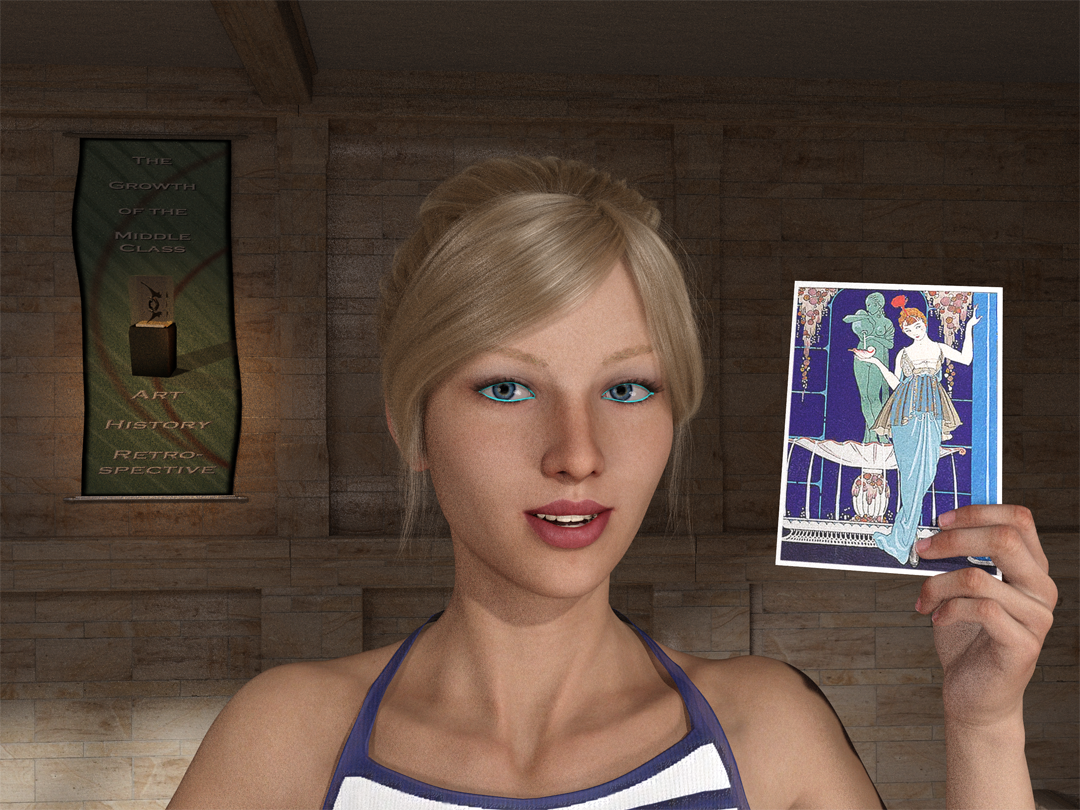
    Title: Pounce's Guided Tour

    Caption: ...and out here on the balcony, you can see the whole world...!

    Software: Daz 3D

    Challenge: Beginner

    Feedback appreciated =)

    Pounces New Clothes.png
    2000 x 2000 - 8M
    Post edited by katywhite on
  • TynkereTynkere Posts: 834
    edited July 2021

    Kismet2012 said:

    1.  Which model are you using? I am guessing the purple is makeup.  There might be a "natural" or no makeup option.

    2.  The 8.1 characters have a "tear" preset.  I believe this is designed to make the eyes look moist which could be causing the reflections.  I think this can be turned off.  Reducing the glossiness of the cornea might also help.

    3.  Adjusting the glossiness on the teeth may help.

    4.  When I google images of fingernails some are rather pink and others have a paler hue.  This may be an area that falls into personal preference.

    I'm using V8 with a bunch of face & body morphs.  Easier way to adjust inner eyelid?  Your suggestion about makeup seems right on the money.  Example is quick .png file made by drawing bright blue over face texture.  Since the eyes are closed, tweaking that one is going to be hard.  Is there another texture file I should look at? 

    As for the eyes...  If light sometimes glances off schlera, try cornea anyway?  Sorry if I sound brain-dead.  I appreciate your being patient with me.   

    SampleScreenie.png
    1080 x 810 - 2M
    V8FaceMap.png
    800 x 800 - 708K
    TestEye.png
    4096 x 4096 - 88K
    Post edited by Tynkere on
  • ShackShack Posts: 22
    edited July 2021

    Title: You Forgot Something

    Software: Daz Studio 4.15

    Challenge: Intermediate Challenge - L.I.E.

    This is the first time I tried using the Layered Image Editor. It is interesting but very slow and limited in its capabilities. I used it to add six tattoos (the Ryker figure includes the full sleeve tattoo).

    Suggestions, recommendations, and comments are always welcome.

    Image removed by mod 

    Post edited by frank0314 on
  • perlkperlk Posts: 847

    katywhite said:

    Title: The Shadow

    Software: Daz 3D

    Challenge: Beginner

    Still toying around with this, here's a couple of versions already. Would appreciate some feedback at this point though since I'm still experimenting. :)

    I think I like the top one better because her face is more visible. Also, have you played around with depth of field yet? It looks sort of like you have from your image, I wonder if increasing the depth of field (reducing the focus area) might help draw more attention to your character and focus on her rather than the background. 

    The posing here is really excellent. I struggle with hand poses - they're not easy for sure.

  • TynkereTynkere Posts: 834
    edited July 2021

    If Kismet was nice enough to allow me a brief return I guess I should enter.

    Here it is before I chicken out.

    Also want to compliment everyone on their entries.  Fun to see everyones imagination at work!  yes

    Title: Photo Fun
    Software: DS 4.10
    Challenge: Intermediate L.I.E.
     

    DAZCONTEST-V1.png
    1080 x 810 - 2M
    Post edited by Tynkere on
  • perlkperlk Posts: 847
    edited July 2021

    I think I'm done with this mess. I just about threw a shoe at my computer and screamed, "Damn you, wood texture!!!!" and then finally said screw it and used a wet wood shader with a geoshell on top. BTW, the geoshell worked better for the bench than LIE did. I feel like LIE wasn't as easy to use for wet skin as it was using the geoshell on the bench. I had to really mess and mess to get the LIE water to show up (whereas the tattoo looked fine).

    Not unhappy with the results, though! Worth the hours and hours of render time. No post work except to add the signature at the bottom.

    freebie-challenge-july-final.png
    1200 x 1200 - 2M
    Post edited by perlk on
  • sueyasueya Posts: 826

    I have added eyebrows to Ryker

Sign In or Register to comment.