Time for sharing, what I have no idea!
 Szark
Posts: 10,634
Szark
Posts: 10,634
Starting from now (Jan 2013) I am going to include any links to my tutorials or other information that may help that I have posted on these Forums.
1: Somethings to Consider when starting to learn CG
2: Tutorial Uber Area Lighting: The Basics
3: Tutorial Point Lights, The Basics:
4: Render Setting…How? Tutorial links?
5: Composition
6: DOF (Depth of Field)
7: What are Transparency Maps?
8: 3d Step By Step:
9: Learning UberEnvironment 2 by adam. A very long and excellent thread to help fully understand UE2.
10: Scott’s Tutorials, FAQs, and other articles
11: Using Uber Environment 2’s Sky Dome
12: Interesting article: The importance of true HDR in HDR images
13: Add Figures in Specific Location of Scene
14: Surfaces: Daz Studio Default shader This is old but it still has some valid info
15: Lights and Camera Settings This is old but it still has some valid info
It was suggested to me that I start a "My Renders" thread so here it is.
Before we start I have had no artistic education at all and it was only 4 years ago I started. So at 44 I found it, and still do, hard, nope no encouragement to express myself with any sort of artistic medium when I was young. My childhood was a pretty sterile existence.
Being disabled and doing this really does take the mind to another place, in the zone I call it. Nice escapism.
Let’s start off with Daz Studio, DS3A that is, well it is only right.
Some of these were at the dawn of learning all this, some 4 years ago and I still don't know what I am doing half the time, well sort of. :) As we go we get more recent.
You can see all the images bigger in my DA Gallery http://itiseyemeeszark.deviantart.com/
I am open to questions and I will try my best to answer them if I can. Some answers can be quick and easy to answer some need a few pages. ;) We shall see how it goes.
This first one is from 2 or 3 months in learning. Only seems like yesterday I did that pic. Spent months on it learning all sorts of things including postwork.
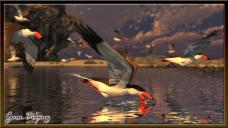
This next one is a remake of my first entry in Ken Gilliland’s Song Bird annual contest 3 years ago. Got an HM for the original. I had loads of fun making the displacement map for the wake. What I like about this image is that there is no Postwork. All the water droplets are meshes with a water shader applied.
Daz 3D is part of 
Connect
DAZ Productions, Inc.
7533 S Center View Ct #4664
West Jordan, UT 84084
Licensing Agreement | Terms of Service | Privacy Policy | EULA
© 2026 Daz Productions Inc. All Rights Reserved.
Comments
Still Daz Studio 3A
These next two are from September 2010. It won me a small prize coming first in the Dreamlight Monthly contest themed “Wicked Game”. Being a fanatic Myst lover I made this. Only diehard Myst fans will/might get this image. But if you are interested the big shiny reflective structure is a number in the language of a race of humanoids that are at the centre of the Myst saga of games and books. The number being 5. I will leave you to interpret that rest. ;)
First one is the full colour untouched render and below that is the end result of Postworking it to death. I had reservations about hacking it up after spending all that time rendering, had to get over that very quickly.
Still DS3A starting with November 2010.
The second one was a few months later, February 2011. This was my first try with Indirect Lighting built in to UberEnviroment 2. Took a while to render. Still not happy with her skin and emotion. Pity I don’t have the scene files anymore. Took ages to drape her jeans and backpack to get it right.
Coming to the last of the DS3A renders now.
The first image was made back in April 2011 coming first for another Dreamlight’s monthly contest themed “A Dogs Life”. Gave myself a challenge with this one. I wanted to see what I could do with only the maps that came with the props. I usually add some additional maps to surfaces when I do an image. I then plugged in Bump, displacement and diffuse maps in all sorts of channels testing the results. If it didn’t have displacement I would use the bump if it had neither I would use the diffuse map.
The second was made for the Beginners Contest on the old forums back in July 2011. I think you can guess the theme.
Now we go on the DS4 Beta and beyond.
This was my first attempt in try to get a more realistic portrait without Reality and all that.
Second was made in the chance of winning 3 months membership with Dreamlight. It did give me 3 extra months on top of my existing membership. Also it was to show off Walle’s new UF3 light set which was the purpose of the contest.
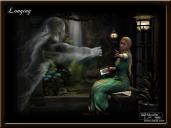
Third is a self portrait. :)
Wow... I wish my renders would have looked like that after three months with Poser... They rarely look like that now, after years with it... Gorgeous art. :D
Of here we go with the final Daz Studio 4 renders
The first image was made for “The House that Jack Built” contest http://dazcreativecontests.deviantart.com/gallery/33136042
Second we have another Dreamlight contest entry for December 2011 themed “Red dress, back Suit”. Came first again. :)
Third is this year’s Song Bird contest entry.
I will be posting the only two Poser 8 renders I have done next.
Poser 8 time.
As you can see both images were rendered with the help of Photobox for poser.
The Table render was done as a Promo image for the table itself.
It's great seeing these all over here. Thanks for sharing them all with us.
Bryce Time
The first one was started in Bryce 6 and finished off in Bryce 7 Beta. It was just a learning tool that went on and on until I get to a place where I was happy.
Second, again learning turn in to this image.
Third was made for another Dreamlight monthly contest theme being “Desert Heat” December 2010. However this version has been updated since then to what we see now. The only difference is that he is holding the reigns and the far right rock has been moved slightly.
But in the spirit of learning and imparting knowledge I thought way not. I am serious if anybody has any questions I will try my best to help.
Now we come to Vue
First image was my very first proper Vue render.
Second I was testing Hyperblobs and this pic evolved from there
Third, again another bout of testing led me to make this. This time testing SubSurface Scattering, Light rays and transparency maps.
Still Vue
Nurdosa has a character called Gadowitz which is an expansion of Teo. I did intend on doing an imaged based story with this chap, encountering different beasties on his way.
Here are the first two I made a while back. Unlike many of my images these have had no postwork at all.
Here are my last two Vue renders
The first image won my first prize for Dreamlight Monthy themed "Pirates Treasure" – Sept 2011
The second one was finished last week where I was playing about with my newly purchased EcoSystems.
This next image, rendered last night started because of kylumi's art thread http://www.daz3d.com/forums/discussion/1389/
I threw everything I had at this image, Uber Spot and Uber Enviroment set to Indirect Lighting with soft shadows. Used UbeSurface 2 for the skin set Valerie, made by Soto and came free in 3Dartist mag some while back. He put some nice SSS and Translucency Maps in the texture set.
However I threw the Spec Maps out and adjusted all the channels and colours myself. This is V5 btw but since upgrading to 4.5 RC2 Genx doesn't work however the morhps I had loaded in to Genesis before updating remained intact and useable.
I wasn't happy with how the hair came out as default so I gave the Transmaps a 5% Gaussian Blur in Photoshop to soften the edges and then applied Uber Hair shader so I could turn off Occlusion. Saved some rendering time.
The only postwork are the two highlights on the eyes and Duplicated he render and set it to Screen at 20% opacity. Thanks to "thesea" for that tip. In fact if it wasn't for his skin tutorials over at Dreamlight I would still be struggling more than I am now to understand it all. And before you ask no, no one set of Hss/US2 settings will suit all skin textures. Some skin textures, to me, have too much red in them so when you add red SSS you often get a sunburnt figure. I generally just drop the red channel of the diffuse to between 223 and 240 testing as I go. Only change one channel and then test render and repeat until all the channels are set.
One of the first things I do is to remove any ambient strengths and then change the spec colour to white, that is my starting point in setting up the skin textures.
Boy, am I glad you started your art thread!!
I am so greatly impressed Szark, your artwork is absolutely tremendous. I especial love the animal scenes and those birds are so damn realistic. Those Poser renders cannot get anymore realistic, I thought that table looked like a bloody photograph!!
The old guy with the pipe, I remember him very well, indeed and have carried him around in my head ever since. He was the guy who made me think my previous portrait stuff looked crap in comparison.....I did not know he belonged to you!!
Another thing that impresses me is the fact that you have explanations about how a piece came about. I cannot remember what I made yesterday, let alone explain how I came to make it. :lol:
You have a great deal of knowledge going on my friend, I am going to love visiting your thread, Szark......Bravo!! :coolsmile:
Thanks, very uplifting words kylumi.
What you have to understand the reason why I say you have loads of talent is becasue of the artistic flair and eye you have. All this doesn't come easy to me. The only thing that I find a little easier is composition for the most part. But my imagination is pretty poor compared some of you.
Remembering is fairly easy for most images as I made a number of tutorails about how I made them, this was for Dreamlight's library of tutorails. Plus all my entries are there for me to see and check dates.:)
I am really proud of the Workingman, dude smoking the pipe. I think I spent a number of months on that making new displacement and bump maps out of blending a few together in PS. Picking the best bump and dsiplacement maps I have in my content library. That last image had Aged of V4's displacemnt maps overliad on to the bump maps which drove the displacement.
Well it appears to me you have imagination in spades............literally.
That guy being pulled out of the CARD, vaporizing humans, little dude crossing the bridge day/night, mixing past and present monochromatic and color and, .....my absolute fave ............NEGLECT, that image tells a story of abject misery for a four legged friends.
Plus, you use Daz, Poser, Bryce, Vue, photoshop and 3rd party render tools............ damn! :coolsmile:
LOL I hear you but it takes days if not weeks to come up with an idea and it is hit and miss at the best of times. I haven't shown my failers where my muse went on holiday. :)
Also I have dabbled in Carrara a little but not enough yet to get a handle on it.
These are the best I have got out of Carrara so far
The first one Jack Tomalin doesn't like becase Mortis (the building doesn't have proper external textures. I did it to learn about the Surface Replicator.
The second was again a test of more advanced Surface Replicating and light.
I posted this in another thread so I thought way not post it here too.
The final image of this is at the bottom of page one.
This image, at this size rendered in 18 hours on a 32 bit system with 3 GB of Ram, Dual Core
One Uber Spot set the Raytraced Shadows with a light gel (blinds)
Uber Enviroment set to Indirect Lighting with soft shadows Set at the Standard highest 4X preset. Normally when using IDL I would drop the Uber shading rate down to 1 or even down to .10.Doing that adds another 12 to 24 hours or so to the render.
Here are my UberEnviroment settings and Advanced render settings used for this image. Plus since I am using DOF (Depth of Field) I increased the Pixel Samples x and y to 16. The more blurring the higher these go, 20 being about the max.
Well you have mastered Cararra because those two images look bloody great!
And, your portrait looks stunning too...........the lighting is awesome.
I am loving reading your info/settings...............I never bother with any of that stuff, I suppose I just create the images that I find pleasing, then store them all away in a file never to be seen again!!! :lol:
lol. I have been very brave with my Rendo gallery, and left some of the Failures, just to remind myself what I have done .
I like helping others as much as I can and since doing a few tuts for Dreamlight I have a tendency to remember a lot. I do this for the same reason as you (which I read on page 3 of Jad's thread) I do it for me for my own feeling of well being, if it winsa prize then a bonus. I am one of those that thinks taking part is more important than winning or being better than others. This doesn't mean I don't enter comps to win, that would be silly. :)
lol. I have been very brave with my Rendo gallery, and left some of the Failures, just to remind myself what I have done .LOL nope keeping mine locked up in a special folder never to see the light. :)
You and me both. I really used to like taking part in challenges, not contests. Prize for the Bryce challenge over at Rendo was to pick the title for the next challenge.
In fact at one stage I was part of the group who were trying to keep the Challenge Arena alive over there.
For me entering contests was/is a way to up my game, to force me to improve and test new ways of doing things which has given me the motivation to carry on without entering any contests now. Plus I like seeing the different interpretations of a given theme. I learn a lot from looking at other people's art.
I am hoping, once we get everything a bit more settled, that we can re-introduce Neils challenge idea from the old site.
I don't know if you remember it, He called it a 6 steps challenge (as we could add 6 images on the old site) and the idea was to show the steps you took to get to the finished render.
So it was a teaching tool, in a way, as much as a render challenge.
Nope totally missed that one but it does sound interesting. Yeah I really like the sound of that. As you say a good teaching tool and fun to do. Count me in.
UNLURK=- Okay I just have to say Thanks for the info. And I'm now a BIG Szark fan -=RELURK