Daz 3D is part of 
Connect
DAZ Productions, Inc.
7533 S Center View Ct #4664
West Jordan, UT 84084
Licensing Agreement | Terms of Service | Privacy Policy | EULA
© 2026 Daz Productions Inc. All Rights Reserved.
Comments
How long is it taking you folks to do one character?
It only takes a couple minutes once you have gone through the tutorial and created the clones and saved your scene for reuse the next time. The tutorial tells you when to save the scene for later use. Next time, just load that scene and pick up with the section of the tutorial after saving the scene. It takes longer if you go to the extent of using the dformer to split the head and body in to separate morphs.
I still don't understand exactly where to do this in the tutorial, in spite of your detailed comments. Do I have to do it before saving the scene file that gets reused for each character conversion? Can you reference a particular tutorial step where I should stop and do your rigidity steps before continuing?
I converted Teen Josie 7 and her eyes were a mess. I had to painstakingly (with emphasis on PAIN) manually edit the mesh in Blender to fix them. I'm hoping your rigidity method would do a better conversion job. I'm eager to try.
It took me a while to figure it out, too. In Redz's Clone tutorial, you would add those steps in Part 3, after you use Transfer Utility from the figure to the clone. Then you fit the clone to the figure, hide the figure, and apply the shape to the figure. (Doing this from memory, so might have some bits wrong, but it is in Part 3, right after you use the transfer utility.)
Thanks, L'Adair. I'm going to try it now.
I'm working with Genesis 3 Female. This is my MyG3Clone_G8F with the head polys hidden. The eyes already have problems. Did I do something wrong already? Does your clone look like this? This is the clone I've been using fairly successfully, so now I'm confused again. Do I need to start over and make a new clone?
Sorry to be babbling on by myself here LOL, but now I'm wondering if the "Transfer Utility" usage that is referred to is the earlier one in the tutorial on the first page instead of the one is Part 3.
Edit: probably not...
Just an extra "Thank You" to Redz and others who have put together the tutorials on this thread. I got around to transferring some V4 morphs to Genesis using GenX (not even GenX2!) and then used the clones method to transfer these to G8F (I previously did a bunch of native Genesis, G2 and G3 morphs). There are a few that look a bit messed up but most are really good. Here is a V4 character transferred to G8F with Victoria 8-based textures.
That's about what I'd expect.
Hell, my clone is probably similar owing to the fact that I only rationalized the eyes, and didn't touch the mouth.
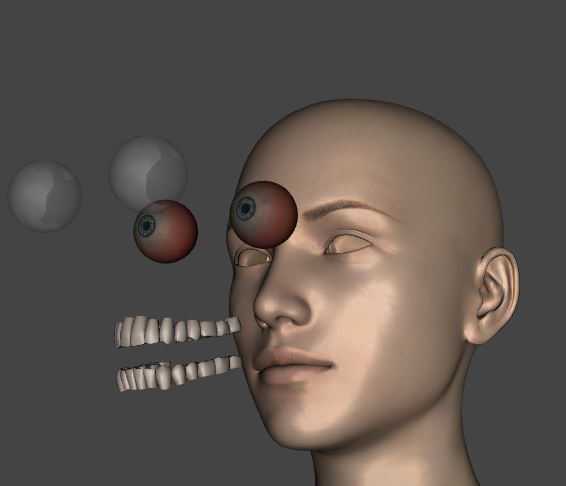
Studio kind of guesses which vertex maps to which when you do any of these methods. This causes a problem with the eyes and mouth because there are lot of vetexes really close together. One way to see how this goes wrong is to export both figures to an external editor and try to shrinkwrap one's teeth to the other's. Even eliminating all other issues that could interfere, and carefully lining the teeth up to match, the result is a mess. Partly because the shapes are slightly different, but also because the verts are so close together.
I've probably solved this issue, but it's not a perfect solution, and it's not implemented. I consider it solved because there was only one technical issue that I didn't know if it could be done, and I did most of that this morning. There's still one more thing to do but I can't think of how to test it without building a working model. I probably wouldn't admit that much, but I'm a bit loopy, have have an absolutely horrid couple of weeks, and the expression converter written by mork is basically the same concept I need to emply to transfer morphs. I just needed a vertex by vertex mapping of G8 to G3, which I have. If my guess about how vertex deltas actually work is correct, then it's all over but the tedious bit.
Sorry, loopy. I really am. There was point and I lost it for a sec. The point being, the only way I'm pretty sure to get a completely distortion free transfer ... actually doesn't exist. But that's because of fingernails. G3's finger and toe nails are separate meshes. G8's are modifications of G3's nailbeds. Oddly, what Clones and TU do very well in handling nail morphs, direct mapping is exceptionally hard, so for sanity, I mapped G8's nails to G3's nailbed. The result should be for most shapes that G8's nails will be appropriate for the shape of her digits, but it means my method can't transfer nail shapes at all. There's zero correspondence. The deltas are going to be lost, or rendered ineefective, (depending on which is most stable). Anything other than direct mapping will result in distortions (like the slight to annoying distortions about the shoulders and arms with some methods). There's very little you can do for the eyes without basically ripping the model appart. (which, by the way, is what I did for my transfer clone, and what I did to create the vertex mapping. Otherwise, the verts are too close and the same problems would crop up.)
My clone does look like this as well (the weird polys you are seing around the eyes are, in fact, the eye socket not the eye itself. normally they'd be part of the head face group, but that gets altered by the transfer utility this doesnt have any effect on the actual mesh itself, thankfully, merely how it looks when we hide parts)
Re-reading through Redz' tutorial The ideal time to do my step is just before
Just to expound on what I was on about, this is the the morph I used to do my vertex mapping. It is similar, (though not the same) as the ones I use to trans fer morphs right now.
This is G8. There is similar one for G3, with some adjustments. This, generally, resolves issues of vertex confusion.
Thank you for the clarification. Since I already went through the whole Redz tutorial before this rigidity idea came up, can I just open the scene that I already saved and apply rigidity to the eyes of MyG3Clone_G8F and resave the scene, or do I have to start the tutorial over again?
Thank you. I have done that now. I was able to get the rigidity groups to match your example, so I'm pretty sure I did it right.
I tried again to transfer Teen Josie 7, but her eyes still get messed up. Maybe she is just impossible. I'll have to stick to my old version that I had edited in Blender after the conversion. I haven't seen a problem with other characters, though.
If you had already loaded the morph onto the MyG3Clone_G8F you might need to select it then go to edit > figure > clear generated morphs this will (as the name suggests) clear any previously generated morphs out of the figure
.... and I trid Teen josie myself and I'm getting super messed up eyes too.... weird. And it really is just her too, Teen Julie does fine, The Girl does fine, Josie the eyelids look like jagged teeth
Ooh! This looks intriguing :) It looks like it could solve the eyelid issues in addition to the eye issues. I think I might try experimenting with this too.
If you figure out how to do it could you post the steps? I've been having issues with the eyes (particularly characters with larger eyes) getting messed up with tranfering them. If this helps that be less of an issue I'd be very interested in learning how to do it. :)
This might interest some people - https://www.daz3d.com/forums/discussion/188186/project-auto-rigger-commercial
Oh, that's a must have. I'll be watching that thread...
Thank you for the link.
This Script has been depricated, given its numerous flaws. A superior script can be found here.
Thank you, sir. Your hard work and stubborness are greatly appreciated.


I'd have never got this far without mork's script for translating pose presets.
I reworte a lot of it, but it saved me the trouble of inventing some methods. I just adapted their's. Also, I straight stole the math, though it was a job an half getting the math to work (because I forgot there were capture groups in the regex. Silly me.
Since I'm a commenting again, the thing with the generic lable and items owning themselves. While just about every way studio can display those properties, they will relate normal labels and normal names, if you ask them who they are via the script method .assetUri the respond "#Value." In those cases, the solution was to "getOwner" which gave their actual name, but not in Uri format. So, the hack around is to feed the name and literally search the whole morphs folder to try to find the source file.
Basically, the script uses the source file's address to know which folder to transfer morphs from. With .assetUri that can be had directly. getOwner is less reliable. I figure it may fail if you have a case like some odd helper morph that has an ID totally unlike its file name. But I think that will be rare case with character morphs. If it does happen, you can always try a different morph. So if it failed on "Rune 7" you could try Rune 7 Head. Seems reasonably unlikely that every single morph will happen to match a completely different morph package and not have one the assetUri will work on.
From what I can see, the morphs that cause the trouble are those not owned by the root node. So it's more likely to happen on morph packs than character, but the script should be able to handle most possibilities, if you keep trying.
Yes, I also appreciate the work you put into this. Thanks
Thanks so much.
I've found an error where the final morph will be unusable if it is an expression containing both mouth open and mouth open wide. Another of those bits where I forgot the function was originally expecting a capturing group, so the result is NaN.
Will have fix up sometime Tuesday.
Pretty sure they said that at the Titanic launch. :) Probably good night too, but with no feeling of finality.
Appreciate the hard work.
This is fantastic Singular Blues. Thank you so much for sharing. I'm just experimenting now :)
hi j cade,
I much appreciate your efforts to help out, but I'm afraid I don't interpret as well as barbult, so an even more specific, dummy-proof translation is needed.
When you said "select the two center loops around the eye," your attached pic did not clarify which loops were selected - are they perpendicular (X,Y,Z) or a parallel pair along a single axis? Looking at your screen capture I couldn't discern which lines you chose.
When you said "Make sure you get both layers of the eye," which exact parts are you describing - I see in Daz available eye-part options being Cornea, EyeMoisture, Irises, Pupils, and Sclera. (Ignoring EyeSocket until anybody resolves whether that solves the Josie etc. issues)
The Geometry Tool Settings Panel's Vertex Page shows a column listing a total Count # of how many should result in # Participants and # References for both Eyes (L+R) but your Rigidity Group guidelines never included that specifity (Total # each) to ensure we're following your method successfully.
If you can add that extra layer of detail to your existing instructions, it would be a huge assistance to those of us who are slower and thick-headed lol.
Thanks so much!