Daz 3D is part of 
Connect
DAZ Productions, Inc.
7533 S Center View Ct #4664
West Jordan, UT 84084
Licensing Agreement | Terms of Service | Privacy Policy | EULA
© 2026 Daz Productions Inc. All Rights Reserved.
Comments
I would like a tool in the graph editor that could push keyframes around, instead of just click and drag.
I would also like to see smoother animations from puppeteer, or something that could thin out and or smooth the keyframes created by puppeteer.
I'm not sure what you mean by "push keyframes around" - you can already do things like scale keyframes to adjust timing, drag groups of keys around, and there are some menu items that will thin out and smooth keys, although sometimes they don't seem to work as well as they should. I recently did some animation in Daz Studio - what a nightmare compared to Carrara! I couldn't believe how primitive it is for animation - you can only see keys for one item at a time, you can't even move a keyframe - unbelievable!
They're trying with 8.5
I haven't tried these yet but they do have a Smoothing Keyframes tool now in the Animation Menu
Using the Carrara 8.5 Animation Filters
Summary
Carrara 8.5 includes animation filters that allow the user to smooth,reduce, and sample animations. These are useful for smoothing out rough animations, eliminating unnecessary key frames, and preparing animations for export.
Process Overview
Select Animation Range
Access the Filters Menu
Apply the Animation Filter
Smooth
Reduce
Sample
Foundation
This tutorial assumes the user is familiar with Carrara 8.5's sequencer and graph editor, and that the user has set up an animation.
Select the Animation Range
Use the yellow animation range sliders to set the start and end points for the animation filter. These sliders are found at the top of the timeline. The active area will appear brighter than other areas in the timeline.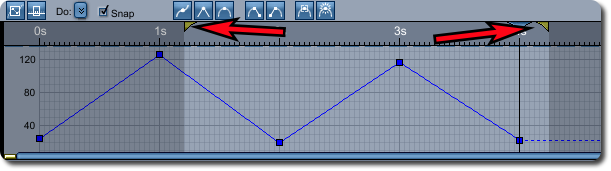
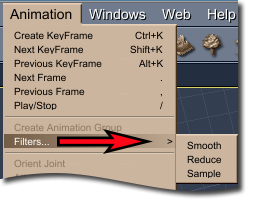
Access the Filters Menu
To access the animation filters find the animation menu at the top of the Carrara interface. From within the animation menu find the sub menu titled “Filters.” All three animation filters can be accessed from here. Click on the filter you wish to apply, and then complete the filter dialogue.
Apply the Animation Filter
To apply an animation filter select it from the menu. Change any settings in the filter dialogue and click 'ok.'
Smooth
The Smooth function smooths out wild keys by flattening the animation. All keys within the selection range are brought closer in amplitude to the average of all of the keys. When smooth is chosen the user can determine the strength of the reduction as a percentage - the higher the strength the smoother the animation.
If the level is too high the animation may become flat. It is recommended that the user start at a lower value, and run the function multiple times to get the desired result rather than starting at a higher value. Smooth is an 'undoable' function however, this means that as long as the function is still in the undo stack the user can use Carrara's undo feature to reverse the smoothing.
Smooth is useful for smoothing out rough keys and points in the animation. Many times sharp corners can be left when using the tangent function in the graph editor. The smooth function can help smooth these out without completely removing the sharpness of the graph.
Reduce
Reduce systematically determines which key frames in the animation are unnecessary and removes them from the animation. When reduce is chosen the user can determine the strength of the reduction as a percentage - the higher the strength, the greater the reduction.
If the reduction level is set too high the user may lose detail in the animation. It is a good idea to start at a low value. Fortunately reduce is an 'undoable' function. As long as it is still in the undo stack the user can revert by using Carrara's undo function.
Reduce is useful for getting rid of unnecessary or excess animation keys.
Sample
Sample increases the number of key frames in the animation by creating new key frames at a determined interval. When 'Sample' is chosen the user can determine the sampling interval. Carrara will then systematically add key frames to the selected animation at the sampling interval. The number chosen in the 'Sample' dialogue will determine the number of frames between each new key frame.
Sample is useful for users who wish to export an animation. Many animations (especially those created in graph editor) do not import very well into other programs. Animations with curves and splines in the graph editor are particular troublesome. Sampling keeps the animation the same, but increases the number of key frames. This will decrease the need to tweak the animation if it is imported into other programs.
Wrap-Up
The Carrara 8.5 animation filters are useful tools to quickly smooth, remove or add keys to an animation. They can be used for a number of different purposes.
Dart, thank you for the link. I will think about it.
No think... Do! ;)
It's fun having input into the dev dept.
During 8.5 beta testing, I noticed an issue with NLA not matching up correctly and Spooky made them fix it for me right away! LOL felt good!
would an invisibility slider in addition to the tickbox,
to make a whole figure or group of things fade without having to mess with the shaders.
for like transporter fades or portal fades, slide the slider, emit some sparkly particles
So imagine the blue circle in the picture is the cursor and you could use that to push the keyframes instead of click and drag. You could change the shape of that curve very quickly and smoothly instead of having to move each keyframe individually, you could even use different shapes or resize it to get the kind of motion you want.
I agree 100% about studio, when I first started with 3d it was in studio. I messed with it for about a year before I realized it's just not going to do what I want it to and moved up to Carrara. I was constantly wondering "why can't I do this? Shouldn't you be able to do that?" Most of the time I felt like I was actually moving backwards when working on animation. The more time I spent the worse the animation looked usually. Aside from being severely limited the animation tools in studio also seemed to be buggy and not work right for me either. In Carrara everything I was looking for in studio is there, made me very happy.
Dart, thanks for showing me the smoothing tools, I had no idea, but those are exactly the kind of things I was thinking of.
I would also like translate coordinates in the modeling room to be displayed with 3 decimal places instead of 2. The value displayed is rounded up to 2 decimal places while the actual position is not. So when you duplicate with symmetry and then position the object by entering translate values, you don't get perfect symmetry. It's a small discrepancy, but has slowed me down enough times that I'm thinking about it.
Does the "reduce" filter actually work? Even set to 1% it is removing all the keyframes in the selected area. Doesn't seem to be any different than hitting "delete". Am I missing something?
Yeah I can't get reduce to do anything other than delete everything, not even just on the one bone, it deletes all keyframes for all the bones within the specified scene range. Not very useful.
Ah - I understand now, yes, that would be good to effectively draw in a curve.
I can't remember if the Reduce filter works that way or the other way - eg. set it to 90% to reduce a little (as opposed to 10%) - have you tried that?
Easy peasy. In the Assembly room, select the Scene on the right and go to the Interface tab. You can change units and the number of decimals. Unfortunately you can't change sthe settings from inside the modelling room - you have to go out to the assembly room each time (which can sometimes be a PITA)
Smooth actually seems to be working quite well on these puppeteer animations. I turned it all the way up 100%
I went out and got a trackball mouse which also helped alot, but it still needs the smoothing
Thanks for pointing that out Dartanbeck!
Yeah I tried 50% and 97% as well. Still deleted everything.
Each time? You mean everytime you enter the modeling room? That does sound like a PITA, and something that should be fixed, should be a global setting that you set once.
I was also thinking this thread might need a subtitle
"Show Scarecrow the stuff he wants that is already there"
No, every time you want to change it. So while the model might be scaled in feet most of the time, there will almost certainly be periodsw when I want to work in inches for some detail. Then I have to exit the modelling room, select the scene, change the units, reselect the vertex object I was working on, return to the modelling room, reselect whatever tool I was using. And then repeat the procedure again whewn I want to change back. Same thing for metres/centimetres/millimetres etc.
@3drendero
Border Rendering Tool: http://carraracafe.com/news/border-rendering-tool/
I have it, but Copyright?
You can get it from archive.org just using the link for download from the carraracafe.com in it
Hi Milo!
@Milo
You mean this: http://web.archive.org/web/*/http://woodscreation.co.uk/border-rendering-in-carrara/
Thanks, send it to me for CarraraCafe uploading.
We can try to email/twitter him or whatever contacts that can be dug up in the archive. It was a freebie once.
The Mega link to the file itself is dead and the archive did not store any Mega content.
Send me via PM your mail please.
Or I can put it at CarraraCafe?
swap arms and legs pose symmetry for duf character!! !! !!
How bout better ambient light?
Now you're just grasping at straws! LOL
Ambient Light setting is perfect as it is - which is only there to simulate an overly simple version of what the immensely adjustable Indirect Lighting controls in the Render Room do.
Years ago, Age of Armour suggested that we all try using Ambient set to be really dark and then turn up the level a bit. I still use this to this day.
I am mostly only interested in doing animations, so I don't really use the indirect lighting because it makes render times unrealistic.
But thanks for tip about turning it dark, I'll try that.
Here, it's easier to show than to tell ;)
For the record, I don't use Indirect Lighting for the same reason. If I felt I really needed it, I've found that Ambient Occlusion can perfrom really well in Carrara. But instead, I use both ambient as well as some lights that I use only on the object in question, so that the ground and other objects won't turn them to shadows before touching the object (my character) and not using shadows can be a real pest when the mouth opens.
Ambient can also contribute to making the inside of the mouth or other dark areas too bright. So it's always good to open mouths and do a test render.
PhilW's advice on using a Linear Workflow with Gamma Correction set to 2.2 can really give nice results, but it can really be tough to get a scene dark if we need the darkness. So for that I just switch back to not using Gamma Correction. But GC = 2.2 is how the PBR engines like Octane and Iray are set, so doing so in our native render engine creates a look very similar to those, which is pretty neat to see! ;)
Thanks,
I haven't messed with Daz studio much since iray came along. What I was thinking though was it would be nice to have an ambient light like the uber environment light I used to use in studio with 3delight. I think that one looks better than Carrara's.
We can also add BiGradient or image maps (or even just a simple color) into our Background channel (Scene settings) and using Global Illumination for more of an Uber light. We can also create Environment Lighting base upon a map on an object. Both of these take longer to render, but there's always a price for push button fixes to replace design.