Daz 3D is part of 
Connect
DAZ Productions, Inc.
7533 S Center View Ct #4664
West Jordan, UT 84084
Licensing Agreement | Terms of Service | Privacy Policy | EULA
© 2026 Daz Productions Inc. All Rights Reserved.
Comments
Some dual specular lobe testing.
1. Default G8 with two box mesh lights.
2. Specular map moved to Dual Lobe Reflectivity.
3. Inverted specular map as specular roughness.
Do we have the additional information on iray's use of dual lobe textures? Dual Lobe reflectivety does appear to add an additional level of detail in closeups. But right now, I can't say the additional texture settings without more specialized information on how exactly the new layer interacts with grayscale textures is worth the investment when the top coat is so responsive to manipulation. I do like where this is heading though. Here are my side by side. The new render has duallobe specular map and roughness settings.
Texture use within the "Dual Lobe Specular" layer is the same as in the "Glossy" layer. sRGB values are converted into Linear space values (approximation to convert Linear to sRGB: "Linear Value"^(1/2.2) * 255 = "sRGB Value"). [A more exact Excel formula: “=255*IF(D10<=0,0031308;D10*12,92;(POWER(ABS(D10);1/2,4)*1,055)-0,055)", where D10 is the cell containing the Linear Value to be converted.]
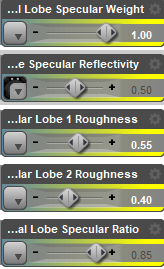
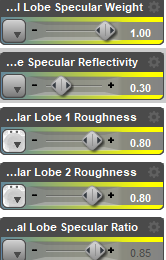
One thing to bear in mind is that the "Dual Lobe Specular" layer is thought as a replacement for the Base "Glossy" and "Top Coat" layers, not as an addition. It combines two layers of the same reflectivity but different roughnesses into a single layer, to get "a sharp highlight surrounded by a blurred reflection".
Another thing is that, as in the "Glossy" layer, "Dual Lobe Specular" Roughnesses uses the same method of squaring the values. So, in case you intend to use measured roughness values, you need to use the square root of that special value. F.e. 0.547723 for a measured value of 0.30.
In case of the new Genesis 8 line of figures, "Lobe 1" uses the "adjusted" value of 0.547723 (which squared will get 0.30) while "Lobe 2" uses the unadjusted value of 0.30 (which, because of getting squared, is in fact a 0.09). So "Lobe2" is responsible for the "sharp highlight" while "Lobe1" provides the "blurred reflection".
Reference: NVIDIA's MDL Handbook PDF as of 21 August 2017 (Chapter 6.6, pages 123 - 125).
Incredibly clear explaination. Thank you. I will try again.
Can someone please explain the difference I get between merging colors in Photoshop and using Iray diffuse overlay option?
All three spheres have Daz Uber applied with Glossy weight set to 0. Sphere 1 has 255.0.0 as base color, diffuse overlay at 0.5, squared "off", overlay color 255.255.0. Sphere 2 has 255.128.0 as base color. Sphere 3: 255.255.0 base, diffuse overlay at 0.5, squared "off", overlay color 255.0.0.
First image: diffuse overlay set to scatter only, second image: diffuse overlay set to scatter transmit intensity.
If there is indeed a positive difference between baking, say, skin details in texture and processing the same details within iray shader, we could get some interesting results.
Two more tests, with Diffuse Strength from hidden parameters set to 0.5 (image 1) and 0.707 (image 2, in case it's squared) for spheres 1 and 3. Still no match with the control sphere.
Hello...
I'm actually now at wits end with this render. I've been fiddling with skin settings for 4 days now, to no avail. No idea what else to do...
Textures on both are, in Base Colour: Diffuse + SSS + Blood vessel maps. Translucency colour has SSS maps (grey map for Makeda G3F set to a grey pinkish colour, coloured SSS map for FW Marcus for Darius 8 set to white). Both have the same skin settings. Faces, bodies, limbs also have the same settings. The faces are just different somehow.
Some assistance with settings and possibly explanations as to what I'm doing wrong will be greatly appreciated. Lots of time has been spent here.
(Added Nyarai for G3F textured model. She has the same settings as listed.)
You're running into a problem that bothers me often so I try to work around it in my own characters. The texel density in the face UV patch is about 4x higher than the torso. But both are usually 4k textures, so that means that you are abruptly going to 4x less pixel resolution along that edge where the face connects to the torso. Unless you're creating your own maps there's really not much you can do about it. Try to lower bump or spec in the torso to get it a little closer to acceptable. No other way than to eyeball it. Good news is that this edge is usually hidden by hair. Where it bothers me often, especially with dark skin since the spec and bump is so prominent, is on the side of the neck.
Oh and it seems you're using Annagenesis? This makes the issue even worse because there is one microskin map used for all UV's, so the face now not only has 4x more resolution purely on a pixel by pixel basis, but it also uses more of that map in a much smaller part of the body so it ends up being more dense. Think like same amount of butter stretched over lots of bread (torso) or condensed onto just a small piece (face). The more dense fine noise patterns like that get the less rough they are going to be to the renderer, so you end up with way more spec in the face. Hope that makes sense.
If you have Lyra, Young Lyra, Faye or Yara, you could try those microskin maps instead as I've countered the effect as well as possible.
Maaan...tch. This is wild. I like the rest of the body texture on the Monique 8, Makeda G3F texture model. Having it lowered to that of of the face would be regrettable. I'll however try this suggestion. That 4x thing is certainly interesting...hm. I'll see.
Also, hair is a good idea. Haha. I'll attempt that too. Thanks
That definitely makes sense. Lyra's skin looks great man. Wow... I'll see what I can do. Thanks for your help.
Hi everyone,
Does anyone have these 'Amari Jun's blood vessel textures' available metioned in the main posts of this thread? They links are all dead and the Wayback Machine only has the original page without images or downloads (https://web.archive.org/web/20150924021006/https://amarijun.wordpress.com/2014/04/13/genesisgenesis2victoria4-blood-vessel-textures/).
Would be very much appreciated!
Please don't post other's content without prior permission.
Thanks for posting the image with skin settings
Tip for unvarnished nails:
Boost the Glossy Reflectivity to .7, set the Glossy Roughness to .45. Set the IOR to 1.52 (I think this is correct) and set the refraction weight to between .25 and .5.
Any ideas on how to pick SSS color when using Chromatic mode? Would it be the same for any skintone, or would it vary? For this render, after a lot of trying different things I came up with RGB 220,210,200 and a scattering distance of 0.045, but I have no idea how far off that is from real-world scattering measurements.
I think but I am not sure that the color when using chromatic is supposed to always be a shade of grey.
That's a cute little lass you have there!
You can try RGB 236, 216, 207 (or more precise: 0.846200 / 0.695030 / 0.630968) for a Scattering Measurement Distance of 0.01. That's based on the real-world measurement for an average caucasian skin type from the sources I mentioned some pages ago. If you want to stay with your Scattering Measurement Distance of 0.045 you can use RGB 181, 121, 99 (more precise: 0.471659 / 0.194543 / 0.156186). Since each coefficent is a constant (for a given measurement distance), the resulting color changes anytime the used measurement distance will be varied. (Iray uses the RGB colors put into to calculate the corresponding scattering coefficent from it and further uses only theese coefficents for rendering.)
While Transmission depends on melanin fraction and type blend, hemoglobin fraction and blood oxygenation ratio, caroten fraction and the amount of water contained in the epidermis and dermis skin tissues, Scattering depends on the amount and density of collagen fibers and other cellular structures skin is made of. Although this will vary from individual to individual and part of the body, the difference would be very small, within the hundredth/thousandth digit range. Too small a bare eye would even notice. So it's legit to use one and the same chromatic SSS Color for any skin tone, be it asian, african or caucasian.
But I'm not so sure about a martian one...
That's true for the SSS Mode "Mono" (SSS Amount defined by a single decimal number), "Chromatic" Mode is in full RGB color.
Thanks Arnold! How do you determine the color coefficients for a given distance? Also, I've seen posts about how the Scattering Measurement Distance isn't really a distance at all, it's just a factor that gets divided into the SSS Amount in mono mode (in which case, it shouldn't really matter what SMD you set, as long as the SSS Amount / SMD ratio is correct). Is this true for chromatic mode too?
You're welcome. For the "Chromatic" mode the Iray plugin calculates the Scattering Coefficient using the following formula:
Scattering Coefficient = log(Scattering Color) / (-1 * Scattering Measurement Distance)
The result is the linear color value for the respective RGB color channel, so you need to calculate the color values for each channel seperately. All three color values will then give you the final color you're looking for. Due to the restriction by the input matrix we're only able to use the coefficients for the Red (750 - 650 nanometers), Green (575 - 490 nanometers) and Blue (490 - 420 nanometers) wavelength ranges of visible light, so it is a very simplified solution. But perfect accuracy isn't in Iray's job description anyways as an "everyday-rendering-solution".
Inexplicably the Iray-plugin needs the amount of light scattered (given as a linear color value) before its photons (of a specific wavelength) have a chance to travel through the given distance of measurement to calculate the coefficients from, instead of simply using the respective coefficient directly put in. In the example in my post above, the 0.846200 means that 84,62 % of the photons of the red wavelength range get scattered before they have a chance to travel through a distance of 0.01 meters in that volume.
So, if you know the respective coefficients for the red, green and blue wavelength ranges of a specific material you're able to calculate the needed color values (in linear space) to put into. On the above example I used the coefficents of 16.7, 36.38 and 46.05 (in a 1/cm scale, which means "per centimeter") I picked from a research paper about the optical properties of human skin. On a recent update DAZ changed Studio's world scene-space scale from the formerly 1 centimeter to 1 meter, that's why I used a Measurement Distance of 0.01 (m).*
For the RGB values I'm always using data for the 700 nm, 550 nm and 450 nm wavelengths, about the average of each wavelength range.
(*) Nah, sorry, I nearly forgot that since the chromatic scattering mode was implemented, the shader includes a special "Fixed Scale" brick, which scales the 1 meter world scene-space scale internally and secretly back down to 1 centimeter, but for the shader only. That was needed for the older materials to work without having to get completely overhauled.
The real reason I used (and had to) a SMD of 0.01 was, that subsurface scattering is multiple times higher than transmission. Since Iray requires you to use a linear value between 0.00 and 1.00 to work properly, the SMD had to be lowered to get a color value below 1.00. That's not 0.01 meter, but 0.01 centimeter!
Then theese posts are wrong, the Measurement Distances aren't factors, the coefficients are. If you're changing the SMD but leave the SSS Amount color value as it is, the result will be a higher or lower coefficient, and so you'll get the optical properties of a more or less different material. What you can do is put the above formula into an Excel- or OpenOffice-Calcsheet and let it calculate the respective color value(s) for a given coefficent (a constant) by using a different SMD-value (a variable). Raising or lowering the SMD will always result in a different color value.
Helpful if the result is a value of 0.000000, which is strongly recommended to definately be avoided, since it will give you highly unrealistic rendering results, especially regarding volume transmission. Which, by the way, uses a similar formula, but instead Scattering Coefficient, Scattering Color and Scattering Measurement Distance Absorption Coefficient, Transmitted Color and Transmitted Measurement Distance are used.
For the "Mono" scattering mode, the formula is a bit simpler:
Scattering Coefficient = SSS Amount / Scattering Measurement Distance
Hope that helps and I was able to explain it in an understandable way, since english isn't my native tongue.
P.S.: If you're also maybe looking for a more decent Translucency Color for the Genesis 2/3 line of figures, you might try RGB 217-133-114 (0.701169 / 0.238828 / 0.170138) in combination with a RGB 250-255-255 SSS Reflectance Tint instead of the dark orange, red, pink, whatever is currently in use.
That color is the result of epidermis/dermis optical properties put into the formula for the absorption coefficent, and using that instead will make the veins painted onto the SSS texture maps visible again. Or after all...
So... we have a standard for SMD and the color based on that for SSS. What about TMD? The standard used to be 1 (if I recall correctly), and I think that would naturally change to .01 based on the change of Cm to M just as the SMD changed. No? And what about Transmission Color? Is there a way to figure that?
What I find odd is for all the talk of PBR & iRay and being based on accurate physical world measurements and considering also the fact that human beings are the primary center of interest in images created using PBR techniques that there isn't a publically available list of comprehensive standard PBR settings (not texture & map images just settings & colors where appropriate) for a reasonably sized subset of human skintones (they'll be really a reduction from countless subtle varients, unlike Lake Wobegone, no one real person will be any of the PBR skintone subsets of average stereotypical phenotypes that are collected, although probability say there might be one or more people that are and some might be part of the averaged samples) at some standard temperature, lighting environment, and it has to be said but not insultingly but as a practical technical matter, some standard of cleanliness, like 3 hours out of the shower at 72 degrees fahrenheit, and 65% humidity.
As I corrected in the post above, the scale is shaderwise internally changed down from the 1 meter world scene-space scale back to a 1 centimer scale. So you can stay with the 1.00.
As mentioned in my post from July 12, transmission is a bit more tricky and komplex than scattering and depends on many varying factors. The Absorption Coefficents are calculated by using a formula similar to that for the Scattering Coefficients:
Absorption Coefficient = log(Transmitted Color) / (-1 * Transmitted Measurement Distance)
Now you could waste your time and go for the hunt for real-world measured absorption coefficents for certain skin types (they're really hard to get), but the solution to get an appropriate color value to use for your DAZ figures is surprisingly a very simple and much less time consuming one:
Due to the circumstance that the diffuse textures had to be usable in both Iray and 3Delight, they just include the final melanin fraction and type blend, hemoglobin fraction and blood oxygenation ratio, and caroten fraction information needed already built inside. Just load a diffuse texture from a certain figure into a graphics editor like Photoshop and pick the color from an area that doesn't contain any ambient occlusion (dark area) or reflection information (highlight) and that matches the overall skin tone best. (For that I'm using a "3 by 3 Average" pixels sample size). Assure you're using "RGB Sliders" set for the color readout. Note down the RGB values you just picked and put them into DAZ Studio's color picker for your Transmitted Color using a Transmitted Measurement Distance of 1.00. That's it, Transmitted Color is always the final skin tone.
Sounds good.
Thanks @Arnold C. You're dedication and perseverance are always appreciated. I wish I could do the maths and speak in a non-native tongue half as well as you.
Alas, these settings yield a mostly transparent character, even with "Show Dome" set to "On". Clearly there is more to understand, still.
That happens with bright lights and transparency set to high but the catch-22 is if you lower the transparency strength too low the skin starts to look hard and plastic. .
It's almost as if one needs to make a geoshell that has the desired material settings & texures (if that is even possible with geoshells) and underneath it have the original with the transparency strength set to 0.
Thanks.
That's odd. None of these parameters should have any influence on transparency. Which character did you use this on? The parameter that's controling the level of transparency is "Refraction Weight". You could check if that is set active (a value >0.00). If it's active you should shut it off.