Fiddling with Iray skin settings...
 8eos8
Posts: 170
8eos8
Posts: 170
(Update: revised settings in posts #18 and 300)
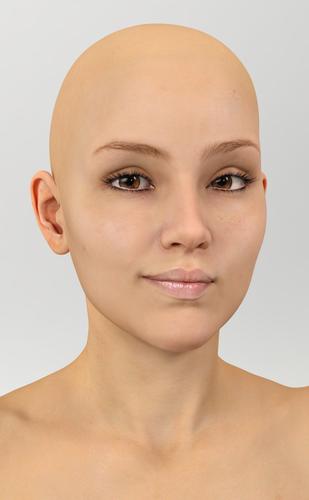
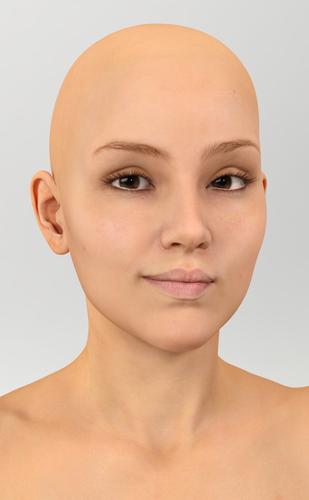
I've been playing with the Iray skin shader based on the docs and various suggestions posted here, and here's what I've got so far. The first image is Olympia 6 HD with the default AoA shader. The second image is what I get when I apply the Iray optimized skin. The third image is the Iray skin with these changes:
Shaping
- Eyes Cornea Bulge: max out to 1
Surfaces
- Translucency Color: HSV 9/180/220
- Glossy Reflectivity: 1 (might be too shiny, I'm going to try 0.9 as well)
- Glossy Roughness: .07
- Top Coat Weight: 1
- Top Coat Roughness: .07
- Top Coat Layering Mode: Fresnel
- Top Coat IOR: 1.333 (= IOR of water, maybe make this 1.5 or so for an oiled-up look?)
- Transmitted Color: leave color as-is, and add these blood vessel maps
- For cornea, eye surface, and tear surfaces, use "Water - Thin" shader
- For cornea only, set Refraction Index to 1.37-1.4 (sources differ on what the IOR of the human cornea is...)
I'm pretty happy with these results. Any suggestions for what else could be tweaked? (I'm thinking Top Coat Thin Film could be useful for glossy lipstick) And does anything look outright wrong to you? I've been looking at these for a few hours and my eyes feel like they're going to pop out of my head so I need to take a break now. :)

Daz 3D is part of 
Connect
DAZ Productions, Inc.
7533 S Center View Ct #4664
West Jordan, UT 84084
Licensing Agreement | Terms of Service | Privacy Policy | EULA
© 2026 Daz Productions Inc. All Rights Reserved.
Comments
I also did some renders of the tweaked settings with different HDRIs (Arches, Ditch River, and Winter Forest from sIBL Archive).
I am impressed, and thanks for the thread. The skin surface nid-bits are spread all over the place, and in incomplete in-passing hints.
There was a starter cheat sheet in the Tips and tricks thread, tho I never had a chance to follow it up.
http://www.daz3d.com/forums/viewreply/784922/
I did try the three different mat presets that Wachiwi had, and tried the Ctrl-Click thing on all three with G2F's Iray mat. The color was either way off, or the mats looked like play-doh (flat mat looking no gloss or peach-fuzz). Needless to say, the best looking one was the no SSS shader mat, and left as is without converting to Iray. It still looked really bad. I am eager for suggestions that dose not require remaking Fred's and Sabbys works from scratch (I don't have the tools, let alone the source materials for it).
I find it very helpful to make a G2 figure with optimized shaders, particularly to steal translucence maps (which rarely have a good texture available, and doesn't need to mesh as closely to the look of the character)
I often flip back and forth, adjusting things. One thing I've noticed is that the base optimized figure likes to have a trans map in the color of the translucency. I don't think that works well, and move the map over to translucence strength.
skintest1a-default_hd.jpg Looks the best over all. good balance of gloss where it is needed, and not overdone.
skintest1a-default_iray.jpg The lips are to glossy on the uppr edge, and over all wet looking.
skintest1a.jpg on the edg of to glossy on the cheeks and forehead (glossy plastic looking).
Yeah, I do need to tone down the shininess a bit. I just found out that using the Iray Uber Base preserves the original skin tone better than the optimized skin shader (which screws up the color like you said). So I'm going to redo some of these starting from that. Also try the translucency maps too. (Tomorrow....right now I'm going to bed :))
One thing you might want to look at as far as shine or lack on skin is where the specularity maps are placed when you convert over. For some whacko reason people have wanted to put them in the specular color slot rather than in the strength slot. If you leave them in the color slot the skin gets very flat. Try moving it to glossy reflectivity. You may find you still need to make adjustments to the strength depending on the map. I've been doing a fair bit of reading and per the information I have read on PBR shaders the specular color on non metalic surfaces should never be higher than 80,80,80. If you follow that "rule" that will also mean you need to make adjustments to strength. If your using a top coat then be sure that the specularity map is also in reflectivity as well. I admit though that I have not done many tests with and without top coat.
I've been just thinking about something like that. If the specular map is supposed to be where the skin surface is reflective, then WHY is it not in the 'Surface roughness' spot? After fussing with mirrors a bit, And that staph of render hell, the concept of specular vs roughness confuses me a tad.
Or dose that specular strength, also control velvet (peach fuzz), and roughness only reflectivity?
If so, it's only a matter of inverting the specular map (making it negative in an image editor), and dropping it in the 'Surface roughness' spot.
Think of roughness as micro texture on the surface. A piece of glass has almost no roughness and it bounces back light sharply and clearly. Human skin with all its tiny imperfections is very rough (see Jurassic park- chaos theory) and so it bounces the rays of light hitting it many different directions. When the rays are bounced from all those angles you have a less sharp reflections of the light and so it is "fuzzier". I'm not sure what putting a strength map into roughness would do exactly other than control where the roughness was strongest. It might be interesting to see in action.
Inverting a specularity map will not do anything other than reverse where specularity/gloss/light reflectivity should be on the surface. I suppose you could try placing a bump map in the roughness since bump is part of what breaks up specularity on surfaces.
One ongoing issue is that way to many content creators have been happy to use the skin tone and some filtering and maybe a little highlighting in Photoshop to get a specularity map for the human body. In other words many of them are not very good as far as realisticly placing oily or dry areas on the human body.
I've not studied this fully so some of this is conjecture.. Velveting is really a different sort of reaction of the surface if I understand it correctly. With a PBR shader the velveting is due to the way that light scatters on the surface and just below it. I should have a better handle on this in a day or two. I'm assuming that when you say peach fuzz in relation to velvet your talking about human skin. That effect is actually caused by the tiny hairs on the human skin as it breaks up the light and scatters it before it even hits the skin. With fabrics like worn cotton the wear (breakage of fibers) has much the same effect as they break up the light before it hits the rest of the fibers. So when we start to work on velvet on surfaces that is going to be a scattering function.
Hrm.
It looks like, for a lot of skins, I'm going to be forced to choose between displacement and translucency. Which do you guys think will be more significant in good-looking skin?
And is negligible.
Basically, there is no need to account for it, if you are using a photo based texture...it's already been accounted for. So, unless you are trying to do Hank McCoy with a dye-job, trying to fit the fine hairs in is just doubling up on it.
Thanks for the info shared, I tweak some settings and I'm fine with the results so far...
I'm not sure why you should have to. Why do you think you have to choose? I'd say that translucency and or SSS was more important than displacement most of the time with skin textures. Not many use displacement that I recall. I know there are some products to add it however.
When I use translucency and displacement, I get ugly bright tear lines between surfaces.
I have a few more things to try -- I've been using -.2 thru .2 displacement, but maybe making min or max 0 will help...
A 4mm range...that's some pretty darn big moles you have there...
Large veins, on a bodybuilder, may stand out 2mm, when flexing, but most skin details are in the fractions of a mm range...and you get the camera more than a couple of feet away and all you are going to get are the 'large' ones anyway.
Thanks Khory, been off waiting on a CPU bound Iray render, lol. Wachiwi's three mat options (I'll add the third when it's done).
I suggested negative of spec-map, as the values are inverse. Black in the Roughness is reflective, instead of white in other settings.
This is the default shaders, not converted to Iray. "O" do the eyes look wrong, lol (one thing at a time). The mats are Daz Default shader with no SSS, AoA shader with SSS, and an Omni Alternate SSS shader. Added a forth one using 3delight (3DL), just to give a glimpse of the skin color, the light intensities are not exact tho.
Lamenting moment, lol. :coolmad:
Remember how I kept asking and begging for DazDefaultShader alternate presets to allow setting up lights without excruciating render face-plant time. Guess what one map preset looks the closest in Iray, to the example 3DL render. The noSSS DazDefaultShader preset one, lol.
A very special thanks for this. I've been really struggling to get the skin right on my Iray renders and this has proved very useful. Incidentally, the quoted Translucency HSV values are for white skin only. They will wash out the skin on a darker-skinned siren.
Cheers,
Alex.
Quick note for eyes as I fire up another set of test renders. The gloss layers lose there Opacity settings, giving that milky look.
I loaded up Wachiwi's mats and did the Ctrl-click on the top Iray shader thing (Not the G2F one) in the Iray Uber Defaults folder, and 'Ignoring Maps' thing.
Then I just threw dials blindly till I got a combination that was not milky looking. After resetting everything, and applying only the dials that worked, here is the settings.
Thanks for all the comments so far! I had some more time to play with this and found out that using the Iray Uber Base shader does a better job of preserving the original skin tone than the optimized skin does. Also, according to the shader docs, it looks like I shouldn't be messing with Glossy Reflectivity, I should just keep it at 0.5. They suggest plugging specular maps into Glossy Layered Weight instead. Anyways, I redid some of my tests as follows:
skintest2a.jpg
- Apply Iray Uber Base to all skin surfaces (note: NOT the optimized skin material)
- Apply Thin Water shader to cornea/eye reflection/tear surfaces
- Set cornea Refraction Index to 1.38, and under shaping set cornea bulge morph to 1
skintest2b.jpg - 2a with these settings:
- Move specular maps from Glossy Color to Glossy Layered Weight
- Increase Base Bump weight to 1
- Remove specular maps from Top Coat Color (just leave it as white), and add bump maps to Top Coat Bump
skintest2c.jpg - 2b with these settings:
- Use Amari Jun's blood vessel textures for Translucency Color (note: I got confused and had this on Transmitted Color originally, it seems to have no effect there)
- Set SSS Direction to -0.5 (for some reason this was 0 by default, which would be no scattering effect)
- Set Top Coat Weight to 0.4, Layering Mode to Fresnel, and IOR to about 1.42
My reasoning with changing Top Coat Layering Mode to Fresnel is so that you can use the IOR (and Top Coat Weight) to control the consistency of the top layer of sweat and oils on the skin. I need to experiment with this more though. Some values I found on the internet:
1.333 - pure water
1.38 - saline solution
1.47 - vegetable oil
1.336-1.582 - silicone lubricants
With all of the renders there's some weird grid pattern showing up on the edges of the shadows, I don't know what that is. But anyways, I think 2c is looking pretty good, her skin looks soft and velvety to me while not looking unnaturally oily. What do you all think?
Really nice render time, I let the computer crunch as I slept.
I looked at that eye bulge thing, and didn't notice much other then what looked like the depth of the eye in the eye-socket, so I left it at zero here.
I loaded Wachiwi's regular SSS skin, and Ctrl-clicked it to Iray Omni shader thing. Selecting the "Skin" in the surface tab, and brought the Diffuse Roughness up from zero to 0.95 (this made her skin color more stable and closer to the 3DL test), then I dropped the Glossy Layered Weight from 0.61 back to a more reasonable 0.15 for a less glossy-plastic looking skin appearance.
The fingernails and lips I left it at 0.61 Glossy Layered Weight, and Diffuse Roughness of zero. Still much more to look at. I gave her Elf ears, so I could look at SSS more easily in this scene, without making her bald, lol.
Yes, I also converted the shirt to Iray, and fussed with the bird as well.
If shadows are bugging you you might want to go high res and SubD to 3 (if the figure doesn't allow it normally, you can 'Convert to SubD' in Edit > Geometry menu)
As for the optimized skin... yeah, I've had good results just ignoring it. The translucency color map is theoretically cool, but I've had decent luck simply deleting that stuff and doing a simple one-color translucency.
I DO use it as a reference, though, for stuff converted with Iray Base.
As for top coat... yeah. It'll also be good for makeup, blood spatter, dirt/grime, and similar, I expect.
warning
I fussed with SubD on that staff in the surface settings, trying to get the Displacement map to stop messing up the spirals, and all it did was make the render times unbearable, like seven times longer going from SubD zero to SubD one (that's both 7 times longer for the delay before pixels START to appear, and 7 times longer for the rendering). I already posted the Q about the Displacement map elsewhere, just thought the effect on render time was important info.
(EDIT)
Also, the weird grid pattern, is a side effect of where the iterations are happening, as it converges the calculated point results. It is Progressive, just like the Progressive mode in 3delight. Iray uses smudged points, and 3delight uses Atari squares, lol.
I've been playing around with eye/skin settings a little bit today. Couple of things that may be valuable. Be sure that thin walled is off so that SSS is active. The upper SSS setting (SSS Reflectance Tint) is used to adjust for sss color and is not really the SSS setting. I'm not really sure about the sss settings as far as distance and direction go yet. I think that the direction is going to be negative so that the light is bounced back toward the surface. I also made sure that the sclera and iris have translucence and sss.
One thing I have noticed in the past is that some textures don't have full black for the pupil or have some specularity set on it. The pupil is a hole in the eye and should be treated as such. Also be sure to check and make sure that the iris does not have specularity of some sort on it. Since it is covered by the cornea it does not have a surface that would reflect.
First render was with the AoA as it loads. Second is the UberIray (not the skin one I think its bunk) with thin wall turned off. I normally move the specularity strength maps from the color slot but I forgot this time. I'll do another render with that done to see what changes it makes.
it's a toss up between 2a and 2c, both are really good for different reasons. For soft light areas, 2a has it. for outside 2c has it.
(EDIT)
Really nice Khory. Possibly, if you want to get the color back a bit, if you didn't already. Crank the Diffuse Roughness way up, it dose NOT effect the reflection or other settings that I can detect, and it makes the skin far more stable to lights for some odd reason. Both with AoA original mats, and the Omni originals that are converted to Iray.
looks good.
I'm wondering if people are staying with the PBR Metallicity/Roughness or swapping over to the PBR Specular/Glossiness which opens up the translucence (something that metals don't get due to the density of the material). Somehow I ended up with some of the surfaces swapped over and some not so my earlier tests are not 100 percent valid as far as translucence. Having the translucence properly turned on does give the skin much more warmth. I was not really satisfied with the first try on the translucence because it seemed to amplify the blush on the face (which I am not 100% to begin with). And I was very unsatisfied with a test with out any base texture for translucence because the eyebrows really faded dramatically. The render I am actually posting uses the face without makeup in the translucence slot. I also noticed that this altered the specularity and its got some odd splotchy bits as you can see from this partial render. The translucence is set at .50 and that may simply be too high for skin as it still seems to fade the eyebrows somewhat.
Last try for now. I've lowered the translucence to .30, put the sss maps that come with Anna in the sss slot and changed the color to white and added the specular strength maps to the reflectivity. As you can see it is still washing out her eyebrows some and I'm not sure what should be done for that other than adding an extra mask in translucence weight perhaps.
So this is my current skin setup.
I used the automatic conversion rather than the preset.
I haven't touched the SSS other than to put the SSS direction to -.5 as mentioned by 8eos8.
However, as you can probably tell I have significantly altered the spec settings.
I got rid of the spec map on the glossy color (for the main glossy there are no textures at all) set the glossy layered weight to .2 and the glossy roughness to .55 (for the lips i increased the reflectivity to .61 and lowered the roughness to .46).
I increased the bump to 1.
I placed my spec maps in top coat weight and set the value to .85, set the roughness to .55, set the layering mode to fresnel, and set the IOR to 2.15.
My aim is a sort of glossy magazine look. I will probably make another version while looking at some movie stills who's lighting I like for a more traditional realism approach.
@8eos8 I really love the lighting in your second example I think the veins are a really nice touch, but probably a bit over the top, I think perfect would be a combination of the final two images. I wish it were easier to combine different textures (LIE is a bit slow, especially when modifying a bunch of maps).
She looks very good Kamion99.
Very nice Kamion99, I'm still getting to grips with so much stuff in Iray. Sunday-night I let a render run while I slept, and it just was way to flat looking, because I had to much light coming from everywhere (the sky-box), and not enough from the sun (photometric spotlight, way off in the distance).
Today, I had time to let the computer run two hour light tests, resulting in the second eight hour render. I didn't ketch the flat one in time, tho the second one ended at about 88% converged.
Skin, I left it at whatever the Iray shader set it to (from the folder with the metals and what-not). I decided to swap out the figure for the all out Wachiwi2 figure. I saved the former posted Skin settings as a Material Preset (along with the other stuff and pose), then applied it all to wachiwi, and removed G2F7W from the scene. I ended up with the flat render. Yes, I added the same Elf ears, to look at the SSS eventually.
Yesterday before the hot water heater exploded, I put a building in the scene off the the left to block some of the light from that direction, and started looking at the light values using that color cube. Then I was swimming in here for a bit wile the computer kept running light level test renders, lol.
A day later, and a new water heater installed, here is the larger render results thus far.
Good luck with the house studd, yeesh!
Really great renders and good info.
Really love your natural poses and smile Kamion99... really adds realism to your render.
I swear with all the iRay threads I think this new render engine deserves it's own forum! lol