-
OFFICIAL DazToCinema4D Bridge 2022 (SEPTEMBER UPDATE): What's New and How To Use It
My impressions thus far :
(versions used were S24.111, R25.010, R26.013)
Basic devload figure without morphs except for the basic arm,leg,torso jcm works in all three. I was positively surprised that you got the correct joint alignments working on import. For that alone will fix alot of issues that were previously a massive headache for the end user. And finally having properly setup erc within expresso I am really glad about. Another user and me already had a python based way to assign those automatically but having something that works out of the box is definately great to have. I will have to see if any other erc morphs other than the basic ones you can export will also be setup automatically, but this is definately a step into the right direction. I surely hope the plugin is somehow able to pick up on erc based connections that exist in the file and automatically set these up in c4d, this way you could even use more elaborate fix morph packages.
What did not seem to work for me was a figure with clothing etc. The import would simply stall out and hang up C4D on all three versions. this was a simple one figure setup with 4-5 clothing items, an FBM and FHM and base jcm export.
I really thought this bridge was dead in the water but you came around and fixed the joint alignments and added the erc connections. The rest I can make work myself, so for me this is already a big win and the most important stuff to have, but you really have to iron out what causes those hang ups with more complex exports.
Oh another thing I noticed. The weight tag for the skin weight is set to linear on export, but should be set to spherical for the correct look.
Question : what does the "Auto JCM" button do? I could not see a difference between using that or leaving it off; the jcms seemed to work regardless.
While further playing around I noticed that when you export animation data to C4D from DS and want to apply these poses to the joint corrected figure in the c4d scene, it is all wrong due to the animation data still coming in with default joint alignments and data being in HPB and not the fixed ones. In order to fix this you will have to create a sort of offset mechanism for the imported animation data or this will be useless for exporting poses or animation from DS to C4D. You are on a good track right now though, so keep it up. The export of poses would go a long way to have a good base to work from, but I understand that it might be a bit tricky to figure out how to properly offset the joint alignments for the animation data to match up with the corrected joint rotations on the exported figures.
Changing origin of imported objI have imported an obj. The import went smoothly, but the props is not centered at (0,0,0) and is even 5m away from the world origin. The object origin is more or less correct at the center of the object and moving it with joint editor is useless.
I tried to center the object before creating a support asset. When I instantiate it it is properly positionned at the world origin, but it has an absurd translation in the parameters and of course rotations do not work as intended.
I tried a couple of mcasual scripts, but they just do what I realized by hands and it did not change anything.
What can I do to have the object properly centered at the orgin?
Skin properties missing when exported to BlenderAs for the wet skins be sure to get the latest version of diffeomorphic that's actually 1.6.2. It does import refractive shells be sure to use the bsdf option for materials and the material option for shells, since the new geonode shells are experimental and may not work fine yet.
As for your skin example you probably imported a daz skin with zero specularity in all channels. The plugin actually imports glossy, dual lobe and top coat. Again use the bsd option for the best result.
Or you can import with the principled option for materials then adjust specular and clearcoat as you wish.
What happened And How Do I Fix It...Thanks for taking the time to help me with this. I am not that smart when it comes to the workings of DAZ Studio so u please explain it like I dont have a clue. So I was making a render and wanted to use a HDRI image, when I went to import it the setting is no longer there. I supplied a screen shot below. I dont know if its the program or something I did. Is there a way to get it back. I have...
1 Restarted the program
2 Restored the program to factory defaults
Neither has worked.
Added second video card and now I get "striping"PerttiA said:
Have you tried eliminating the lights and environment as the cause
This is a blank default scene with no lights added and no environment set. I open DS, import a G8F character and render.
Daz to Photoshop bridge does not update after first im-/exportI am having the same issue after the first import and export it works but after that it stop updating so confused whats happening, any clues?
Problem with Transfer Utility...Hi,
I use Transfert Utility for the meshes that I import in DazStudio.
For the dresses, I use dForce or Marvelous if I have a large number of frames.
Until now, I had only imported short hair, and Transfer Utility gave satisfactory results.
But when I used Transfer Utility for long hair (with option Shoulder Length Hair) I got an imperfect result.
For some poses, the hair goes into the body of character (as we can see in the picture below)
I consulted the online help for Transfer Utility. I tried to use Convert to a SubDivision Surface, but the result is the same.
Of course, I can find a way to get the bottom of the hairstyle away from the chest by creating a morph.
However, I would like to solve this problem with the DazStudio tools. Cant install DazToO3DE gem bridge on O3DE
I managed to install this on Daz and it works great to export the files, but I have been trying for 3 days to install this on O3DE.
I am confident that I installed O3DE properly, but I just cannot reach the step I highlighted below. The "gem: shows up with all the other germs, and I can activate it, but after I build the project, it can't be found in the O3DE app. i ALSO ATTACHED THE zip FILE FROM gITHUB
I am using Windows 11, and my system is very stable in general, but assuming that I don't do code, other than following instructions, am I missing something?
These are the instructions as per the downloaded ZIP file:
### Steps to install the bridge on the O3DE side
* The bridge will be installed to O3DE as a gem.
* Inside the extracted folder of the bridge, go under '03DE' and copy the 'DazToO3DE' directory.
* Paste the copied 'DazToO3DE' directory to any location in the system where the O3DE gems are stored.
* Navigate to the path ``C:\Users\<username>\.o3de`` and open 'o3de_manifest.json' using a text editor.
* Read the 'o3de_manifest.json' file and find the ``external_subdirectories`` array type property.
* Note the path to the storage location of 'DazToO3DE' directory and add it to ``external_subdirectories`` array. This step will enable 'O3DE Project Manager' to look for the user installed gems in the system.
* Using 'O3DE Project Manager', create a new project and configure it with the 'DazToO3DE' gem.
* Build and run the newly created project.
* 'Daz Importer' action can be found under 'Tools' menu which can be used to import an exported character asset from Daz Studio.
* While updating to a newer version of the bridge, replace the 'DazToO3DE' directory with the latest content.## Directory Structure
Files in this repository are organized into two distinct top-level directories, named after the applications that the files within them relate to. Within these directories are hierarchies of subdirectories that correspond to locations on the target machine. Portions of the hierarchy are consistent between the supported platforms and should be replicated exactly while others serve as placeholders for locations that vary depending on the platform of the target machine.Placeholder directory names used in this repository are:
Name | Windows
------------- | -------------
appdata_common | Equivalent to the expanded form of the `%AppData%` environment variable. Sub-hierarchy is common between 32-bit and 64-bit architectures.
appdir_common | The directory containing the primary executable (.exe) for the target application. Sub-hierarchy is common between 32-bit and 64-bit architectures.[OwnerURL]: https://www.daz3d.com
[TwitterURL]: https://twitter.com/Daz3d
[LicenseURL]: http://www.apache.org/licenses/LICENSE-2.0
[RepositoryURL]: https://github.com/daz3d/DazToO3DE
[DazStudioURL]: https://www.daz3d.com/get_studio
[O3deURL]: https://o3de.org/download
[ReleasesURL]: https://github.com/daz3d/DazToO3DE/releasesDiffeomorphic DAZ Importer version 1.6.0 released@marble @benniewoodell Just tried Kento 8.1 and he works fine here, there's no black skin whatsoever with any material option. So please describe the exact steps to get the issue, and/or provide a duf scene as simple as possible reproducing the issue.
Be sure to get the latest diffeomorphic development version, that's acually 1.6.2.1034. Be sure to update both the blender script and the daz script. Also please state your blender and daz studio versions.
my steps, daz studio 4.20, blender 3.2, duf scene attached:
- export Kento 8.1
- import Kento 8.1 with any material option
- render with cycles or eevee
how to apply the side burns for short-beard-for-genesisYou are using Smart Content, right? Well, surprise, surprise, there is no metadata at all for the sideburns, so they will not show up. Look in the Content Library. Follow the path from DIM, or look in the .zip file. The ReadMe is "WIP", ten years later...
Some G8F Character Morphs do not work anymore...* SOLVED *I am sorry for the late reply Richard Haseltine.
Here is the log file after i tried to apply the character preset of Pei to G8F.
------------------------------------------------------------------------------------------------
2022-06-19 21:39:40.939 [INFO] :: Prepare asset load (merge): /People/Genesis 8 Female/Characters/! Asian Characters/Pei/RS Pei !Body Apply.duf
2022-06-19 21:39:40.939 [INFO] :: Locking viewport redraw...
2022-06-19 21:39:40.939 [INFO] :: Viewport redraw locked.
2022-06-19 21:39:41.027 [INFO] :: Native format content directories: 1
2022-06-19 21:39:41.027 [INFO] :: Poser format content directories: 11
2022-06-19 21:39:41.027 [INFO] :: Other import format content directories: 0
2022-06-19 21:39:41.027 [INFO] :: Begin asset load (merge): /People/Genesis 8 Female/Characters/! Asian Characters/Pei/RS Pei !Body Apply.duf
2022-06-19 21:39:41.028 [INFO] :: Determining missing assets...
2022-06-19 21:39:41.028 [INFO] :: Setting textures...
2022-06-19 21:39:41.028 [INFO] :: Applying animations...
2022-06-19 21:39:41.041 [INFO] :: Finished asset load (merge): 0m 0.13s - /People/Genesis 8 Female/Characters/! Asian Characters/Pei/RS Pei !Body Apply.duf
2022-06-19 21:39:41.163 [INFO] :: Loaded morph deltas: 0m 0.122s - /data/DAZ 3D/Genesis 8/Female/Morphs/RareStone/Pei/FBM RS Pei.dsf
2022-06-19 21:39:41.682 [INFO] :: Unlocking viewport redraw...
2022-06-19 21:39:41.682 [INFO] :: Viewport redraw unlocked.
2022-06-19 21:39:50.071 [INFO] :: Prepare asset load (merge): /People/Genesis 8 Female/Characters/! Asian Characters/Pei/RS Pei !Body Apply.duf
2022-06-19 21:39:50.071 [INFO] :: Locking viewport redraw...
2022-06-19 21:39:50.071 [INFO] :: Viewport redraw locked.
2022-06-19 21:39:50.153 [INFO] :: Native format content directories: 1
2022-06-19 21:39:50.153 [INFO] :: Poser format content directories: 11
2022-06-19 21:39:50.153 [INFO] :: Other import format content directories: 0
2022-06-19 21:39:50.153 [INFO] :: Begin asset load (merge): /People/Genesis 8 Female/Characters/! Asian Characters/Pei/RS Pei !Body Apply.duf
2022-06-19 21:39:50.153 [INFO] :: Determining missing assets...
2022-06-19 21:39:50.153 [INFO] :: Setting textures...
2022-06-19 21:39:50.154 [INFO] :: Applying animations...
2022-06-19 21:39:50.166 [INFO] :: Finished asset load (merge): 0m 0.12s - /People/Genesis 8 Female/Characters/! Asian Characters/Pei/RS Pei !Body Apply.duf
2022-06-19 21:39:50.654 [INFO] :: Unlocking viewport redraw...
2022-06-19 21:39:50.655 [INFO] :: Viewport redraw unlocked.
2022-06-19 21:39:53.324 [INFO] :: Prepare asset load (merge): /People/Genesis 8 Female/Characters/! Asian Characters/Pei/RS Pei !Head Apply.duf
2022-06-19 21:39:53.324 [INFO] :: Locking viewport redraw...
2022-06-19 21:39:53.324 [INFO] :: Viewport redraw locked.
2022-06-19 21:39:53.405 [INFO] :: Native format content directories: 1
2022-06-19 21:39:53.405 [INFO] :: Poser format content directories: 11
2022-06-19 21:39:53.405 [INFO] :: Other import format content directories: 0
2022-06-19 21:39:53.405 [INFO] :: Begin asset load (merge): /People/Genesis 8 Female/Characters/! Asian Characters/Pei/RS Pei !Head Apply.duf
2022-06-19 21:39:53.405 [INFO] :: Determining missing assets...
2022-06-19 21:39:53.405 [INFO] :: Setting textures...
2022-06-19 21:39:53.405 [INFO] :: Applying animations...
2022-06-19 21:39:53.417 [INFO] :: Finished asset load (merge): 0m 0.11s - /People/Genesis 8 Female/Characters/! Asian Characters/Pei/RS Pei !Head Apply.duf
2022-06-19 21:39:53.475 [INFO] :: Loaded morph deltas: 0m 0.57s - /data/DAZ 3D/Genesis 8/Female/Morphs/RareStone/Pei/FHM RS Pei.dsf
2022-06-19 21:39:53.519 [INFO] :: Loaded morph deltas: 0m 0.42s - /data/Daz 3D/Genesis 8/Female/Morphs/D.Master/Auto Face Enhancer/G8F Character Links/14 Pei Head.dsf
2022-06-19 21:39:53.972 [INFO] :: Unlocking viewport redraw...
2022-06-19 21:39:53.972 [INFO] :: Viewport redraw unlocked.---------------------------------------------------------------------------------------------------------------------------------------------------------------------------------------------------------------------------------------------------
I have now uninstalled and re-installed Daz Studio more times than I care to mention and upon opening the fresh installation all the morphs work, but when I close Studio down and open it again, they do not.
How do I make my products visible in my Smart Content?To get the most out of Daz Studio you really want to combine the Smart Contents tab and use it in combination with the Content Library tab... for example I have both pinned at the left side of my screen (vertical) to have easy access. Alas... I know this has been explained before but I'm currently working on some renders and I'm fully in "that" mood... DS is one of my all time favorite software environments, right next to stuff as ZBrush, Ableton Live, FL Studio.... and then stuff like this happens ;) Alas... enough offtopic venting, let's dive in!
Add a custom library
Optional, but highly recommended: don't muck around in your main Daz Studio library because that can only become problematic. Adding stuff is easy, but... what about removing? I also strongly suggest that you don't "ab-" use your personal library for it because... why mix re-installable static contents with your own work that you'll want to backup? Waste of backup space!
And this is easy:
- Make a folder somewhere for your custom stuff.
- Start DS, press F2
- Open the 'Content' section, click "Content Directory Manager" at the bottom.
- Decide if you're working with DS contents or Poser contents (maybe both?); add your new folder to the appropriate section(s).
- For now your content folder / library will only be accessible using your content library pane.
Add metadata + categorize
So, the first thing to realize and understand is that the smart contents section is fully virtual: it only exists by the grace of a database, no more and no less. You only need to add / assign so called metadata to your 3D material, and then assign it with its own place within the category section. So how do we 'recognize' the presence of metadata? Easy: by the small rectangluar "icon" in the upper right corner of a product image. For example: expand the 'Figures' category within the smart contents pane, click on "People". Notice the many green (and sometimes blue!) "Actor" icon? That's what I'm talking about.
Now... open the content library pane, browse to a section which contains item(s) that you want to add. In my example I'm focussing on some clothing (a bodysuit) that also came with some material presets.
#1 Categorize
Now, a word of warning: #1 & #2 can be swapped, np. So if you're checking out the "Lost + Found" category for "missing" contents then you should categorize something after you added any metadata (when needed). For obvious reasons: the moment you categorize something within Lost + Found it usually disappears from there. Could be annoying if you still had to add metadata.
Having that out of the way: the reason why I categorize first is to start by thinking what kind of material we're dealing with. In my example a bodysuit, so... right click on the item(s!) you want to add, click "Categorize" and then find a suitable (and logical!) location for your stuff. Also be aware that you can easily make sub-categories (or new ones) if you want to.
I'd add a bodysuit to "Wardrobe => Full-body" and optionally to the "Outfits" section as well (assuming it comes with more accesoiries). SO find the locations and enable the checkbox in front of the one you're going to use. Click ok if you're done, you'll notice that nothing has changed.
#2 Add metadata
Now we're getting to the "cool" part: right click on the folder in the content library pane that contains your item(s) and select: "Edit metadata...". Now this screen can become confusing at first... First: make sure that "Sync product and local database" is enabled (option at top). This is important!
On the top half of the screen you'll see all the physical files. This section will also tell you if metadata is already present (notice the 'file type' and 'type' columns?). Select the file you want to edit. Now you need to select a "Type".... click the small arrow button to open the selection screen. Careful: if you move your mouse too far away it'll auto-close.
Generally speaking...
- Use 'Actor' for older posable figures, use 'Actor => Character' for new(er) ones. When in doubt you'll probably want to stick to 'Character'.
- "Preset" is the most often used section today. Pose? Use "Preset => Pose", clothing? "Preset => wearables".
- Notable exceptions to the point above: Props, Sets, Hair (see 'Follower => Hair') and "unfiltered wardrobes" (when using "Preset => Wearables" you may not see your items appear until you have a compatible figure selected, with "Follower => wardrobe" this won't be a thing (this can be important when you rely on auto-fit to use items for unintended figures)).
When you have selected the right type click "accept", now the main product icon/preview should show the "metadata indicator" as mentioned above.
At this moment you're done and your stuff is added to the smart contents pane.
But wait... there's more!
Compatibilities
The main advantage of 'smart contents' comes from the fact that it can filter your stuff based on what you have selected in the scene tab, and thus only show you assets that are compatible. So let's say our bodysuit is compatible with... Genesis 3 Female, how do we set this up?
And in addition: how do we make the "link" between the bodysuit and its material presets?
In the "Metadata edit" window as mentioned above you'll notice some sections in the lower half of the screen. By default "Categories" is selected, but we also have stuff like "Tags", "Descriptions" and.... "Compatibilities". That's what we're after. Select it, then right click on the entry in the lower half of the screen and click: "Add compatibilities to selected files...".
Now you're taken to a "meta database" as I like to call it, referring to the fact that this is a support section. Scroll around and find "Genesis 3", expand it and you'll see "Female". Select the main entry, click 'Accept' and you should now see this added ("/Genesis 3/Female").
If you click "Accept" again you've now told DS that your new item is compatible with Genesis 3 females and thus whenever you select one in your scene tab it'll show up.
But what about our own stuff? How to tell DS that whenever we select the bodysuit it should show us the compatible materials?
Adding your own compatibilities
Beware! The "meta database" (as I like to call it!) is already in use, so be very careful before you start changing stuff in there. My advice is to add a dedicated node / "root base" for your local stuff add add everything of your own in there. How? Well...
- Add the main item to your scene. So in my example I'd add a Genesis 3 female figure, then I'd add the bodysuit for her to wear.
- Make sure the new item is selected in the scene tab, right click on said scene tab ("Pane") and click on: "Edit => Set default compatibility base(s)....".
- Note that you can select multiple items, for example using control-a or using control-left-mouseclick.
- Click on the "3 dot" button at the end of the entry field.
- You will now see the same screen as when you added compatibilities, but now you can also edit!
- Right click somewhere, use: "Create new root compatibility base". I'd suggest a name like: "Local items" or such (local is easy to find again later).
- Select the newly created root base, click "Accept".
- You're now back to the previous entry screen, but the entry field should have an entry ;)
- Enable "Selected nodes only" at the bottom (otherwise you may interfere with the Genesis 3 node).
- Click "Accept".
What did we do here? We told DS how to identify our 3rd party asset, so all that remains is to "link" this to our material:
Follow the steps I've already explained above to add the material items to your smart contents pane. I'd categorize this under "Materials => Wardrobe", but you're always free to set up your own categories. I'd use the "Preset => materials" type. Now... as soon as you set up the metadata, you need to search for "local" within the "meta database" when you're adding the compatibilities. In case you didn't notice: the entry field on top can be used to search, and "local" isn't an often used word, so it'll be easy to find.
Expand the root base and you should see an entry for whatever you added. Select it in the same way we selected the "Genesis 3/Female" node before and you're good to go.
It sounds more complex than it is ;)
And there you have it!
I've spend hours, no: days adding my own stuff and it made me appreciate Daz Studio all the much more, because with this software we're in full control.
Hope this can be useful for some of you out there!
Chinese Face and Body Shapes for Genesis 3 and 8 Female not workingfrom Log file ...... the shape didn't not change
022-06-19 20:30:54.116 [INFO] :: Prepare asset load (merge): /People/Genesis 8 Female/Shapes/Chinese Shape Presets/LL Chunhua Head.duf
2022-06-19 20:30:54.116 [INFO] :: Locking viewport redraw...
2022-06-19 20:30:54.116 [INFO] :: Viewport redraw locked.
2022-06-19 20:30:54.406 [INFO] :: Native format content directories: 3
2022-06-19 20:30:54.406 [INFO] :: Poser format content directories: 3
2022-06-19 20:30:54.406 [INFO] :: Other import format content directories: 0
2022-06-19 20:30:54.406 [INFO] :: Begin asset load (merge): /People/Genesis 8 Female/Shapes/Chinese Shape Presets/LL Chunhua Head.duf
2022-06-19 20:30:54.407 [INFO] :: Determining missing assets...
2022-06-19 20:30:54.407 [INFO] :: Setting textures...
2022-06-19 20:30:54.408 [INFO] :: Applying animations...
2022-06-19 20:30:54.411 [INFO] :: Finished asset load (merge): 0m 0.5s - /People/Genesis 8 Female/Shapes/Chinese Shape Presets/LL Chunhua Head.duf
2022-06-19 20:30:54.786 [INFO] :: Unlocking viewport redraw...
2022-06-19 20:30:54.786 [INFO] :: Viewport redraw unlocked.
2022-06-19 20:30:58.082 [INFO] :: Prepare asset load (merge): /People/Genesis 8 Female/Shapes/Chinese Shape Presets/LL Chunhua Full.duf
2022-06-19 20:30:58.082 [INFO] :: Locking viewport redraw...
2022-06-19 20:30:58.082 [INFO] :: Viewport redraw locked.
2022-06-19 20:30:58.373 [INFO] :: Native format content directories: 3
2022-06-19 20:30:58.373 [INFO] :: Poser format content directories: 3
2022-06-19 20:30:58.373 [INFO] :: Other import format content directories: 0
2022-06-19 20:30:58.373 [INFO] :: Begin asset load (merge): /People/Genesis 8 Female/Shapes/Chinese Shape Presets/LL Chunhua Full.duf
2022-06-19 20:30:58.374 [INFO] :: Determining missing assets...
2022-06-19 20:30:58.376 [INFO] :: Setting textures...
2022-06-19 20:30:58.376 [INFO] :: Applying animations...
2022-06-19 20:30:58.386 [INFO] :: Finished asset load (merge): 0m 0.12s - /People/Genesis 8 Female/Shapes/Chinese Shape Presets/LL Chunhua Full.duf
2022-06-19 20:30:58.786 [INFO] :: Unlocking viewport redraw...
2022-06-19 20:30:58.786 [INFO] :: Viewport redraw unlocked.OFFICIAL DazToUnreal Bridge (SEPTEMBER UPDATE): What's New and How To Use ItIf you are using the Subdivision Levels option, please download and use the latest hotfix available here: https://github.com/daz3d/DazToUnreal/releases
It fixes problems where the Fbx is corrupted and unable to import into Unreal Engine.
OFFICIAL DazToCinema4D Bridge 2022 (SEPTEMBER UPDATE): What's New and How To Use ItThe September Update for the DazToCinema4D Bridge is now available on Daz Central and Daz Install Manager. It has some changes to the UI which may take users familiar with the old version time to get used to. Here's what's new:
- Fixed several bone-rotation bugs on import
- Now allows option for no bone-rotation changes
- Updated to latest Daz Bridge Library v2.2
- Fixes morph undo bug (distorted face after exporting)
- Geograft material support
- Preliminary steps for Geograft Morph support (exported blendshapes
New Menu Location:
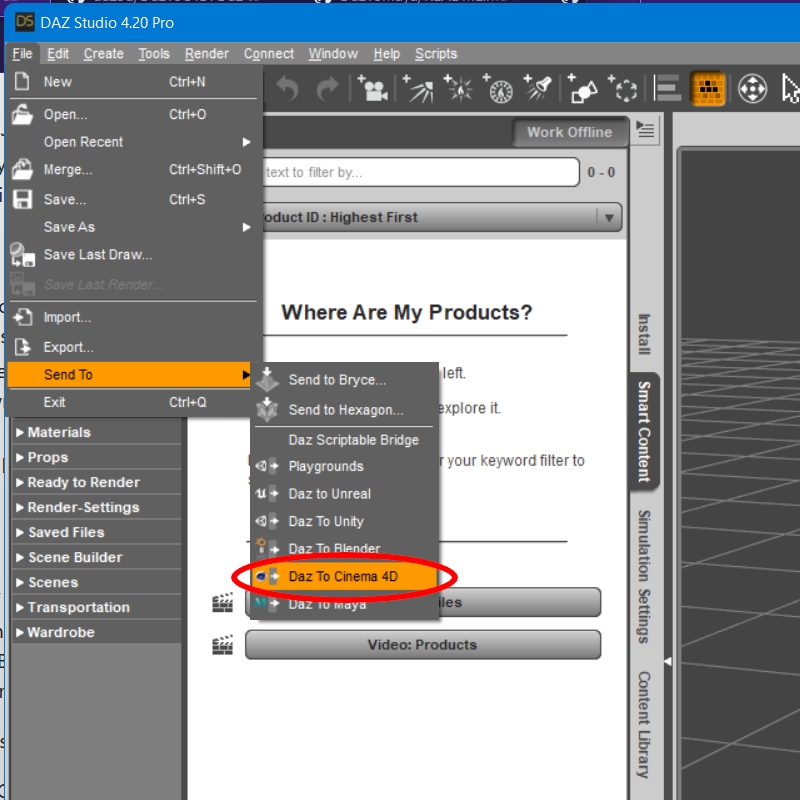
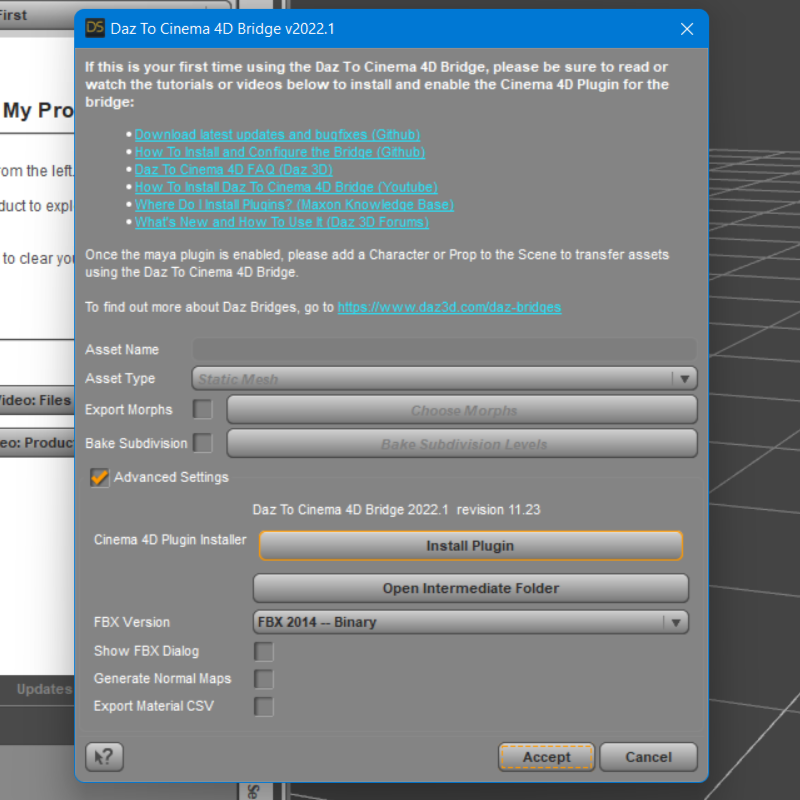
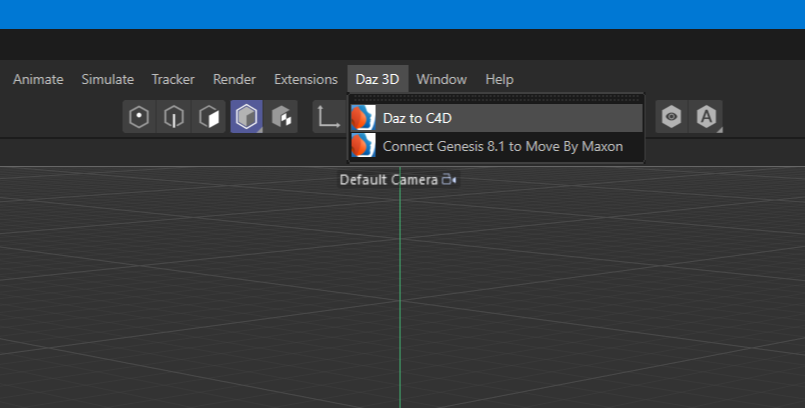
You will need to install the Cinema4D Plugin using the new integrated Cinema4D Plugin Installer. Access this from the Advanced Settings box of the new DazToCinema4D Bridge UI.
How to Install the Cinema 4D Plugin
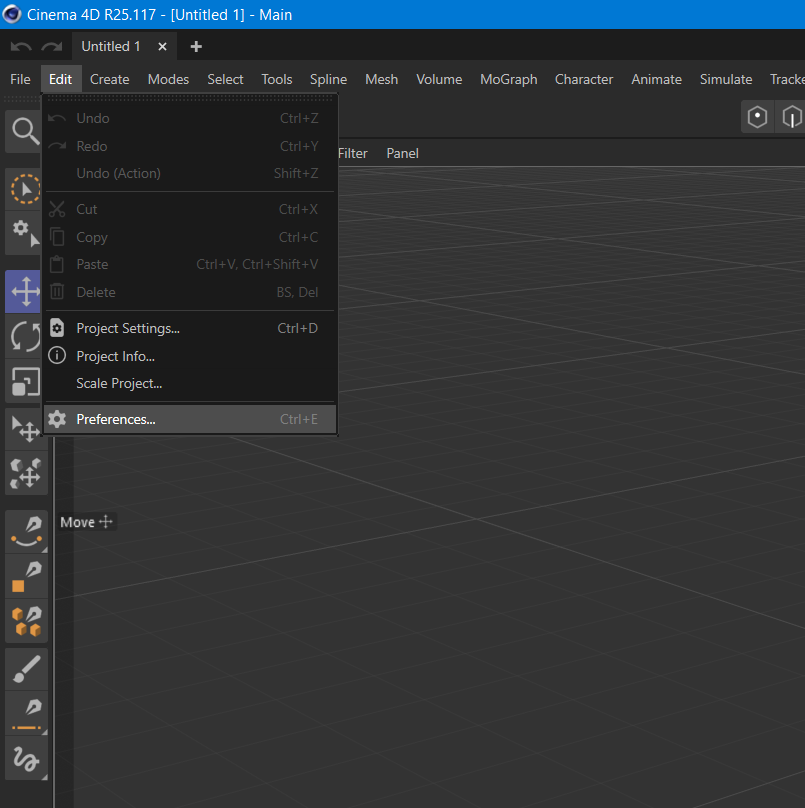
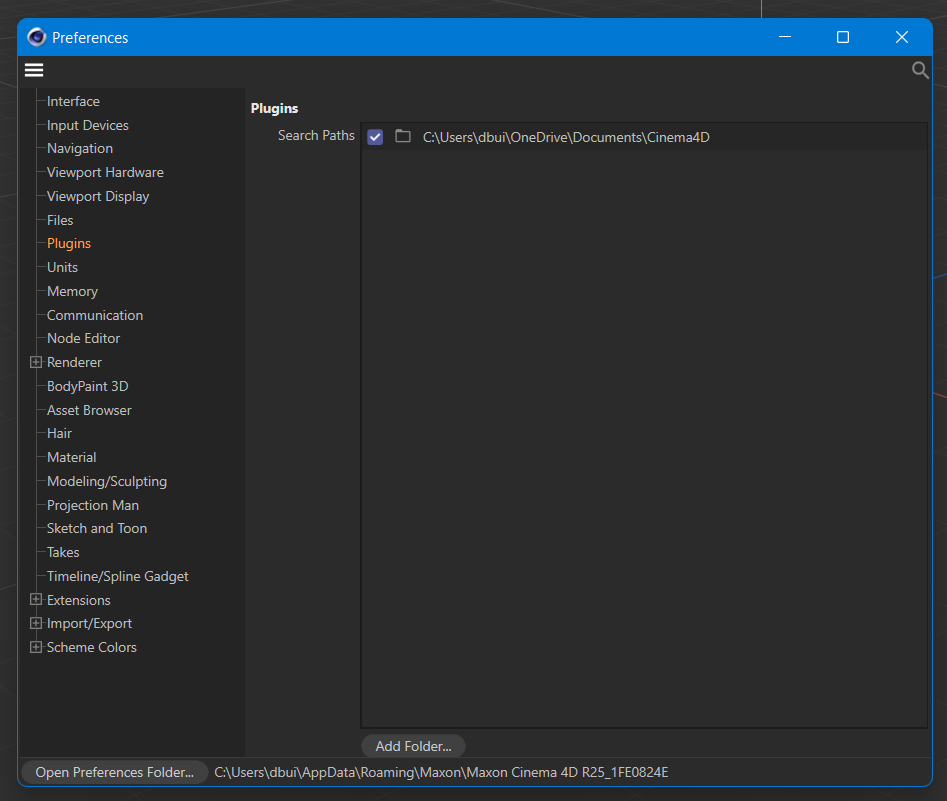
- Cinema 4D no longer requires a Plugins subfolder in the location where Cinema 4D was installed. Since R20, users should set a plugins path inside the Cinema 4D Preferences window and install plugins to that folder. We recommend creating a "\Documents\Cinema4D\Plugins" folder in your user's home folder and selecting that as the Plugins path in Cinema 4D. Please refer to this link for more information: Where do I install plugins? - Cinema 4D Knowledge Base
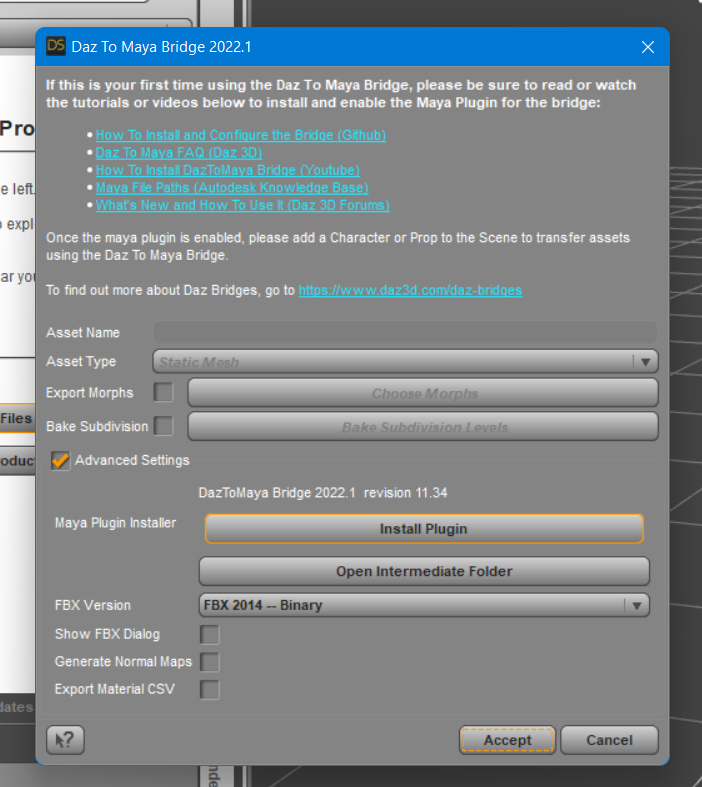
- The Daz Studio Plugin comes embedded with an installer for the Cinema 4D plugin. From the Daz To Cinema 4D Bridge Dialog, there is now section in the Advanced Settings section for Installing the Cinema 4D Plugin.
- Click the "Install Plugin" button. You will see a window popup to choose a folder to install the Cinema 4D plugin.
- Navigate to the plugins folder path which you set from the Cinema 4D Preferences window, and click "Select Folder". You will then see a confirmation dialog stating if the plugin installation was successful.
- If Cinema 4D is running, you will need to restart for the Daz To Cinema 4D Bridge plugin to load.
- In Cinema 4D, you should now see "Daz 3D" in the Cinema 4D main menu.
You can find more information about the updated DazToCinema4D Bridge with these resources:
- Download latest updates and bugfixes (Github)
- Daz To Cinema 4D Bridge FAQ (daz3d.com)
- Daz To Cinema 4D Bridge on Github
- How to Install Daz To Cinema 4D (Github Readme)
- Where do I install Plugins for Cinema 4D? (Maxon Knowledge Base)
- How to Use Daz To Cinema 4D (Github Readme)
How to Install and Configure Daz To Cinema4D 2022
 OFFICIAL DazToMaya Bridge 2022 (SEPTEMBER UPDATE): What's New and How To Use It
The September Update for the DazToMaya Bridge is now available on Daz Central and Daz Install Manager. It has some changes to the UI which may take users familiar with the old version time to get used to. Here's what's new:
- Updated to latest Daz Bridge Library v2.2
- Fixes morph undo bug (distorted faces on export)
- Geograft Material support
- Prelim steps for supporting Geograft morphs (exported blendshapes)
New Menu Location:
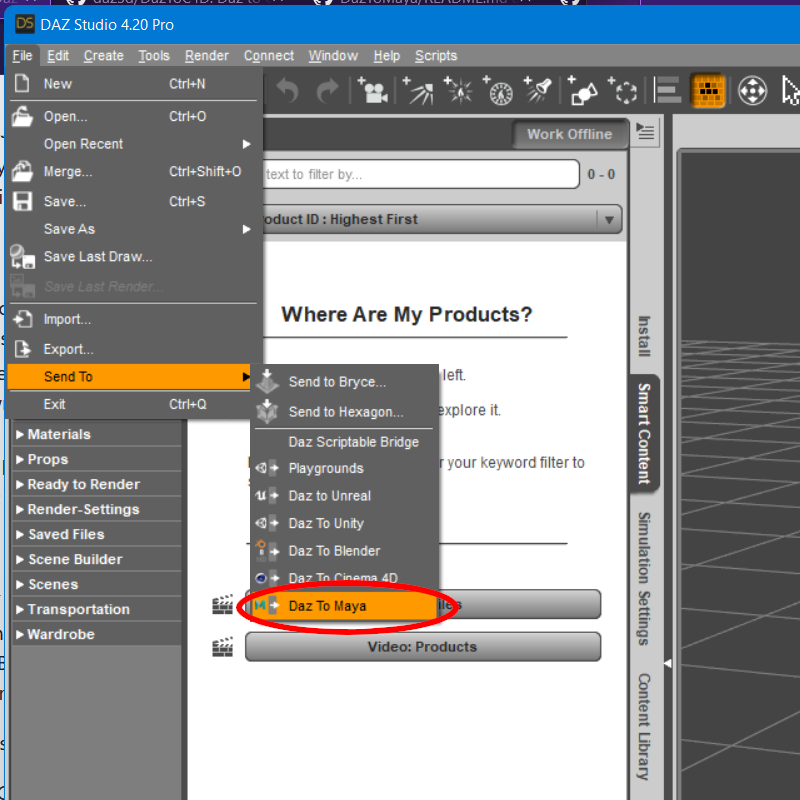
You will need to install the Maya Plugin using the new integrated Maya Plugin Installer. Access this from the Advanced Settings box of the new DazToMaya Bridge UI.
How to Install the Maya Plugin
- The Daz Studio Plugin comes embedded with an installer for the Maya Bridge module. From the Daz To Maya Bridge dialog, there is now section in the Advanced Settings section for Installing the Maya module.
- Click the “Install Plugin” button. You will see a window popup to choose a folder to install the Maya module. The starting folder should be the default location for maya plugins and modules.
- On Windows, the path to install modules should be “Documents\maya\modules”. On Mac, the path should be “/Users//Library/Preferences/Autodesk/maya/modules”.
- For most Maya setups, you should be able to just click “Select Folder”. You will then see a confirmation dialog stating if the plugin installation was successful.
- If Maya is running, you will need to restart for the Daz To Maya Bridge module to load.
- In Maya, you should now see a “DazToMaya” tab in the Maya Shelf toolbar. Click this tab to find the DazToMaya options.
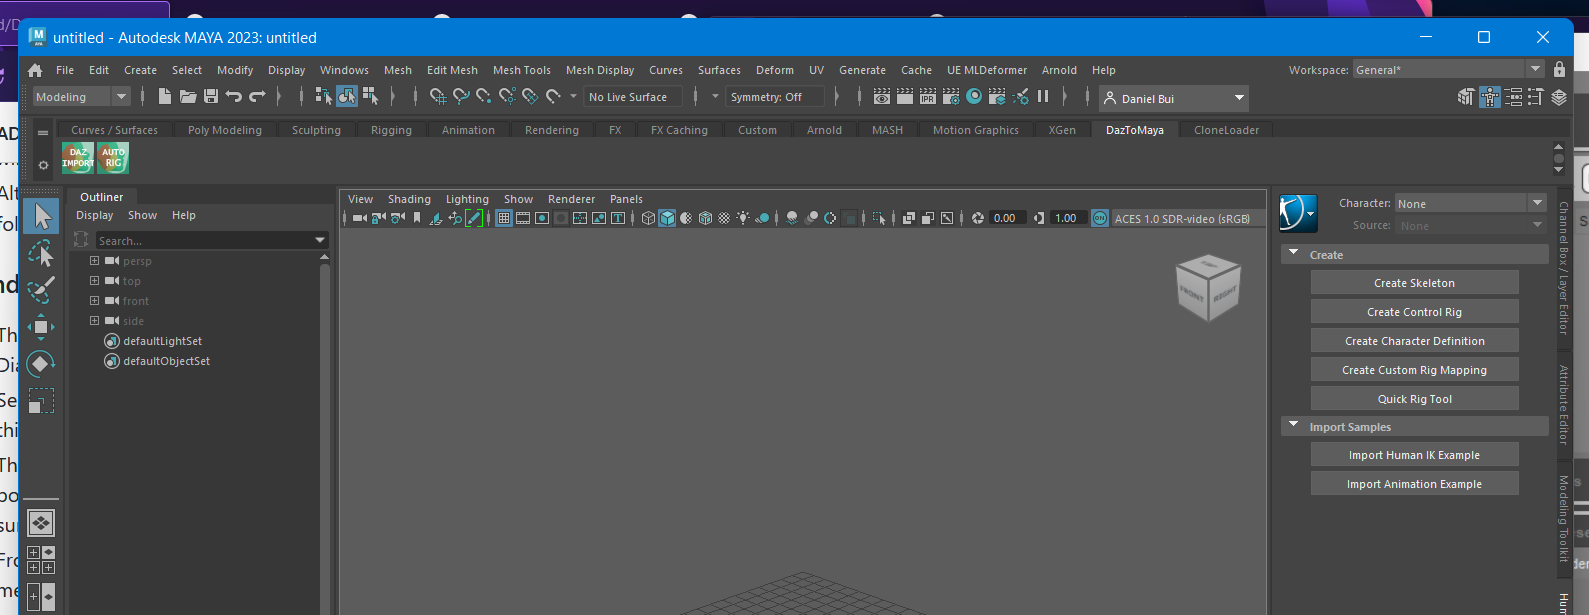
- If you have tabs disabled in the Maya Shelf, you may need to click the “cog” icon and select “Shelf Tabs” to find and select the “DazToMaya” tab.
- From the DazToMaya tab of the Shelf, you should now see an icon for “DAZ IMPORT”. You are done installing Daz To Maya Bridge!
- If you recieve an error when trying to click the "DAZ IMPORT" icon, make sure you have PyMEL installed.
You can find more information about the updated DazToMaya Bridge with these resources:
- DazToMaya Bridge on Github
- Installation Instructions for DazToMaya Bridge (Githhub)
- How to use the DazToMaya Bridge (Github)
- Download the latest updates and bugfixes (Github Release Page)
- DazToMaya FAQ (daz3d.com)
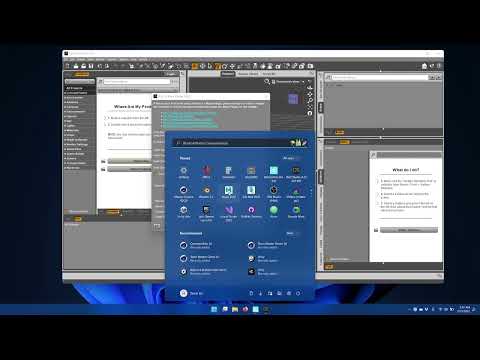
How to Install DazToMaya Bridge v2022
More tutorials coming soon...
How to transfer completed scenes to BlenderFirst, Don't waste time with the Daz to Blender Bridge or diffeomorphic importer. they are totally useless. If you just want to import 1 single character or model to blender, they are fine for that. otherwise, they are trash. & Before anyone says "Nu uh, you can import whole scenes with dem", I spent weeks scouring the internet looking for ANYTHING on how to do it with those tools & it was nowhere to be found. So even if the ability to is techincally there, Where's the directions? Nowhere? or at least nowhere that's clearly articulated? Yeah. Point proven. Like I said. Completely useless.
All Daz content imported via Diffeo
(except the skycar was freebie from sketchfab)
 Exporting From Daz 3D to Unreal Engine 5
Just so you know there are a number of threads on here already that have answered these questions. The Daz to UE bridge is indeed working for 5.0.2, you can get it here. That will take care of your other questions as well, since you don't need to worry about what format to export in if you are using the bridge. However, just to answer that question, we typically use the .fbx format for characters in realtime, since it allows you to import a rigged mesh with an armature which can be used for animation.
I make some animation whats the best way to make the video and how it do it?Ivy said:
Use Hitflim express free version https://fxhome.com/product/hitfilm-express
its a free video editor that you can stich the animations together in the film editor and then resave as a MP4 video for sharing. Best solution is to render in PNG single frames and import them as a folder to the hitfilm video editor timeline and reduce the timeline down to .1 to make the animation run at 29.9 or 30kfps
then save and export as a MP4 video for sharing on YouTube or Facebook, twitter etc.
it will look something like this when yourt done

Thanks! :) I have more few of this editor video but I try this as well , thanks all!
Cannot import in C4ddczc2014 said:
When using plug-ins to import in C4d, the following window will appear. How can I solve it?
Hi, I've posted a bugfix update that may help you if you are using a custom Documents path: https://github.com/daz3d/DazToC4D/releases/tag/2022.1.8
Please let me know if this resolves your problems. Thanks
Daz 3D is part of

Connect
DAZ Productions, Inc.
7533 S Center View Ct #4664
West Jordan, UT 84084Licensing Agreement | Terms of Service | Privacy Policy | EULA
© 2026 Daz Productions Inc. All Rights Reserved.