July, 2022 - Daz 3D New User Challenge - Portrait Rendering and L.I.E.
 Kismet2012
Posts: 4,252
Kismet2012
Posts: 4,252
New User's Challenge - July, 2022
Sponsored by DAZ 3D
Are you new to the 3D World? Are you at the beginning stages of learning 3D rendering? Have you been around for a little bit but feel you could benefit from some feedback or instruction? Have you been around awhile and would like to help other members start their creative journey? Well then come and join the fun as we host our newest render challenge!
New this year, we are breaking down each month into 2 different challenges. A Beginner Challenge and then also an Intermediate Challenge.
So which "Challenge" should you choose?
Follow the Beginner Challenge if you are:
- New to the New User Challenges
- New to Daz Studio
- Newer to 3D Rendering in General
- Or if you have not participated in the February Lighting Challenge
Follow the Intermediate Challenge if you have:
- Participated in the New User Challenge for awhile
- Know the basics of Daz Studio and would like to learn more in depth topics
- Been using 3D Rendering Applications for awhile and feel comfortable with learning Intermediate Topics
- Or if you have all ready participated in the February Lighting Challenge
*Please be sure to list in your post which Challenge you are participating in*
Closing date for both is July 31, 2022
For a list of the current challenge rules, please see this thread: Challenge Rules
They apply for both versions of the challenge.
Daz 3D is part of 
Connect
DAZ Productions, Inc.
7533 S Center View Ct #4664
West Jordan, UT 84084
Licensing Agreement | Terms of Service | Privacy Policy | EULA
© 2026 Daz Productions Inc. All Rights Reserved.
Comments
Beginner Challenge - July, 2022
"Portrait Rendering (Expressions and Lighting)"
This month's focus will be Portrait Rendering, with an emphasis on the character's expression and lighting. Portraits are the way we show off the unique aspects of each individual. Expressions should convey their personality. Good lighting will enhance your portrait and set the mood. Portraits don't have to look like yearbook headshots. Get creative, hone your skills, and have some fun in this months contest.
A portrait is a representation of a person, group of people, or even a pet, that displays the expression, personality, and mood of the subject. The focus of a portrait is usually the subject's face, although the entire body and the background or context may be included. Depth of Field is often used to blur the surrounding environment to draw the eye to the subject.
Inspiration:
Portrait Tips and Examples:
Tips for good portrait photos
Google Search - Portrait Expressions
Beginner's Guide to Portrait Composition
Foundations of Portrait Composition Part I: Framing Your Model
Lighting:
Portrait Lighting Patterns
Mastering Lighting in Blender (The first 25 minutes of the video are basic lighting theory and insights.)
Other Helpful Links:
When following tutorials, be cognizant of the different applications (Bryce, Daz Studio, Poser, Carrara, Blender, etc.) and different render engines (3Delight, Iray, Reality, etc). Techniques for one may not apply directly to another. If you have some favorite portrait lighting and composition tips, please share them in this thread.
Composition Golden Ratio helpers:
Bryce
DAZ Studio (Also, DS has a built in Rule of Thirds guide; just select Show Thirds Guide in the Viewport context menu)
Rule of Thirds Guide in Daz Studion
Lighting Tutorials:
Tutorials by Szark (Credit is given to Szark for this wonderful thread with links to many tutorials.)
6 Tips for Better Lighting - Blender Guru (Most is general lighting tips, not Blender specific)
Creating And Lighting A Scene With Iray In DAZ Studio
Great Lighting for Dark Backgrounds
High Key Portraits: Take and Make Great Photography with Gavin Hoey
Low Key Portraits: Take and Make Great Photography with Gavin Hoey
Laws of Light: 5 Portrait Lighting Setups
How to Set-Up Camera, Lights, & Displacement in Daz Studio Octane
How to Create the Perfect 3D Scene Lighting with Daz3D
Portrait Tutorials:
Let's Make a Character Portrait - In the Studio with Daz 3D (live streamed in February, 2022 – tutorial starts approximately 14:45)
Daz3D Portrait Tutorial ( magazine article )
Create a realistic portrait in Daz Studio 03: setting up the scene
Some good information on useful portrait cropping
https://digital-photography-school.com/good-crop-bad-crop-how-to-crop-portraits/
The Rule of Thirds in 5 minutes | Creating More Dynamic Framing
And of course its always a good idea to check the portraits contests from the last years:
July, 2021
July, 2020
July, 2019
July, 2018
July, 2017
July, 2016
July, 2015
Intermediate Challenge - L.I.E. (Layered Image Editor)
What is the Layered Image Editor?
The Layered Image Editor (LIE) allows you to create, open, edit, and save DAZ Studio Layered Image (DLI) sets (*.dsi). A DLI is a composite of image layers into a single Studio material file which can then be applied to an object's material zone in Studio via the Surfaces tab. DLIs can be composed of any image file format supported in Studio (i.e., TIFF, PNG, JPEG, etc.). In addition, DLIs can contain other DLIs as part of its composition. The images composing the layers are not modified as the DLI file contains the pathname to the files and the opacity and blending information.
The DLI format provides a way of combining images without modifying the original images. For example, a tattoo could be available as an option on a figure. Usually, this might require separate texture maps for each skin color plus an extra set of maps with the tattoo. Using the LIE, a DLI file could be built layering the tattoo over the skin maps and the resulting .dsi file added to the material file to load via a MAT pose file. The original skin map can then be applied to the figure without the tattoo or with it, all without having to create two texture maps.
L.I.E. Video Tutorials
Daz Studio Layered Image Editor
DAZ Studio Tutorial - Layered Image Editor - Make your own Tattoos
Daz Studio Tattoo Tutorial
L.I.E Article Tutorial
Daz Custom Tattoos Tutorial
DAZ Documentation Centre - Layered Image Editor
Forum Threads
https://www.daz3d.com/forums/discussion/19670/how-do-i-use-layered-image-editor-lie
https://www.daz3d.com/forums/discussion/191661/how-to-save-a-layer-image-editor-l-i-e-preset
Let me kick start this month's competition :)
This is my first entry in the Intermediate Challenge - L.I.E. (Layered Image Editor). Rendered in Daz Studio Iray.
Infinite Shirt
Great first entry @Daedalus-7! Very cool idea. Your guy has some very hairy arms. :)
I missed the cutoff for last month, but already have an idea in the works for this month.
@Shimrian Thanks for the tip, I have now "trimmed" the problem :)
I missed last month's contest too. I gotta be more consistent, there is always something new to learn doing these.
Beginer's Challenge - Portrait - Expressions & Light
Rendered in Daz Studio, no post work yet.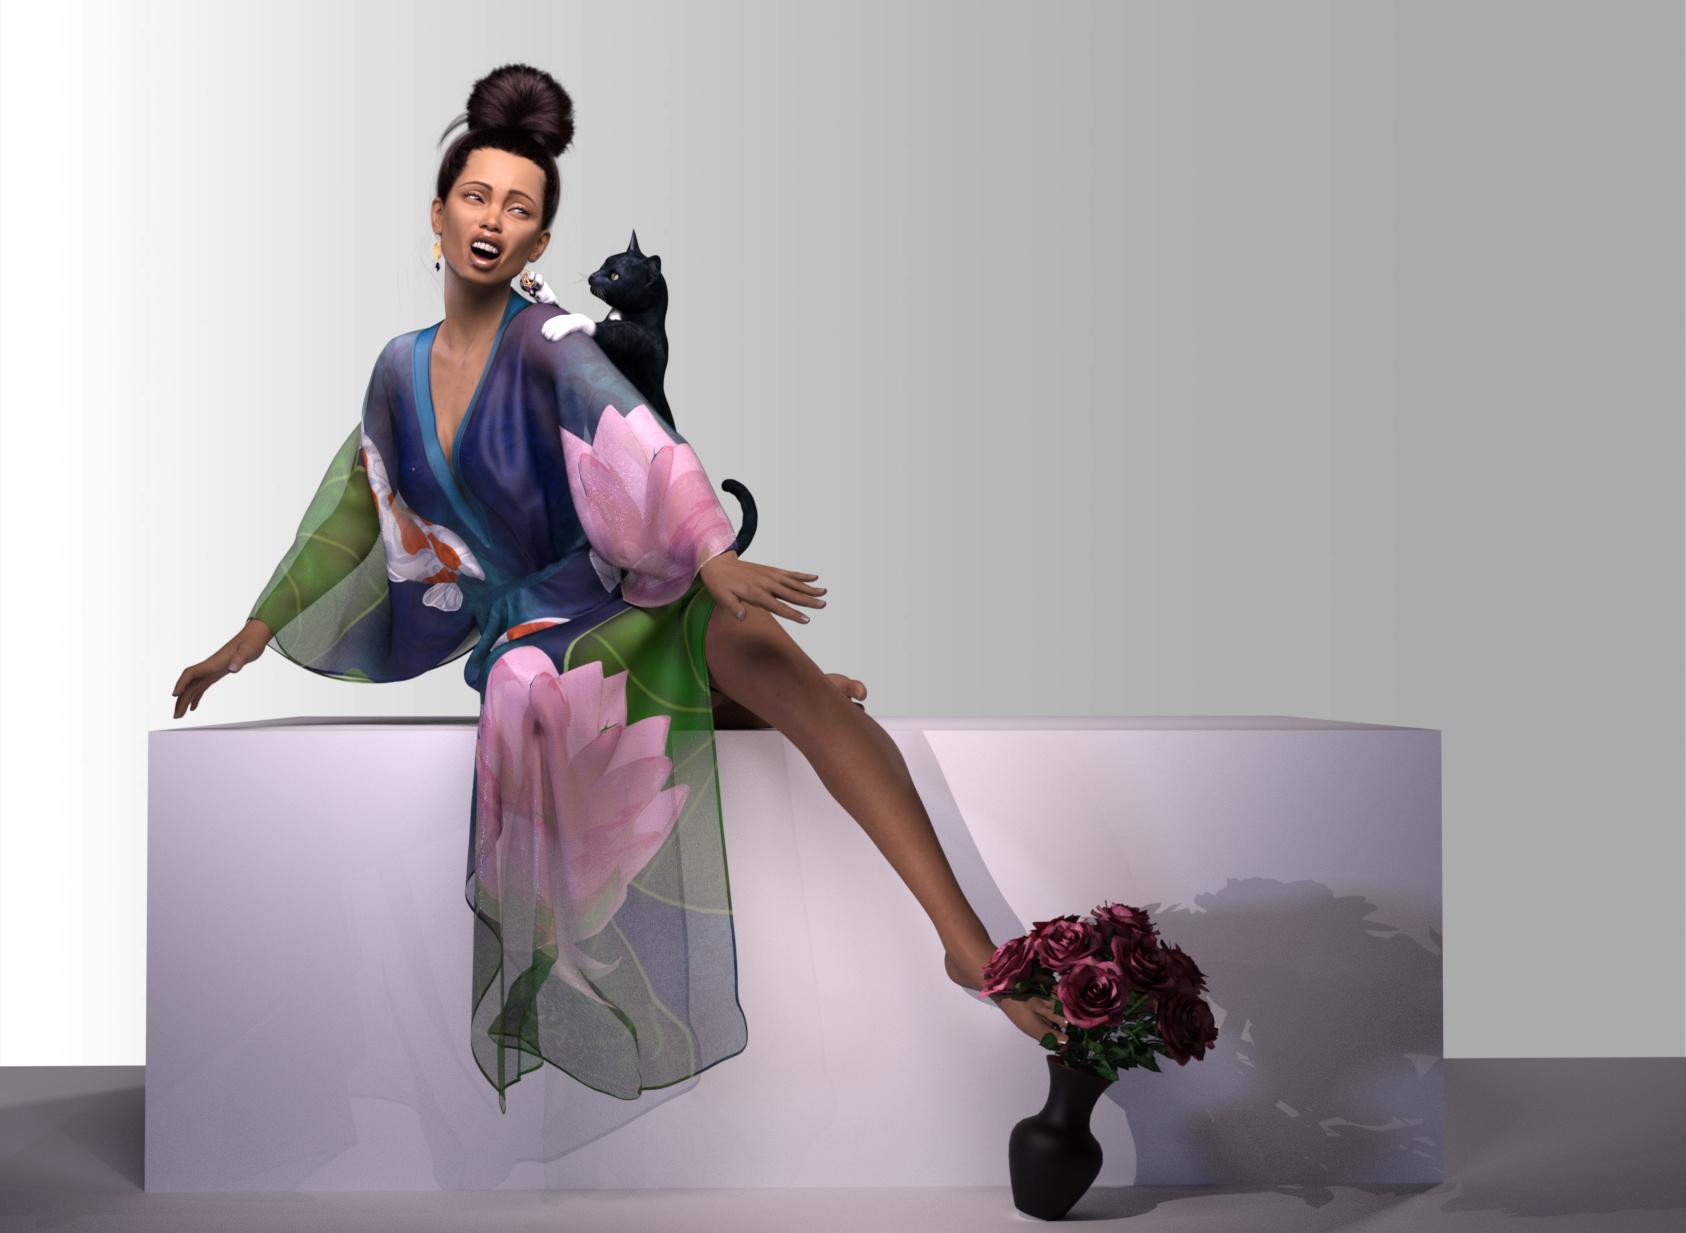
I agree. This is a great concept and well executed.
Thanks for starting off the month
Another great concept.
One thing I noticed is there are a few instances of collision. I think the cat's paw is colliding with the earring? They may need to be separated slightly.
I love the drape on the clothing. That is very well done.
The body pose really gives the impression that she is moving away from the cat and the shock of having an earring pulled from her ear.
I am looking forward to see what else you do with this image.
@Kismet2012 Thank you so much for the feedback. It is greatly appreciated. I will move the cat paw back. I guess in my eagerness to make it clear that the earring was being played with I got too close :- )
I am still mulling over what more to do. The part of me that knows how to finish off a picture still feels very beginner to me and lighting is always a huge challenge. Thanks again!
@Kismet2012 Thanks a lot.
Intermediate Challenge - L.I.E. (Layered Image Editor)
Fan Club President
Thanks for Looking! This should be fun.
Intermediate Challenge - L.I.E. (Layered Image Editor)
Title: Mirialan protector
Ok, so my entry is still a work in progress. I feel like I've been working on her way too long and I need a break, but can use some feedback. The background on her is that I started with the challenge last month for kitbashing, but didn’t finish and still needed to add her face tattoos. I was trying to create a character I made years ago for Star Wars the Old Republic game. After reading a Kenobi book and watching the Kenobi series I guess I still had a star wars theme in my head.
This character is a Mirialan with green skin and face tattoos. The Tattoos are done with Lie. My character wasn't using a traditional lightsaber and used a double bladed spear with particle effects. It's actually surprisingly similar to the prop I found! I don't have a background yet and for some reason everything is slowed down to a crawl. I've been watching a lot of youtube videos and had used the 'point at' with camera and some lights, and found that unpointing the eyes did help, but I am still having issues. It might also be the spear that is causing the issues. I have to figure out what I did that caused it to completely freak out any time I try and adjust things like posing on the hands or moving the camera. I still have lots of days left in the month to finish so any early feedback is welcome!
Thanks and happy rendering!
Lighting is a challenge. One suggestion would be to use a rim light to help the cat and the lady's hair to stand out a bit from the background.
You are welcome. One of the things I love about these challenges is seeing the creativity.
This is a great start.
I like your choice of makeup. Keeping it simple with the eye liner really emphasizes her face. Do you realize she has no eye brows? Was that intentional?
Is the Tommy Fan Club SkyPilot meant to be a tattoo or a sticker of some kind? If a tattoo, I would turn down the opacity slightly.
Than you for participating.
I am not sure what could be slowing down your computer. Are you using Iray? Is the background an environment wall prop or did you just turn the background black from the default grey?
I do not mind the simple black background. it really brings the emphasis to your character. i would suggest a rim light though so help her stand out from that dark backgound.
The shirt collar is intersecting with her chin and her left hand is intersecting with the spear. Rotating the hand slightly might help with this.
It could be the reflections and particle effects that are slowing things down. If they can be turned off when you are making adjustments it might help.
The tattoos on her face look great.
I sometimes find that the eye settings from a pose can interfer with the "point at". I tend to zero out all the settings for the eyes then apply the "point at". If that fails I either create a primitive sphere that I can "point at" with the eyes and then move around or just pose the eyes manually.
Sometimes taking a break from an image is the best thing you can do
I hope these suggestions help.
@Kismet2012
Fan Club President
Kismet2012 Great suggestions, thanks. So I made some tweaks. I'm pleased that I now understand how the Layered Image Editor works. As I use it more and assimilate it I may find more creative ways to use it. This has been a good assignment. More to come I hope!
Title: Forsaken Path
Intermediate Challenge
Still tweaking this, so feedback would be appreciated!
That looks much better. You did a great job getting it to follow the contours of her arm.
The missing eyebrows were causing my eyes to be fixated on her face.
The dress really allows the tattoo to be the focus now.
Well done. Glad you are enjoying the challenge and I am looking forward to see more.
I love a dark moody image. It can be a challenge finding a good balance between getting the dark shadows you need to give it that dark atmosphere and being too dark to discern details.
Differnet monitors can also make this a challenge. For me the image is just a little too dark. A bit more ambient light whoudl help me to see the details. You do not necessarily need to turn up the light. If you haven't tried already, you could try adjusting the Tone Mapping settings. Turning up the ISO from the defaul 100 to 200 - 400 should lighten the image without having to add more lights.
Here is a tutorial by SickleYield that might be helpful.
The ambient light on the LIE tattoos is well done. You found a good balance. It is easy to have them too bright and completely obscure the tattoos themselves.
Looking forward to the tweaks.
Intermediate Challenge
I am trying the intermediate challenge for the L.I.E. I added designs to the face and arm. Any feedback is appreciated.
Portrait of Mirai with Carp Tattoo
My entry for Intermediate Challenge
I used a free Japanese carp Tattoo. I may move the tattoo or Zoom in the camera.
Beginner Challenge: Portrait Render - Expressions & Lighting
Title: "Caught"
Ok, so here is my 2nd draft. I re-worked the lighting a bit and added a rim light along the right/back of woman and cat. When viewd by itself the rim is quite pronounce but gets quite subtle with the other lights. Is it enough?
I also did some fine tuning of the poses and moved the cat's paw so that it is not colliding with the earring.
Postwork in PSincludes: Backdrop, vignette, water drops and light grain. Still grateful for all feedback :- )
Thanks!
Final Version
Thanks Kismet! My screen is on the brighter side, so it can be hard for me to tell, sometimes. I've increased the ISO to make it brighter, and also tweaked the textures for ghost's tail so that it fades out a bit at the end
When I first looked at this image I thought you were entering the portrait challenge and the face markings were either part of the character or from a PA.
You have done a great job with the lighting. It reflects off her hair and provides some interesting highlights.
My eyes go right to her face.
The only thing that is bothering me a bit, and it is getting quite nitpicky, so please ignore if you do not agree, is the eye band and black line stop just short of her hair line. It is only noticeable when the image is viewed closeup. I'm not sure if getting the band and black line to extend to her hairline will really make a difference.
This is a well composed image. Thank you for sharing.
This is a good start Sueya. I would suggest rotating the carp a little to the outside of the arm. Or possibly move it to the inside of the forearm with the head facing the palm of the hand.
I think your light source is a little too strong. It is washing out the colours on the figure and the fish.
Did you add the fairy to the shirt?
Zooming in a bit with the camera will help to make the carp stand out a bit more.
Nice start.
I really like the changes. The window like reflection on the back "wall" really adds a lot of movement to the image. Your figure is well lit. I know how much of a pain changing posing can be to deal with the collsions but it makes such a huge difference.
Changing the cat from a tuxedo to a siamese also lightens the overall look of the image.
Nicely done.
Screen resolutions and brightness are difficult to deal with but changing the ISO has made a difference.
I could not see before the subtle blue in her hands and the skin of her arms.
Something I notice now that things are a little brighter is an abscense of shadows? Are you using 3Delight or Iray?
@Kismet2012 Thank you so much for the direction, comments and the help. It was a pleasure fixing the collision, its the art of lighting that is my nemesis :- )
These challenges are great for learning something new and for shining a light on the areas that still need more work. I am working on another entry right now to give myself some more practice.