July, 2020 - Daz 3D New User Challenge - Portrait Rendering and LIE
 Kismet2012
Posts: 4,252
Kismet2012
Posts: 4,252
New User's Challenge - July, 2020
Sponsored by DAZ 3D
Are you new to the 3D World? Are you at the beginning stages of learning 3D rendering? Have you been around for a little bit but feel you could benefit from some feedback or instruction? Have you been around awhile and would like to help other members start their creative journey? Well then come and join the fun as we host our newest render challenge!
New this year, we are breaking down each month into 2 different challenges. A Beginner Challenge and then also an Intermediate Challenge.
So which "Challenge" should you choose?
Follow the Beginner Challenge if you are:
- New to the New User Challenges
- New to Daz Studio
- Newer to 3D Rendering in General
- Or if you have not participated in the February Lighting Challenge
Follow the Intermediate Challenge if you have:
- Participated in the New User Challenge for awhile
- Know the basics of Daz Studio and would like to learn more in depth topics
- Been using 3D Rendering Applications for awhile and feel comfortable with learning Intermediate Topics
- Or if you have all ready participated in the February Lighting Challenge
*Please be sure to list in your post which Challenge you are participating in*
Closing date for both is July 31, 2020
For a list of the current challenge rules, please see this thread: Challenge Rules
They apply for both versions of the challenge.
Daz 3D is part of 
Connect
DAZ Productions, Inc.
7533 S Center View Ct #4664
West Jordan, UT 84084
Licensing Agreement | Terms of Service | Privacy Policy | EULA
© 2026 Daz Productions Inc. All Rights Reserved.
Comments
Beginner Challenge - July, 2020
"Portrait Rendering (Expressions and Lighting)"
This month's focus will be Portrait Rendering, with an emphasis on the character's expression and lighting. Portraits are the way we show off the unique aspects of each individual. Expressions should convey their personality. Good lighting will enhance your portrait and set the mood. Portraits don't have to look like yearbook headshots. Get creative, hone your skills, and have some fun in this months contest.
A portrait is a representation of a person, group of people, or even a pet, that displays the expression, personality, and mood of the subject. The focus of a portrait is usually the subject's face, although the entire body and the background or context may be included. Depth of Field is often used to blur the surrounding environment to draw the eye to the subject.
Inspiration:
Portrait Tips and Examples:
Tips for good portrait photos
Google Search - Portrait Expressions
Lighting:
Portrait Lighting Patterns
Mastering Lighting in Blender (The first 25 minutes of the video are basic lighting theory and insights.)
Other Helpful Links:
When following tutorials, be cognizant of the different applications (Bryce, Daz Studio, Poser, Carrara, Blender, etc.) and different render engines (3Delight, Iray, Reality, etc). Techniques for one may not apply directly to another. If you have some favorite portrait lighting and composition tips, please share them in this thread.
Composition Golden Ratio helpers:
Bryce
DAZ Studio (Also, DS has a built in Rule of Thirds guide; just select Show Thirds Guide in the Viewport context menu)
Lighting Tutorials:
Tutorials by Szark (Credit is given to Szark for this wonderful thread with links to many tutorials.)
6 Tips for Better Lighting - Blender Guru (Most is general lighting tips, not Blender specific)
Creating And Lighting A Scene With Iray In DAZ Studio
Dreamlight Lighting Video Tutorial (currently free in Daz Store)
Creating Eye Reflections with Reality Poser Edition Part 1
Creating Eye Reflections with Reality Poser Edition Part 2
Carrara Chapter 14: Setting Lights
Bryce Artist’s guide page 123
Great Lighting for Dark Backgrounds
Perfect Lighting for a White Background
High Key Portraits: Take and Make Great Photography with Gavin Hoey
Low Key Portraits: Take and Make Great Photography with Gavin Hoey
Laws of Light: 5 Portrait Lighting Setups
Some good information on useful portrait cropping
https://digital-photography-school.com/good-crop-bad-crop-how-to-crop-portraits/
The Rule of Thirds in 5 minutes | Creating More Dynamic Framing
And of course its always a good idea to check the portraits contests from the last years:
July, 2019
July, 2018
July, 2017
July, 2016
July, 2015
Intermediate Challenge - L.I.E. (Layered Image Editor)
What is the Layered Image Editor?
The Layered Image Editor (LIE) allows you to create, open, edit, and save DAZ Studio Layered Image (DLI) sets (*.dsi). A DLI is a composite of image layers into a single Studio material file which can then be applied to an object's material zone in Studio via the Surfaces tab. DLIs can be composed of any image file format supported in Studio (i.e., TIFF, PNG, JPEG, etc.). In addition, DLIs can contain other DLIs as part of its composition. The images composing the layers are not modified as the DLI file contains the pathname to the files and the opacity and blending information.
The DLI format provides a way of combining images without modifying the original images. For example, a tattoo could be available as an option on a figure. Usually, this might require separate texture maps for each skin color plus an extra set of maps with the tattoo. Using the LIE, a DLI file could be built layering the tattoo over the skin maps and the resulting .dsi file added to the material file to load via a MAT pose file. The original skin map can then be applied to the figure without the tattoo or with it, all without having to create two texture maps.
L.I.E. Video Tutorials
Caution: Nudity
German Language Tutorials
( uses GIMP )
Creating a LIE Overlay Preset in DAZ Studio PDF Tutorial
Using LIE (Layers Image Editor) in DAZ Studio 4.5
Forum Threads
https://www.daz3d.com/forums/discussion/19670/how-do-i-use-layered-image-editor-lie
https://www.daz3d.com/forums/discussion/191661/how-to-save-a-layer-image-editor-l-i-e-preset
Hi Folks,
So, like many people, I had a bit of spare time on my hands recently... I became interested in Daz purely by chance and and have been trying to fit in a few sessions round workload. This new user challenge seemed like one I could have a go at, so I had an attempt using a fairly basic character sitting in a pavilion and turning to a friend. I had a quick render to see how it looked: (Having some issues putting the pictures in the post, so any help convincing it I am not a Corps of Hackers from China/Russia would be appreciated. Have attached the files instead!)
I realised I needed to add a few things. I wanted the character to be a little more playful -potentially laughing and sticking her tongue out at her friend. While I am happier with it, I fear it looks a little more pained/constipated than I had intended. Light wise, I wanted the light to be hitting the character from the open sides of the paviliion, so tried to play with a key, fill and back light - though it was tricky with architecture getting in the way. This is where I need the most help. Have read a few bits about light and would really like any tips for my next improvements.
Thanks in advance.
Hmmm, realised this was not showing up as a post. Wondered if it got caught in bot trap as it said awaiting approval. Odd, how editing this made it appear.
Portrait Rendering (Expressions and Lighting)
Here's my start. I'm going to need to work on the lighting and expressions when I get a chance, as well as do some texture work on what we see.
The characters are based on my friend and myself with the faces created using Daz's face transefer utility. The idea is that we've found ourselves in the Fallout universe, (Don't ask me how, I've no clue.)
So I missed last month...Decided I need to get a move on early in the month this time. Here is a portrait I have been working on. Any tips to improving would be welcome so I can work on that this month <3
You do kinda look like you are not sure how you got there.
This may change when you adjust your lighting but at the moment I am being distracted by the bookshelf thing behind your characters. I keeps drawing my eyes.
I really like your choice of using a landscape format.
This is getting really nitpicky but I find the little details can be a distraction.
The treble cleft charm is hanging away from her upper chest. From this angle I think it should be against the chest.
Her hair also needs some slight adjustment. It should be shift slightly to her right, our left.
I really like the lighting, her posing and expression. The background is complimentary without being distracting. This is a great start.
Portrait Rendering (Expressions and Lighting)
Version B here. Tweeks to the expressions my friend and I have and my friend's pose along with texture work and lighting.
No, no! Nitpicky is great! It's hard for me to divorce myself from the piece enough to see those things sometimes. Thank you for your assistance!
Is this better?
I'm not entirely sure if I should be in beginner or intermediate as I have been doing Poser since the early 2000's, but never really came onto the forums here until, well, now. So... both, maybe ? :P
I am by trade a photographer, so I shaped the lighting similarly to how I would do so in studio. This was a 5 light set up with Rembrandt lighting. I gel'd (colored) all but the key light. Did some LIE, by using makeup layers. Rendered with IRAY and slightly processed it in Camera RAW in Photoshop.
Portrait Rendering (Expressions and Lighting)
In the last month I had attempted a couple of portraits, and they had come out reasonably well. Given that this is a challenge, I thought I'd approach it as I would with a real camera and lights. As a hobby, I dabble in photography.
Well - first off, found that the backdrop in Environment doesn't blur out . I countered that then by dropping the Environment and using a plane instead to act as a background - Now, that blurred out nicely
The camera settings don't quite work the same as you would expect them to with a real camera. A number of articles later, got something satisfying. Then the fireflies hit - around the eyeballs!!! Had to get creative with lighting to swat them away - phew!
This is the result...
The adjustment you made to the textures and expressions work. The bookshelf is no longer a distraction.
A bit of rim lighting of you? in the back would help to make that figure stand out a bit. Right now he is blending into the background.
Yes. The adjustments to the hair and pendant look more natural now.
Your choice of background does help her to stand out but a rim light behind her head to add some highlights to her hair might help her stand out even more.
She has a lovely, dreamy expression.
Are you using Poser or DAZ Studio? If you are using DAZ Studio and you are new to that program then Beginner may be appropriate.
Being a photographer by trade you have an understanding of lighting that will be quite helpful.
Did you intend for the highlights on the crown of her hair to be strong?
I love the strong shadows you created using the Rembrandt lighting.
DAZ Studio's camera is modelled after real cameras but being a computer program there are some differences from real life. Figuring out what those are and making those adjustments can be fun or a lesson in frustration. It has been both for me at times.
You have done a nice job with the rim lighting to get your figure to stand out from that dark background. I really enjoy strong shadows on a figure but perhaps softening the shadows slightly on your figure's face will really help his eyes stand out more.
This is a great start.
Had another go at mine, after some inspiration from seeing the others posting here. Still a ways to go but I am happier.
@Hanabi, I really love the skin texture there - how do you get that on the knees for instance?
I am so sorry I missed your original post.
I like that you have chosen to go with a closer crop and make your figure the focus.
The necklace she if wearing needs to be adjusted slightly so that it is not intersecting with her top. Her hair hanging over her left shoulder also needs to be moved back or possibly to the side a bit so it is not intersecting with her shoulder.
You have some nice lighting on her shoulder. White clothing can get blown out by strong lights quite easily but you have found a nice balance.
Portrait of Shane
Here's my first portrait render for the beginners challenge. Constructive feedback welcome.
Thank you! Not not to Daz per say, just hadn't done a lot until the last few months. But with COVID I kinda got back into the 3D world as I am unable to do photography now ;/
With the hairlight, yes and no. The way lights render in Daz, and with it being strand-based hair, it is hard to give it that total halo affect I would achieve like real life. I tried doing it with a small haze cube and some textures that are 'backlit', but it wasn't coming out like I wanted. That said, a different hair that is not strand def. did a better job.
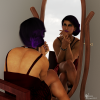
So i'm not sure how far i'm going to play with this idea, haven't even gotten an exact idea of how I want it to look. I want to do a usb icon style going down the arm, still tweaking what's seen here. But i'm having some difficulty figuring out how to make the lines start more in the middle/touching the elbow. Anyone able to help?
I really like the tie-dye shirt he's wearing. You might want to consider either darkening or maybe changing the colour of the background. It really helps to bring out the blue in the tie-dye shirt but it is also causing the shirt to blend in with the background where the blues meet.
I would also pull back the camera slightly. The top and bottom edges are really close to cutting off his toes and the top of his head.
This is a nice start sueya. His pose looks natural and he has a great smile.
Not everything in a 3D program will be true to life...but sometimes you can get a result that would not be possible in real life and in some ways may be better.
I haven't used strand based hairs much myself so am not sure about trying to light them.
Are you using a LIE application? You can adjust the location by moving it on the X and/or Y axis in LIE, I believe. I have adjusted makeups that way but it is total trial and error and may require a lot of patience. Reducing the size might also help. That was my first thought. It looks a little large for her arm.
I like the concept.
A somewhat surrealist/nonrealistic composition for a tarot deck I'm working on. I'm pretty happy with how it came out. I wanted it to be a blend of high fashion editorial styling, classical art, and folklorish themes.
Kudos to you for taking on a tarot deck.
The only thing that jumps out at me is her hair is intersecting her chin. If the hair morphs will allow you could try moving them slightly to the side and away from her chin. A twist might also work and hopefully won't cause any issues anywhere else.
Love the red nail polish on her toes. It really stands out.
yeah it's my first time using LIE, it's a bit frustrating at times but I like what can be done with it. While moving it in the editor itself is useful, with what i'm doing it seems like rotations would also come in handy.
From what i've found it seems like the elbow part of the arms texture is where the seam was placed, so the only way I might get it how i'm looking to do it is with something like substance painter.
My progress so far.
I did not know what a Layered Image Editor was untill I saw this post. Will spend some time and see what I can do.
Hey there! This is my first entry into a Daz competition. It's named "Moongazer". I was going for a young woman with striking blonde hair taking a night time walk through the park and gazing up at the moon. I'd be grateful for any feedback anyone could provide. I'm still very new at this, so I'm not sure if I have the lighting quite the way I want.
EDIT: I'm updating the image, as the one I originally posted was far too dark. This one is better, but I'd love to hear some opinions on the level of darkness.
Portrait Rendering (Expressions and Lighting)
Hi all! this is my first entry into a DAZ contest, and I hope you like 'Bruiser'. My wife has called this piece "It hurts to smile"... Please, any constructive critisism would be fantastic. Great work from all you others in here too! I only used DAZ for this, just opened it in PS to crop it a bit.
I would really love some suggestions, comments and/or corrections I might make. thanks
Have an awesome day!
Kev
Got bump turned up to 6, normals turned up to 2, and Bluejuante's Nadya HD details on at HD level 4. Skin texture is, uhhhh....MDD Fable from R'osity, with a bunch of tattoos applied.