Daz 3D is part of 
Connect
DAZ Productions, Inc.
7533 S Center View Ct #4664
West Jordan, UT 84084
Licensing Agreement | Terms of Service | Privacy Policy | EULA
© 2026 Daz Productions Inc. All Rights Reserved.
Comments
Thanks Nath and Faeofthe3rdDimension. Glad to hear the thread has inspired you to give dForce a try!
I keep thinking I'll run out of ideas, which I did for a while until I figured out how to keep spheres, cylinders, cones and toruses from exploding. That opens up a lot of avenues since all these primitives can be created by anyone with Daz Studio.
It snowed yesterday and in the morning the gutters had many icicles hanging from them. That gave me the idea to try making an icicle with dForce.
35. Creating Icicles. Although the concept of draping cloth doesn’t appear to apply to an icicle, you can use dForce to make one.
a. Create a primitive cone of 10 inch length, 2 inch diameter, 64 segments, and 32 sides. Rotate it on the X-axis 180 degrees so it points down.
b. We need to create two new surfaces on the cone. They will get different dForce surface properties so the mesh doesn’t blow up during simulation. Using the Geometry Editor tool, select all the polygons that make up the top circular surface of the cone. Right click in the viewport and choose Geometry Assignment/ Create New Surface from Selected and give it the name Top.
c. Next, select the bottom couple of rows of polygons at the pointed tip and create a surface named Tip.
d. Add a dForce dynamic modifier.
e. Select the Top surface and go to the Surfaces pane and set Dynamics Strength to 0, as we don’t want it to participate in the simulation. Select the Tip surface and set Stretch and Bend Stiffness to 0.1 and set Contraction-Expansion Ratio to 0.9. Select the default surface of the cone and set Contraction-Expansion Ratio to 0.9. We do this so the mesh can pull in and form around the string of spheres we are going to create shortly.
f. If you run the simulation now, you’ll find the mesh wants to tilt and curve.
g. Add a cube at the top and move the cone so it touches. This will keep the top from tilting.
h. Set the Dynamic Strength of the Tip surface to 0.25. This will hold the tip in place. This will keep the cone vertical.
i. What we have right now is not very icicle-like. Icicles are not a smooth cone but have bumps and indentations created as water flows down the surface and freezes.
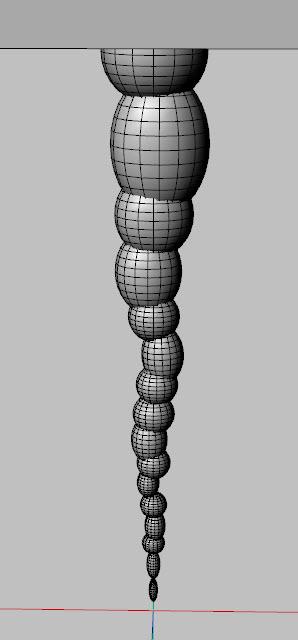
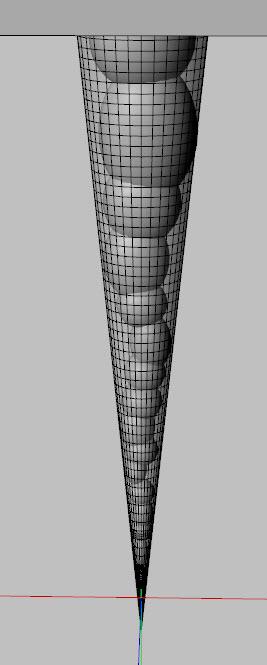
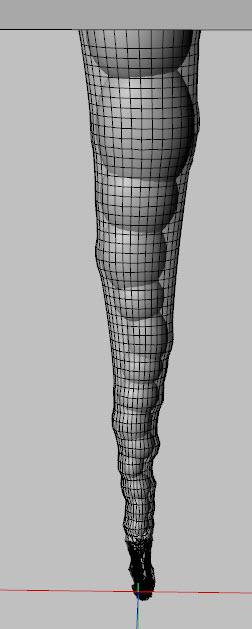
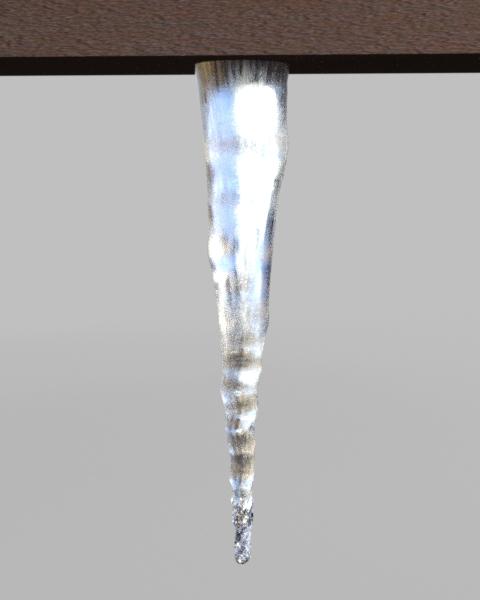
j. Create a sphere and position it at the top of the cone. Size it so it so it fits inside the cone with a little space left over. Select the sphere, go to Edit/Duplicate/Duplicate Node(s) and create a copy. Scale this a little smaller than the first sphere and move it down so the two spheres have some overlap. Repeat this down the length of the cone (I ended up with 16 spheres). Go back up the chain of spheres and elongate some. Move others slightly off-center. Then run the simulation. Add an ice shader and render.
Sphere Chain: Inside Cone: After Simulation: Render:
k. For a variation, hide the lower half of the spheres and run the simulation.
l. If you want multiple icicles, and you duplicate the first one, you’ll find the copy is just a straight-sided cone. You will need to duplicate your chain of spheres and simulate each new icicle in turn. Alternatively, you can change your first icicle into a morph that you can apply to subsequent cones.
m. Hide everything in the scene except the cone. From the main menu, choose File/Export and save an .obj file named icicle_morph.
n. Duplicate the first cone. With it selected, from the main menu choose Edit/ Object/Morph Loader Pro. Click on the Choose Morph Files button and pick the icicle_morph.obj file you just saved. Then click Apply.
o. In the Parameters Pane, there will now be a new section labeled Morphs. Set the icicle morph to 1.0. Now you can duplicate this icicle as many times as you want. Change the scale and rotation of the copies to give some variation. (If the copy flips over, that’s because X or Z rotate is also being applied, just turn it back around).
Cool
Yoda would be proud! :) Awesome work here!
Thanks sapat, I do try to add in enough details so items can be replicated. On this last one I ended up working in reverse - after getting it to look right, I had to go back and fill in and simplify the steps from the beginning.
Thanks Robert
barbult, I'll wear the force master title proudly. May dForce be with you!
chadCrypto, I hope so
By the way, a reminder that there's a table of contents on the very first post of this thread. You'll find links to each of the sections if you ever want to get to them quickly.
I think at some time I'm also going to assemble an index organized by topic, as sometimes a topic like wind node is covered in multiple sections.
You, sir, have way too much free time. And I really appreciate what you're doing with it!
Thanks!
Dana
Thanks so much for the PDF, it's beyond helpful and nice that I can have it for off line viewing! You are D Master Force.
What about making a supercape and fastening it to a figures shoulders? :)
Cape, you need to make sure that the bits of the cape are separate surface groups that you can then turn down the drape strength or turn off the drape strength. So say you have a square that you want to make into a cape, what I did was make a nice border around the cape to add interest to the cape over all and then selected a bit of the surface of that border and named it like "BorderD-Force" then when I applied the D-Force to the materials that is one I turned off so the cape would stay in place and not slide off of the traps...
It does help to be retired!
I like PDF's myself - easy to read and see the steps versus trying to step my way through a video. It's also easy to make. I write everything out in a word document with the photos, then cut and paste the text to a post.
I gave it a try, not as fancy as what RAMWolff suggested (there's no border) but the basic steps are here. You can always embellish as you desire.
36. Creating a Cape. I don’t know how to make clothes so there’s most likely a better approach than what I show here.
a. Create a primitive plane of size 2 feet and 100 divisions. This will be the cape. Stretch it in the Z-direction and narrow it along the X. Add a dForce dynamic modifier to it.
b. Create two primitive spheres of size 2 inches and 16 segments and sizes. These do not need a modifier as they will only be used to lock the cape to the shoulders. During renders, they will be hidden.
c. We want to add a new surface to the cape so it can have a lower dForce Dynamic Strength to slow its movement. Select the plane, go to the Geometry Editor, and using the Marquee Selection Mode, select a small strip at the front edge of the cape. Give it the name Shoulders. See image below.
Because we created the surface after adding the dForce modifier to the plane, you won’t see the Simulation settings in the Surface Pane hierarchy for the new surface. Just add the modifier again and it will appear.
For the Shoulder surface, set Simulation Dynamics Strength to 0.9. For the Default surface, set Contraction-Expansion Ratio to 110%.
d. Load a figure and wardrobe. I used Dmitri G3M and the Bard Outfit for G3M. Add a pose.
e. Position the plane so it is square to the shoulders and above them a few inches, almost touching the neck. Adjust the rotations so it is parallel to the slope of the shoulders. Set the two spheres near the outer edges of the plane, above the plane, and above the midline of the shoulders. This is frame 0.
f. On the animation timeline, at frame 3, move the figure back into the plane’s mesh. Before simulation, it will look like it penetrates the neck, but during the simulation, it will actually wrap around it.
g. At frame 6, move the sphere’s down so they just touch the shoulders. By this time, during the simulation the plane will have settled down along the neck and the front edge will have slid back to the midpoint of the shoulders where they will be caught by the descending spheres and held in place. You may have to adjust which frame this occurs in as if the movement is too late, the cape will slide partially off the shoulders and down the back.
h. Run the simulation. Afterwards, hide the spheres. With this wardrobe, there was some poke-through on the back of the plane. Add a Smoothing modifier and fill it with a weight of 0. Then with the brush, paint some weight in over the spots.
Frame 12: Frame 30:
Renders:
i. I have the plane and spheres parented to the figure’s neck, but if you change poses, you will have to reset the position and rotations of the plane and spheres. A little clumsy but doable. Here’s a jumping pose render:
RGcincy ? You are teh bomb, sir.
(That's a good thing.)
thanks!
Like many who follow this useful thread, I experiment and question what happens with dForce, and today I think (not sure, as I haven't reproduced it) that it's possible that even small morph errors can sometimes cause cloth explosions. Such as duplicate errors.
What makes me suspect this is that I opened Studio, and loaded a basic G8F, which produce a Duplication error - something that happened every time, and I ignored until now. Then I loaded https://www.daz3d.com/dforce-sunday-afternoon-outfit-for-genesis-8-females, posed the character, and started the simulation. So nothing should have gone wrong... Except the entire outfit exploded.
So, I thought about it and checked the error log, to find that the only thing out of place was a single duplicated breast morph that was part of a third-party set of morphs.
I closed Studio, dug out and removed that one morph, re-opened studio and set up the same character (no more loading error) and the outfit. Hit "Simulate" and problem gone.
Now I could be wrong, but it makes a little sense that if Studio doesn't like something, then that may affect dForce.
If anyone else can duplicate this it means one more explanation for exploding clothes.
Interesting. I'll have to look at the error log next time something explodes like that.
37. Mummy Wrappings! I’ve posted a number of items made or modified using dForce. In addition to those, I’ve run a lot of experiments that have not worked out. This is one that mostly works, although it could be improved upon. It took dozens and dozens of simulations before I got what I thought was an acceptable outcome.
a. Load a figure. I used G3M Abel. Add a laying pose and adjust the limbs as needed.
b. Create a primitive plane of 10 yards, 100 divisions, with a Z-positive axis.
c. Use the geometry editor to select all the polygons except for a vertical strip of 4 polygons. Hide the selected polygons then delete them.
d. Select the four bottom polygons and assign them to a new surface called Tip.
e. Move the plane so its Tip (the white part of the strip in image below) is embedded in the figure’s head.
Tilt the plane so it angles towards the feet. By varying this angle, you will change how the plane wraps around the figure and how much overlap there is between layers.
f. Add a dForce dynamic modifier to the plane.
g. For the default surface, set Bend and Stretch Stiffness to 0.01. Set Buckling Ratio to 0.1%, Contraction-Expansion Ratio to 99%, and Dynamic Strength to 0.92. I found that a 0.95 and a 1.0 Dynamic Strength allowed the wrap to partially unwrap as the figure rotates; you may have to adjust this depending upon your setup.
h. For the Tip surface, set Dynamic Strength to 0.9 and Contraction-Expansion Ratio to 87%.
i. Set the Simulation Settings Gravity to 0.5 and Air Resistance to 0.1. Turn Start Pose from Memorized Pose to Off, use Animated Timeline for Duration, and increase Frames Per Second Multiplier to 3.
j. I used a 30 second timeline, which ended up using about half the plane and wrapped half the figure. Double this to 60 seconds if you want to wrap the entire figure. I added a keyframe every 2 seconds, with the figure rotating 180 degrees in the same direction at each keyframe. That resulted in 7 full rotations.
k. Run the simulation.
l. You can see there’s a long unused strip of the plane (see image below). I used the geometry editor to select the unused polygons and assigned them to a new surface and set opacity to 0 to hide it..
m. To smooth out the wrapped mesh, I added sub-D and set it to 3.
n. I found the wrap did not fully respect the figure’s surface nor the underlying wrapped plane and so there was poke-through both of the figure and underlying fabric (see image below).
o. To correct this, I added a Push Modifier and use the spherical gradient tool to add an inverse gradient to the plane - more blue at the lowest part of the plane and red at the top. This means later wrappings have more push and that will help them sit higher than lower wrappings (see image at right). I found I had to set the displacement level to 8.5 to hide the tip of the nose.
p. I used the geometry tool on the Node Weight Map Brush tool to choose polygons on the wrapping that were out of place - either above or below the previous wrappings. I then used the painting brush on the tool to move those out or in to hide poke through. Be sure to check the box “Respect Selection” so you paint only the polygons you choose.
q. Here’s a finished render:
New PDF's are available. Total page count is now 138!
I bumped up against the Daz Forum upload limits in my last update so had to split the pdf into two parts. This means you will only have to download part 1 once and part 2 as it is updated.
hello, I'm trying to make a skirt sit down, but....is there a way to keep the folds intact when using dForce, one way was to use weighted maps....?
I made the cape for a client time ago, worked great!
But I can't manage to create an earring that works like the cape... I tried small chains, flat strips... all they gets crumpled like scrap paper!
Any suggestion?
Try dropping simulation strength to 0.9 or 0.8, increasing stiffness and leaving self-collide on.
you mean the Dyamics Strength? if there's actually a setting for Simulation Strength, where is it? And which stiffness?
Yes, it would be dynamic strength. For stiffness, set Stretch and Bend stiffness to 0.1. That may suppress everything; if so, increase it in 0.05 increments.
Remember that scale affects the simulation too - smaller items will deform more/faster than large ones or may explode. If that's the case, scale up to 500%, run the simulation, and if successful, freeze it and reduce it back to 100% scale (and don't hit the Clear button as it will reset even frozen simulations).
I didn't have luck with earrings and neck chains when I tried them because they collapse in on themselves, but that was some time ago and before my recent learnings.
That looks to be a tough one. You could try painting a weight map but that's a lot of folds to handle. If there was a way (I'm not aware of one) to use an image to create the weight map, it would be easier.
That explains it. So also, I'm not sure which tutorial should I use (if there is one), but is there a way to have a charcter sit down on the couch and be effected by the dForce?
Remeber that the folds are designed to stretch out, thus keeping the modesty of the wearer ( I suspect the reason). They aren't meant to stay the same, only in as much as return to their original shape; so it seems anyway - skirts aren't something I wear. :)
Did you want the couch to be affected by the character or clothing on the character to be affected by the couch?
If the first, and assuming the couch cushion has enough polygons and doesn't blow up under dForce, you would follow the steps for a footstool (sections 14 and 15), setting the figure in the sitting pose, then moving it into the couch during an animated simulation.
If the second, and assuming the clothing will dForce, you would start from a memorized pose (the default T or A figure pose) so the clothing drapes to the figure as it sits down and then the clothing will collide and adjust to the couch. If the clothing has adjustments for sitting pose or autofits to the sitting pose, you could start with that pose instead of the T or A pose.
If you want to do both, do the couch cushion first, freeze simulation on that object, then do the second simulation. Just be sure to never use the Clear button on the Simulation Settings pane as it will unfreeze the first simulation and you have to start over.