Daz 3D is part of 
Connect
DAZ Productions, Inc.
7533 S Center View Ct #4664
West Jordan, UT 84084
Licensing Agreement | Terms of Service | Privacy Policy | EULA
© 2026 Daz Productions Inc. All Rights Reserved.
Comments
Lighting Blooper! After I worked out the poses, I started to add the lighting. The challenge here was the natural lighting, being my sources were the moonlight and the lamp. So I added a linear pointlight at the candle flame, and rendered, and found this awful shadow smack dab on the Sailor's face. I rotated the lamp and that didn't work, it just put an unflattering line on the Sailor. Finally I realized that it was the lamp lid that was creating the shadow.
I fixed it in 2 steps:
(1) I moved the lamp from the center of the bench towards the Sailor. This improved the lighting on the chess pieces.
(2) I replaced the candle: [Edit: because the light source was too high so I had to lower it. Note in the second render how much lower the new candle is]. I set the lamp candle's opacity to zero, and added a new candle from Votive Candles and Stand, used a shader on the glass, made the ambient bright on the candle to make it glow. The flame was too small so I decided to enlarge it in postwork.
Voila! no stupid shadow!
Challenge: Captain's Coat colliding with his legs. When I sat the Captain down, the coat went through his legs. No amount of dial spinning could fix it. I tried D-Formers, but they pulled on both sides of the coat at once (or maybe I don't know how to use them). Even so, the best that D-Formers could give me was a bulge in the side of the coat, and not the opened up look I wanted.
So I turned to Hexagon. I had picked it up a long time ago but never did anything with it. So I had to hunt around for tutorials to create morphs. So I happily morph away, thankful I was able to get the hang of it quickly.
Then the snag hit me: The buttons would not move with the coat. ...?!... I thought I could just grab one and move it to where it needed to go. This worked, sort of. I couldn't rotate the button to be at the right angle. For the buttons that did work, they move out place again once I loaded the morphed coat onto the captain.
I spent time on the Hexagon forum, I just couldn't isolate the buttons to rotate them and they weren't behaving the way they should. OK, forget it! I've wasted enough time with the stupid buttons... I'll just add them in postwork, that otta show 'em!
Challenge: the ocean. I wanted to use Ocean Wide for the large horizon, but the water would show up in Jolly Boat and made it look like it was sinking. I had to use the water that came with Jolly Boat, because it had a "cutout" for the boat. I could not rotate the boat, because the cutout would not rotate with it. Made it limited, as well as creating a very short horizon. I tried to add Ocean Wide and move it far in the background to create the further horizon, but that created a light blue line along the horizon, and I couldn't get the two water props to match in color. Finally I had to abandon Ocean Wide all together.
Challenge: Lighting Refinement. I had to make some refinements to the lighting. This included a couple of lights around the captain where the lamp light was insufficient. I didn't like how the shadows from his fingers fell over his face. The lamp bar along his arm was really cool... it gave the render a symbolic "he's trapped" feel.
I added a point light to the chess pieces as well.
I also added an additional spotlight to enhance the cool moonlight. The 3Delight challenge was to get the angle to line up with the moon (which isn't in the picture yet).
Look at my wonderful new morphed coat (with the stupid buttons hanging at odd angles... grrr). [Edit: Oops I just realized that the picture above doesn't show the morphed coat with the buttons out of place. Well, take my word for it, they were!]
... oh yeah... and I need to fix the angle of the Sailor's shirt laces. Don't you hate it when you complete your final render only to find something else needs fixing?
Final Render with Postwork
I used GIMP. First thing I added the moon using Ron's Space Brushes.
Next I used the clone tool to eliminate the errant buttons and copied new buttons from another part of his coat. Some buttons were stretched too, and I didn't have the experience to figure out why and at this stage who cares! So happily I replaced them.
Last was the water. I used Aaron Blaise's Water Brushes to add texture to the flat water as well as the moon's reflection, including the little sparkles. I can't say enough praise for these brushes from a digital artist who paints with them. I practiced first, and was amazed how easily they worked.
So now my render...
Um, except I put the reflection at the wrong angle. Um... I should know better. D'oh!
OK, now here's my final render!
Later I went into GIMP and it crashed every time I tried to load a picture. I went to update it but my virus scanner told me the certificate for the site was invalid. Since I knew that a GIMP download site had once been hacked, and the fact that I had ignored my virus checker once before and had to pay to have a trojan removed, I was hesitant.
So, hello Photoshop!
I had been thinking about getting the 10 buck photo subscription for a while now. My reasoning is this:
a) I looked up the cost of PS C6 full version: over $1500. Yeowch! Even the upgrade was $700 plus. Student price? I'm out of luck.
b) So $10 per month = $120 per year. It would take me 12 years to pay for that full version, and that doesn't include upgrades.
I wondered how you did this I thought this was a great render!
Thanks! I was hoping to give back some things I learned in the contests. Hopefully you find it helpful!
Good information is always helpful. I have been seriously considering the $10 buck a month photo shop myself. I have the elements program and I love it and it has a lot of the things the full version does but there are several tools that I really really want to use that only come in the pro version. and the pro version is more 3d friendly as well I've heard. I hate to spend even that since I do have the elements but I am probably going to cave soon lol.
Wanted to mention too your postwork is brilliant. the water and the moon shining on it is beautiful
I bought elements (admittedly, on sale, but still...) and then almost immediately went for the Creative Cloud version. Latest versions of both Lightroom and Photoshop for $10 / month is a really good deal, especially when you consider what the standalone versions (and upgrades!) used to cost. The sheer number of tools, etc. in PS are mindboggling...
Go ahead and cave....
I'll have to say that you get a free 13 hour Photoshop tutorial with your subscription. I've been cramming and I'm only a third of the way through!
I don't use Elements, but I've been frustrated with GIMP. Not to say that it's a bad program, but there were things I had wanted to do in GIMP but it's tools just weren't nearly as sophisticated. There's also the many YouTube tutorials out there: I find just the thing I want, and "all you have to do in Photoshop is..." But I didn't have Photoshop! I had to look around to find the GIMP way of doing things, and sometimes it just didn't work. All I want to do is create slanted eyebrows for my elves - why is that so hard?!
Dang, I'm amazed just how much Photoshop can do! The 13 hour class isn't long enough to show you everything.
So don't worry to much about caving... it's kind like that next DAZ thing that you absolutely have to have!
By the way, I noticed that DAZ tends to put out a freebie that's not on the Freebies page on Tuesday or Wednesday morning. Don't wait until you get home from work, because it'll be gone! Yes, I just admitted to checking DAZ on my cell phone at work - but only during break time, I promise!
Lol I've been using elements for a couple of years, I used to do traditional art as a hobby (before kids and life got in the way to be able to do much of it) and now that my youngest is going into her last year of college I finally had the free time a couple years ago to really get back into it. And then I discovered digital art, mainly photoshop and started combining drawing and painting with photo manipulation. Was fairly pleased with how it was going but still not really satisfied. Then I found Daz and that was pretty much all she wrote lol. This is what I have been looking for. I have watched probably a good 100 hours of photo shop tutorials although I will watch the class that comes with it anyway as there are several tools that don't come with Elements. The idea of being able to create something using both 2d and 3d skills is just really exciting to me. So ya, I'm probably gonna cave. well I have already but I have to do it kicking and screaming so I don't feel to guilty about it lol. Just have to go and actually set it up....
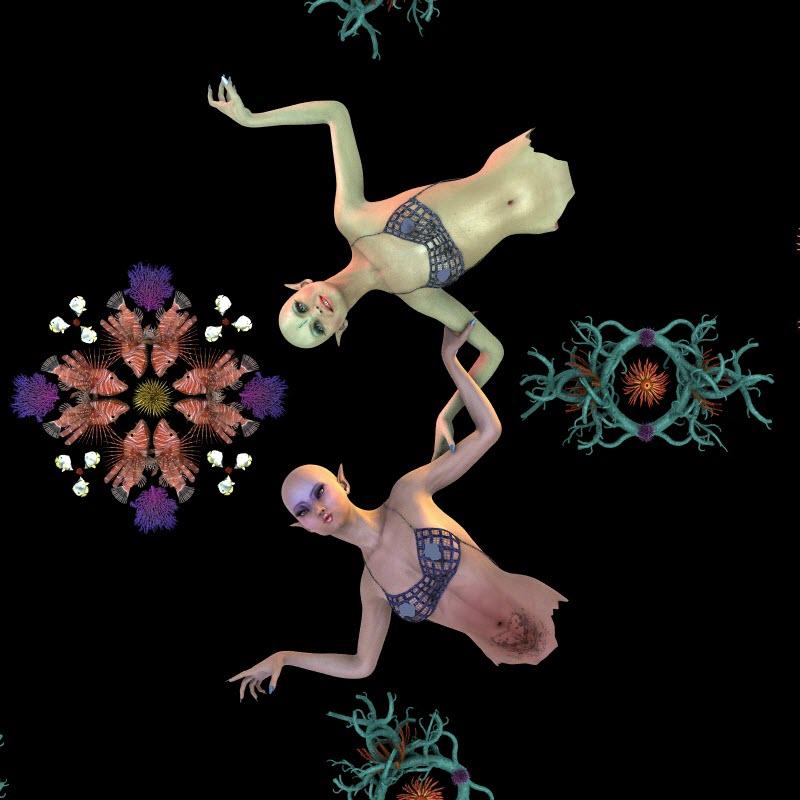
Character: Green Elf (3Delight)
I created a green elf using Genesis a while back, and I wanted to update it. I tried Dark Elf for Genesis, but it didn't have the right face/body type, and I didn't like the leaf pattern on the face. However, I loved those glowing green eyes.
I'm a dial-spinning fanatic. I almost never use a character out of the box. In fact, most of the time I buy characters for their skin because I have my own ideas about what they should look like. However, some characters to have morphs I really like and I will use those.
Face: I started with Victoria 5. I really like her face and have made some very nice characters with her. I didn't use Supermodel for this one. I started with Branwen's head because I love her lips. Then I added a little of Anwyn's head. I gave her Mina's skin because of her nice clear completion and also has nice green eye makeup.
Eyes: I added other dial spinning for the eyes (I think I will do an elf eye tutorial separately), and Dark Elf's glowing green eyes.
Ears: I used a combination of Anwyn Ears, Dark Elf Basic and three options from DD Resource Ears.
Skin Color: I played with the subsurface to achieve the color I wanted. My original settings are (red green blue):
Diffuse: 62 139 99
Specular: 78 85 127
Ambient 101 112 47
So 'nuff said about the original figure. Here she is:
So I picked her up again and thought, how can I update her? Her skin looked a little flat.
So let's darken the Ambient to 31 35 14:
(I'm trying to line up the original with the change here. The Original will be on the left):
It worked! At any rate, I really didn't like the darker look so I reverted back to the original.
Next, I was looking at the surfaces for Mina, and realized that she didn't have all the SSS surfaces, so I added Omnifreaker's UberSurface Base. Again, the original is on the left.
Wow, did that make a BIG difference! I like that a lot!
Now I lost the glow effect from the Dark Elf eyes. So I re-added them, and changed the ambient back to black and ambient strength to zero. So here's my final on the right:
You've been busy! I learned a lot with your breakdown of the Bishop Takes Queen. I'm still in the GIMP camp for now. I just can't see getting PS until I know more. I did do the trial they had for awhile and I found I could find things easier in GIMP just because I've been using it for so long now. I figure, though, that I might get PS when I come across a situation that I can't absolutely do in GIMP.
That was weird about the coat. I've had similar problems with other props when trying to make morphs in Hexagon. I think vendors can come up with some strange ways to create an item that just doesn't make sense to me. I'm sure there was reason for doing the buttons that way, but I can't imagine what it was!
I love reading a person's process when they go through how they did something. Even if I don't like what they did, I can learn a new technique. Not saying I don't like the Bishop Takes Queen because I thought it was an awesome image! I'm just saying, in general, I can still learn from someone's art I don't like if I can see how a person got from start to finish. I really enjoyed reading how you got there!
Thanks Knittingmommy. That's my whole reasoning for doing it. The more we see other people doing things the more we learn from each other.
I am learning so much with these great break down of how you got the render you did!!!! Thanks for this Dracorn!!
You are welcome Saphirewild!
Very nice work! And its fun to see your steps on the way. I'm still using Gimp and I have to say the more I'm aquainted with it the more I like it.
Render Diaries - "Mandala - Mermaids"
I had been kicking around this idea for a while and wanted to see if I could do it.
The first thing I did was create the mermaid characters. I completed each one including her hair pose. Only the red and blue hair textures that came with Christina Hair. The rest are blond with changes to the diffuse. I also played around with the diffuse to change the skin tone slightly to match the tail color. I retextured the necklaces using Gemologica.
When I was finished, I renamed "Genesis 2" to a unique name for each one, based on the colors of the tails: Opal, Beryl, Crysocolla, Jasper, Labradorite... and... well, Lorelei Mertail plus textures only equaled five, and I needed six. So I took Opal and colored both the tail and the Woman red for Ruby.
You can see them here right side up:
Opal
Beryl:
Crysocolla:
Jasper:
Labradorite:
Ruby:
After I added the expressions, I saved each one as a scene subset.
So I thought I should use a hexagon diagram to place each object in the mandala. I found one on the net, downloaded it, and slapped it on a plane. However, I was still just eyeballing the placement, and it simply didn't work the way I wanted.
See how it looks without the hexagon - it just isn't positioned right.
Since I have never taken Trigonometry, I went to my husband for assistance. He made the calculations for me so I was able to place them. The bottom mermaid had a Y position of 30 (based on the hexagon-plane). Note to self: Start the bottom object at ZERO - it'll make the whole thing easier.
Here they are mathematically positioned. I also put Ruby on the bottom because people liked her the best.
I posed the arms on the first and second pair, then wrote down all the position numbers of each arm part. I added these to each successive mermaid, and made minor adjustments to get the positioning right.
Now it was time for the other design elements.
After posing the lionfish, I took another one and flipped it. Saved this as a subset.
I made another set with the butterflyfish. I knew I would have to rotate this one and the darn fish were giving me fits. The axis of their rotation was above them, as though they were parented to something. I asked some questions and people were talking about editing nodes [... that was about the time my head started to swim, and though I appreciate people’s suggestions, it was more work than I wanted to do]. There comes a point when you reach the "oh heck with it" moment and look instead for a quick and dirty solution.
So I found that if I clicked on the body, I could rotate it properly. I then put a sea urchin in the middle and pointed their noses at it, and then parented the fish to the urchin. So all I had to do is rotate the urchin and the whole set behaved itself. (That was rather clever if I say so myself!) Saved it as another subset.
The finished centerpiece.
Here's the next design piece: Blue Coral. There are 4 coral pieces here, with the little purple urchins to cover the seams. Again, it was parented to the anemone in the center so I could rotate it on that axis.
Now because I started with Ruby at Y=30, and also because the tails are curved, this threw the math off for positioning the rest of the items. I used math for the rotation, but I had to eyeball it for the actual position.
I actually put a ruler on the screen from the center urchin through the blue coral and the turtles to see that they lined up properly.
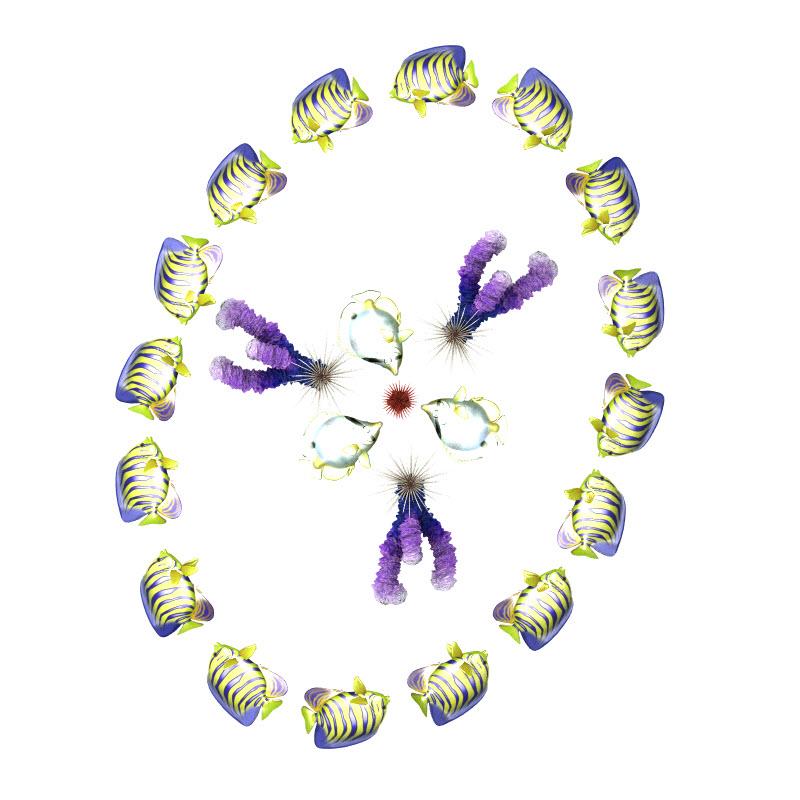
For the Angelfish, I posed the first one, then positioned them in a curve then saved it as a set.
I loaded more sets and I flipped them for the lower curve, and finally had a full circle.

Here's the centerpiece:
For the final Angelfish motif:
Now for the lighting. I hid everyone but Ruby and she gets to be bald for this step, 'cause I want to see her face without the hair. I wanted rim lights of complementary colors to their skin for each, so I created a green spotlight for Ruby and positioned it off to the side. By this time I changed the central urchin to yellow because there was too much purple in the center motif.
As I began to add additional mermaids, I didn't want the light from one to spill out onto another (or onto the other objects for that matter). I also hid everything I didn't need. I used Advanced Spotlight (3Delight), and took advantage of a cool feature: I set the diffuse of each mermaid to 99.1, 99.2, 99.3, etc., and set her spotlight to illuminate only an object with the diffuse of that value. So each spotlight will illuminate that mermaid only.
Trying to get the spotlight angles right by looking through the spotlight when your characters are not right side up made for some really weird upside-down views as I was doing it. Sorry, no pix, because I can’t render through a spotlight.
If you are using 3Delight, I highly recommend AOA's Advanced Lighting bundle (distant, ambient and spotlight). It makes lighting so easy and renders faster than Uberenvironment, not to mention the feature of lighting only items with specific diffuse or ambient values.
So here's the lighting in succession:
The motifs were too dark so I added a point light over each one. I ran into a problem: The fish were overexposed to the point where I couldn't see detail. It wasn't the brightness; it was the glossiness setting on the fish. I had to go back to every single fish in the entire design and set the glossiness to 100%. Here's the before and after (in tiff, which is why the background is white). Note to self: REMEMBER to change the file type back to JPG after saving in a TIFF.
Rendered at 3000 x 3000 in 3Delight, which took 16 minutes. Saved it as a TIF and now it's off to Photoshop!
I wanted to add the background in Photoshop, so I brought in the render as Layer 01 instead of Background. I made a dot over the central urchin, and then used that to create a blue circular gradient over a black background. I wanted something that resembled the ocean but then was close to black which was simple and made the characters and motifs stand out.
I created the bubble column and splash motifs in separate files using Ron's Water Brushes, then dropped them into a new layer and positioned them. The mermaids are actually the top layer and all my work was in layers below them. Don’t you just love the splashes looking like a manta ray? I thought it was particularly kewel.
My final PSD file is 3000x3000 x 300dpi, and 42mb. I exported it to a 1500x1500 jpg to get it under the 2mb forum limit.
I'm going to upload a larger jpg to COSTO and see what happens when I make a print. COSTCO makes you crop an image, so I'm going to see if I can create a white background behind the original that's larger, so I don't care if it gets cropped off. I'll let you know how this experiment works.
Here's my final image:
Great render diary!