David Brinnen - needs advice on your porcelain tutorial
 launok
Posts: 807
launok
Posts: 807
@David Brinnen - copied this from here: http://www.daz3d.com/forums/discussion/53147/show-us-your-bryce-renders-part-9/p45 and here http://www.daz3d.com/forums/discussion/53147/show-us-your-bryce-renders-part-9/p46 regarding your steps to porcelain:
"Decided to have a go at porcelain. There's the render, the render option, the HDRI used and how it is setup, the light source (obscure) which is called "Background", how it is setup and what its material is, then the sun setup and finally the materail setup for the porcelain itself (global ambient is set to the default).
 "
"
"Yes sorry, I forgot to mention that setting. But you figured it out. As you say it is dependant on how thick/think you expect the material to be. The stuff I googled was mostly the thinnest variety it seems.
 "
"
Is the steps in the order the images are attached?
I have never used any HDRI's or the IBL in Bryce before. I don't have the HDR you use in your short tutorial called "GarageOpen_1280.hdr" Is this a freebie? If not, which .hdr can be used giving the same effect of porcelain? I can only use freebies.
Daz 3D is part of 
Connect
DAZ Productions, Inc.
7533 S Center View Ct #4664
West Jordan, UT 84084
Licensing Agreement | Terms of Service | Privacy Policy | EULA
© 2026 Daz Productions Inc. All Rights Reserved.
Comments
GarageOpen_1280.hdr is included in the set http://www.daz3d.com/practical-bryce-7-1-pro-volume-1
For the reflection, you need an HDRI with bright light sources, here there are fluorescent lamps on the ceiling and at left daylight through the opened door but no direct sunlight. Note that an HDRI as backdrop can be very much brighter than the white you see on the screen and hence act on the surface it lights differently than an ordinary picture.
Generally, you can use any free HDRI you can find on the Internet if it is either in the angular map projection or in the spherical one, the file must be in the Radiance RGBE format encoded with rle-2. In my experience, there are many 360 x 180 degree panoramas available for free that are just LDRI converted to HDRI, though there are some "jewels" around.
Some find IBL very confusing and difficult to use. In fact, it's the simplest means to light a scene in my opinion. I have several tutorials on the subject on my website (Bryce & 3D CG Documents; Mine (PDF) > Sky; and Videos (Links) > Horo).
@Horo - Thank you for help and advice, will go and have a look at your site. :)
You're welcome. I forgot to add that you can also generate an HDRI directly from the Bryce sky in the Sky Lab, IBL Tab.
Yes the steps are in that order. But it is only fair to point out, if you have not used any HDRI or the IBL in Bryce before you are really diving in at the deep end here. This is quite a difficult subject. The HDRI was chosen beacuse it has nice hightlights, these really help sell the illusion of it being a glossy and hard substance. My suggestion would be to familurise yourself with IBL and True Ambience rendering independently before attempting to use the two together. As often just combining them without understanding how to isolate them from one another effectively can just result in huge render times with little gain in terms of rendering quality.
Thanks for the warning regards HDRI or IBL. What I am actually trying to do is to use a texture on a ball jointed doll (Daz3D's Genesis 2 Female for Daz Studio) which I have exported to Bryce. A texture for the doll's body resembling a type of porcelain effect - so it looks more like a doll than the human skin of G2F. I saw a Bryce material freebie called "smoked teeth" at Infinity Designs but can't find download buttons on any of the mats. Specially when I want to make a close-up render the porcelain (or nearest material) should be noticeable. In Bryce the closest to plain white is actually appearing greyish.
EDIT: Done a quick render with the flat white mat in Bryce. I have to add I did not actually tested it before now only and the mat looks not too bad.
Launok: Nice start. Maybe use a little less white material (e.g. light yellow-greyish) and add pure white specular?
Add some hairline cracks maybe.
Nice!
How do one do these hairline cracks in Bryce? I am not using Bryce as much as I should, am still learning my way throught it.
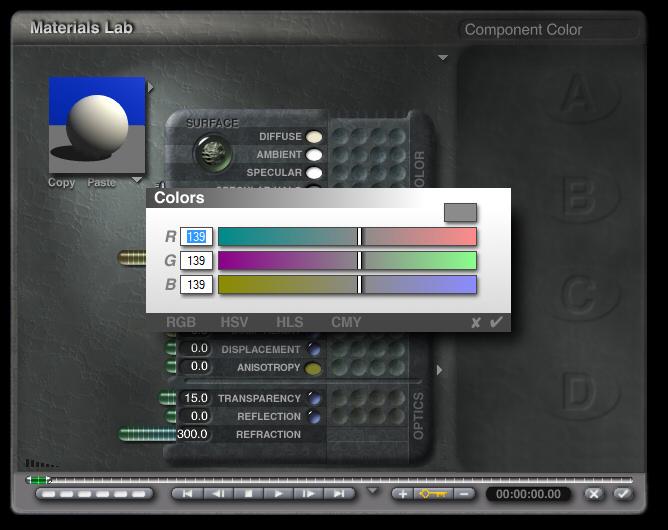
Below is a screen shot of the Deep Texture Editor (DTE) setting for the cracked material.
So in the Material Lab, you place a blue dot on the 'Bump Height' row in an unoccupied channel (A, B, C, D). Then in the right side settings pane that will appear, click the 'Texture Source Editor' button to enter the DTE.
Firstly, click the little Pearl coloured buttons on each corner of the Component 1 box to open up the Noise, Phase and Filter panels and then click the green corner of the Noise settings to gain access to the setting shown on their own box to the right of my picture.
When that's st, all you need to do is click the tick and that takes you back you to the Mat Lab where you can set the ideal bump height for your cracks.
Hope this helps.
@Dave Savage - Wow, thank you so much for the description and accompanied screenshot which will be very useful indeed! I will give this a go and see the outcome. There are so much I still have to learn, so many features I haven't used including the DTE. The other day I have downloaded and installed a tool called large address aware (LAA, I think is shortcut) and now I can add even more objects to scene and Bryce not crashing or run out of memory as much as before. Bryce I got free at that time via DAZ and do all my scenes/renders only with this great landscape editor!
Things to check:
Make sure that in the DTE you have clicked the A and B buttons down the side of Component 1 (where the C,A and B buttons are, the B and the A ones should be lighter grey). This sets the Alpha and the Bump properties of the component you have just set.
Make sure that when you click the tick and go back to the Material Lab that you slide the slider next to the Bump so it reads something other than 0.
If you still have trouble, I'll try find some time to upload my material to somewhere you can download it and import it into your preset materials.
Dave Savage - thank you for the extra help. I am still not getting the cracks as in your screenshot of DTE above. I have got the result as shown on the dolls in the attached image, quite big and not as small cracks as on your pictures above. I actually have used the same settings as yours of the DTE. Is it then possible to send your preset?
Laura
Laura - There are two things: the texture (from the DTE) and the material. The material can also be scaled. In the Mat Lab, click on the upper left button of the texture to open the Transformation Tools. A small window opens Edit Texture. The top one is to scale the texture (in %), the middle one to rotate it (in °) and the lower one to shift it (in BU). Increase the X/Y/Z percentage on the top one 5 to 10 fold and check on the objects whether you need more or less.
Ah right... so your cracks are there just big... That's an easy one to solve.
In the MatLab, click on the 'Transformation Tools' button for the crack texture and then increase the number shown in the top tool (highlighted in Red on my screen grab).
To increase X,Y and Z at the same time, place your cursor on the center of the tool and clcik and drag. One way will increase and the other decrease. If the numerical reading is at 0, make it somewhere around 50 and see what effect it has, then go back and fine tune it with the same tool.
Hope this helps.
EDIT: Cross posted with Horo.
Cross posted but better advice.
Dave Savage & Horo - Thank you for the advice and help and screenshot Dave. I will go and play around with these settings and hopefully tomorrow post the outcome as I am now off to bed.
Thanks Dave for the screenshot of the DTE for the cracks.
I am just as pleased with the help I got about cracks. Today I have played a bit more with the settings but still have more to try. I have used the basic tile in texture library for getting this result.
What texture is actually better to use Dave & Horo? The attached images shown maybe a bit much bump on the cracks which mean I can lower it a bit.
Thanks again,
Laura
launok - difficult to say which one is better, you are the artist. However, if you go for cracks, both of yours look too wide to me. The pattern size is good, but the grooves are too wide. Look at Dave's screenshot of the DTE above. Check your Filter settings (a and b). With them, you can adjust the width of the grooves.
I have double post here, can't remove this one.
Thank you Horo, I will go and check the crack groove settings.
I am almost there. The boy doll still have a bit too much grooves compared to girl doll.
This whole process taught me the DTE which I haven't used before.
Big improvement.
@Launok: Looks really good. I am sure you have realized, that the hair of the dolls has a lot of faint lines. The reason for that is during the import the transparency map got broken. If it bother you, I could show you a solution.
@Dave Savage: Thanks for the idea how to make cracks. Nice work.
Electro-Elvis If you can help me with this, it will be great! I am still learning Bryce. Even with Daz Studio skin textures I struggle when trying them in Bryce. Sometimes it stay grey or white. Then the only solution I get is to physically add a texture in Bryce that resembles skin. But I am sure there are ways, only I don't know them.
I am happy to do so. I have written a kind of tutorial (attached as PDF document). I needed much longer, than I have expected, but I hope it is understandable. Any critique is appreciated.
Thank you for the tutorial, this is so much appreciated!