-
Getting lower disk size of rendered JPG files
IrfanView (free) can do batch conversion too, has a ton of options.
+1
I usually save renders as PNGs, process them in Photoshop, and then save a copy to JPEG with the highest quality. I then open the image in Irfanview and save incrementally, setting the quality at 99, then 98, then 97 and so on, until the size of the image is just under 2MB, which is the size limit for the Galleries. Previously, if I uploaded an image with a file size over 2MB, the gallery software would resize the image, I assume to bring the file size under the 2MB limit. (I can remember a time when uploading an image larger than that would result in an error, much like trying to upload an image less than 400 by 400 pixels does now.)
As for using the batch function, there are step by step instructions in my Map Transfer tutorial, an entire section devoted to Irfanview and Batch processing.
You can find more information and download the utility from Irfanview.com.
How to remove a colliding element but keep the collision effect?There's a Bake Smoothed Morphs command, I can't recall if that does what you want. Failing that, export as OBJ and then bring in as a morph with Morph Loader Pro (Edit>Figure), making sure you use the same preset in both the OBJ export and Morph Loader.
Clothing parts with unwelded vertices?Some things I didn't write about are the Facegroups, the Surface and the Shader settings for this converted Clothing Item.
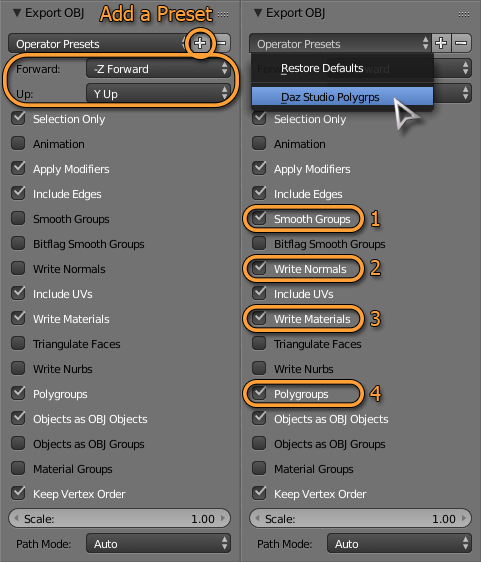
I wouldn't recomend you to use the Transfer Utility for transfering the Facegroups or Surfacegroups, not only that the results can be vary, it isn't needed because the Face & Surface -groups will be maintained and gets imported back by the OBJ (actualy by the companion MTL file) if you have checked Write Material and Polygroups in the Blender export settings.
In Daz Studio open the Geometry Editor pane and compare the original Face & Surface -groups with the imported one - the polygons should be the same. You may have to rename the Surface Group because Daz Studio somehow adds the object name behind the original surface name while importing.
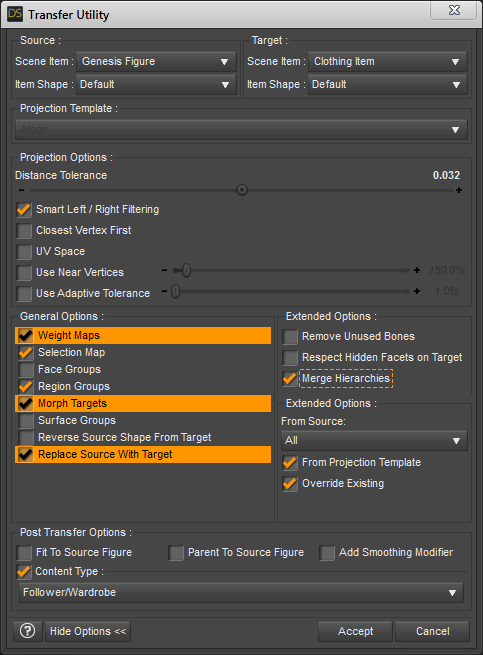
...just make shure you use a low Distance Tolerance (higher values would make the weightmap blury and smooth the morphs too much) and only check to transfer Weightmaps and Morph Targets.
Sorry I have to correct myself, not only check Weightmaps and Morph Targets but also Selection Map, Region Groups and Content Type (will be automaticly the same as source).
[Edit]: Wrong info Merge Hirarchies just select WeightMaps
And in the extended options of Weightmaps check Merge Hirarchies, it is strange but if I don't check this not all Parameters - especialy the controller Properties and the Property groups don't get transfered over - at least with my last experience in some DS 4.9 version.
For the extended options of Morph Targets select From Source: All in the dropdown menu.
[Edit]: Also select Replace Source With Target, this will make shure all controller Properties and Property Groups gets transfered over like within the original.
Then try to apply some original clothing material from the library. If the Surface Group name is the same as the original the chances are good that it will apply just as the original. If not you may have to select all Surfaces in the Surfaces pane and apply the right shader first. You can select some Surface from the original and save the Shader Preset to the library and then apply it to the converted clothing.
The last step would be to save this converted clothing item to the library as Figure/Prop Asset.
And that's it - I hope I didn't forget something since I havn't done this for a while. I wish you success with this method.
Sakura 8So I picked up Rarestone's Japanese Anime Poses for Sakura 8 and Genesis 8 Female(s) in the last sale! Here is an image using one of the poses, and the snaggletooth morph
 (click for a big size, its a big one!) I threw in a little dForce on the Cardigan. They did a good job on that feature, it's simple to use!
 Clothing parts with unwelded vertices?
This question comes up almost every two month or so, but I see much of these threads with no solution for this issue. So I think its time to hopefully change that.
These unwelded Facegroups are most likely seen in old content made with Poser compatibility in mind where every bodypart is split up in seperate Facegroups.
There is a solution with a method I once used succesfully that I like to explain.
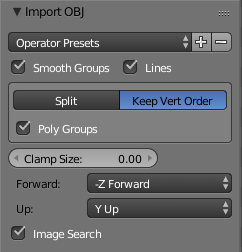
First export the clothing item as OBJ and import it to Blender. This alone is a challenge and a matter of the right export-import settings often discussed here and there.
I have made some screenshots for that - just use the settings and you're good to go.

Once you have your cloth imported to Blender you can go to edit mode and choose the function Remove Doubles from the ToolShelf - Mesh Tools. There is also an option for the Merge Distance by default at 0.0001. But since the edges of the Facegroups should match exactly, all seams should be welded by now.
Also take care of the UV-map, before you use Remove Doubles first you have to open the UV-Image editor and select the Seams from Islands there to make shure Blender knows where the UV seams are (showen as red lines in the 3D view but not showen at first import). With this it dosn't weld these vertices together at the UV-map seams that would destroy it.
With this done you can export this mesh as OBJ and import it back to Daz Studio as a seperate object. See these settings for exporting with Blender - simply use the settings on the left.
Yes your problem is the vertex count has changed but if you also load the original clothing item into the scene you should see that the shape does match the original shape while all faces starts to flicker while navigating the perspective view.
Now the trick here is to use the Transfer Utility to transfer all Rigging, Weightmap and shape morphs back to the altered base mesh. Since the vertices of both items are at the same position it should be an easy task for the Transfer Utility, just make shure you use a low Distance Tolerance (higher values would make the weightmap blury and smooth the morphs too much) and only check to transfer Weightmaps and Morph Targets.
References:
Wow super! Thanks.
How to get a kid 5 years old model?.The Kids+ Pro Bundle is good and comes with clothing. The technology behind the Kids+ models has been abandoned and they don't get much, if any support.
If you want to use the latest supported DAZ 3D modeling technology, if you get the
1) DAZ Studio 4.x Pro (software)
2) Genesis 8 Starter Essentials (free - models)
3) And the following list of model products (paid - wait for a sale if you've a tight budget)
https://www.daz3d.com/genesis-8-male-head-morphs
https://www.daz3d.com/genesis-8-male-body-morphs
https://www.daz3d.com/genesis-8-male-expressions
https://www.daz3d.com/genesis-8-female-head-morphs
https://www.daz3d.com/genesis-8-female-body-morphs
https://www.daz3d.com/genesis-8-female-expressions
then you will find among all those morphs the ability to make a face younger looking, older looking, and same with the body and all. I've done it and it just takes a bit of reading the morph sliders and trying them.
You'd want to buy some clothing too but for that you can look for yourself.
Finally, there is a product called Growing Up for Genisis 8 (Male or Female) that will do all that with one easy morph slider but it always makes the boys and girls look identical and so that's not very good for creating original characters.
bunions, hammer toes and canklesis odd how there is no corresponding podiatry morph set to dental plan etc for all those ugly feet to go with our witches, Georges etc or even the stunning beauty who has the scary tootsies!
I thought of that seeing the pretty foot jewelry in fastgrab
even chipped mishappen nails
Clothing parts with unwelded vertices?This question comes up almost every two month or so, but I see much of these threads with no solution for this issue. So I think its time to hopefully change that.
These unwelded Facegroups are most likely seen in old content made with Poser compatibility in mind where every bodypart is split up in seperate Facegroups.
There is a solution with a method I once used succesfully that I like to explain.
First export the clothing item as OBJ and import it to Blender. This alone is a challenge and a matter of the right export-import settings often discussed here and there.
I have made some screenshots for that - just use the settings and you're good to go.
Once you have your cloth imported to Blender you can go to edit mode and choose the function Remove Doubles from the ToolShelf - Mesh Tools. There is also an option for the Merge Distance by default at 0.0001. But since the edges of the Facegroups should match exactly, all seams should be welded by now.
Also take care of the UV-map, before you use Remove Doubles first you have to open the UV-Image editor and select the Seams from Islands there to make shure Blender knows where the UV seams are (showen as red lines in the 3D view but not showen at first import). With this it dosn't weld these vertices together at the UV-map seams that would destroy it.
With this done you can export this mesh as OBJ and import it back to Daz Studio as a seperate object. See these settings for exporting with Blender - simply use the settings on the left.
Yes your problem is the vertex count has changed but if you also load the original clothing item into the scene you should see that the shape does match the original shape while all faces starts to flicker while navigating the perspective view.
Now the trick here is to use the Transfer Utility to transfer all Rigging, Weightmap and shape morphs back to the altered base mesh. Since the vertices of both items are at the same position it should be an easy task for the Transfer Utility, just make shure you use a low Distance Tolerance (higher values would make the weightmap blury and smooth the morphs too much) and only check to transfer Weightmaps and Morph Targets.
References:
Transferring custom morphs on props?First try to unfit and then Fit the clothing item to the figure again - this should trigger the "autogenerate Morphs" in the backround.
If this dosn't work, try to save the custom morphs first with the File>Save As>Support Asset>Morph Asset. To make shure DS recognizes the new custom morph.
Then maybe create a new scene, reload the figure, reload the clothing item and fit again. Also check the Parameters pane with the Clothing selected to search for the Morph Property that may be already created.
As sayed before these are "autogenerate Morphs" - basicly its the Transfer Utility function working on the fly in the backround for you.
Its not guaranteed that these "autogenerate Morphs" are perfect fitting morphs but its a starting point where you can export the fitted clothing shape to an geometry editor and fine tune the shape.
Otherwise you can also select your figure and mark your custom morph as Favourit in the Parameters pane. Next open the Transfer Utility select the figure as Source and the clothing as target, uncheck all but Morph and select "Favourits and Sub-Components" in the trasnfer settings.
Dformer and morphsFile>Save As>Support Assets>Morph Asset, select the morph, set the Author and product names (these are used to generate folder names in, e.g. /Data/Genesis 8/Male/Morphs), mkae sure - if you isntalled using Connect - that the content directory at the top isn't set to the Connect data directory.
Transferring custom morphs on props?Go into the Parameter Settings for your morph, from the gear icon on the slider, and make sure its type is Modifier/Shape and that AutoFollow is checked.
Identifying Character in Promo Image (Aaron Hair)Is the character used in these promo images available or is he a custom morph? If it's the former, I'd really love to buy him.
Transferring custom morphs on props?Hi, I can sculpt or D-form custom morphs, but unlike "official" ones, clothes don't follow these. I tired "transfer active morphs" but I don't know how it works. how to apply custom morphsfrom base figures on props?
How to get a kid 5 years old model?.Just look for a Kid morph for your base figure of choice in the store.
Also, there is the old generation 4 with The Kids, it should work.Help! Transfer Utility driving me nuts - solvedI was having a similar issue with genesis 3. Once the base is zeroed and you have your brows ready to go hide everything in the scene except the brows. Export the brows/import them again and run the transfer utility. Hopefully now the brows will place in the identical place as the original brows. unhide your figure and hide the original brows so you can see if your new brows are in the right place. You can now save them as a support asset/figure prop assets in a folder for loading them onto your figure. They should fit to automatically but the option to 'fit to' should be there once they are loaded. That's how I've been doing it. So far I've made about 3 different brows this way and they seem to work ok. Original thread where Reds helped me out http://www.daz3d.com/forums/discussion/248056/super-natural-brows-solved#latest
Thank you! This worked perfectly.
Experimenting with dForce on older hairHas anyone tried dForce with Kozaburo's hair?
I tried with Alice hair. Some of the parts aren't welded, so just fall out of frame (or they can be made invisible). Adding a weight map is a must. May have to morph the hair/ add deformers to move it away from the figure's face too. For the Alice, the hair texture map runs left-right rather than up-down, so after updating the shader to Iray and applying one of the modern hair shaders over the top of the original shader, I went into LIE to rotate the gloss maps etc. In the attached very rough-and-quick render below, it looks like I missed one. The white line on her neck is I think due to some geometry hidden by the default transparency map - this was just a quick test so I didn't fix it.
So yes it can work, but it needs a lot doing. Still, it was cool to get out one of the old Koz hairs
I agree, it's not a one-click solution by any stretch. And it probably isn't particularly practical for animations in most cases. However as I've played with it, I do find that a little bit of simulation is often enought to get the hair to sit properly against the body rather than floating slightly above it (especially the back). Some hairs are unusable with this technique, some (lots by Outoftouch, for exmaple) work exceptionally well with it. Another tool in the toolbox, for the right situation.
Help! Transfer Utility driving me nuts - solvedI was having a similar issue with genesis 3. Once the base is zeroed and you have your brows ready to go hide everything in the scene except the brows. Export the brows/import them again and run the transfer utility. Hopefully now the brows will place in the identical place as the original brows. unhide your figure and hide the original brows so you can see if your new brows are in the right place. You can now save them as a support asset/figure prop assets in a folder for loading them onto your figure. They should fit to automatically but the option to 'fit to' should be there once they are loaded. That's how I've been doing it. So far I've made about 3 different brows this way and they seem to work ok. Original thread where Reds helped me out http://www.daz3d.com/forums/discussion/248056/super-natural-brows-solved#latest
Help! Transfer Utility driving me nuts - solvedin #2, for the source if you select current instead of default, then you will be able to check the reverse morph from source box
Okay I just tried this, and it still keeps dropping down. This is driving me nuts.
Help! Transfer Utility driving me nuts - solvedin #2, for the source if you select current instead of default, then you will be able to check the reverse morph from source box
Who said Blender was hard?Just happened across this. May be of interest to anyone who wants to export animations to Blender. I'm thinking that might be very desireable once Eevee is live. Which brings a question to mind: this video uses Cory 6 as an example and I'm guessing that was not IRay materials. In the video he fixes a problem with alpha transparency after transfer to Blender. Would it be a different procedure for IRay?
Sorry - don't know how to insert a video in this forum.
Daz 3D is part of

Connect
DAZ Productions, Inc.
7533 S Center View Ct #4664
West Jordan, UT 84084Licensing Agreement | Terms of Service | Privacy Policy | EULA
© 2026 Daz Productions Inc. All Rights Reserved.