-
CARRARA CHALLENGE #63: There be Dragons..... WIP
Your challenge is to do a render/animation of a Dragon inspired scene.
Types of Dragons:-
Western Dragon, Eastern Dragon, Wyvern, Wyrm, Drake, Hydra, Lindworm, Fafnir, Drachenstein, Amphisbaena, Amphitere, Jörmungandr, Rainbow Serpent, Basilisk, Apalala, Tiamat, Chelan Lake Dragon, Dragon of Beowulf, Dragon of St.George, Ladon, Sui-Riu, T’ien Lung, Hydrus, Naga, Quetzalcoatl, Azhi Dahaka, huge serpent, Dragon lizards, Komodo dragons, Crocodiles, Alligators, Dinosaurs, to name a few !!!Dragon resources:-
https://en.wikipedia.org/wiki/Dragon
https://en.wikipedia.org/wiki/List_of_dragons_in_mythology_and_folklore
https://en.wikipedia.org/wiki/List_of_dragons_in_popular_cultureDAZ3D Dragon inspired items:-
https://www.daz3d.com/catalogsearch/result/?q=dragon------------------------------------------------------------------------------------------
DA RULES:-
YOU can do up to 4 carrara renders/animations including in an external renderer for which there is a carrara plug-in (eg LuxRender, Octane) with your interpretation of the theme.
Images must be new, unpublished before the start of this challenge, but derivations of previous work allowed.
A WIP (work in progress) image must be posted to the WIP thread.Content Use
Use of any and all content is allowed Subject to the Forum Terms of service.
Used content should be credited in the Entry Thread.
Participants are encouraged to create or modify content, but it is not required.Post-work
Post-work is allowed and welcome.
Entrants are encouraged, but not required, to explain their post-work in the WIP thread so that others can learn from it.
At least a brief description of post-work done should be included with the final entry in the Entry Thread.Winners
The winner of the Challenge gets to pick the theme for the next Challenge and to make changes to the rules if they wish.
The winner of the Challenge will be the host for the next Challenge, but they may pass the hosting duties to any of the other winners if both agree, or to any other member of the forum if none of the winners is able or willing to host the next Challenge.------------------------------------------------------------------------------------------
Sponsorship:-
Thank you to our generous sponsor DAZ3D for offering the following awards to the winners:
1st Place: $75.00 towards DAZ3D owned item(s)
2nd Place: $50.00 towards DAZ3D owned item(s)
3rd Place: $40.00 towards DAZ3D owned item(s)
4th Place: $30.00 Towards DAZ3D owned item(s)
(Can only Win Once)
------------------------------------------------------------------------------------------
DATES to Remember:-
WIP Thread Opens: Saturday, 09 July 2022
Entry Thread Opens: Saturday, 06 August 2022
Entry Thread Closes/Voting Begins: Saturday, 20 August 2022 23:59:59 CST (GMT-6) 3 September 2022 23:59:59 CST (GMT-6)
Voting Ends: Saturday, 27 August 2022 23:59:59 CST (GMT-6) 10 September 2022 23:59:59 CST (GMT-6)Colored Cast Shadows In Carrara?...YES!This was inspired by reading about RGB MultiMattes for Cast Shadows in Jeremy Birn’s book Digital Lighting & Rendering: Chapter 11, “Rendering Passes and Compositing” (mine is 2nd edition, it may have changed since then).
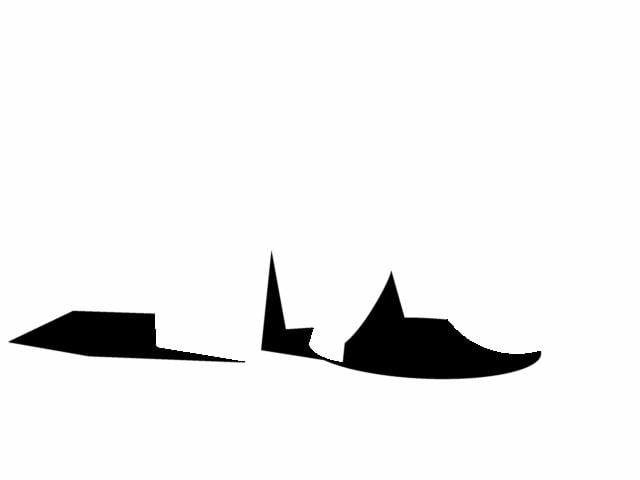
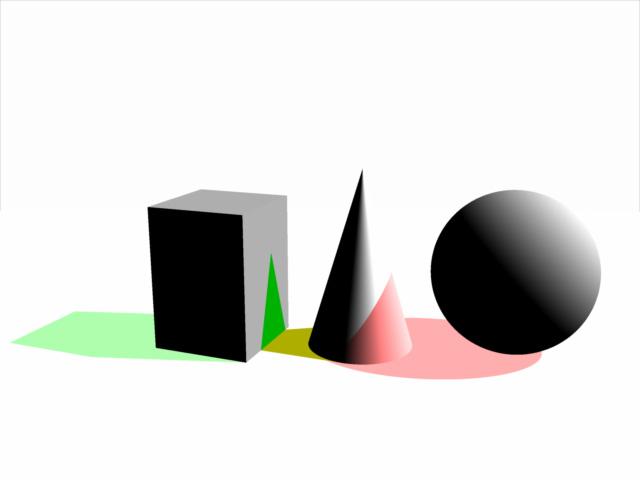
In this simple scene there are three basic shapes, a sphere, a cone and a cube. They cast shadows both on the floor and the sphere casts a shadow on the cone, and the cone casts a shadow on the cube. If you wanted to isolate those shadows, even with a Shadow Pass, it would be tedious to make proper selections.
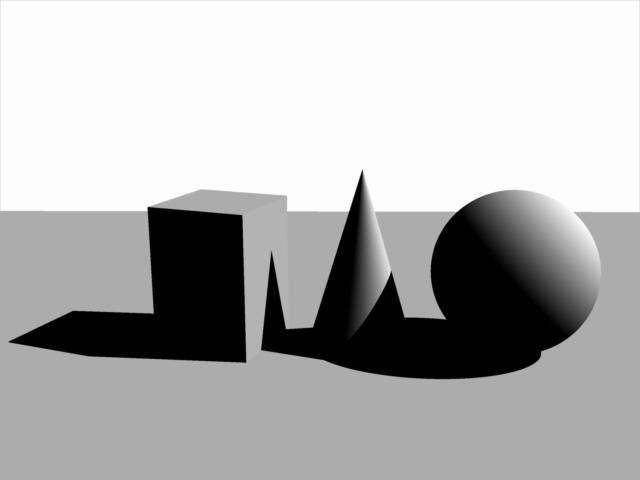
You can create a 3 in 1 matte which renders pure Red, Green and Blue values for easy manipulation in post. Carrara’s Shadow Pass will render colors.

However, using a dedicated RGB Light Group, as previously explained, and light linked to each object met with failure because each successive light group worked to add lights upon lights and resulted in a blown out Shadow Pass, never mind the Beauty Pass, which we discard for these purposes anyways.
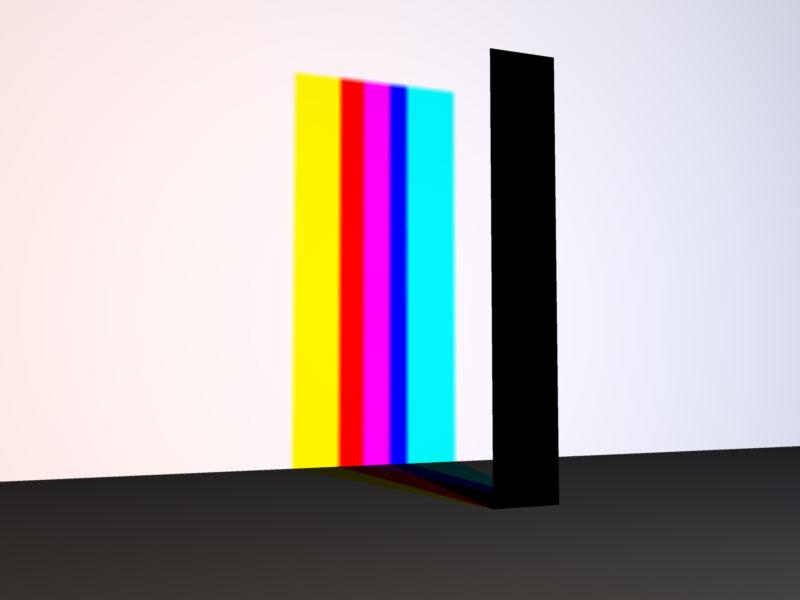
The following images demonstrate the successive blown out image. The first shows the sphere only - it has a light group set to cast a red shadow for the sphere, the floor plane and the cone. If we then dedicate a light group to shine on the cone to cast a green shadow, you already see the Shadow Pass looking unhelpful. Adding the last light group dedicated to the cube totally blows out the image.
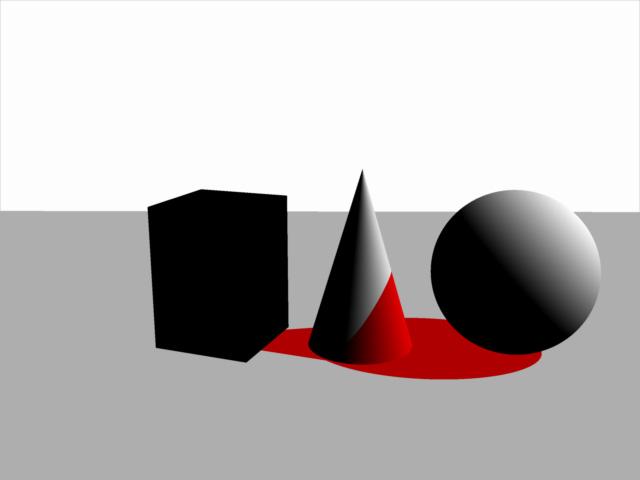


This is because in order to get the sphere to cast a shadow on the cone, we have to link the cone to that light group. And same for the cone to cast a shadow on the cube, we have to include the cube in the light group aimed at the cone. The resulting Shadow Pass is a hot mess.
Even if we separate the floor shadows from the cast shadows on other objects we still get a washed out Shadow Pass.
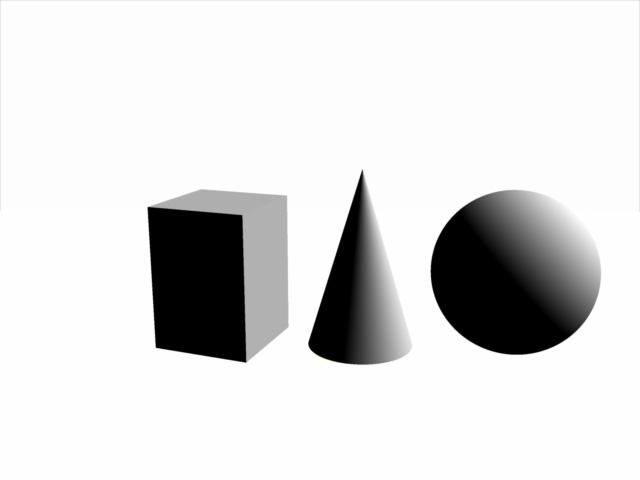
Mr Birn writes: “You may need a workaround such as giving the light a negative intensity and a negative shadow color. Regardless of how you set it up, packing three shadows into each shadow pass is more efficient than rendering shadow passes with only one shadow, or a shadow pass in which the shadows cannot be separated.”
Carrara does offer an option to use a negative light, and with some experimentation I was able to get it to work…for the most part.
Colored Cast Shadows In Carrara?...YES!DesertDude said:
WendyLuvsCatz said:
ah yes, this is something I always found annoying about DAZ studio, because being a Carrara user I expect coloured shadows, iray has improvec things a lot but getting a spotlight to work in that properly is difficult.
Carrara on the otherhand sometimes the shadows are Too Coloured in my experience

I think I completely misread and misunderstood your previous post, I'm sorry if my response sounded like a total jack a....
Cheersit's OK, I was just showing my usual smugness DAZ studio still cannot do stuff as well as Carrara even if it is improving
my opinion only
 Colored Cast Shadows In Carrara?...YES!
WendyLuvsCatz said:
ah yes, this is something I always found annoying about DAZ studio, because being a Carrara user I expect coloured shadows, iray has improvec things a lot but getting a spotlight to work in that properly is difficult.
Carrara on the otherhand sometimes the shadows are Too Coloured in my experience
I think I completely misread and misunderstood your previous post, I'm sorry if my response sounded like a total jack a....
CheersCan anyone help me to get the windows to go down in family carthis is easy to fix
(the windows not going down)
go to edit rigging and convert triax weightmapping to general weights
DAZ studio that is,
it works perfectly well in Carrara so I likely would not want the updated dual quat version
 where I would need to do the reverseColored Cast Shadows In Carrara?...YES!
Hi Wendy,
I'm simply pointing out you can, that's all.
I don't know anything about DAZ or iray or anytihng, simply trying to showcase Carrara's abilities 'out of the box'.Often based on watching videos on different topics of different software, and I'm like..."huh...can we do that in Carrara?"

 Colored Cast Shadows In Carrara?...YES!
ah yes, this is something I always found annoying about DAZ studio, because being a Carrara user I expect coloured shadows, iray has improvec things a lot but getting a spotlight to work in that properly is difficult.
Carrara on the otherhand sometimes the shadows are Too Coloured in my experience
Strandbeasts to inspire modeling and animationsFascinating.
Would make for quite a learning experiment trying to rig something like those in Carrara.
Beautiful motion of those 'wings'.Colored Cast Shadows In Carrara?...YES!For convenience I grouped the Spot Lights together and named the Group RGB_Light_GROUP.
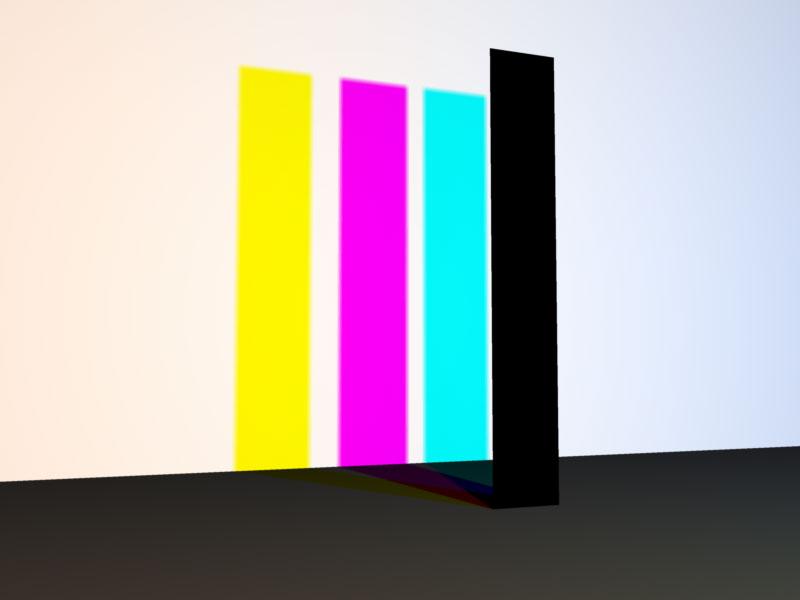
In the following examples I opened each Spot Light to their maximum of 90 degrees, and all three occupy the same space.
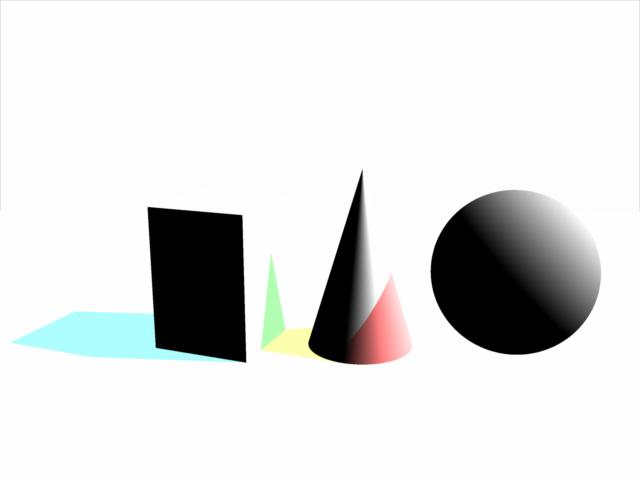
In the first render the shadow is as you would expect - the stick casts a black shadow. But if we start to separate the lights, the shadow starts to split into color components, and if we move them even further apart, we see those components completely separated.
So it seems Carrara can cast colored shadows, but how can we access them?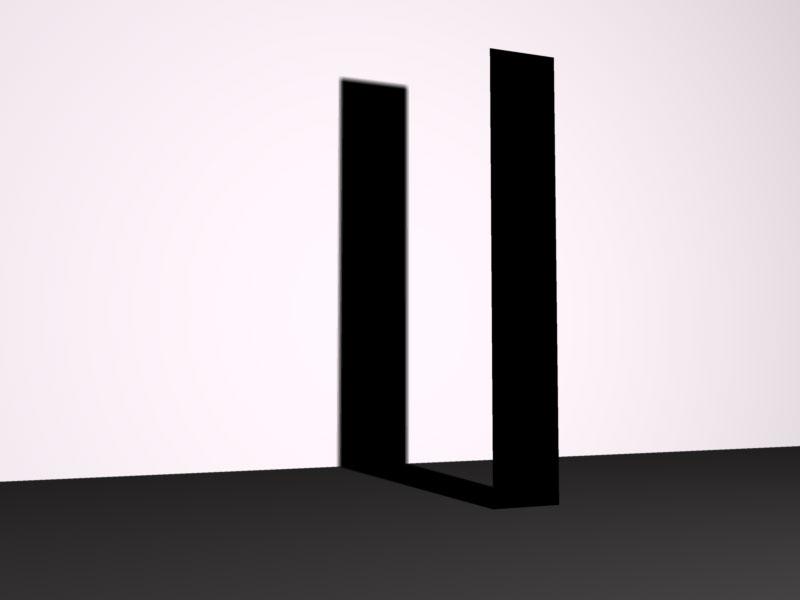
 Colored Cast Shadows In Carrara?...YES!
Super apologies if this has been presented and/or demonstrated in the past.
One can create colored Cast Shadows in Carrara using lights, despite the lack of a Shadow Color chip.
This expands on a concept put forth by forum member Evil Producer where he cleverly placed 3 duplicated lights, one pure Red, Green and Blue, occupying the same space to create nice rainbow splays using Caustics with glass shaders.
https://www.daz3d.com/forums/discussion/comment/884391/#Comment_884391
Using his same set up, we can control Cast Shadow colors.
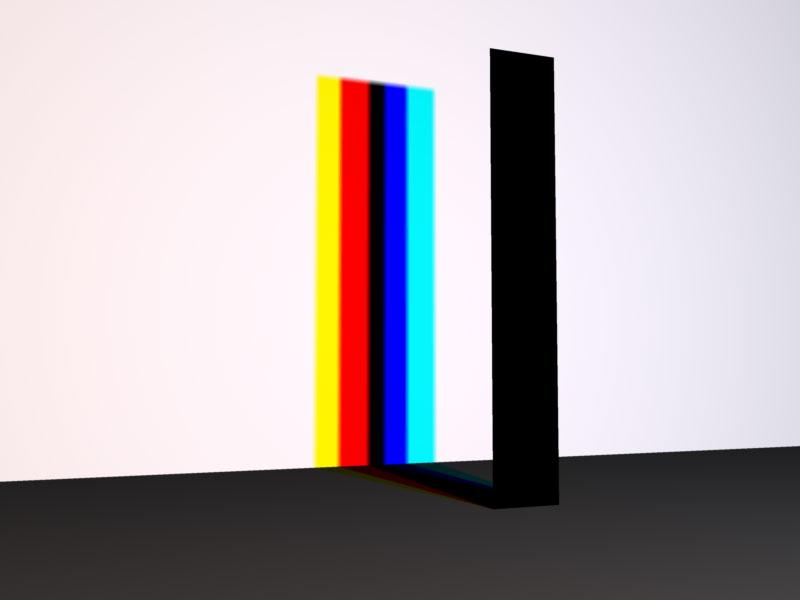
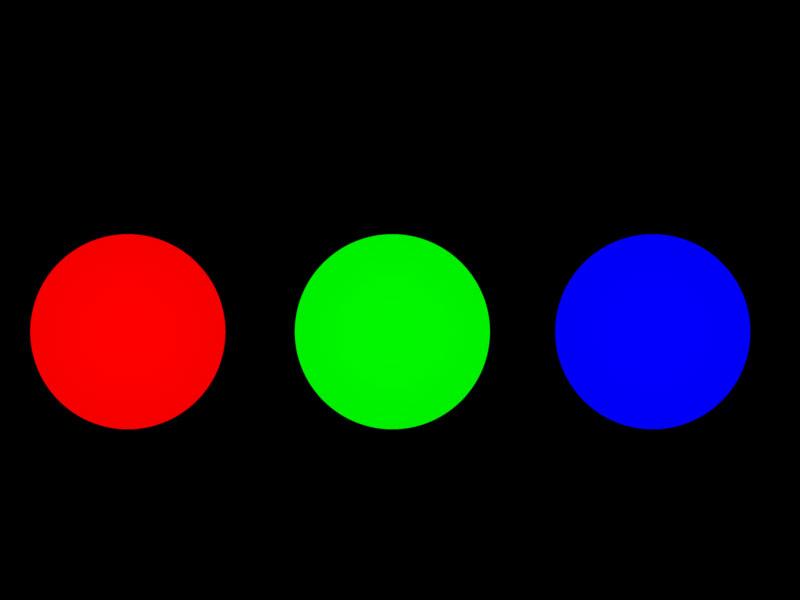
But first, a brief intro and some pictures.Here are three spots, one each set to pure Red (255,0,0) Green (0,255,0) and Blue (0,0,255). The Radius has been dialed back and they are aimed directly at a white plane - no other lights are in the scene. You can see in this first image the Spot Lights are separated.
In this second image, the Spot Lights have been moved closer together and in the overlapping areas, we see Carrara mimics real life light.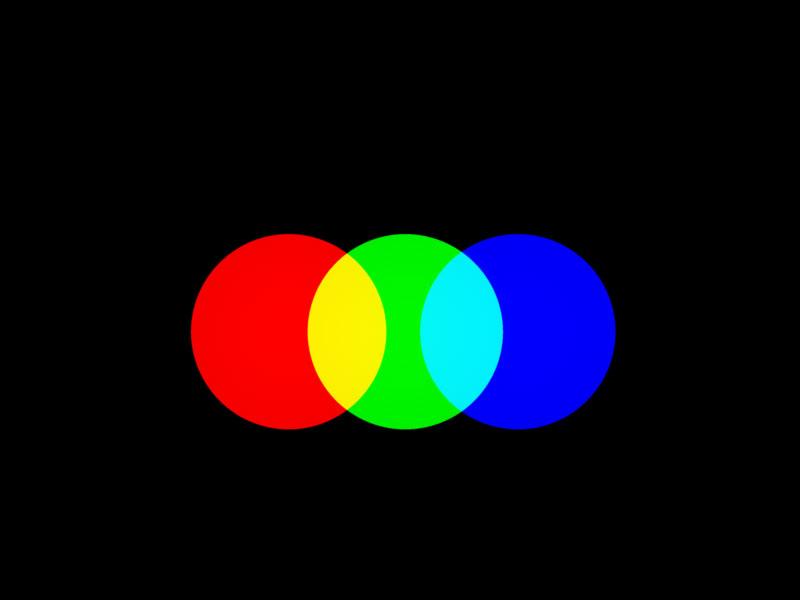
In this third image all three lights are overlapping to produce the three secondary colors Cyan, Magenta and Yellow, and ultimately, pure white where all three overlap.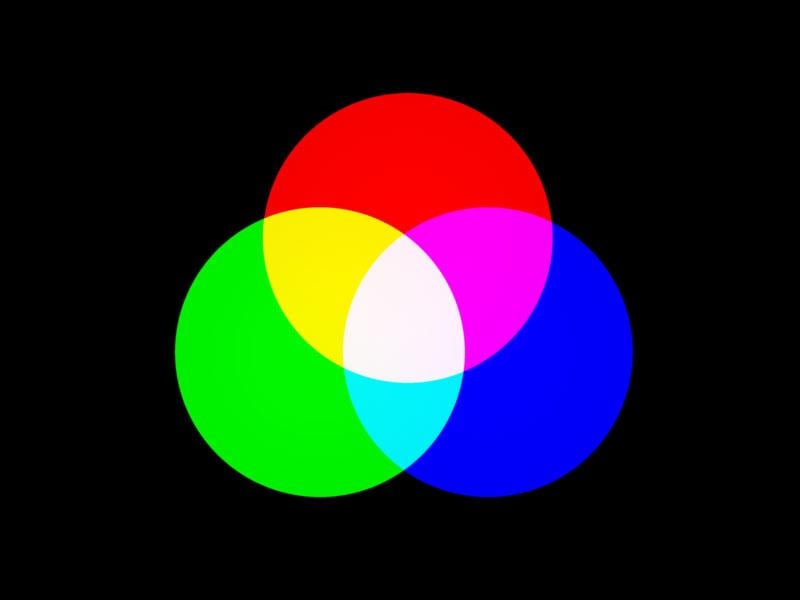
This last image shows all three Spot Lights occupying the same space. They produce pure white…well,almost. It does looks a bit "pink". A quick Eyedropper reveals RGB values are: 254,247,253. Putting that discrepancy aside, it is theoretically correct.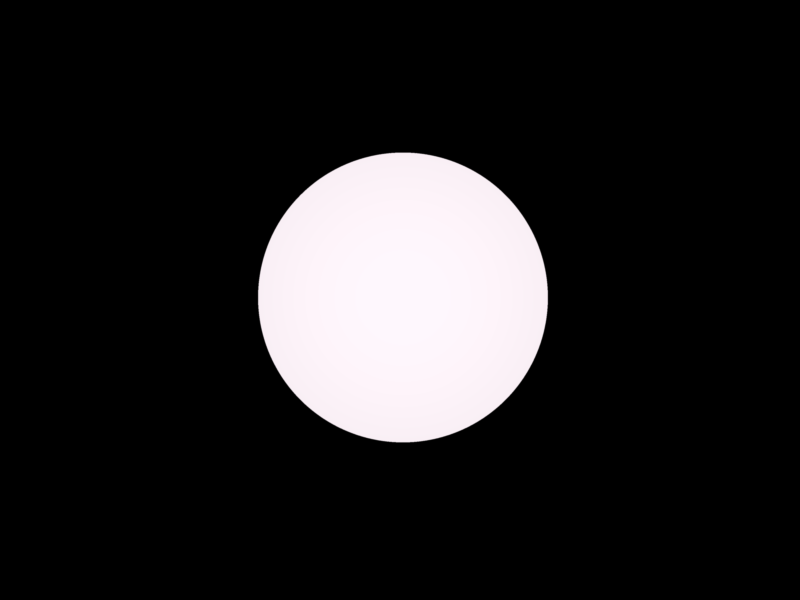 Carrara Community Art Gallery - Show us your Renders!!!
Khoe said:
new tree planting campaign. Lots of grass and flowers installed. Designed new trees. I think it was worth it though. Carrara is just fun.
yes I agree it's awesome :)
Wombo Arts!Richard Haseltine said:
There is quite a bit on this topic here https://www.daz3d.com/forums/discussion/571401/the-future-and-artists-redundancy/p1
I think a lot of people hide the Carrara forum
we are sort of used to others thinking we are redundant
No one asked me - Diomede screenshots on whatever - Warning AI Discussion OKDiomede said:
For the walk cycle reference, I did a simple mapping of a reference image to a plane and inserted that in the Carrara scene next to the rigged character. I slide the reference plane to line up the next image.
That is incredibly clever!
Carrara Challenge #62 "Clowns and Other Circus Stuff" - WINNERS ANNOUNCED!!Congratulations to all!
Congrats to Bunyip02 for a well deserved win!@Headwax - thanks, and sorry to hear about your family member. I hope she has a speedy recovery.
@Diomede - thanks, everything is fine just plagued this past year by total creative malaise. I did pick at Carrara here and there and discovered a few technical tricks I will be sharing shortly once I double check that my 'T's' are properly crossed and my 'I's' dotted.
Looking forward to again being more participatory here.
Animated ... Sculptures?Thanks for pointing out that artist @Steve K, it's one of those things I plan on doing once I get better with my 3d printing.
If you start doing things like this in 3d printing I imagine Tinkercad is fairly fairly simple but good.
and Windows 3d Build is neat for cleaning up models (making them water tight) before you print them.
I've also had a small look at making things with Arduino Arduino - Home - electronics have come a long way since the last time I fiddled.
Domestika aalso has afew courses for making moving objects.
There's also stuff like this you could do in Carrara - see next post
OT a little -- NEW FREE program over at Pilgwayvoxels are solids
the iray OpenVDB is a good exaple of a voxel
as are Carrara and Bryce metaballs
they export as hollow objects like chocolate easter bunnies and how faceted they are depends on export settings
in their native programs smooth AF
a vertex model on the other hand is made of polygons
Animated ... Sculptures?I have yet to get into Carrara's physics, but Jean Tinguely's kinetic art makes me want to try.
For some reason this Forum won't let me post a Vimeo link to his work. If you're interested, try searching "Making Modern | The Art of Jean Tinguely Comes Alive"
Its a short Vimeo video about the works displayed at the Museum of Fine Arts Houston (MFAH)
Trying to align leaves with pre-existing UV mapI know how to do this in Carrara, make the UV image the diffuse colour ( or use the diffuse map if it matches) and work in textured view selecting and moving your islands around but don't know if that works in Hexagon
just posting in case it does
Carrara Challenge #62 "Clowns and Other Circus Stuff" - WINNERS ANNOUNCED!!I hope it's not too late to vote, I have been way out on the outer rim of the solar system this past year.

Entry# 2
Artist: Bunyip02
Title: Bobo the Clown at the CircusENTRY# 15
Artist: Diomede
TITLE: Horse ExpertiseENTRY# 27
Artist: UnifiedBrain
TITLE: Finding BozoENTRY# 32
Artist: ed3D
TITLE: the Jester's VacationAnimations -
ENTRY# 24
Artist: Headwax
TITLE: Bozo Finds His Nose ANIMATIONENTRY# 30
Artist: Diomede
TITLE: Clown Duo Dancing (animation)Always amazed at what everyone creates with Carrara - lots of intense work presented here.
Question Regarding Blender "Manifold?" lines [Solved]I'm not sure what the proper term for this is in Blender, but in the old Ray Dream Studio & Carrara apps, I've heard them referred to as "Manifold Lines"--
But in whatever app is used to make/edit a model, they're edges that frequently show up in a different color/highlight than the ordinary face edges will, often found on the openings into the interior, or where something wierd is going on in the mesh, like really, really sharp bends in the mesh. Please see attached picture at the bottom of the post for a better view:

I've never figured out the significance as to why they exist or what their purpose is for. The only thing I know, is I have little control as to where they'll show up, and they will often cause morphs to not work exactly as planned when used in Poser or DAZ. Since Carrara is kaput for me, I'm permanantly forced to use Blender as the app for making/modifying meshes--now please don't get me wrong, I DO greatly appreciate how versitle and powerful Blender is--it's just that the learning curve is still quite steep for me in comparison to what Carrara, & RDS before that, were. And, sorry to say, but all documentation for using Blender leave much to be desired--searching for specific phrases in the DAZ forums is easier. (And yes, I did search for "maniforld lines/edges", "highlighted lines/edges", and other terms in multiple combinations to think of--nothing found here, either.
So, like the apps I was using before, I learned how to convert these highlighted edges back to normal edges, but the task is an extremely tedious one.
My questions are:
- Is there an easier way to convert them to normal edges without having to go to each one, delete it, relink the verticies, refill all the faces that get blown away when I delete the highlighted edge, and THEN sometimes have to flip normals--ALL DAY LONG??
- Is there some valid purpose to keep them or to purposefully put them into the mesh (such as for the seams of mesh segments)? If so, how can that be done?
Thanks in advance for any info and advice.
Daz 3D is part of

Connect
DAZ Productions, Inc.
7533 S Center View Ct #4664
West Jordan, UT 84084Licensing Agreement | Terms of Service | Privacy Policy | EULA
© 2026 Daz Productions Inc. All Rights Reserved.