-
Quality - has it dropped or am I just insane?
I think the quality has gone up.
Overall I agree.
I also think people's expectations have gone up too....I was just about to post that for myself, I know that my expectations have risen as the "base" quality has improved over the years.
For instance, I'm now more focused on the flexibility of an outfit. How are the material zones laid out? Can I recolor / rexture them or will I lose too many details doing that? Can I re-use a skirt from one outfit with a top from another or are the styles so specific that they'll look silly together? How does the clothing support body morphs and movements beyond a simple standing modeling pose? If it's not dForce enabled by default, does it explode when I try to set it up myself?
A character morph / texture has to be REALLY special now that I have about 30 of them for G8 females. And I'm looking for more "natural" looks. In other words they should have some flaws. I have enough generic perfect supermodels. Give me a girl (or man) that has some character to them.
Poses that don't offer partials and mix/match aren't likely to get my money either. Even better if they do the mirroring for me so I don't have to remember how to do that myself. I'd rather spend $15 on poses I can use quickly for the specific look I want than $9 on a set where I'm constrained to a single look that the PA chose for me.
There is definitely quality in the market. Some new vendors are clearly still learning. Some others have come out of the gate with impressive products. Just because I'm being pickier about spending my money doesn't mean the overall quality is lower. It just means I'm being more discerning as a consumer.
Converting Under-Arm Wings To G8FRichard, what are you baking in each step? The costume or the figure that will wear the costume? I'm confused.
Bake the figure to match the clothing implicit pose, rig the clothing, then pose the clothing to match the figure base pose and bake the clothing.
Is the issue the A pose? If so you can bend the arms into a T pose and then right-click in the Viewport with the Joint Editor>Edit>Bake Joint Rotations, then do your rigging from that (I think you also need to zero out any JCMs). Once done, pose your wings to the A pose of the default figure and use the same Joint Editor right-click>Edit>Bake Joint Rotations to get a version that will work, then tidy up JCMs and any other tweaking needed.
The issue isn't the pose. I know about baking in the joint rotations. The problem is the new weight-mapping. I'm not sure how to transfer the weight-mapping from G8F to the wings without them getting horribly distorted.
After transfer (which should give the correct joint centres but not so useful weights) you'd have to do a fair bit of hand editing. Or you could just rig the struts and then let dForce handle the membrane, I would think.
FaceGen and EyesI haven't had trouble with the eyeballs warping per se when I use facegen, but I have had cases where the eyes pointed in the wrong direction or where what the morph dials call "eye shape", but which is really more like "eyelid shape" or "shape of the visible part of the eye as defined by the surrounding eyelids," looked kind of weird. Pointing in the wrong direction I fix with eye pose controls, and some of the eye options in the 200 Morphs pack by @Dogz can go a long way to fixing the other.
Krampus HD for Genesis 8 MaleJust bought and installed Krampus HD.
Opening the file gives me this error:Duplivate formulas found in files. Make sure that the content is properly installed. See the log files for more details.
I work with DAZ Studio 4.11 beta (still habe4.8 installed). And I installed the files with DIM. Anoybody any idea what went wrong?
Logfile says this:
2019-02-04 13:09:14.317 Loaded Morph Deltas in 0 min 0.0 sec.
2019-02-04 13:09:14.319 Loaded file: Krampus_Horns_Ridge_Morph.dsf
2019-02-04 13:09:14.469 Loaded Morph Deltas in 0 min 0.0 sec.
2019-02-04 13:09:14.489 Loaded Morph Deltas in 0 min 0.0 sec.
2019-02-04 13:09:14.489 Loaded file: KrampusLegsFix.dsf
2019-02-04 13:09:14.499 Loaded file: KrampusMouthCorrective.dsf
2019-02-04 13:09:14.529 Loaded Morph Deltas in 0 min 0.0 sec.
2019-02-04 13:09:14.529 Loaded file: Krampus_Test_04.dsf
2019-02-04 13:11:47.597 File loaded in 2 min 57.1 sec.
2019-02-04 13:11:47.597 Loaded file: krampus.duf
2019-02-04 13:11:48.913 Loaded Morph Deltas in 0 min 0.6 sec.
2019-02-04 13:11:48.913 Loaded file: PHMEyelashesExpand.dsf
2019-02-04 13:11:48.944 Loaded Morph Deltas in 0 min 0.0 sec.
2019-02-04 13:11:48.944 Loaded file: Krampus_Test_04.dsf
2019-02-04 13:11:48.960 Loaded Morph Deltas in 0 min 0.0 sec.
2019-02-04 13:11:48.960 Loaded file: Krampus_Horns_Ridge_Morph.dsf
2019-02-04 13:11:48.960 Loaded Morph Deltas in 0 min 0.0 sec.
2019-02-04 13:11:48.960 Loaded file: Krampus_Horns_High.dsf
2019-02-04 13:11:49.900 Loaded image KrampusLegs05.jpg
2019-02-04 13:11:49.978 Loaded image AK_ED5sclera4.jpg
2019-02-04 13:11:50.072 Loaded image AK_ED5eyes02a.jpg
2019-02-04 13:11:50.386 Loaded image KrampusArms05.jpg
2019-02-04 13:11:50.620 Loaded image Krampus_Mouth02.jpg
2019-02-04 13:11:50.856 Loaded image AK_ED5esoc1.jpg
2019-02-04 13:11:51.185 Loaded image KrampusFace05.jpg
2019-02-04 13:11:51.466 Loaded image KrampusTorso05.jpg
2019-02-04 13:11:51.606 Loaded image Krampus_HornsTX.jpg
2019-02-04 13:11:51.686 Loaded image G8MBaseEyelashesMapTR_1006.jpgLa Femme in DSI agree with Caravelle , some of her does not look natural to me , her wrists ,ankels , feet, knees and mouth for some reason don't look right to me, i do like the HD morph promo look of the rest her body .
DS Feature Request: Export only selected item(s)Wouldn't it be nice if the Export utility in DS had the option to export ONLY the selected item(s). All too often, I find myself wanting to export an object/figure as an obj file so I can load it in as a morph using Morph Loader Pro. Unfortunately, before I can do this I have to go through the scene deleting/hiding everything I don't want to export. It would be a lot quicker and easier to export only what I DO want to export by selecting it. This option could be added to the Export popup window as an option button.
PockmarksAlthough it may be hypothetically possible to model or morph the mesh to create such an effect, generally such small features would be created using bump mapping, displacement mapping or normal mapping. Bump maps will work fine as long as the area is being viewed more or less straight on, otherwise displacement or normal mapping that distorts the mesh would be best.
Morphs I would like to seePeople tend to not be perfect. They have imperfections that are not symmetric. What I would like to see are morphs that change each nostril independantly. For isntance- I have an absolutely beautiful character morph I have created- looks exactly like who it is suppose to, save for the nostrils are all wrong. Also morphs that can simulate pock marks (Like the kind you get when you have chicken pox and have scratched it) .
It would be awesome to be able to place them where I want them or to be able to make them on my own. Also I would like a product that places freckles as beauty parks. Perhaps one that allows them to be placed in various spots as well... Im not sure if that is even doable. But beauty marks and pock marks and nostril morph independance.
Scully HairI would like to find some Dana Scully hair from xfiles. As well as a good morph for her for Gen7 or 8.
How to Use dForce: Creating a Blanket, Draping Clothes on Furniture, and Much More [Commercial]After my post on momentum transfer, Praxis shared an animation of a bouncing ball. He recently posted a more elaborate example using moving cubes to cause a ball to bounce (this post shows how the cubes were positioned).
Importing FBX files into Daz Studio - Parts scattered everywheredon't hold your breath
it is not the purpose of DAZ studio
DAZ studio is meant for posing and rendering DAZ and some Poser content and it does that exceedingly well.
it was created as an alternative to Poser for DAZ3D to display the content they sell.
any other format import is a bonus, obj is usually the only type needed for creating content to use with DAZ figures etc
FBX is always a third party figure from another software or game and not particularly in DAZ 3D's interests to support.
I told you the best way to do so is via Poser 11 Pro, there is not a lot more I can add other than find a program that does import FBX and convert to obj
or a series of objs you can use as morph targets for some very basic animation bearing in mind you will need many for one that does not distort, Blender will export an animation as a series of obj files.
Setting up Basic Materials for Genesis FiguresEyes - Cornea, Tear and Reflection
Basic Male (Genesis 1) doesn’t have the Eye Reflection domain but I’ve included it here for Genesis 2 users.
In most situations, I treat Cornea and Reflections layer with the same shader, keeping a separate Tear shader to allow for control of the visibility of the Tear separately.
This one is really simple, and is where I’m going to have you switch from a simple shader conversion to using a Carrara shader preset. This particular part of the eye is important enough to dictate that we use Carrara’s render engine to help us out.
Open the Cornea shader. Now go to the browser’s Shaders tab and scroll down to find the Glass presets.
With the Cornea shader open, drag the shader preset called “Clear” in the Glass presets onto the where it says “Top Shader” in the Cornea shader window.
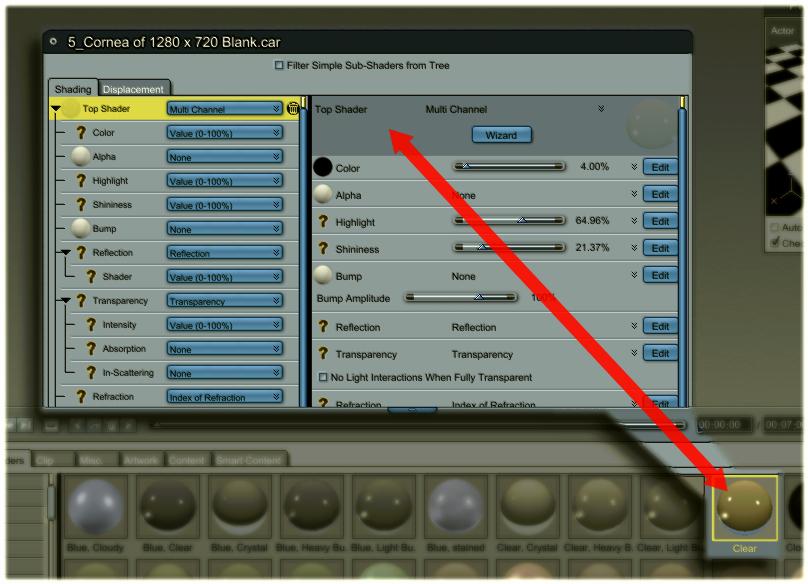 Here is where we’re using a basic use of Carrara’s more advanced and powerful shaders system.
I say “basic” because it’s a very basic way of setting up a simple substance within Carrara without going into heavy technical accuracies and experiments. “Advanced because we’re adding more of the powerful shader functions, like Refraction.
In the Domains list, drag this Cornea shader onto the Eye Reflection domain if you have one, or select it from the drop-down.
Open the Tear shader and drag the same “Clear” shader preset onto its Top Shader. With the shader still open, reduce the Highlight slider to 0 to remove the tear and increase it to 100 to make it very highlighted. This can really help to add emotion to expressions. Even tears of happiness can get nice and glossy - and increasing the Highlight value will increase the shaders glossiness.
If you like, have a look around in the glass shader preset. Notice how Carrara isn’t using the Alpha channel to reduce visibility. Instead, we’re using Transparency to allow light to pass through the material, allowing highlight and shininess to do their thing!
Reducing levels of Alpha makes the whole shader disappear, while increasing intensity of Transparency doesn’t remove our ability to see the shader, it instead allows us to see through it, except when our vision is blocked by highlights or reflections.
The surface is further enhanced with Refraction and Reflection.
It is common for folks to feel a need to increase reflection to make things shinier when, in fact, we use Highlight and Shininess for that. Reflection is a more intensive calculation which can actually hide what we really want to see, if overdone. I often keep Reflection of my Cornea shaders really low: between 2 and 3.
What we’re actually looking for is often just more highlight and/or a tighter (higher value) shininess. We also need to be aware that too high of a value in Shininess can reduce the highlight to such a tight angle that it will not show up in the render. Much over (or even up to, in some cases) a value of 35 can often be too much. But for these eye surfaces, we can even go up to and over 50 for a nice shine on the eyes. It really depends on out lighting and render setting, so adjust this to your own taste and settings.
I love having Refraction on my Cornea shaders for those times when I can catch a view of the eyes from their side, showing off a cornea bulge - a morph I always use. The refraction is what keeps this clear material form being empty. It uses the angles of incoming light against surrounding nearby colors to create an effect very similar to how real eyes look at these rare views - especially when the light flows passed the eyes just right!
The Official aweSurface Test TrackI'll be damned! I deleted the figure from the working scene and merged the problem character, made no changes to shadersettings, just hit render in bucket mode...18 min
 So problem solved, and looks damned good as well.
So it went from 1 hour to 18 min?
Yup no problems now:) I doubled the SSS samples which added 10 min to rendertime, but in this case 256 worked just fine. I also tried 25% SS weight, but didn't really make that a big difference to rendertimes. A little more noise, no artefacts though. I also tried really low rendersettings, basically cutting all values by half, ok speeded up things a bit but looked noisy so not recommendable:) Interesting with your optimization, as you have said, going the other way and upping all the quality settings makes sense, the other way around, not so much
I guess strange things happen in DAZ-land, have no idea what was going on. So as it turns out, over all improved rendertimes with higher quality, impressive:) And I'm yet again utterly confused, but I can live with that=)I've seen even stranger things with DS. Geometry got somehow joined into one surface/material or figures breaking up due to non-exported morph data. For other problems, starting the app and re-creating the scene solves most problems.
Oh, and you mentioned using regular 3DL with progressive for fast preview, I tried that, on my machine it won't render faster even with ridiculously low pixel samples, so...it was worth a try. Anyway, I've learned a few things again, testing continues:)
Converting Under-Arm Wings To G8FIs the issue the A pose? If so you can bend the arms into a T pose and then right-click in the Viewport with the Joint Editor>Edit>Bake Joint Rotations, then do your rigging from that (I think you also need to zero out any JCMs). Once done, pose your wings to the A pose of the default figure and use the same Joint Editor right-click>Edit>Bake Joint Rotations to get a version that will work, then tidy up JCMs and any other tweaking needed.
The issue isn't the pose. I know about baking in the joint rotations. The problem is the new weight-mapping. I'm not sure how to transfer the weight-mapping from G8F to the wings without them getting horribly distorted.
Setting up Basic Materials for Genesis Figures Optimizing Shaders
Everyone has a different view on what an optimized shader is. Basically, if we’re happy with how the Basic Male looks when he’s loaded in from the library, our journey to optimizing will be quick. This is a very basic, but well performed optimization that the Daz3d Developers have built into their Daz Studio shaders - knowing how they will translate into Carrara.
While I’ll be using Basic Male in my example, the same applies to the Base Daz3d character presets. Quite simply, there are certain aspects of any material setting in Daz Studio or Poser that will never transfer perfectly into Carrara when being loaded in. This cannot be helped.
So the developers looked at how Carrara is converting the materials over, and designed their base Daz Studio shaders to make for a good cross over - which I think is really cool.
For more realism, however, we have at least one more map to add to some of the shaders, and want to set things up to work more like the real thing. We cover that in the More Advanced article.
Lets look at the simple setup and advance in the next article. That way those of us whom are happy with the simple setup have less to read, and it also helps to explain where we’re going with the more realistic options later.
By the end of this Basic Shaders discussion, we’ll wrap it up by making a full-figure (Multiple Zone) preset that can add this optimized shader set to any figure of the same base mesh (Genesis, for example) as well as how to create individual shader presets to add these settings to ANY figure period.
 Basic Shaders
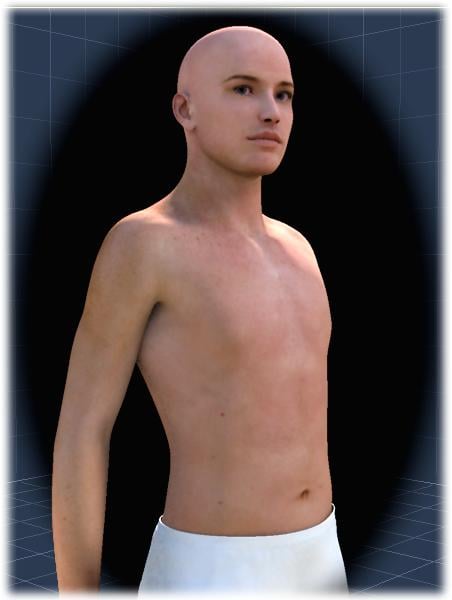
It should be said that we’ll need to load a figure for this exercise which comes with texture maps. Genesis base figure does not load with maps. So we need to load Basic Male, Basic Female, Basic Child, Genesis 2 Male or Genesis 2 Female, etc., It can also be Gorilla or Troll or Michael or Victoria, Gianni, Gia, etc.,
For a full understanding, however, please refrain from loading in a third-party character preset. As with Carrara artists, Daz Studio content artists enjoy thinking outside the box to get their shaders to be special, and that sort of thing doesn’t often translate to Carrara, often leaving your figure all black or something odd.
We’ll get to how to load in your third-party characters in the Advanced section. For now, however, it’s best to start with one of the Genesis (1 or 2) standard characters.
(Image on left - Genesis 1 Basic Male, No shader changes)
After we’ve performed the Edit > Remove Unused Masters > Consolidate Duplicate Shaders, let’s take a look at one of the skin shaders.
Select “Actor” and go to the Texture Room so we can see what’s getting applied to what. When asked if we want to Create a New Shader or Edit the Existing Shader, choose Edit Existing, so that all Shading Domains get updated, not replaced, starting with a new, blank shader.
Setting up Basic Materials for Genesis FiguresUV Coordinates for Genesis in Carrara
When we bring in the Base Genesis model from the library, it comes in without textures. If we instead load in one of the versions found in the Characters section, they come in with their basic color maps in place, and they load with the UV Mapped Coordinates for that specific shape. This can be important to know if we wish to use a specific set of maps - no matter the shape we want to end up using.
Basic Female comes in with UVs that match Victoria 4 texture maps. Basic Male is the same for Michael 4 maps and Basic Child for Kids 4 maps.
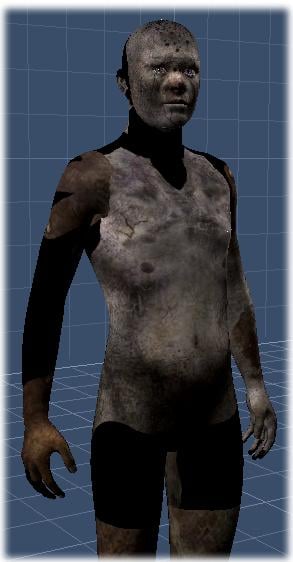 Other characters we collect will often have custom UVs which make for more uniform texture mapping of the figure after its shape has changed to that, particular shape - a really nice design feature Daz3d has built into their Genesis system.
Knowing this, let’s consider that we want to use (for example) the Troll maps on a shape of a small girl child.
To do this easily, we’d start by loading in the Troll character preset so that the maps line up. Remember, we want to use Troll’s maps. Those maps were made to fit the custom UVs of the Troll shape.
So we begin with the Troll character preset and then change the shape to anything we want. In this case, remove the Troll morph, and add some Female and Child morphs to our liking.
In this same idea, we can use Michael 5 maps on a Troll or Gorilla or on Victoria or whatever shape we want. We just want to begin with the base character that corresponds to the maps we want to use - and then change the shape to whatever we want.
It’s important to do this or we’ll end up seeing map irregularities on the figure, like the outside of the map, etc.,
The figure here shows the Troll maps loaded onto the basic Genesis. Notice how the maps don’t line up with the figure. This is what I’m talking about here. If we want top use the Troll maps, begin by loading the Troll character preset. This will give us the proper UV Mapping for those textures. Now we can change the shape to anything we want, and the mapping will follow.
Daz Studio has a built-in function which allows users to swap UV Mapping directly while working but Carrara does not. So the simple work-around is to just load in the preset character according to which maps we will use.
The Official aweSurface Test TrackI'll be damned! I deleted the figure from the working scene and merged the problem character, made no changes to shadersettings, just hit render in bucket mode...18 min So problem solved, and looks damned good as well.So it went from 1 hour to 18 min?
I guess strange things happen in DAZ-land, have no idea what was going on. So as it turns out, over all improved rendertimes with higher quality, impressive:) And I'm yet again utterly confused, but I can live with that=)I've seen even stranger things with DS. Geometry got somehow joined into one surface/material or figures breaking up due to non-exported morph data. For other problems, starting the app and re-creating the scene solves most problems.
OBJ import wrong vertex countEditted original post after I did more digging and moved to Hexagon forum.
I'm trying to do a morph on a piece of clothing. The tutorials I've seen all said to export from Daz as a .obj (wavefront) file. Before the export, I made sure to have only that figure in the scene and set on my figure:
- No fitting or adjustments
- Resolution Level = Base
- View subD Level = 0
- Render subD level = 0
I imported my *.obj into hexagon, did my adjustments, exported as a *.obj and everything seems happen. When I try to use it as a morph in Daz, it complains about non-matching geometry (vertex count is wrong). I did some more digging, and it seems like something is going wrong in the Hexagon import. The Daz exported *.obj has the correct vertex count, but as soon as Hexagon finishes the import script, it's added vertecies. However, if I use the Send to Hexagon... menu option from witin Daz, it has the correct vertex count. When I import the *.obj, which came from Daz, into Blender, the vertex count is correct. What am I doing wrong in Hexagon?
RPG SeriesI think the OP mentioned things being Poser capable, so I am guessing the stuff post Genesis 2 maybe unusable, and even Genesis 1 and 2 may be undesirable if he/she doesn't like messing with DSON.
Ah, overlooked that, too. There is always Creature Creator for M4 and V4; still quite a bit from RawArt, Valandar, Predatron, GhostofMacbeth, to name a few. Morph packs for Mill Gen 3 are still available, too.
Animating controller dials?Off the top of my head, the process goes something like this.
Set up the timeline with the morphs activated at the correct frames.
Go to Parameters> Edit Mode> ERC Freeze. In the dialog that opens, create a new property, name it and hit Accept.
In the 1st dialog, use the "Keyed (Extract from Play Range)" option.
You should see the morphs you used appear in the list below that option.
Once you accept that, the new property will appear - usually in the root node, although you can move it (in Edit Mode)
Edit - Here are some notes I made on the peculiarities of the timeline. (Courtesy of Josh Darling at DAZ)
Every property has a key at frame 0 automatically
You automatically key a property when you change its value on any frame
When animating you should never use "alt+click" to reset a property back to the default value because it resets the values on all keys back to default, not just the current frame
The range of the timeline equates to the range of the property you are going to ERC Freeze to. Doesn't matter if your range is 0-500 or 0-30, the first frame will be your min value and the last frame will be your max value.
Your first frame is your min value. That means when you create a new property you want to make sure to set your min value to 0 unless you want the slider to animate in both directions (positive and negative)The notes below relate to something I was doing - a bottle with morphing liquid in 15 steps. But they probably appply to anything with multiple morphs.
Dial up the 1st morph to 100% then dial the 2nd morph to any value and then put it back at 0%. This is necessary for creating a 0% keyframe
Increment to frame 2 and repeat the previous step - morph 2 dialed to 100%, morph 3 to a value and back down to 0%
Repeat this with every morph until they are all animated
at frame 15 - dial up morph 15, then 0%
at frame 30 - morph 15 100%
then ERC Freeze using Keyed (Extract from Play Range)Daz 3D is part of

Connect
DAZ Productions, Inc.
7533 S Center View Ct #4664
West Jordan, UT 84084Licensing Agreement | Terms of Service | Privacy Policy | EULA
© 2026 Daz Productions Inc. All Rights Reserved.