Tutorial: Converting Textures from Gen2 to Gen3
 j cade
Posts: 2,310
j cade
Posts: 2,310
As discussed in this http://www.daz3d.com/forums/discussion/58379/v4-uvs-for-g3f/ thread. Here's my method for converting textures to Gen3
Abandon Hope all ye who enter here. This method is not quick. It is tedious and can be fiddly. But, If you persevere you can get any texture that works on Gen2 onto gen3 (or vice versa if you are so inclined)
*Trigger warning* this tutorial uses blender, and expects you to be able to navigate its viewport a bit, also I am not the best at explaining, if anyone else thinks they can write a better version, please do.
*Edit* ChangelingChick has written a clearer and more non-blender user friendly version of the tutorial that can be found here: http://the-freehold.com/2015/09/03/texture-conversion-using-daz-studio-and-blender/ It explains a bunch of things I forget to because I am used to using blender
First things first, you will need this http://www.sharecg.com/v/81631/view/21/DAZ-Studio/Texture-Conversion-Helper-morphs ; It will make Gen3's gen2 clone line up better with the original gen2. It also moves out the eyes and teeth so they don't interfere with the texture projection.
Unless you're only planning on converting 1 uv set you'll also want to install this http://wiki.blender.org/index.php/Extensions:2.6/Py/Scripts/UV/Copy_Paste_UVs
Alright. The first step is to export your figures so they can be used in blender.
- Load each figure
- When loading the object select "keep vertex order" (thanks to Periastron and Mjc1016 for reminding me of this step)
- Set its uvs to what you are converting to/from
- Remove all textures (otherwise blender will load multiple copies of the textures for every material zone and eat all your memory)
- Dial in the texture converter prep morphs (they're stored under morphs>morph loader)
- Set the figure to base resolution
- Export as .objs with the default settings (make sure to check collapse uvs for gen3). Make sure you have only the figure you are exporting visible, daz will export everything visible in the scene
- Save them in a reasonable place that you will remember and names you wont look at a month later and have no idea what it is (this one's more a note for me)
Open up blender and import your gen2 and gen3 .objs they will be big compared to the blender scale, but that doesn't really matter. You can scale them down or not it doesn't really matter.
Make sure the renderer is set to blender and not cycles in the top,
Add Sub-d modifiers to both figures, but don't apply them. (It will make the projection more accurate without the added memory of a heavier mesh as you scroll around)
Now comes the first tedious part, but it will save us exponentially more tedium later on. We need to consolidate the material zones. Blender doesn't let you select and edit mutliple materials simultaneously, and if we manually add the textures for the shoulders, forearms, hands, legs feet, etc, for every texture we will get carpal tunnel. We need to rearrange the materials so that there is one per texture. the easiest way is to:
- Select your figure and go into edit mode
- use the material tab to select all the materials that share a texture, and assign the selection to just one of the materials
- for instance: with gen 2 select the shoulders, forearms, hands, legs feet, etc, and assign them all to the legs material (and rename the legs material limbs for clarity)
- Essentially you want to rearrange the materials like the templates in the material panel in Studio.
- Once you have consolidated your materials exit edit mode and delete the materials that are now extraneous, (to make sure I don't accidentally delete materials with vertices assigned while in edit mode I stick _keep/-keep on the end of the name of any material that has vertices assigned. I use the -/_ to differentiate the materials for gen2 and gen3, as materials must have unique names even when on different objects)
Make sure to save your file, because the good news is once you have done this for both gen 2 and 3 you will never have to do this again. If you want a different UV map you can just export a base res gen2/3 with the uv you want and use the script I linked above to copy the uvs to your modified version. *Edit* There are now actual instructions for this in this post
And now the next tedious part! Adding textures!
For the figure you are copying from you want to
- select the material,
- go to the texture tab,
- hit new,
- load the texture you want to convert (and yes, you can only convert one texture per material at a time. I told you this was going to be tedious)
For the Figure you are converting to
- split your viewport into 2 sections, one with the traditional 3d view and switch the other to uv/image editor
- in the image editor create blank textures for your texture to be projected onto (make sure to make them the right size and give them sensible names. Mine are named torso_converted etc)
- note, the textures you create do not need to have the names of your final saved textures (in point of fact its probably better that way)
- go into edit mode
- select your material
- in the uv/image editor pane, select the blank texture you want to associate with it
- repeat this for all you materials, making sure to deselect the previous.
Why does the figure we're converting from have its textures added one way and the figure we're converting to have the added another way? Your guess is as good as mine. The blender internal renderer is a thing of great mystery to me. Sadly the cycles baker is still in pretty early development and when I tried to use it I was less than successful.
Almost Done!
- Go to the render panel
- Under "Bake"
- set the bake mode to textures
- select "selected to active"
- set "distance" to something like .3
- Select the figure you are copying from
- Shift-click the figure you are copying to
- Hit bake!
- Wait a bit and hope everything worked
- Your previously blank textures should have the projected textures on them
- If there's a lot of white increase the distance under bake settings, and re-bake
- Save your new files out somewhere sensible (I create a folder named "converted" where the original textures are)
- Remember that you just did one diffuse set and you also need to convert the bump, specular and the makeups
- (Cry a little)
- Repeat the relevant steps for the rest of your textures
Some notes
If you so desire you can also use this tutorial to convert from gen3 to gen 2, or across any 2 objects that you can get to near identical shapes
going from gen2 to 3 The eye socket doesn't convert at all as there's nothing there in gen2 to be converted. I just use the V7 eye socket textures.
Teeth, the mouth, eyes, and eyelashes sort of convert but they need far more cleaning. Once again I just use textures from a gen3 character. For the Iris I just plop in the unmodified gen2 texture, as they're all uv'ed pretty much the same.
on some of the textures there might be a white spot. thankfully, its pretty much only on interior corners so they're really not noticeable, and they're easy enough to clean up with the spot healing brush in Photoshop.
What? You're still here? You haven't passed out yet?
Render is converted V6 Anna
Daz 3D is part of 
Connect
DAZ Productions, Inc.
7533 S Center View Ct #4664
West Jordan, UT 84084
Licensing Agreement | Terms of Service | Privacy Policy | EULA
© 2026 Daz Productions Inc. All Rights Reserved.
Comments
thanks for sharing. I might try this later in the week.
I'm attempting this but I'm running into some problems...of my own doing. I'll keep plugging away at it.
Thank you for sharing! Seems over complicated for a blinded newbie Blender user, but I will try as hard as I can. By the way, Anna is beauty on Gen3.
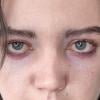
I'm thinking that there is some minor difference in the UV mapping of the eye on G3F, as almost all the figures I've looked at so far, have rather exaggerated black around iris. That may possibly be the figures I was looking at, and I've just not noticed it before. It almost looked like the 'White part of the eye' ran out of texture before it got to the boundary of the Iris.
Honestly, I've never looked this close at the eye before. I've simply not noticed it before.
There probably is a bit of difference there, but it would also probably be easier to fix the iris textures by whipping up a new uv-map for them rather than the projection method...
I should do that.
Whee, I got it to work! (This is Danae's Paris, converted to G3)
(tip for those new to this process like me, do make sure that the "write groups" option is deselected when you export your objs)
Question for the Blender gurus that may or may not frequent this thread: Tab is supposed to toggle into and out of Edit Mode, correct? Is there any reason why it wouldn't work, or only work sporadically?
I believe it toggles between the last two modes you have used.
In Blender, the "window" which get the input is the one with the cursor on it (bad UI habit coming from a heritage going back to X-Window). If the TAB appears not to work check whether the cursor is in the 3D window.
The G3F (and a lot of) characters all have a black, soft-edged spot in the middle of the sclera texture to simulate the dark ring around the iris that many people have regardless of the iris texture used. The easiest way to fix this is to find a texture that doesn't have that spot in the center of the sclera. There are (in my opinion) better ways to simulate the softer transition between the iris and sclera (and the darker ring on some irises). There are small differences in the iris maps which will give you off-centered but often usable irises. The sclera has a little more pronounced difference, but the g2f and v4 maps are pretty much usable as is for this without converting the textures.
Actually, I think the ring is to hide the poor iris/sclera junction...it's not a very good fit right there.
I hadn't noticed that, but I use a map on the cornea with a trans on it to blend the sclera and iris.
I spent a couple hours last night 'tweaking' the eyeball to get a better fit. I noticed it after I made a new eye texture without the ring.
In my material setups (not just converted textures all of them) I always setup the cornea and scelera as though they were one material, with an image map controling the opacity (refraction weight now that I'm using Iray)
Some of the problem may be the Gen 3 character textures I generally have been using the V7 ones, and have noticed that the scelera texture and where the opacity map ends mean that the ring ends up as part of the scelera texture. Eva is less strong but still there. Got to say Daz and I are at odds here, when the ring is present in real-world eyes I have always thought of it as part of the iris. Good news is that AprilYSH released a set of free eye textures that include ring free scelera textures which I think I'm going to be using a lot. I doubt ever the most eagle-eyed viewers will notice if I use the same scelera textures for pretty much everyone.
1st render shows the v7 scelera texture with an untextured iris and pupil. Second shows April's texture and an unmodified Ninive Iris texture stuck in the Iris. neither render is cooked very long.
thanks for this
when I am in a masochistic mood I may try it too,
no hurry as not adopting Genesis 3 yet and hopefully someone like 3Duniverse make make a texture baker before I do.
I might try it simply as I need more practice using Blender oneday
I'm one of the DAZ forums main blender cheerleaders. Practice it! Once you get used to it, its really nice, I swear.
Basically, if you want SSS on the eye (sclera surface) the geometry is all wrong for it. The eye should be an enclosed volume to actually work correctly. The iris should not be separate from the rest of it. Also the iris should have more of an inward slope.
I did some of that (not connecting the parts, but tweaking them for a much tighter fit...not sure how will it wll stand up to some morphs but most things I've tried so far work fine) and now they are behaving much better (still need to make a geograft 'back' for the eyeball to actually define the volume as something other than the whole head).
Now, on to some of the actual stuff of this thread...
1. The closer you can get the shapes to matching the better the results.
2. Some textures are just not going to convert cleanly, no matter what you do. Ones that are further away from your target image size will probably be the most problematic. 4000 x 4000 convert fairly well. 3500 x 3500 somewhat less...and lower than 3000 x 3000, you're probably better off skipping or rescaling in an image editor first. Or you could create the 'correct'/matching size to bake to. Personally I like resizing the originals in GIMP to 4096 to begin with. I also prefer png over jpg (but not converted from jpg). You'd also get 'cleaner' conversions with tif or bmp images, especially ones that were never compressed in any way (hint to PAs who may be reading/thinking about trying this method...).
3. You can use a Collada export from DS...it reduces the surfaces to a per map used...so for a pre-G3 figure, it will automatically export a figure with all the surfaces reduced to a managable amount. Unfortunately, you don't have the collapse UV option (or at least I didn't find it) so you'll need to export G3 the 'old fashioned way' and follow the outlined procedure to handle the surfaces...also if you may need to play with the scaling on importing to Blender to get the two figures to match.
4. And even if you get everything prepped, matched and otherwise set up perfectly...after the bake you may end up with some odd issues...like the lips being slightly out of alignment or a really 'muddy' ear conversion.
Slightly off topic, because none of these textures were converted in blender, but here's where I am with eyes after some furter tweaking.
The cornea, scelera etc are using V7s textures. The iris and pupil use an unconverted David 5 texture. I made an improved opacity map for the scelera/cornea and a morph that expands and contracts the scelera/cornea border without moving the iris so I can control where on the iris texture the scelera ends (now that I think of it a secondary iris size morph may have been more intuitive). There's also a morph I made a few weeks ago that makes the center of the iris deeper. Theres still a few tweaks to do (the sceleras look so dry my eyes are starting to itch)
@Skiriki If 3dCoat has a way to project textures from one mesh to another a similar methodology should work. I know in one of the other thread someone used Maya and a similar method to mine. I am not at all familiar with 3dCoat but I sis some quick google-fu and this idicates it may be possible (the blurb mentions that it isn't reliant on having matching topology and vertex numbers which is key). I certainly wouldn't discourage you from trying.
Yes, 3Dcoat should be able to do it.
Praying someone comes up with a conversion tool!
Basically a conversion tool is not going to be a quick, easy piece of software to write....and is it really worth writing?
Because a 'flat' conversion isn't going to work, so you need to have 3D support in the program...the ability to import 3D meshes. Then you have the various image formats to deal with...yeah, you can rely on the OS to supply those or if using the DS SDK, they are in there, too. And that's just to start...basically when you are done, you've got half of Blender...
Does the limited audience (and sales) justify the time to make it? Or what will the finished converter cost? Are people going to pay $80 for a limited use program?
Now a series of scripts or even a plugin to automate parts of this procedure....much more doable, at a reasonable cost/effort. That way you using existing software that has the capabilities you need....without having to reinvent the wheel.
So far, THIS is the only way to convert with a reasonable chance of success and have them look pretty darn good, afterwards. Yes, it's fiddly and fussy to get set up. Yes it requires a piece of software that most find about as easy to use as the clock on a VCR. And one big advantage...it is not going to cost a lot. Yes, there are other 3D programs that can do this...all the big, 'pro' suites (Max, Maya, etc should be able to do it) some of the 3D painting programs, too. But they all cost...and have learning curves at least as steep as Blender's (of course if one is already familiar with those pacakages, then...) and the basic 'setup'/fiddly parts aren't going to go away...it still will need something similar, if not the same to be able to do the projection, in the first place.
Honestly, all I had ever done in Blender before this was delete the cube, and I was still able to do this. It's not actually that hard. It's just time consuming.
Some dumb questions, with hopefully simple answers: I'm starting to try this, and when I import an exported figure into Blender, I don't get a single figure; instead, I get a list of disconnected parts. Is this expected? Am I doing something wrong during the OBJ export from DAZ Studio? Or do I need to group these parts in Blender (or parent them to an empty object)?
Not doing anything wrong...just need to check on the import options in Blender 'Keep Vertex Order' and probably switch to polygroups, too.
When you export from DAZ, uncheck the "write groups" option.
Nice looking eyes y'all, and I have a slight disclaimer on my former post as well, tho first a Q.
I noticed some figure maps having a tad bit of shading, as if it was made with a light off to the side (not complaining). Is that part of the blender “bake” thing, or is it actually copying pixels from one surface to another without shading it?
Disclaimer time. I had only asked about the dark ring on the eyes, I was not expressing a dislike for such, or asking for exclusive ring or no-ring eyed figures. Last year I had made a comment in Novica's thread I wish I hadn’t, as I'm sure it was taken to far, and a good majority of figures released after that all had round bulbus like noses. I sincerely hope that was coincidence, rather then me being misunderstood.
if the bake option is set to textures only it should transfer shadeless-ly.
With the eyes I'm with you some should have a bit of the ring some shouldn't (I notice I didn't atach the pic I meant to in my last post) as you'll notice it has a bit of a ring, but it comes from the Iris texture not the scelera, which I think makes things more adjustable. I have a pretty stror ring around the iris myself, so it always tends to feel more natural to me.
Thanks, that did the trick!
I'm apparently an idiot, because I get to the last step and it tells me "No objects or images found to bake to." I've got g2f with her images assigned. I've got g3f with hers generated... I select g2f and shift click g3f... they're both visible... Any ideas what I might be missing?