Daz 3D is part of 
Connect
DAZ Productions, Inc.
7533 S Center View Ct #4664
West Jordan, UT 84084
Licensing Agreement | Terms of Service | Privacy Policy | EULA
© 2026 Daz Productions Inc. All Rights Reserved.
Comments
nberry sauce and rice pudding sandwiches (that's sandwiches containing both rice pudding and cranberry sauce together, not cranberry sauce plus sandwiches containing just rice pudding - that would be so passé). With wasabi and black pudd'n mayonnaise of course.
[stupid giggle]
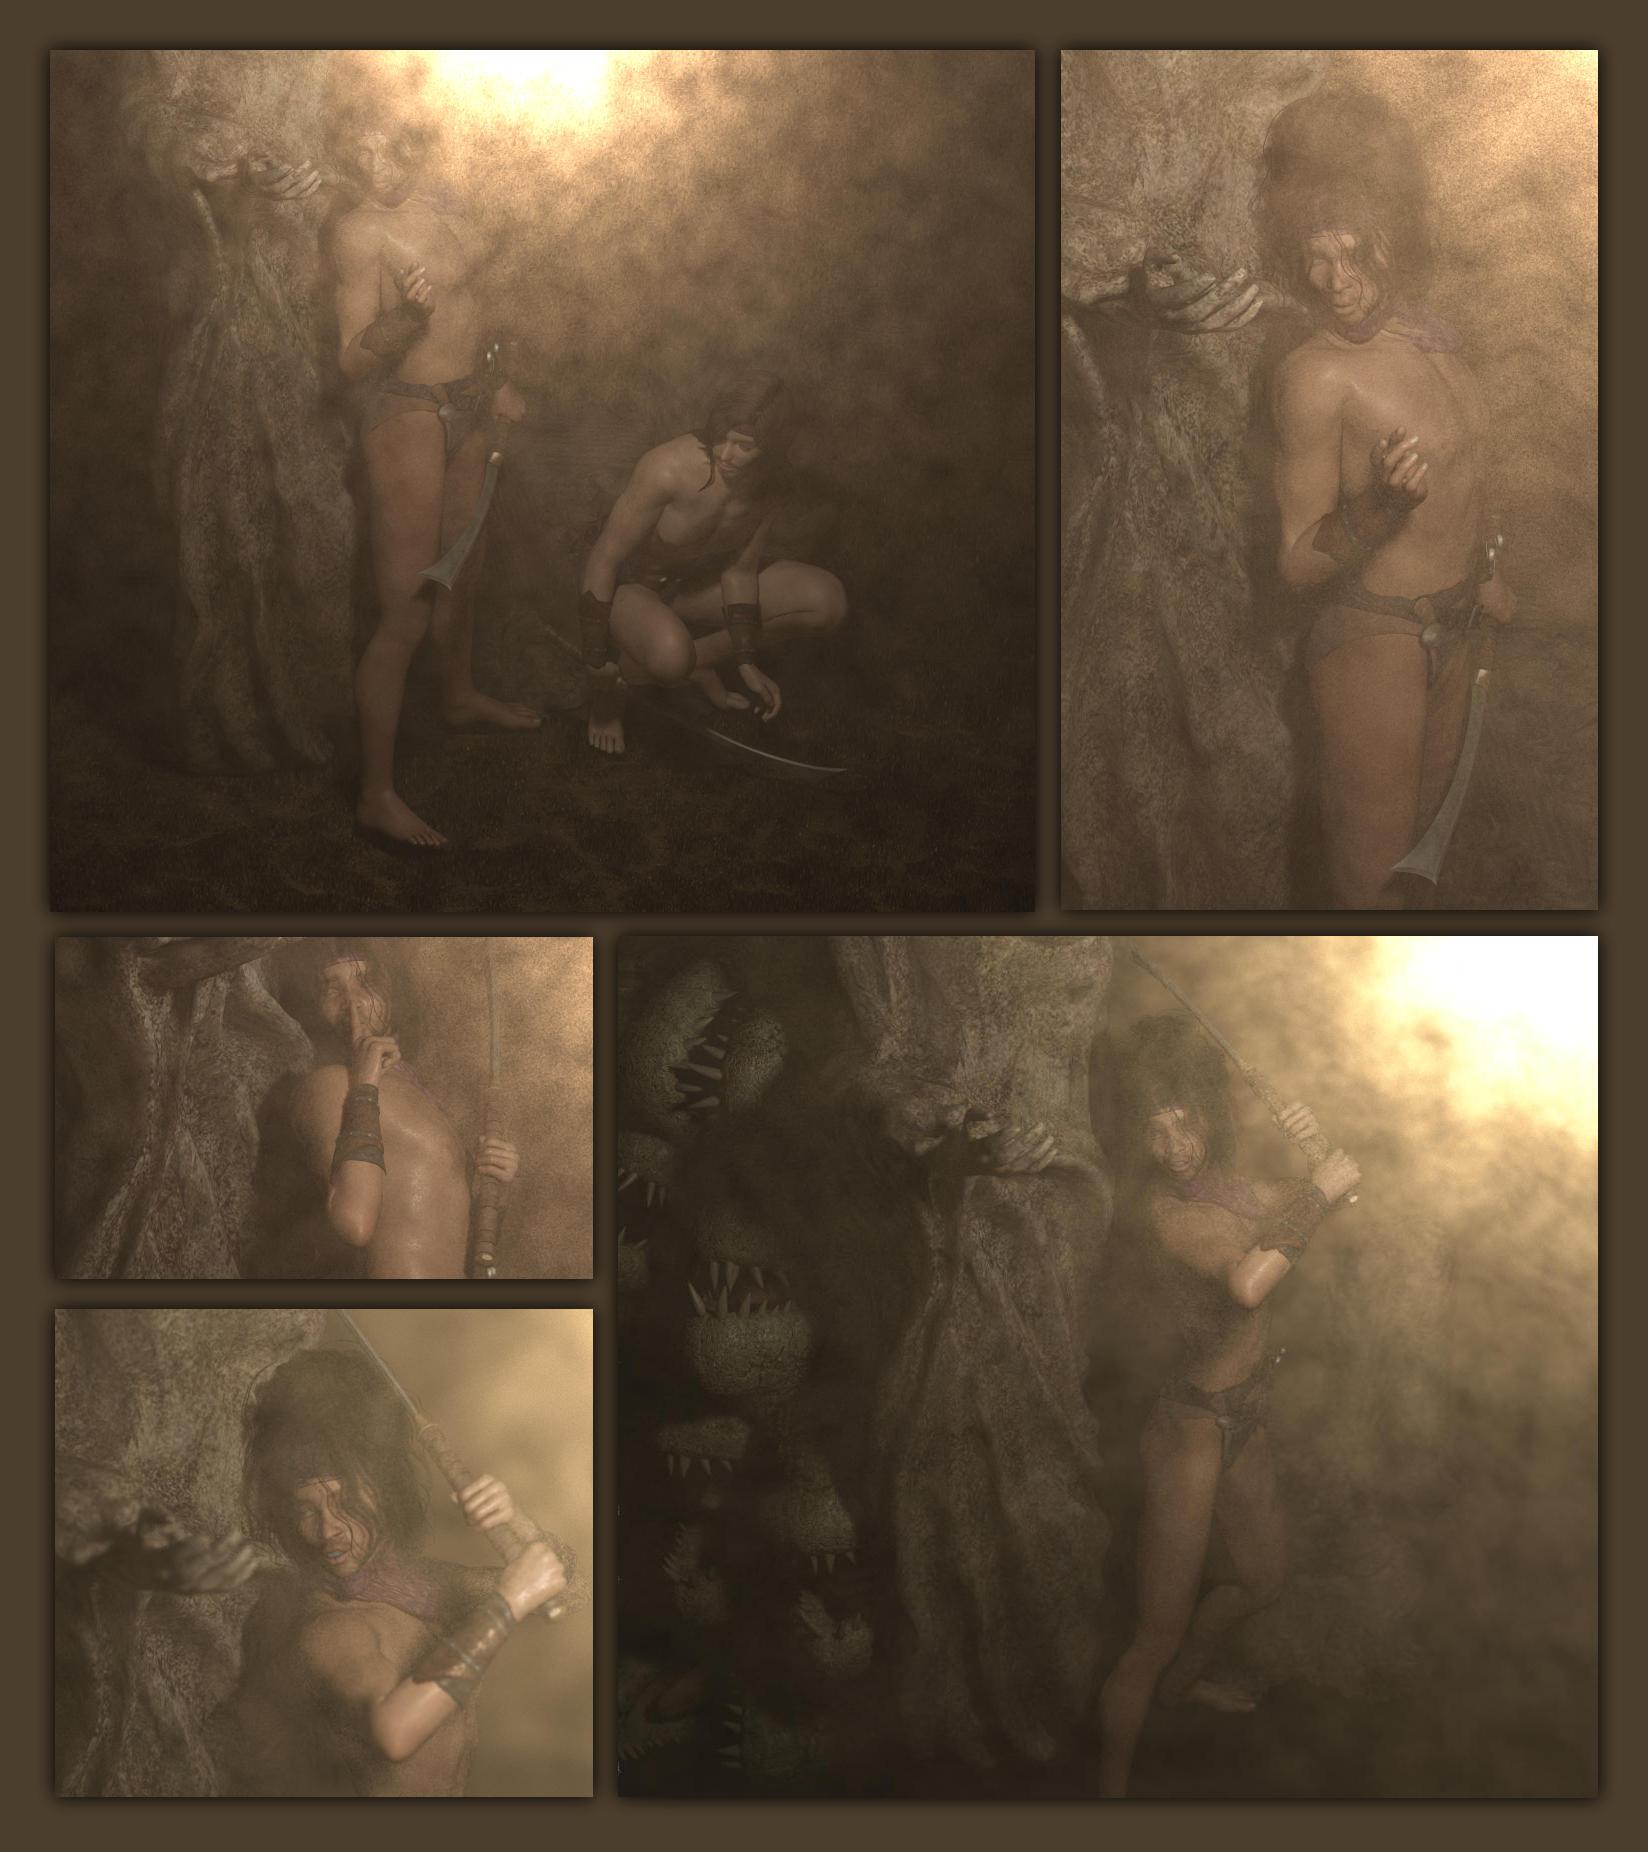
Chapter 23: The Thing Behind The Statue
Wherein Bernard, Prince Of Thieves encounters Ghoulash The Gobbler...
(Apparently. That's what it says over there ->, and who am I to disagree ? )
.
Going Boldly ... or Baldly?
HIM Tactical Space Suit (Sixus1 - no longer available) minus helmet + V4 Gynoids helmet (formerly RDNA, assimilated into the DAZ collective) + Dwarvez (Sixus1) head only + Balok (ShareCG) + Alien Queen (ShareCG I think, but I can't find it)
How I ended up here is a curious tale. It all started with this, which I realized once rendered was almost identical to one I did before.
So I restarted.
For reasons that are far too complicated to explain my default scene is as below - a dwarf doing side bends and an axe.
(rather fortuitously, just as I was wondering how I could post a picture of a naked toastless beardless dwarf on the DAZ forum I must have done something that caused a broken link icon to appear over his non-genitals. Marvellous solution, and astoundingly appropriate!)
"There's no way the cyberbabe armour* will fit him" I thought, my mind obviously still being on cyberbabe armour.
But a space helmet will. Fit him.
I immediately thought of my favourite one from FleshForge's free Encounter V4 at ShareCG, but remembered I'd used it already on my space dwarf (2nd picture down) .
Looking at my auto-plagiarized cyberbabe render for inspiration I suddenly recalled Traveler's Gynoids (whoops! That sounds like a rather unpleasant medical condition! Sorry Traveler!) the V4 Gynoids sets by Traveler, specifically "Technophilia Retro - Gynoids V3 - Rock-It"** (which I picked up for nothing, my favourite price, a few months back with one of those coupon codes that DAZ generously provides at irregular intervals), which has a couple of nice retro space helmets.
So deleted the axe, zeroed the toast-free naked dwarf, loaded a three piece helmet, scaled and positioned it to fit over his head... and then remembered that I don't have any clothing for the Dwarvez other than what came with the freebie figure. That explains why my previous space dwarf was wearing normal dwarf clothes with his space helmet. Alternative solution, make his body invisible and just ignore the problem. Genius !
I decided to use a single spotlight pointing at his face and tried both the bell jar and fishbowl, changing the glass to use bagginsbill's old cockpit canopy material (reminder, I'm using Poser here)
I prefer the fishbowl because that'll provide enough space for his cigar.
(maybe Marco's freebie fairy alien should be in there too ? Or the Li'l alien ?)
And then I remembered the H.I.M-T.S.S - the old Sixus1 freebie Tactical Space Suit for the old Sixus1 freebie H.I.M (the TSS doesn't seem to be available any more). I was going to load H.I.M. then load the TSS and conform it to H.I.M but then I thought "why not cut out the middleman", so I just loaded the TSS and posed it. Worked fine. So I zeroed it again, hid the helmet, and positioned the suit so the space-helmeted dwarven head lined up. Then parented the (still unposed) dwarf to the chest of the TSS, reposed the suit, and rendered. The helmet metal and suit colour clashed. I tried a couple of alternative suit materials and one of them was a perfect match.
What's missing, apart from the cigar obviously ? Giant piglets ? Dinosaurs ? Fish (he could be underwater) ? A fireplace and a comfy chair perhaps ?
How about spaceships ? Stars ? Aliens ?
Personally I like the idea of fish (outside the bowl) and a comfy chair... and how about that curious hallway as a background ? Maybe With an environment leaking out of one of the rooms...
I think I've got it - he's tiptoeing down this corridor towards us, and as he passed each room the alien occupant came out to watch him.
Amended title would have to be something like "Going Boldly (on tiptoes)"
Not sure whether I can be bothered to do it though, too much like hard work. I've got the picture in my head already, and hopefully you have too (although I bet yours is very different from mine), so what's the point ?
There isn't one - it's pointless, and it's quite a challenge.
And there are no prizes.
...
So I gave it a go, just to see if it's worth continuing along this curious route....
First problem: I never saved the scene with the environment leaking out of the room as I was just playing with ideas. So I'd have to remake it from scratch. Can I be bothered ? Don't think about it - just load the curious hall into the spaceman scene I'm working on and see what it looks like. The two aliens will make it difficult to see the corridor, so I deleted them (they weren't posed, so they're easy to put back later). Then I adjusted the camera a bit. I also felt a need to add a wavy water plane (just a diffuse colour so it'll render quickly) - don't ask me why realized a year later that it was a stand-in for the leaking environment. And an infinite/distant light so I could actually see the the corridor
Now the fun starts, playing with the lights and materials ! A point light for each candle in camera, and a simple shader with a bit of translucence for the wax candle. I'll leave the candle flames till later. A bit of depth-cue (Z-depth) atmosphere and a few aliens poking their heads out of the doors as a quick test. I also added a point light inside his helmet above his head to illuminate the little guy who might be sitting there looking behind.
Well, nothing like the picture in my head (or yours probably). I think I prefer the first one I posted - something to do with the proximity of the aliens perhaps ?
...
No ! I realized that it was simply too much illumination of the hallway around my space chappie - the point light I'd just added inside the helmet was illuminatimg the hallway. I deleted that, and also the light for the closest candle to him. That brought to mind the horror film corridor lights cliché, where the ligts start going off, starting with those furthnest away. But in reverse. With candles. Behind him.
Also the depth-cue atmosphere wasn't doing it for me, so I turned that off.
Now we're getting somewhere !
All the renders in this post have been incredibly quick, in the order of around a few tens of seconds. I wonder how longer a standard atmosphere will take (and whether it'll be worth the wait) ?
With the atmosphere it took a few minutes. So what sci-fi cliché lighting/atmospheric interactions can we try to add ?
(Probably worth noting - at this point I realized that the corridor in front of my space chappie is obviously an ordinary empty sci-fi corridor, so we need to see a bit of that. I also have a suspicion that if he turns around, all this will disappear)
The green light didn't work quite as expected (t was intended to be a horizontal fan-type laser thingy) but I'm happy that this is worth pursuing. Not bad for a 5 minute render
And Balok and the alien queen have their places reserved.
Ah ! It was the 5 minute render that was, indirectly, the problem. I had ray-tracing disabled, so ray-traced lights weren't casting shadows. So the green was simply a wide spotlight. Once I turned ray-tracing back on the render time shot up to a couple of hours. It's the combination of ray-tracing and atmosphere that does this (Poser remember - probbably similar in DS) - just ray-tracing or just atmosphere and it's usually just minute to a few tens of minutes. Anyway, with ray-tracing on the two big off-camera squares I use to limit the spot to a more or less horizontal line work as intended. A bit of playing around with the position and direction of the red and green lights, and a couple more aliens, and I now have this...
But the scene is now getting too heavy for my poor old computer. Problem is I've only just started adding the aliens (note to the observant - Balok isn't in quite the same position as in the original picture, as he got an uneasy feeling standing there). Obvious thing to start with is to remove all the bits of the curious hallway that are out of shot - I don't have any lighting coming from that direction that they affect, and I'm not using IDL. I think I may have to resort to an old trick - do a scene with just the background and main foreground figures, all lights and atmosphere, and render that. Then do several versions of that scene but each with a different extra background alien, placed so as not to overlap any other backgroun alien, spot render the area around that alien, and overlay all the background aliens on the main render using GIMP.
~ ~ ~ ~ ~ ~ ~ ~ ~ ~ ~ ~
*what do you mean it's not armour ? Of course it is. The cyberpolyepoxide used is ten times tougher than chainmail, and as we all know the only armour a lady needs is bikini shaped !
**The V in V3 is for Volume, which is confusing, And curiously none of the V4 Gynoids stuff appears if you search the store for 'gynoids'' )or even if you look at all Traveler's stuff - now that's weird...)
Footnote: my grammaticist has put me on a reduced ellipsis diet, although I can't help sneaking the odd one - they're just so delicious... I'm also trying to cut down on exclamation marks, if you can believe that ! But on the positive side it told me I need more waffle and hyperbole, although I should apparently steer clear of bullshit as it's very difficult to scrape out from the tread of your wellingtons.
Going Boldly, Round 2
If you missed round 1, it consisted of many edits to the previous post. If you'd like an action replay so you can see the bits you missed you need to scroll up about 3 feet if you're using a desktop monitor or click here to go to the start of that post. You can then scroll down until you get back here.
So where are we ?
We're at the point where I've just realized that the Mr Fishbowl Helmet is completely unaware that the ordinary sci-fi corridor in front of him is turning into a weird alien hotel corridor behind him. So we're at the point where I've just realized that we need to see a bit of what's in front of him.
We're also at the point where I've remembered why I don't normally use ray-tracing and atmosphere together, and the point where I've remembered why my renders are usually very quick.
And we're also also at the point where my decrepit old laptop is almost grinding to a halt trying to cope with what's in the scene.
So start by removing all the bits of the corridor which aren't going to be in camera. And all the aliens except Balok. Adjust the camera (position and focal length) so everything in the scene stays more or less the same but we see a bit of what Mr Spaceman sees. Add the first sc-fi corridor I find, Add a big light just to help me see what I've got, and then do two very quick renders (no atmosphere, ray-tracing or shadows), one with just the sci-fi corridor, one with just the hotel corridor. Overlay them in GIMP and see whether it's worth going any further...
You'll notice that I didn't manage to hide the curious hallway for the second test render, which was supposed to have just the scifi corridor. I started to, but in Poser this is tedious (in DS it's easy), so I simply didn't bother. Quite lucky really - I like the way bits of the curious hallway poke through the sci-fi corridor (or is it vice versa?). Mental note to do a Z-depth render of the sci-fi corridor to incorporate into a mask for blending the 'in-front' and 'behind' renders.
Definitely worth continuing. Move the sci-fi corridor a bit. Turn off my big light, and repeat the two renders but with shadows and ray-tracing. Whoops! The 'in-front' part of the scifi corridor wasn't visible as I forgot to add a light for it. Remedy that, try again.
I'd intended to have the sci-fi corridor just continuing along the same line as the curious hallway, but when I loaded this one there was a passageway going off to his right. So maybe somebody should be hiding there. But who ? or what ? Darth Vader was my first thought, with his back against the wall, lghtsabre ready, and left hand covering his mouthpiece to block the schoolboy chuckle. Then I thought perhaps a Darth Vader puppet - Balok's body with a Darth Vader helmet. Or since all the aliens are going to be in the curious hallway part, then maybe a rightful denizen of the curious hallway...of course - the Mad Hatta (this one too) ! Now it's all beginning to make sense !
~ ~ ~ ~ ~ ~ ~ ~ ~ ~ ~ ~
(I'll probably be adding to this post for several days until either (a) I get bored, or (b) I think ithe post is long enough and I need to start a new one)
I really like the lighting, with his front lit and then going to darkness but the light in the hall shows where he's been. That hall on the right should definitely hold some surprises!
Thanks Novica. I decided to take a break from that one for a while (for ever ?), and ended up with this as yet unfinished piece
Not really sure how or why.
Or where it's going.
But I'll give it the uninspiring temporary title of...
Barbarian Watching TV
I think maybe it needs a battle yak and a couple of war dogs.
But I don't really have anything that could pass muster for those on a serious inspection.
But what I do have is a unique set of skills a couple of bicycles and the DAZ piglet...
And now for something completely different...
a man with three buttocks
My normal approach when I'm short of ideas is to start with an empty scene, load a character, apply a pose, move the viewpoint, and see if anything pops up in my head. Rinse, repeat.
However, I did something completely different this time. I loaded a background/environment/whatever-you-want-to-call-it first - The Dark Corner of the Dungeon , an old StoneMason set from the DAZ Store. A single infinite light so I can see it, move the camera to get a reasonable viewpoint, and render (I'm using Poser 11 FireFly here). Rather dull, flat and lifeless.
I'd normally go for the materials first, adding bump and displacement, but not this time. Go for the lighting instead. An infinite (DS calls them Distant) light doesn't really make sense in a dungeon, but Spot or Point lights would. So I played about a bit with spots and points in various positions and ended up with two point lights (attenuation on both set to inverse square so it's slightly less unrealistic). Too white for my tastes, so I made them rather more yellow/orange/red
Next thing, try to give it a bit of atmosphere - first, try a simple Z depth atmosphere which adds almost nothing to the render time (left), then try a normal Poser atmosphere (right) which whacks up the render time by a factor of ten or more
For some reason I'd put three point lights under the grate for the renders above, each with a slightly different colour and position. Why did I do that ? I don't know. Delete them.
Turn atmosphere off and re-render with just the point light on the staircase (left). Turn on IDL to see if that adds any light into the darkest corners (right) - it does, and didn't take that much longer for the extra IDL pass (I set Indirect Light Quality = 20)
Add the standard Poser atmosphere back in, so I now have a single point light with inverse square attenuation, IDL, and atmosphere...
I quite like that. Far better than the dull, flat lifeless original render.
Atmosphere and light settings for the above render just to remind myself. The atmosphere settings are really the key (thanks Connatic, way back!)
And finally for tonight dial up the Atmosphere Strength for the point light by a factor of 10, to 0.1. The IDL pass took less than a minute, the render took about ten. I think that's a bit over the top (the atmosphere strength, not the render time)
I wonder if this is where the barbarian should be watching TV ?
Tks for sharing some bits of your workflow, interesting:) Can't wait to see if you can make ends meet
I don't think that I really have a 'workflow' - mainly because the 'flow' bit sort of implies steady progress in a specific direction. And I rarely do that.
Regardless, I rather enjoyed doing those Going Boldly and And now for something completely different posts. Not sure why I went into verbose mode, but I kinda liked it...
...almost a sort of performance art - flow of conciousness stuff. Or maybe just bullshit !
Anyway.
Since I mentioned that "My normal approach when I'm short of ideas is to start with an empty scene, load a character, apply a pose, move the viewpoint, and see if anything pops up in my head. Rinse, repeat." I might as well upload an old composite from 2015 that I recently (re)found. It summarises my usual way of doing things
Which 3 months later became this (possibly already posted on this thread)...
Vampire Smackdown
I just had an idea... why not do the same thing with Stonemason's Dark Corner Of The Dungeon - but in DAZ Studio ?
Trying the same "Something completely different" in DAZ Studio
DS4.12.1.something Pro.
Import the Poser scene. DS converts point lights to distant lights when I do this, so it loses the position of the light.
Restart, load the prop (doesn't have DS materials - it's that old!), load a distant light, position things so it's similar to the setup I had in Poser and render in 3Delight (left). Dull flat and lifeless as before. Extra shiny due to the way DS misinterprets Poser specularity (I'll add a link to my thread on that - it's very old hat and rather irrelevant nowadays). Load a single point light, position it on the stairs, turn off the infinite, render in 3Delight (right). Obviously the default settings for the point light won't do here !
It's been a long, long time since I played with lights in DAZ Studio, and I can't be bothered to read the manual, so I just fiddled with a few light settings. Quite quickly I got something reasonable. So here's my 3Delight render with just a single point light, plus my light settings. If anybody can briefly explain which ones I should have tweaked and why what I've done is wrong that would be appreciated - honestly !
Soooo... how about iRay ? For my first attempt (left) I forgot about the environment dome. Turn that off (set Environment Intensity to zero - is that the correct way to do it ?). My second attempt (right), you guessed - default point light settings need adjusting
Try dialing up the point light intensity, but it only goes to 200% and doesn't make much difference. Try the Photometric Mode and twiddle things until I get something that looks as I want (below - less than 10 iterations, just a couple of minutes). I ended up dialing Luminous Flux (Lumen) to 150,000 ... a tad on the high side ! So what am I missing about the light settings ?
Looking good so far ! Main problem is that I don't understand the DAZ point light settings, either for 3Delight or for iRay. So any enlightenification on that would be appreciated - please feel free to post answers/suggestions here.
Next step, after getting to grips with the lights will be... atmosphere. Assuming, of course, that there's a way to do it built into DAZ Studio without having to buy any 'atmosphere assets'...
Regarding 3DL DS standard points and spots, for a physically correct light falloff set decay to 2 and crank up intensity scale as needed. Pointlights will only produce 100% sharp shadows, unless you get Omnifreaker's Ubersoft point light. Or you could use an AoA spotlight with 360 degree light spread, will simulate a soft spotlight, found in this bundle.
Looks like you now know more than me about IRay:)) I've probably made less than a handfull of testrenders since the introduction in 2015 . But you obviously found the luminous flux thingy, just add zeroes until you see something and set environment settings to scene only (or dome and scene). For soft shadows use the geometry and increase size...or something along those lines. Ok that's about what I know about IRay, not bad, eh...
I get the impression that it's easier to set up atmosphere in Poser? Seems to render much faster than 3DL. I think the only option for true volumetric smoke/fog in 3DL (well the DS version) is the OmUber volume shader applied to some suitable geometry with "accept shadows" enabled. There was the AoA effect cameras, (which I thankfully have), with the EZ volume camera that was very easy to use, but they are now pulled from the store, as some DS upgrade broke compability and DAZ was not willing to fix it.
A very very early render using the EZ cam:
Your point about 3DL point lights casting only sharp shadows reminded me of something - way, way back (actually only 7 years ago) I played with light shaders in ShaderMixer and ShaderBuilder. The only thing that really came out of that was the crappy DIY ShaderBuilder IBL that I used in my DS worldball freebie. It never worked to my satisfaction as I couldn't get ambient occlusion to work. I think that was another main reason I went almost exclusively Poser shortly thereafter
Anyway, I just had a quick mess around in ShaderMixer using what little I recall and made a crappy DIY point light with a blur control for the shadow. Lots more needs to be done in order to make it useable and I'm not sure it's worth the effort. Anyway, bedtime now, so for now I'll just post the annotated screenshot and save the scene. (Note: I used green for the shadow just so I could easily spot it on the render, but I needed to add a second (ordinary bog-standard DS) point light in order to see the green shadows !)
P.S. These three ShaderMixer bricks are probably the basis for a DIY atmosphere...
~ ~ ~ ~ ~ ~ ~ ~ ~ ~ ~ ~ ~ ~ ~ ~
Good morning ! Well, the ShaderMixer documentation seems to be in the same abadoned state it was in back in 2013 when I last gave up on it, but I've started a new ShaderMixer online help - was the ShaderMixer documentation ever updated ? (since 2013) thread in the Tech Support forum with my fingers firmly (edit 12th March 2021: and apparently vainly) crossed.
I also recall that I never got my head round the atmospheric bricks being associated with a material or a camera. I'm too used to the way Poser does it, where the atmosphere is (or at least appears to be) a completely separate entity, and you set how much effect it has on each light separately. And you turn the atmosphere on or off.
~ ~ ~ ~ ~ ~ ~ ~ ~ ~ ~ ~ ~ ~ ~ ~
Got my crappy DIY ShaderMixer point light + blur working a bit better, and added a crappy DIY ShaderMixer camera with simple fog...
Not what I'm after, but it's got blurred shadows from a point light and some atmospheric effect - so I'd say this might be worth pursuing for a bit longer. (The most obvious thing in that render is that there's no light/atmosphere interaction, so I've asked about how to do that) Edit 30Nov - making good progress on that thread
Attached screenshots of the the 2 shadermixer thingies
~ ~ ~ ~ ~ ~ ~ ~ ~ ~ ~ ~ ~ ~ ~ ~ ~ ~
30 November edit: making good progress over on that ShaderMixer atmosphere/light interaction thread - lots of work still to do but the basics are all working now ! .
Still just playing with scenes / settings / environments / backdrops / whatever-you-want-to-call-them - you know, the thing I don't usually bother with in my renders.
Poser render again with IDL and atmosphere, but this time a point light and an infinite
The window originally rendered very bright because the background was the Poser ground construct, which was a long way off - an infinte light interacting with atmosphere all the way out to the dome wall of the construct. So to make it black I simply put a flat object roughly perpendicular to the line of sight just beyond the window.
ShaderMixer is giving me a headache again so time for a change of pace. With the It's Raining Men challenge now in full swing Barbarian Dad's thinking about a makeover*...
Conan The Gardener ?
Yes, the fork and spade on his back are just floating there at the moment because I don't have a suitable back-scabbard thingy. And Poser locked up when I tried to add his bic ycle.
Perhaps Mrs Conan's just asked "You're not going pillaging or anything like that are you darling ?", and he's reassured her with a "No dear, I'm just going out to the allotment to do a bit of tidying up, and I'll bring back some fresh courgettes"
Next picture he's battling ents© ™ ® ☠ treants© ™ ® ☠ un-trademarked-tree-based-beings-of-no-copyright-status...
...or trying out a new hairstyle ?
Barbarian Dad (thinks): "Well, it worked for Bernard Prince Of Thieves - but I don't think it's me"
*terrible word!
Love the pipe and the gardening implements! My question is did you know your thread title was upside down and how on earth did you get it like that?
ummmm what happened to the thread title? cause to me it's upside down and backwards ........that just ain't right ........
¿ʇı ɥʇıʍ ƃuoɹʍ sı ʇɐɥʍ
Well, for one thing the baseline of the t has been dropped (err, raised) far too far - was there no QA on the font?
noitseuq taht ot rewsna eht wonk t'nod I
LOL
Okay, now you guys are just showing off! ;)
h̸͖̙̕m̵͖̳̀̐m̵̰̦͇̥̞̈̓͛ ̷̣̠͔͑̎ ̷̤͇͚͒͝ͅ ̷̝͓̘͂̃̚ͅs̵̡͔͙͂̀͝o̸̤̪̝͂͂̆̀ͅm̸̠̬̙͓̅̅̔͗̀ḛ̵̕͜ ̴̼̞́̊͛̆͝s̶̺̬̏́̃t̷̢̜̊̆̃̀͘ą̴͕͖͚̎͒̄̉̚ͅt̴̥͔̥̆ḭ̴̛̱̻̙̅͘c̴̥̋ ̶̛̟̑̐o̴̧̳͈̯͂̎̎n̷̻̠̖̤̔ ̸͕̪̤̼̱͋t̸͎̜̅̿͐̓̚h̶͍̩̦̻̞͊̄̋̎̆e̵̡͔̗̼̒̀̓̽͝ ̷̦̌̽͗͗̉l̸̹̣̭͇̀̒̋̾̾ī̴̙̮͒n̷͔̖̻͆̔̄̃̀ę̵͙̈͒̑̆̇ ̵̹͖͖̘̩͐͛̃͠i̷̛̺͎̅̔̍ͅt̸̠̭̪̲̓ ̶͇̯̖̬̀̔̈́ṡ̸͑̇͒͜ë̶͍́e̴͓̔͗m̵͓̉̆̒̔̍s̵͓̮͗̉̐̉
B̭̱̯̣̃̈̋̍ḁ̬̩̮̲̂̃$̣̲̰̰̐̎̍̉h̦̩̬́̃ ṭ̲̭̗̮̤̃̈Ḫ̤̮̯̈̋̌̎̒̒̓̓̔̆̑̅̕ẽ̬̩̥ f̰̭̅̑̑̆̆ò̖̗̭̀́r̗̭̱̮̣̀̂̍̋̊̉̑ử̲̯̮̣̂̃m̭̱̮̆́̂ ẁ̭̭̯̂̄ỉ̮̯̉̊̋̆T̯̒̓̔̌̋̊̈̆̑̄̄̃́̀̕h̖̗̃̂ ã̯̣̂̃ h̤̮̲̋á̗̭̭̭̭m̭̰̱̱̂m̌̌̈̆̆̆̇̇ẻ̮̲̭̗̋̐r̦̣̯̔̐̎
There, first line maintenance - that seǝɯs ʇo ɥɐʌǝ pouǝ ¡ʞɔᴉɹʇ ǝɥʇ
,ʇxǝʇ uʍop ǝpᴉsdn, ǝlƃooƃ ʇsnſ ˙ɟ ǝsɐɔɹǝʍol uʍop ǝpᴉsdn uɐ ǝʞᴉl ʞool oʇ suǝddɐɥ (,ǝʞoɹʇs ɥʇᴉʍ ɾ ssǝlʇop ɹǝʇʇǝl llɐɯs uᴉʇɐ˥, - Ⅎϛᄅ0+∩) f ƃ˙Ǝ ˙sɹǝʇʇǝl uᴉʇɐ˥ uʍop ǝpᴉsdn ǝlqɯǝsǝɹ oʇ uǝddɐɥ ʇɐɥʇ sɹǝʇɔɐɹɐɥɔ ǝpoɔᴉu∩ pɹɐpuɐʇs ʇsnɾ s,ʇᴉ - ʍoɥ ǝɥʇ ɹoɟ s∀
˙˙˙ǝɹǝɥʇ ʞɹoʍ plnoʍ ʇxǝʇ uʍop ǝpᴉsdn ɹǝɥʇǝɥʍ pǝɹǝpuoʍ I os 'ǝlɐʇs oƃ oʇ ƃuᴉuuᴉƃǝq sɐʍ pɐǝɹɥʇ sᴉɥʇ ɟo ǝlʇᴉʇ ƃuᴉʇsᴉxǝ ǝɥ┴
˙˙˙uʍop-ǝpᴉsdn ʇnq uɐᴉssnɹ ǝɯos pǝʇsod uǝɥʇ ǝslǝ ʎpoqǝɯos puɐ '(ɹ lɐʇᴉdɐɔ ɐ ɟo pɐǝʇsuᴉ Я ,,ɐʎ,, ǝɥʇ ƃuᴉsn ʍouʞ noʎ) uɐᴉssnɹ-xnɐɟ ɥsᴉlƃuƎ ǝʇᴉɹʍ oʇ ʇǝqɐɥdlɐ ɔᴉllᴉɹʎƆ ǝɥʇ pǝsn ʎpoqǝɯoS ˙pǝʌloʌuᴉ sɐʍ ǝloɥoɥƆ ʇɐɥʇ ƃuᴉlǝǝɟ ɐ ǝʌɐɥ I - sɯnɹoɟ Z∀p ǝɥʇ uᴉ ǝɹǝɥ spɐǝɹɥʇ ǝɥʇ ɟo ǝuo uo sᴉɥʇ ǝʞᴉl ʇxǝʇ uʍop ǝpᴉsdn ʍɐs ʇsɹᴉɟ I ʞuᴉɥʇ I
ǝɹǝʍ sǝssɐlƃ puɐ ǝdᴉd ǝɥ┴ ˙sʞuɐɥ┴
*¡ʞƆ∀MH┴*
*THWACK!*
originally intended for a picture with Barbarian Dad sitting on his throne reading the Barbarian Times. But I haven't got round to doing that one yet.
I'd positioned the pipe and glasses onto a zeroed Freak 4 and applied a randomish pose, one of the Hiro 4 ones, just to check that the glasses and pipe stayed in position. It just jumped out once he was posed that he should be wearing a bowler hat, carrying a briefcase in his left hand, and holding an umbrella over his shoulder with his right hand. Unfortunately I couldn't find a suitable bowler, or briefcase, or umbrella. But I found a watering can and a some garden tools.
In the meantine another idea is beginning to come together. I call this partial scene...
Pile O' Freaks
Starting point, a freebie Many Dead M4 pose set years ago from somebody at ShareCG. I know there were V4 and M4 ones but all I can find today is an M3 one.
...and this one...
My Hero !
However, each of the pictures seems to have something missing.
Unfortunately I just can't seem to work out what it is, so I may have to abandon them...
Just had an absolutely amazing, totally inspired idea ! Why not combine Pile O' Freaks and My Hero !
Am I a genius or what ?
(Don't say "what?")
My Hero ! (Prototype B)
Hmmm... for some reason it's not working for me. I'm not talking about Ginger's pose - that just needs a bit of adjustment. I think it's the lighting.
Another idea that I'll probably never finish..
"Yo, Pipsqueak !"
The second picture obviously requires two more shields, two more spears, two more pairs of sandals, and a corkscrewing triple PAF! And both pictures need some background. Etc.
Inspired of course by everybody's favourite indomitable Gaul...
I've just started playing with some of the freebie OBJs from TurboSquid and CGTrader...
A medieval style house...
A monster's head...
A lectern with skulls and stuff...
Ooooh, I love that medieval-looking house, in particular! Is it Barbarian's new home?
No, I think that Barbarian Dad's home is rather more basic, ominous, and cavernous. Although it probably has chintz curtains, scatter cushions, and coasters to prevent tankard marks on the stonework.
P.S. I've added links to the models in the previous post
P.S.2 - I don't think he lives in this one ...
...or this other one on the left either...