LJ Studios - Art Work and Tips
 DollyGirl
Posts: 2,710
DollyGirl
Posts: 2,710
Introduction:
I am not an artist by trade but an engineer. I began my art journey when I started to make fabric art dolls. I loved dolls all of my life thanks to my grandmother. Her stories of having porcelain dolls to play with as a little girl fascinated me. My grandmother was good with needle and cloth and she taught me how to make clothing for my dolls. From there I started to make rag dolls. In 1993, I attended a cloth doll convention where I saw some of the most beautiful pieces of art work. Human and creature forms made from flat pieces of cloth and bits of things we humans have made for other purposes. Now being an engineer, I tend to want perfection as my goal in my art and my skills were just not good enough, I thought, in achieving success with my visions of cloth dolls. In 2009, I discovered the 3D world and it just seemed natural that I would continue my journey with my dolls in the virtual world. What I want to do, in this thread, is show off the current projects I am working on and see if I can impart little nuggets of wisdom for those that wish to take such advice.
Daz 3D is part of 
Connect
DAZ Productions, Inc.
7533 S Center View Ct #4664
West Jordan, UT 84084
Licensing Agreement | Terms of Service | Privacy Policy | EULA
© 2026 Daz Productions Inc. All Rights Reserved.
Comments
Light Fixation
Dog 3Zi Glass Dog by sannzi.
Environment: Background # xmas Surprise by Capelito.
Environment: Lighting # FWSA Soft Light Probes by Forbidden Whispers.
Postwork * Ron's Particles by deviney.
Postwork * Ron's Wisps by deviney.
Postwork * Ron's Angel Dust by deviney.
Shader: Clothing * Mec4d PBS Shaders vol.1 for Iray by Mec4d.
Shader: Clothing * Mec4d PBS Shaders vol.2 for Iray by Mec4d.
Shader: Clothing * Pd-Daz Studio Soft Leather Shaders by Parrotdolphin.
Shader: Dog # Ultra Genesis Studios - Ornamats by Ultra Genesis Studios.
Warrior: clothing: Arm Cuffs * V3-Warrior-Character+outfit by A::DP.
Warrior: clothing: Blind fold # RDNA V Implants by Traveler.
Warrior: clothing: Earring * Stonez4All by janimatrix.
Warrior: clothing: Geodiscs Luster Quasar rontonton 15 N291216 by Alex.
Warrior: clothing: Gloves # RDNA V Hunter by Traveler.
Warrior: clothing: Neck Ruff * Renaissance Ruffs for V4 by Rosemaryr.
Warrior: clothing: Pants Kj Pant for Victoria 2 and Stephanie by aerysoul. 13th row fourth column
Warrior: clothing: Shoes * Fetish Pumps V4 by Reiko-Kano.
Warrior: clothing: Staff # Galeara's Claw Staff by Arki.
Warrior: clothing: Top Magical Vest for V2 by aerysoul.
Warrior: Hair * Beaver Den Freebie by Alessandro_AM.
Warrior: Poses Hand Pose Vol. 1 for Victoria by HarpoonVolt. Hand poses
Warrior: Textures Serenity and Death by FrogLace Studios. Non-Commerical
* - Free Registration is required to obtain the freebie
# - No longer available.
Rendered with iRay. I used Victoria 2 with my Art Doll morph applied. The pose was created for her body using an image of an art doll I found on pinerest and then applied the hand poses listed in the product list. Used my go to shaders by MEC4D for the metal surfaces. The image was post worked using Ron's fabulous brushes (see list for the particulars).
This is very cool!
Really awesome and thank you for the list of everything used to create the image.
This is Alexa for La Femme (https://www.renderosity.com/mod/freestuff/alexa-for-la-femme/82770) I have ported her over to DAZ Studio. This image was rendered in iray with La Femme's textures. I converted the textures to iray using the iray uber shader provided in the starter essentials for DAZ Studio. I then used VRX iRay Skin Shader (https://sharecg.com/v/87083/browse/7/Material-and-Shader/VRX-iRay-Skin-Shader) to set the skin surfaces to be a bit more softer. Used the directions in this thread (https://www.daz3d.com/forums/viewreply/817055/) for the eyes. I think she came out pretty. To get Alexa into Studio I used 2014 Poser Pro to create a cr2 file with the option to include all files in the cr2, of La Femme with the head morph injected. I then injected the body morph and exported out the body in obj format. I then imported the body obj into Studio and applied the scaling to the cr2 model I had just created. Saved her as a scene subset.
I have been having some artiist block. Just don't seem to have it in me to make art. But I did manage to do something with V2. I converted her textures to iRay and rendered in iRay. I call her Dark Angel.
Here is the render useage list for the image:
E's Sasha V2 by Ecstasy.
Very cool image! It's more impressive considering how old V2 must be. Nicely done!
Thank you Diva. Yes I think she is 20 years old now. To think, that is ancient in electronic years. But in all honesty iRay makes it easy to create a wonderful image of her. I sure wish Traveler would re-issue some of his stuff. What I have of his is really really well done for being that old. I need to do more with her and her wardrobe.
I think V4 probably has a lot more content available if you like working with older models. :) It might be fun to "clean her up" for Iray too.
You are correct. But truth be told I "really really" love the hunt for the older stuff. Must be the archologist in me. I like to go hunting and the finding of the rare nugget. She is also a way to learn about modeling not so much to do it myself but to understand how software works. Since you can now only get free things for her and we all know that freebies are notorious about presenting problems the engineer in me likes to fix things. V2 content is prime for this type of past time. I do appriciate your discussion and thank you for taking the time.
hahah I have to admit, I'm kind of the same way. I really enjoy polishing up older content for Iray. It's so satisfying to see the "before and after" of the older stuff converted to Iray and polished up a bit. And it's also great to get some of that older content when you can because eventually, it will be gone. I don't usually get anything older than A3 though. I enjoy hunting for A3 and V4 content. You're right, the hunt is part of the fun! :D
I look forward to seeing more of your conversions and renders. :)
How to Fit Clothing when Spikes Show Up After Posing
This was a recent find for me. The Millineum Catwoman. After some discussion with Redfern I found out that she was called Mia. So as normal for my entries in this thread I have listed the stuff I used. I do however have a tip. Mia's bodysuit was orginally made for Furrette. I decided that I wanted a better fit to Victoria's body so I converted the clothing using Crossdresser by EvilInnocense. I wasn't quite happy with the fit so I added a smoother but that put to much distortion in the suit. So I decided to try to convert it to a weight mapped figure. When I did that every pose I used with the suit gave me spikes. They were on the arms and legs. I have seen this happen before and I finally did some research and found out 1 of the reasons for this occuring. Bottom line DAZ and Poser use different ways in dealing with how mesh is positioned at the joints. So there is a lot of leaway for DAZ to confuse a poor mesh and make spikes happen. Here is what I did to fix this issue when it happens to be a weight map issue.
Instructions:
1. Convert garment to Tri-Axe weight mapping.
2. Bend the garment and note where the spikes are created. You should be able to tell which bend direction causes the problem for what bone. So for the bodysuit it was the Z bend in the right and left shoulder bones.
3. On the Tool Settings Tab, select the Node Weight Map Brush Tool
4. In the Scene tab select the(one of) bone(s) where the spike or spikes occurred. In my case I had multiple places that needed attention so this process become iterative from this point on.
5. In the viewport right click and select the Brush Mode->Paint Brush. You will see two circles a green inside a red appear in the Viewport when you move the mouse over the garment.
6. Select the Rotation map for the previously identified bend. In my example it is the Z Rotation map that was not performing like it should, i.e. spiky. Upon selection you should see on the garment the area which the map identifies as having influence. Represented by red, blue and/or yellow fields of color. It is now, that you should be able to see some areas where the garment colors show through.
7. With the left button held down move the mouse over these areas to turn them red.
8. Rotate the bone within the Parameter tab or the pose wheel in the upper left corner of the view port. If you still see deformation then pass the mouse over the area again.
9. You have fixed your problem. If you want to keep this version of the garment and not have to make these fixes each time you use it. I would highly recommend saving it out as a figure.
Title: Join the Space Force Now
Rendered in iRay. Postwork in Gimp to add the text and sig.
An imaginary recruitment post for the US Space Force. Featuring one of their own Lt. Mia Tabby. Lt. Mia as she is called, is a combination of Victoria 2 body and Millineum Cat. A creature created by Little_Dragon with the help of Redfern and others. The poster behind her is from the JPL site. Lt. Mia is based loosly on Redfern's Mzzkiti, both being service girls and all. I want to thank Redfern for all of his information about this character, where she came from, who was involved. I love history.
So here she is:
Freebies:
Character:Lt. Mia:Actor * Millennium Catwoman v1.2 by Little_Dragon.
Character:Lt. Mia:Tail Bushy Tail 2 by Little_Dragon.
Character:Lt. Mia:Texture * MilCatwoman Red Tabby Texture by Little_Dragon.
Clothing: Jewelry: Earrings * Ankh Earrings for Poser by Chris Cox.
Clothing:Bodysuit and Vest Furrette SPF Uniform by Little_Dragon.
Clothing:Jewery:Ring * Shardz Elven Ring for V3 by Shardz.
Environment:Background Visions of the Future - Venus by Jet Propulsion Laboratory.
Hair Little_Dragon's Ziggy Hair for Furrette 2.0 by Little_Dragon.
Pose:Lt. Mia Inspired by Louis Royo by Schlabber.
Prop:Lt. Mia:Weapon * Angry Hornet Raygun by Archeopterix.
Shader: Lt. Mia:Claws * Iray car related shader presets 'megapack' by Tom2099.
Shader: Suit: Jewelry: Gold * jewelry_iray_shaders by AllenArt LaurieA.
Shaders:Clothing * Iray Leather Shaders by Tom2099.
Paid fors:
Character Base:Lt. Mia:Head * Millennium Cat by DAZ 3D.
Character:Lt. Mia:Claws # Cat Character (w/ poseable nails) by DAZ 3D.
Character:Lt. Mia:Texture # Classic Cats Combo by LaurieS Lisa's Botanicals.
Clothing:Conversion * CrossDresser V2 by EvilInnocense.
No Counts:
Character Base:Lt. Mia:Body # Victoria 2.0 by DAZ 3D.
Clothing:Bib # RDNA Roma by Traveler.
Environment:Lighting # FWSA Soft Light Probes by Fred Winkler Art Sabby.
* - Requires free registration
# - No longer legally available
How to Fit Clothing when Smoothing Blows Up
Here again is Lt. Mia. This time Lt. Mia is based loosely on the British TV show called UFO. Released in 1970 the show is very much a 60's piece. JoEtzold created several of the costumes worn by the actors, the moon base and cars driven by the main characters. For this post I want to add to my discussion on how to make a clothing item fit a figure other than the original. In the below image I have taken the bodysuit created for V4 and converted it to V2. As in the previous example I used EvilInnocense's Crossdresser to transfer the bodysuit from V4 to V2. I converted the suit to Triax Weight Mapped. When I fitted the suit onto Mia there was a lot of poke through. I added the smoothing parameter but when I did that I got spiky things again. After further inspection I found that the side leg lacings intersected in some places making the poor smoothing operation go bonkers. This problem is then definitely not a weight map problem, although I did have to do some corrections on her right arm. With smoothing not working for this model I had to come up with another way to make the fit work for this suit. I used the Mesh Grabber to adjust the bodysuit over Mia's body. I also put Mia in several of the poses I was going to possibly use in the image and made more adjustments. I exported out the bodysuit as an object and then created a morph for the suit.
Tools I used in correcting my spikes
Clothing:Conversion * CrossDresser V2 by EvilInnocense.
Geometry Modification * Mesh Grabber by ManFriday.
Instructions:
0. The only things in your scene should be the figure and the garment. Makes life easier latter on.
1. Convert garment to Tri-Axe weight mapping.
2. Make corrections using the directions in post How to Fit Clothing when Spikes Show Up After Posing with regards to weight map issues.
3. Fit the bodysuit onto the figure.
4. On the Tool Settings Tab, select the Mesh Grabber. 5. In the viewport rotate the camera around the figure observing where the poke throughs occur.
5. In the Scene tab select the figure and hide it and select the suit. In the viewport click one of the areas that poke through is occurring. Make the figure visible again to make sure you clicked in the correct area. Move the sphere out. I try to go in a direction that is perpendicular to the polygon I have selected. Most of the time I used the Falloff type of Smooth and left everything else in default. Make the changes to the mesh small so to try and keep the topology of the garment intact as much as possible.
6. Continue to adjust the mesh until no poke through is observed. Apply a pose you are interested in and look for poke through again. Repeat step 6. I used three poses that were close to what I was thinking I wanted for the image.
7. Return the figure to default pose and unfit the garment. Delete the figure. The only thing in the scene tab should be your modified suit.
8. Export out you suit as an obj. I named my obj what I wanted the morph to be called in the suit.
9. Load the original corrected weight mapped suit into the scene. Not the one that has been messed with with Mesh Grabber.
10. Select the suit and go to Asset and select Morph Loader Advanced. Make sure you have the preset set to the same format as you exported your modified suit. Click Accept.
11. Load your figure and fit the suit to the figure. Find the morph you just made and slide it to 1 or 100% depending on your choice of using percent or not. Rotate the camera around the figure and see what your handy work has accomplished. No poke through, then you can save out the figure. Poke through, then use the Mesh Grabber and do some more tweaking. Repeat steps 4 thru 11 again.
12. You have fixed your problem. If you want to keep this version of the garment and not have to make these fixes each time you use it. I would highly recommend saving it out as a figure.
So here she is:
Title: Hanging Out with Her Best Friends Forever
Rendered in iRay. Postwork in PaintShop Pro to add the sig.
Freebies:
Character:Lt. Mia:Actor * Millennium Catwoman v1.2 by Little_Dragon.
Character:Lt. Mia:Tail Bushy Tail 2 by Little_Dragon.
Character:Lt. Mia:Texture * MilCatwoman Red Tabby Texture by Little_Dragon.
Character:Lt. Mia: Hair Sumire Hair by Yamato.
Clothing:Suit and Boots * S.H.A.D.O. Uniforms for V4 by JoEtzold.
Clothing:Suit:Belt * S.H.A.D.O. Uniforms V4 - Addon by JoEtzold.
Clothing:Suit:Textures * MoonBase Uniform DS Texturing, V1 by luqu.
Best Friends Forever: Pose * Odd Poses for MilCat by Carrie58.
Best Friends Forever: texture * Thai Cat for DAZ MillCat by czarny_jednorozec84.
Environment:Bench Sofa N200816 by Oishe. (3ds format)
Environment:Décor:Vase Grass vase décor 3D Collection by 3DBar. (3ds format)
Environment:Décor: Window Wall Floor * Window Prop by A. Gunsolley.
Environment: Window Space BGs for pulp poses by RedeyeCat.
Shader: Clothing, Boots, Window Frame * DAZ Studio 4.10 by DAZ 3D.
Shader: Room, vase and spheres * Iray car related shader presets 'megapack' by Tom2099.
Paid fors:
Character Base:Lt. Mia:Head * Millennium Cat by DAZ 3D.
Character:Lt. Mia:Texture # Classic Cats Combo by LaurieS Lisa's Botanicals.
Clothing:Conversion * CrossDresser V2 by EvilInnocense.
No Counts:
Character Base:Lt. Mia:Body # Victoria 2.0 by DAZ 3D.
Environment:Lighting # FWSA Soft Light Probes by Fred Winkler Art Sabby.
A little Something about Shaders
In continuation of logging my journey to making the last piece I rendered, I want to expound upon attempting to recreate a real world texture in 3d. I am getting old and need to have notes to jog my memory. So one of the signatures of the UFO TV series is the girls from the S.H.A.D.O. moonbase. They all wore bodysuits made from metallic fabric and a ribbed knit. The knit had big loops of a clear plastic ribbon that made lovely reflections when light hit the surfaces, sparkles (A girl needs her bling). The metal fabric back then was probably a thin layer of metallic plastic bonded to a knit layer. The following is a list of things I did to get my shader to work in the environment I wanted it in. In developing the shader I found an important piece of wisdom. If you want to use displacement then you must subd your object and push the render parameter to a higher number. My list of things to do to make this shader work.
1. My choice of renderer for the image I was creating is an iray render.
2. I selected the light set I was going to use.
3. Load the model the shader will be used on.
4. Perform Convert to SubD
5. On the parameters tab select at least a level 2 subd for rendering. I used the maximum 4. Model is ready to take on the shader.
There was a kind soul who goes by the handle, luqu, who created a DAZ Studio mat file for the suit. Within the file luqu had a diffuse image of the knit fabric, a bump image, an opacity image and 2 reflection images. These were what I used to make the shader. I used Filter Forge to make a normal map from the diffuse image. So now there are five files I can put in the parameters.
6. Experiment with settings to reproduce the effect, at least for distance shots. I did not use the diffuse file it seemed to darken garment.
I found that sickleyield's small tutorial Iray Surfaces And What They Mean was very helpful.
I made the preset as a shader so that I could use it on other clothing items but thur my experimenting I do not think I can use in any other setting other than with FWSA's freebie set. (Which was a Christmas gift here at DAZ).
A little More Something about Shaders
I am in the middle of installing content for Victoria 2 (mostly characters) and during my hunt for stuff for her I have noticed that there is very little in the way of jewelry for her but there happens to be lots of cool stuff for Victoria 4. I came across a beautiful bracelet by fabiana here https://www.renderosity.com/mod/freestuff/rapsody-bracelets/73436. I am a DAZ Studio girl so when I loaded the bracelets into DAZ and rendered them all I got was a wire bracelet but no beads. I kind of know what to look for in the Poser files to see what Poser is doing and found that fabiana was using displacement to create the bead shapes along the length of the geometry. I decided that with my new found information about displacement I would try my hand at recreating fabiana's work for Poser in DAZ Studio with iRay shaders. Fabiana set up her geometry into two zones. The first zone is a string of 6 to 10 small beads. The second zone creates the big bead. She uses one displacement map for both zones and changes the tiling to get the number of beads. After looking at the map which is a rectangular grey scale gradient. I tried putting it in the image channel of the Displacement parameter all I got was beads that looked like they came out of a fresh water shell. So the first thing I did was play with the strength valve of the displacement, the max and min values and what subd level I wanted the shader to use. This got me the sizes I wanted but I was still getting the odd shapes. So then I went into the Layered Image Editor and resized the map and moved it on the x axis to get the right number of beads. Once I got that piece down I then went to the zone that was designed for 6 to 10 beads and set the tiling to 2. For the one bead zone tiling I kept it at the default of 1. Here are the before and after images.
For those that wish to try their hand at playing with the shader here are my instructions and settings to control the shape of the geometry. As to color there are many jewelry iray shaders to pick from. I would apply these prior to doing the next steps.
1. Load bracelet into scene. Select bracelet and convert to subd.
2. In the Parameters tab select 4 in the render SubD Level
3. With the bracelet selected in the scene tab, select the Surfaces tab and apply the !iRay Uber Base to both material zones.
4. For each of the material zones under Geometry expand Displacement on the Displacement Strength Parameter in the image selection box, select the gradiant map that fabiana provided. It is called Rapsody-Shade 1.jpg
5. For bead1 Set the Displacement Strength to 0.05, the Min to -0.12, the Max to 0.12 and the SubD Displacement Level to 4. Set tiling to 2 for both horizontal and veritical.
6. For bead2 Set the Displacement Strength to 0.05, the Min to -0.25, the Max to 0.25 and the SubD Displacement Level to 4. Tiling remains the default.
7. In the Layered Image Editor set Xscale to 159.6384%, xoffset to -178, operation should be alpha_blend.
Editor's Note: I made some fits and mat files for the bracelets. Fits are for Genesis, G2F, G3F, G8F and of course V2. The mats have been set up using the above steps. You will have to add sub-d once you have the bracelets loaded into the scene and before applying the mats. Download is here:https://sharecg.com/v/96686/.
And to continue my tradition of uploading a render here is:
Baby Girl All Growed Up
Rendered in iRay.
Baby Girl: Hair: Raven Punk GaGa Hair by Mareek
Baby Girl: Texture:eyes E's Sasha V2 by Ecstasy
Baby Girl:Character Base Victoria 2.0 by DAZ 3D No Longer Available
Baby Girl:Clothing:Dress Double Layered Muscle Coctail by Poser World
Baby Girl:Clothing:Shoes Nurse Dress Set by ISOP
Baby Girl:Jewelry:Bracelets Rapsody Bracelets by fabiana
Baby Girl:Textures Ewelina by magbag
Baby Girl:Textures iRay Material Files for Ewelina by LJStudios
BabyGirl:Character:Face Hayley Hazel Helen by Morphography
Environment:Lighting FWSA Soft Light Probes by Fred Winkler Art Sabby No Longer Available
Environment:Toys Rag doll by Digital Cats Media No Longer Available
Environment:Toys Saddle for DAZ Eastern Dragon by klausdbg
Environment:Toys Stuffed Bunny by elleque
Environment:Toys Thursdays Child - Deaddy Bear by DAZ 3D RuntimeDNA Traveler
Environment:Toys:Textures Fine Feathers Textures for Stuffed Bunny by Trumarcar No Longer Available
Shader: Finger nails and shoes Iray car related shader presets 'megapack' by Tom2099
How about Geo-shells
In my hunt for treasures I have come across many 2ndskin outfits. They are very cool, like the red and black latex outfit by Dirk Holzenhauer for V3 over at Rendero. But you are kind of stuck with the skin texture that comes with the images provided by the artist. That is okay but there are times when I like to mix it up. So last year I played around with using a geo shell and modifying the textures to only show the clothing part of the texture. This gave me the ability to use what ever skin texture I want on my character. Here is an example of what I got using the geo shell and modified texture.
You can obtain the 2ndskin by Cris Galvao called Zinax for V2 here: http://crisgalvao.free.fr/downloadsB.html
Victoria has the Serenity texture from Froglace Studios here: https://web.archive.org/web/20070104211119/http://froglace.com/poser/index.htm?id=freeposer_wolfrose.inc
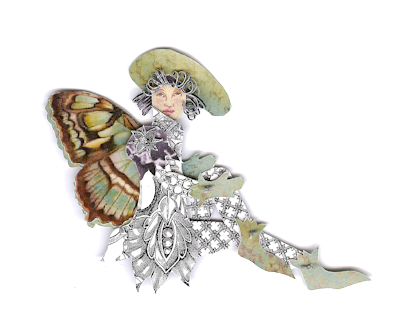
Since then the artist Mystic Art Design did some work on G8F using the Layered Image Editor. It is an amazing freebie, Mystical Flower, with several options for bikinis and facial adornments. Her efforts center around using displacement to make the adornments work but you have to be careful with tiling. But that got me to thinking about the work on the geo shell bodysuits from last year. So I set out to figure out how Mystic Art Design did her work. When you look at her displacement files they are the typical grey scale with midway being the 127,127,127 color. But they were very percise. sharp edges, fine detail so to my thinking these files were generated by computer. So I did some digging. I knew I had seen these types of files before. Then it hit me. Splitting out channels. Photoshop and Paintshop Pro have been able to split out the HSL, the RGB or the CMYK images for a particular image for as long as I can remember. So I experimented with MAD's images and although not exact and not as good I came up with something similar. Well woopietdo! Over the first hurdle. To continue the experiment I selected a freebie by Ashpash. She called this series of textures as the Orange, Pink, and Yellow Flower Fairies (See list below render for the link to the Orange Flower Fairy). As was normal for the time the body decoration was applied to one of Ashpash's skins. I set out to make the bodysuit. It was tedious work. I am sure that our texture experts would come by and say oh yea just do this and that and you are done but I am of the older generation now and slow but I get it done. Here are the steps I took to get the files I needed to make the geo-shell bodysuit.
1. Bring the texture file into Paint Shop Pro. Remove everything but the body design from the image. This is the diffuse layer. Save out as your diffuse image.
2. Create 2 new layers that will be used for the transparency and displacement maps for the geo-schell. Select all the areas outside of the body images. In these areas fill one layer with black (0,0,0) and the other layer with mid grey (127,127,127).
3. Invert the selection of the diffuse layer and on the layer that you filled with black fill the new selection with white. The transmap image is complete. Save out your black and white image as your transmap.
4. To create the displacement map, Make the transmap layer invisible and merge the remaining 2 layers, the diffuse and mid grey layer. Apply the HSL channel split action to the newly merged layer. The lightness image is your displacement map. Save it.
The next steps are to set up the geo-shell materials.
1. If your figure is not subd then make it so. Create the geo-shell.
2. In the surfaces tab for the geo-shell, make all of the materials that are not affected by the body art to invisible. In my example all of the material to do with the head, eyes, lips, and eyebrows were set to zero in the cutout parameter.
3. The geo-shell only has one material zone for the entire body. So in the diffuse parameter I put the diffuse image. In the cutout parameter I put the trans map and in the displacement parameter I put the displacement map.
For the below bodysuit (geo-shell) in the image below, my values were 1.5 for strength. -0.25, 0.25 subd was 7. I also bumped up the space between the geo-shell and V2 to 0.40 to make sure the geo-shell stayed on top.
And on that here is:
The Orange Flower Fairy
Rendered in iRay. No postwork cause I did enough to begin with.
Freebies Clothing:Bodysuit Orange Flower Fairy by Ashpash.
Clothing:Bracelet Mistress Charm Braceltes for V4/A4/Alice by aerysoul.
Clothing:Headdress * Chinese Headdress Addon for Queen Headdress by LJStudios.
Clothing:Jewelry:Armband * Moon Shadow Armband by Valea.
Clothing:Jewelry:Earrings * Scarf Earrings by janimatrix.
Clothing:Shoes ANCIENT SANDALS by Arduino.
Clothing:Skirt * Free Sample SheetZ For Victoria 4 by jepegraphics.
Environment:Lighting:Outdoor Patio * DAZ Studio 4.10 by DAZ 3D.
Hair Amante Hair by AprilYSH.
Orange Fairy:Morph Alina for DAZ Victoria2 by Poser Girls.
Orange Fairy:Pose:29 Vicky-Standing 02 by Schlabber.
Orange Fairy:Textures * Ray Material Files for Ewelina by LJStudios.
Orange Fairy:Textures * Ewelina by magbag.
Orange Fairy:Wings Flutterby Wings 2 by mada.
Shader:Clothing:Headdress: Jewelry: Gold * jewelry_iray_shaders by AllenArt LaurieA.
Shader:Headdress flowers * Iray car related shader presets 'megapack' by Tom2099.
Shader:Skirt * AllenArt Shimmery Sheer Fabric - Iray by AllenArt LaurieA.
Other
Environment:Lighting # FWSA Soft Light Probes by Fred Winkler Art Sabby.
Orange Fairy:Character Base # Victoria 2.0 by DAZ 3D.
Clothing:Jewelry:Necklace # succubus---complete 14 piece fantasy outfit by Baron Vlad Harkonnen.
* - Free Registration Required
# - No longer available
Absolutely stunning conversions! Wow! Awesome work! :D
Here is my take on G2F(left) and V3(right). I wanted to see just how different or better or worse the models are when compared side by side. The image consists of the two figures using a texture called Yarishan by Dreampaint. It was a character set with morph, textures and props for the character V3 in this case (2005). I had converted the base texture to V4 and I used the V4 UV mapping change on G2F to apply the texture. The leotard that the twins are wearing is a 2003 freebie by Specs2. (Simple LeotardV3 - Poser and Daz Studio Free Resources Wiki). Who by the way was a published artist for DAZ in the early days. If you have the freebie Princess Akkan which is for V3, as well, you have one of the DAZ products Specs2 created. I took an older free hair called Simple Hair by Mark003 (2010) at Rendersoity as my product I wanted to see if I could make it work in the more advanced setting of an iRay render. I used a shader set by Astuceman (https://github.com/Astuceman/Daz-Iray-Shaders-and-Lights) He has several hair iRay presets. The original hair is on G2F and the modified hair is on V3. To update the skin I used VRX iRay Skin Shader by vrxitachi. (Sharecg). The feather boa is by StudioArtVartanian. So in conclusion. I think 20+ year old stuff does have a chance of competing with the big boys. I give you the twins.