The Official aweSurface Test Track
 Sven Dullah
Posts: 7,621
Sven Dullah
Posts: 7,621
Hi everybody and welcome to the aweSurface testing ground! Since aweSurface just hit the market and everything is new, I thought we could use a place to share our findings and discuss everything regarding aweSurface in particular, and 3Delight in general;) That way we won't derail the "Show us your 3Delight renders" thread with millions of testrenders, put them here instead!
aweshading-kit-10-for-daz-studio /awe-surface-shader-a-new-physically-plausible-shader-for-daz-studio-and-3delight/p1
3delight-laboratory-thread-tips-questions-experiments#latest
Daz 3D is part of 
Connect
DAZ Productions, Inc.
7533 S Center View Ct #4664
West Jordan, UT 84084
Licensing Agreement | Terms of Service | Privacy Policy | EULA
© 2026 Daz Productions Inc. All Rights Reserved.
Comments
some useful links:
http://docs.daz3d.com/doku.php/public/software/dazstudio/4/referenceguide/interface/panes/shader_builder/start
http://docs.daz3d.com/doku.php/public/software/dazstudio/4/referenceguide/scripting/api_reference/intrinsic_types/renderman_shading_language_objects
Ok so I have some issues with opacity, it seems it is very hard to get right. Here is one example:
I just converted Stonemason's UrbanSprawl2 to awe and run into a couple of issues, this being one of them.
This is a wirefence from that set, this is what it looks like in the viewport after conversion:
Render looks like this with no opacity optimization or filters:
And with 100% optimization this is what I get:
After trying every (almost) possible combination of the three opacity parameters, I didn't get it to look right, so I turned limits off for opacity strength and set it to 1000% (10):
That seems to have solved it, don't know if this is a bug or a feature, but this actually works. Feel free to come up with better solutions;)
Having the same issue with the flower in this hair. It is supposed to be lace, but I cannot get it to look right. Didn't try the limits off thing yet.
Also testing eye settings/skin settings. Feel free to comment;)
More opacity testing... This is a tree with modelled leaves, no opacity maps:
This is a tree with opacity mapped leaves, no optimization, filters at zero:
Using optimization makes the leaves invisible, turning limits off for opacity strength and setting it to 1000% looks like this:
And rendering is much much faster;)
Finally I turned opacity off, inserted the opacity maps in the base transmission slot, base transmission at 100, also inserted it in translucency strength, transmission color (light green) and transmission roughness slots. Think it looks better actually, but renders a bit slower than opacity...
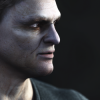
Tweaked the skin SSS settings to get rid of that D Trump- look=) This particular skin had no specular maps I realised, so had to use the diffuse maps, think it's a bit better. Also set limits off for opacity strength on the hair ornament thingy, doesn't look like lace but it now shows in the render lol. Testing/tweaking continues...
I've been fighting with the hair, can't really get it to look the way I want, this is her current state . Could be the HDRI too, it's very yellow. I postworked this a bit to fix colors/gamma:
Hmm this is what I ended up with
Displacement works in mysterious ways. Mid gray is zero displacement, right? I've made a number of displacementmaps for my characters. I use them with LIE. I have a "zero displacement" 128,128,128 base map that I load into LIE, then add various layers as needed. This has worked very well for years with the vanilla 3Delight renderer/shaders. Now I loaded the base Genesis figure, applied the awe base shader, just made it reflective to better illustrate the issue. And the awe environment sphere with the default ruins HDRI. Inserted the base displacement map into the hip displacement slot. First render is with displacement strength at 200%, min value -1, max value 1:
Then I tweaked the max value until I didn't see any seam. Ended up with min -1, max -0.59:
How about that
Excellent tips & tricks, thanks !
Umm I'm sorry but I have to ask - what do you think specular maps are for?
You're very welcome:)
Not sure if this is awe related, I did an over night render and when I checked on it it nothing has happened in 8+ hours, took a screenshot. Nothing special with the eye surfaces, so I don't get it. Light setup is an HDRI and 3 arealights:
I canceled and switched to progressive mode, and..it's rendering now... will take about 45 min . Any idea why this would happen?
"Glossier", nope. Unless you're using this word in a "layman" meaning, like, "the highlight is more visible".
But okay, in oldschool shading specular maps were indeed used to control specular strength.
And so you would not want to use a diffuse map for it either way. I mean, for instance, lips are generally darker than the rest of the skin, right? Consequently you decrease the strength of your highlight on the lips. And so on.
That's actually even leaving aside the issue of gamma correcting each map per its purpose.
Now, we are in the PBR world, where roughness will also realistically affect the strength of the highlight. So unless you mix two different materials on the same surface, you do not need a specular _strength_ map at all. It's still all skin. The strength slider controls its edge reflectance basically.
What you want is variable roughness, so that you'd get something like glossy ( = smooth hence shiny) lips, moderately glossy T-zone and cheekbones, and the rest of the skin dry enough to look silky.
I understand that since I don't post finished, pretty pictures but only tests, most people just scroll on by and never read my walls of text. But even if you don't care for my "anti-sunburn" adjustments, you may still want to have a look at the extremely quick-to-make but efficient roughness map I attached to that post. It's efficient because you only need to use it on the front head surfaces and set the roughness the same for all skin surfaces, face, torso, limbs - so that the map computes variable roughness for the face and the other surfaces seamlessly connect to the face without mapping. // texture lookups do take some time //
It is literally a minute or two to paint in Paint.NET or whatever - just half grey on white. Or if you want to get more fancy, use other grey values. The darker it gets, the glossier that spot will be. So be reasonable.
https://www.daz3d.com/forums/discussion/comment/4005391/#Comment_4005391
So will it render as fast now if you go back to scripted rendering?
DS does have weird bugs. Many times its memory management gets out of hand, at least on my machine. And since you're not using Windows IIRC, you may have your Mac-specific DS bugs in addition to the "generic" WinDS bugs...
Yeah I meant more visible, not more glossy, sorry! And tks for the heads up and the great tip, I somehow managed to miss your post:( Off to experiment...
I cancelled the progressive render because I wanted to adjust some settings, then made a spotrender of the eyes with progressive off, it rendered. Then I thought ok so it works now, and started rendering again with progressive off, well it stalled again, so now I'm rendering in progressive mode, and I think it takes longer that way. As somebody pointed out, the first two passes are very fast but the final pass takes forever;)
That was Gone who said this, IIRC.
Wait, would you happen to know if he's a Mac user too?
...what I never use is spot rendering, so no idea how buggy it is even on Windows. Either way, due to all the weirdness I run into, it's become sort of second-nature for me to reload DS at fairly regular intervals. I also start with a fresh reboot most of the time (I usually turn the PC off rather than hibernating it). I don't know how helpful reboots are on a Mac, but you could try...
..great thread. Thanks for starting it..
And I'll include a new piece of information kindly provided by @Mustakettu85, thank you so much:
Increasing subD level in 3Deligh won't change a thing, it's either base level or subD, off or on. It will change in the viewport but not when rendered. So stick to level 1 and your viewport will thank you!
I think it was @BarefootUpto My Soul who mentioned it, and IIRC he is a mac user? No it was @Gone, I checked! Don't know what he uses.
Enjoy =)
Especially when using DoF, between that simple roughness map and a good relief map, you don't really need anything else outside the diffuse.
So what about hair? In my humble opinion hair with no spec maps looks like a glass helmet. Well you naturally have to enable the "multiply reflections with opacity" thing.
Good to see you in here;) And I hope you get your hardware troubles solved, you're way too creative to give in;)
Not with DoF.
This is Kieron hair (the male bob from this store) with the first aweSurface hair preset (with SSS for blondes). Please disregard the crappy-looking skin and eyes on Gia 8, it was very much a WIP.
Only two maps used on hair are diffuse and bump.
With my shaders, I don't even bother to enable anisotropy but look for a perfect relief strength value (the relief will scatter the highlight anisotropically). Wowie does things somewhat differently, so I guess his anisotropy settings should be fine as-is even with DoF. Or you could experiment, of course.
..new drive came in today. Tonight I'll see if that backup I did worked.
Looks nice! So exactly how is depth of field interacting with the anisotropy settings?
Keeping fingers crossed;)
You mean technically?
Anisotropy is like a smearing of the highlight along an axis. IRL it happens when the surface has fine relief in the shape of narrow parallel bands - with hair or thread on a spool, they are fibers; with brushed metal, these are what remains between the tiny grooves formed by the tool during processing. Each of these bands gets a highlight of its own. So the highlight is spread perpendicular to the fiber direction.
Somehow there is this undocumented feature in the 3Delight raytracer that when it renders without DoF, it only takes the most pronounced surface relief into account when rendering highlights. With DoF, however, every minute detail on your bump map is traced.
So if you have a relief map with grooves, it will create strong anisotropy.
PS It's not just about anisotropy, but actually all highlights interacting with relief. With anisotropy it is visible as a smearing of highlight, while if you have a "generic" relief, it just makes the highlight become rougher as you increase the relief strength. It makes for way more lifelike and interesting effect IMO.
Hate the forum software;)