New plugin: Phong tessellation and displacement
 Philemo_Carrara
Posts: 1,175
Philemo_Carrara
Posts: 1,175
I would like to thank @Magaremoto for the starting point of this idea. He suggested to look into Renderman to pick good ideas.
I discovered that Renderman subdivides meshes so that each facet fits in a Pixel. The first idea I had reading this was that would be great for displacement.
That done, I needed a subdivision (or tessellation) method that respected the existing render and was fast enough. Carrara using Phong shading, I decided to use Phong tessellation. This algorithm, created by Tamy Boubekeur and Marc Alexa (see https://perso.telecom-paristech.fr/boubek/papers/PhongTessellation/). This method is widely used in games to give nice contours to low poly models. As the author says, “Our technique is a geometric version of Phong normal interpolation, not applied on normals but on the vertex positions. We call this strategy Phong Tessellation. “.
Carrara and displacement
Carrara usually does a fine job to simulate displacement with bump mapping when the surface is facing the camera and the light. This is not so good when the camera and/or the light are grazing the surface. Also, contours do not reflect the impression given by facing facets.
Carrara has displacement. It works great on geometric primitives (like sphere, plane,..). For meshes, it's a little more … touchy. Displacing the vertices at the facet size is usually not enough. So, there is subdivision. The problem here is that the complete mesh is subdivided, regardless of it actually on the screen and visible from the camera. Heavy subdivision usually takes a lot of time.
Micro-dispalcement
The idea of this Plug-in is to subdivide heavily (up to 4 vertices per pixel), but only what is necessary. So, off-screen facets or facing away from the camera are not subdivided. Contours are perfect due to subdivision and micro displacement is now possible.
Micro displacement is using displacement in place of bump mapping. It allows to have consistency in quality between facing and grazing angles, both from the Camera and the lights, as it uses real geometry and is not trying to simulate it.
As Carrara is already very good at simulating displacement by bump mapping, for realistic values of displacement, the improvement is very subtle and should be considered before using.
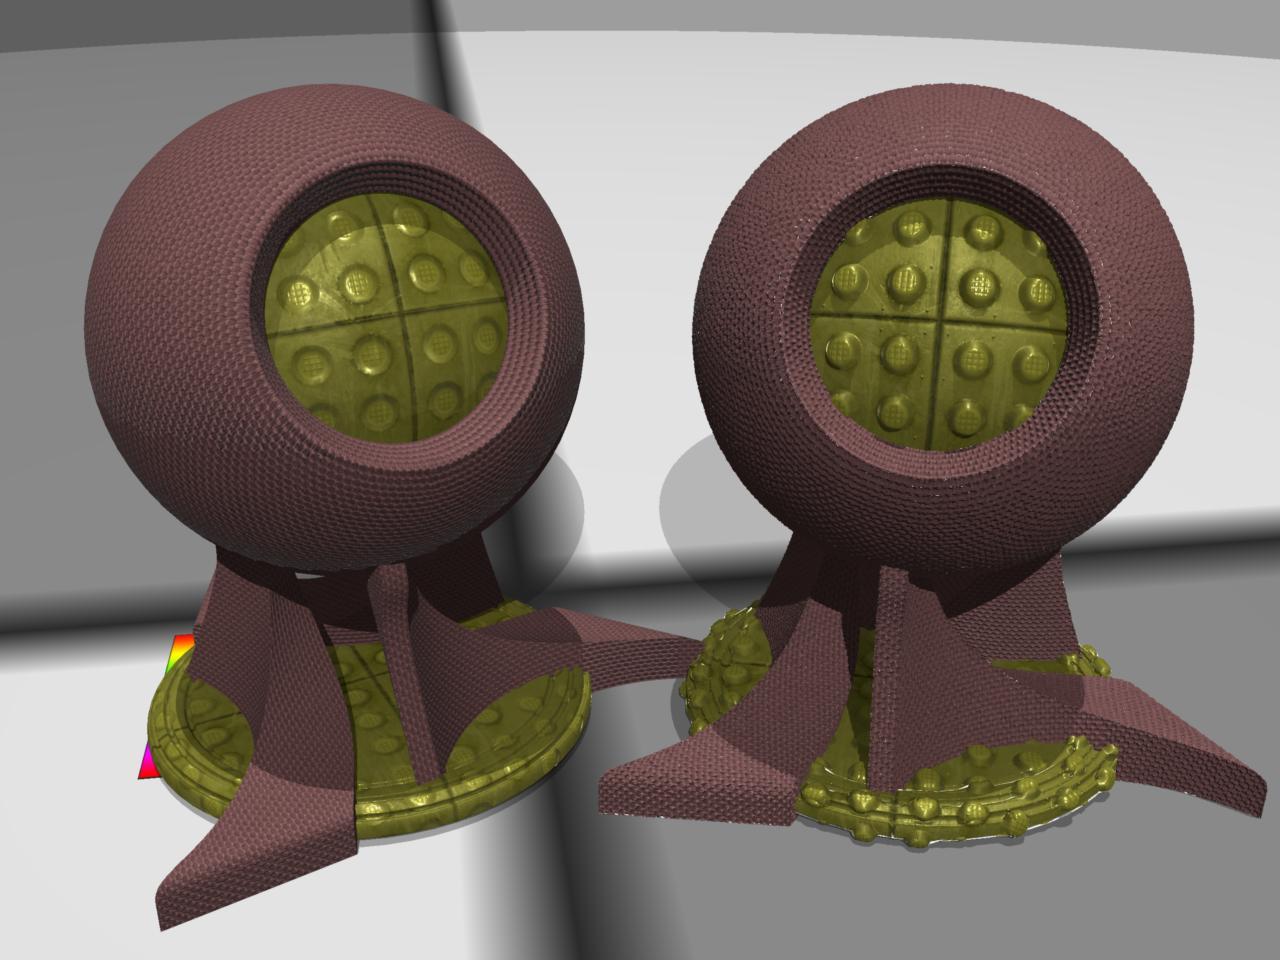
For instance, for a grazing angle (upper jaw), the first image is rendered using bump mapping and the second one using micro displacement. There are differences, although you may have to look for them and I think the overall quality is better.
On this example on a facing fragment, (the forehead), the difference is not obvious at all:

On this example, micro displacement slows the render by a factor of 2.5 (120 seconds instead of 40). I can deduce this simple rule: No grazing angle, no micro displacement :-)
Macro Displacement
Macro displacement is used to simulate geometry at run time. It usually has both displacement (or height) map and bump/normal map.
This is where the plugin takes its full power:
Usage
Plugin
Phong tessellation is a modifier that applies to meshes.
Select the modifier from the list:
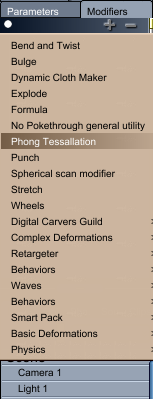
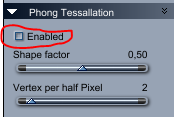
There are 3 parameters in this plugin:

-
Enabled: Activate the plugin. Otherwise do nothing. Use it to re-generate the tessellation is camera, object or displacement has changed.
-
Shape factor: Strength of the Phong effect. 0 will give you flat shading, 0,5 is normal, 1 is overdone (stuffed fabric effect).
-
Vertex per half pixel: number of vertices generated by half screen pixel horizontally and vertically. 1 is 4 vertices per pixel, 2 is 1 per pixel, 4 is 2 per square of 2x2 pixels and so on. Use value 1 for micro displacement or macro displacement with sharp contrast, 2 or less is the displacement map is blurred. Starting from value 1, each successive value divides the number of vertices generated by value squared (2 is 4 times less, 3 is 9 times, 4 16 times and so on).
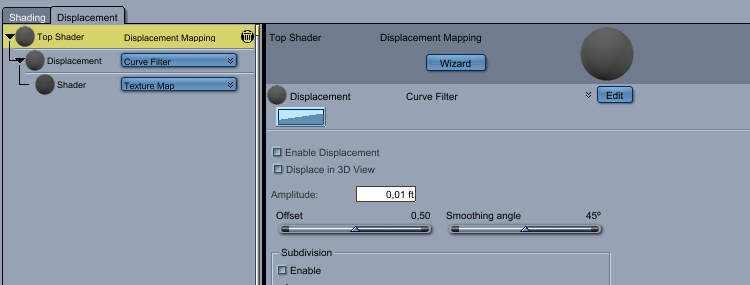
Displacement
To set displacement, use the standard displacement shader in the shader room.
Before doing so, untick if necessary the “enabled” value in the modifier (otherwise it may take a very long time).
 First make sure the “enable displacement” is disabled.
Then set amplitude and offset and displacement shader as usual.
Performances
On my 5 years old laptop, tessellation generates about 1 million facets per second. Displacement is about 3 times faster.
Afterwards, Carrara needs at least as much time to digest all those facets.
Rendering is usually 2,5 times slower at maximum precision.
Download
Windows version is available at Sourceforge.
I'll publish the OSX version this week.
Daz 3D is part of 
Connect
DAZ Productions, Inc.
7533 S Center View Ct #4664
West Jordan, UT 84084
Licensing Agreement | Terms of Service | Privacy Policy | EULA
© 2026 Daz Productions Inc. All Rights Reserved.
Comments
This plugin is definiteley dedicated to render. Vertices and facets are created according to their view in the rendered image (up to 4 vertices per pixel). Facets that are offscreen, behind the camera, facing away from the camera are not tessallated. So it creates an awful lot of vertices, but just enough to have maximum rendering quality.
looks great Philip, as usual (hey, wheres the Donate button? )
)
thanks for all your efforts to keep carrara alive
ps a bridge to RM would be one of the best well-paid plugins ever -endless possibilities with that - but I guess very demanding too
Thanks! Even when I don't fully understand what you say, I really appreciate your efforts. I guess that it will take experimenting with it to see how Macro Displacement is different from regular displacement, beyond saving resources.
maybe it could be useful make an OSL hypershade node or environment functions to run OSL shaders within carrara
It should not be different. But, if you subdivide enough to have that kind of precision, regular displacement will take a long time and may even clog Carrara.
does this mean i could use M4's displacement maps in carrara and it will lift skin to be seen in silhouette ??


https://www.daz3d.com/m4-displacement-maps
I would imagine so
thank you thank you thank you thank you once again Philemo for your kindness and intelligence
wheee skreeches for joy
++++++++1
fee fi fo phong!
thankyou Philemo ++++++++++++++++++++++2
Thanks Philemo for this cool new plugin.
Thank you, Philemo. Looks amazing. Can't wait to try it ot. Your efforts are appreciated. You are a treasure.
I don't have this product, but I'm 99% sure of it.
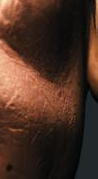
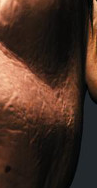
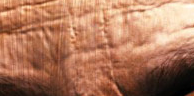
As an example, I've built up a vein displacement map. Below is a quick render of M4 at 3 levels of zoom.
There is a visible seam visible in my displacement map on the left arm, sorry for that.
@UnifiedBrain That's an illustration of my previous answer. You can zoom in or out, the plugin adapt the displacement to the current view.
@th3Digit @head wax @Stezza @Cellulo @Diomede
Thank you for your Thank you
It would . It would allow side by side comparison when translating shaders. It would also be a nice addition to Carrara.
I wonder if I would have to build a new renderer or if I could get by with a new top level shader.
I'm also terrified with the OSX version. Not sure my feeble knowledge of OSX would allow me to compile that
what a beautiful days you must have coming soon, truly envious of you
Carrara native and Octane
M4 on the right has the phong modifier
it indeed has some displacement without but the second guy more ripped
one needs to add a displacement of value 1-100 set to 50 (or grey colour) to all the other surfaces Phong or no phong
his nipples a bit wrinkly though
adding more angles as my animation renders for Misty
underwear a problem, had to enlarge and does not fit well
I wonder if VWD would see the displacement in 3D view or more to the point cope with it!
a video
everybody was phong phu phighting.....
is a dream come trooooo


 OMG HAZ TO RERENDER EVERYTHING LOL
VEIN MAaaaaPS precioussesss
TYooo
TYooo


oh wow what terrific examples !
WOW - many thanks for this! Awesome!
clicky click vid
nice :)