LUXUS FOR CARRARA - Initial Experiments
 Persona Non Grata
Posts: 1,365
Persona Non Grata
Posts: 1,365
Dealing with Matt Colours:
In this image, you will see that getting a particular colour as mixed in Carrara to read correctly in LuxRender needs a bit of juggling to get it right. My initial experiments show that by mixing the desired colour and then mixing in 80% Black seems to do the trick with red... I've yet to experiment with other primes before moving on to textures and the like.
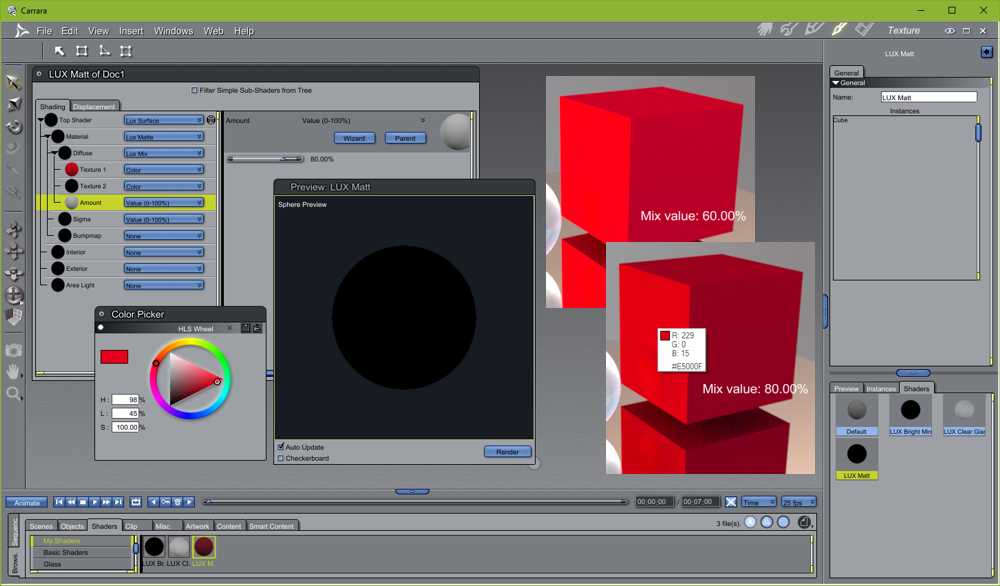
Here's what we are looking at:
- In Carrara a red is mixed with a RGB value of 229,000,027 and applied as a LuxMatt meterial to a cube which is rendered
- A LuxMixer node is applied to add a percentage of Black to stop the LuxRender looking as though it glowed
- An initial value of %60 black was tried and the resultant values checked
- A final value of %80 was hit upon and as you can see the sampled colour is close enough to Carrara's original colour value
The acutall render is lit with a LuxInfinity light and an HDRI environment map.
MODS: If this shouldn't be a new thread but put somewhere easy to find then I kindly ask one of you to move it or delete it if it is redundant.
Selina
Daz 3D is part of 
Connect
DAZ Productions, Inc.
7533 S Center View Ct #4664
West Jordan, UT 84084
Licensing Agreement | Terms of Service | Privacy Policy | EULA
© 2026 Daz Productions Inc. All Rights Reserved.
Comments
Dealing with Matt Colours - Conclusion:
Using the LuxMix Node and adding 80% black to your chosen matt colour seems to work across the board...
In this image an ordinary Carrara Spot was used as the light source and the colours tested were the purest, brightest I could think of at the time. This concludes this stage of LUX Matt material experimentation...
Selina
Dealing with Matte Translucency:
The following image is my attempt at demonstrating LuxRender's Matte Translucent capabilities.
My various experiments have led me to believe that a basic HLS setting of:
- Reflection: H: 0.00, L: 20.00, S: 20.00
- Transmission: H: (same as above), L:40.00, S: 20.00
- Interior: Lux Clear
- Fresnel: 1.42 (50% Sugar Solution)
- Absorpition: H: (same as above) plus 60 modulo 100, L: 30.00, S: 50.00, Value: 250.00
..is a great starting place from which to create all sorts of interesting shaders that need a matte translucency base. In this example red is being used as fundamental hue.Below is a table demonstrating some variations on the above 'default' with each changed parameter shown below each image. I have made sure that the Reflection and Transmission L: settings when added together do not exceed 80.00:
Reflection L: 5.00
Transmission S: 40.00
Reflection L: 10.00
Transmission S: 40.00
Reflection L: 15.00
Transmission S: 40.00
Reflection L: 30.00
Transmission S: 40.00
Reflection L: 40.00
Transmission S: 40.00
..and there's more. This table shows the effect of changing the Transmission L: setting:
Reflection L: 20.00
Transmission L:30.00, S: 40.00
Reflection L: 20.00
Transmission L:40.00, S: 40.00
Reflection L: 20.00
Transmission L:50.00, S: 40.00
The one major issue to realise with this shader is that it can take between 15 and 30 times longer to render, but well worth the wait!
Selina
Dealing with Glossy:
Building on what has gone before... This image highlights the correlation between Specular and Roughness settings.
The highest specular setting for glossy materials is 25% anything higher will turn the surface into a mirror and the diffuse colour is lost - great for chrome perhaps but I have yet to experiment with the Metal shaders. Specular reflections can be blurred by increasing the roughness values for U and V.
Just to highlight what we are looking at; the cuboid nearest the camera and the disc to the right of frame has no diffuse colour whatsoever, a specular value of 7.50%, Index of Refraction (IOR) of 1.75 and UV Roughness values of 2.50%. The two yellow spheres have a Specular value of 15.00%, IOR of 2.26 and a UV Roughness value of 0.50%. Finally, the nearest cyan sphere has a specular value of 25.00% (the recommended maximum), an IOR of 3.00 and UV Roughness of 5.00%.
Selina
Dealing with Glossy - Conclusion:
The following four images (below) highlight the relationship between specularity and IOR (Index of Refraction)... Each features four red spheres with the specularity set at 2.5%, 7.5%, 15% and 25% for the near to far spheres. The only parameter to change is the UV roughness setting as indicated under each image. There is a strong mathematical correlation between the specularity and IOR thus: IOR = (sqrt(SPECULARITY)+1)/(1-sqrt(SPECULARITY)) these values are calculated as 1.3756, 1.7523, 2.2642 and 3 for each of the spheres respectively.
U: 2.5%
V: 2.5%
U: 7.5%
V: 7.5%
U: 15%
V: 15%
U: 25%
V: 25%
In all of the test renders above identical values were used for U and V, but it is interesting to note that a difference between these two could be used to show anisotropic highlights as seen on hair or velvet for example. This concludes my experiments with LUX Glossy shaders at this time.
Selina
wow Selina, I am so sorry I missed this. Thank you for posting those results. You rock!!
wow, I missed this too. Very interesting. Thanks Selina for sharing the work, and thanks head wax for the thread bump!
--ms
pleasure I dont know why we all missed it! I feel bad
.
Thanks!!
..started to have a look at this again...
This image uses a plane as a 'true' area light (not something that Carrara currently offers,) just have to remember to make sure that the normals are pointing in the correct direction - lost half a day on that one!
Also experimenting with Networking as my laptop and desktop offer a similar 8 cores each. This image is a recap on what I did before, matte, matte_translucent and gloss as surfaces only - no volume settings, yet, I'll touch that when I get to glass.
I have still been using his luxcore beta he did for Carrara but with the ability to bring in the IRay textures I have not trieed them again which I should.
I don't have Luxus or Octane but I am enjoying his thread.
you can get luxcore as it was a free beta and still works just look for the thread on it.
Last update had removed the monthly build locks.
Thanks
does You have to have Carrara 8 or 8.5 +then ??
Fireflies: What are they and how to avoid them (?) - Initial Thoughts
The above image of LUX Render mattes shows 'Fireflies' or hot pixel spots in the render and they can be reduced by:
Here are a set of images to illustrate the above points where the highest R, G or B values are kept to a ceiling of 64%, ie 164:
S: 32
L: 100
S: 48
L: 33
S: 56
L: 18
S: 60
L: 10
NOTE:
..Starting to look at Texture Mapping for colour and bump (still with Matte textures) ...
NOTE:
..and looking at Depth Of Field..
IMAGE 1
IMAGE 2
NOTE:
f/Stop
1
1.4
2
2.8
4
5.6
8
11
16
22
Radius
0.025
0.0179
0.0125
0.0089
0.0063
0.0045
0.0031
0.0023
0.0016
0.0011
played with any glass bottle shaders?
Looking at Shiny Surfaces: Glossy, Metal2 and Glass...
NOTE:
Just a very sparce overview of the Matte and Glossy Translucent settings using red as a base in the form of two PDFs...
These shaders do not use 'volume' settings and therefore offer a flat translucency, which is not realistic, but quicker to render...
..another sparce overview of the Glass shader settings using red as a base in the form of one PDF...
NOTE:
PDF removed as it was inaccurate - see replacement here.
Wow! That's very kind, albeit inaccurate
That looks very realistic, and frankly, gorgeous.
I've never used Luxus, or any other PBR. I will likely wait until I can afford Octane (which I think will be easier to use).
But I'm enjoying your experiments, like everyone else.
These are great - this mix of materials is impressive and showcases the capabilities quite nicely.
My interest in Luxrender has always been for distributed rendering - like RIB sequences in DS/3DL. Are you thinking of doing something similar?
tnx for sharing your research/results!
--ms
..a quick foray into 3D-Coat and back to Carrara (before being discovered) for final rendering in LUX Render..
IMAGE 1
IMAGE 2
Creating Texture Maps and UV coordinates in 3D-Coat
I've seen some good examples (and some not so good) of Octane, but for a small hobby such as this is for me I can't justify the purchase of a better graphics card, stand alone software and plugin...
But LuxRender is not doing so bad for now
Yes using other PC's with LUX Render is such a breeze! I tried setting up my laptop and desktop with Carrara - but it was... shall we say, 'temperamental?'
I expected to get RIB sequencing with Carrara, but it didn't work like that for me. I had to wait for each frame to be completed by each machine - they didn't work together on the same frame. I'll have to have another look [some day!]