Daz 3D is part of 
Connect
DAZ Productions, Inc.
7533 S Center View Ct #4664
West Jordan, UT 84084
Licensing Agreement | Terms of Service | Privacy Policy | EULA
© 2026 Daz Productions Inc. All Rights Reserved.
Comments
Did you spot the mistake?
Sorry, but the pdf for Glass (here) had a glaring mistake in it... the normals were reversed. Here's a corrected version attached.
JUST TO EMPHASISE THE POINT
In Carrara backfaces are treated as frontfaces, so normal direction can be neglected or overlooked (or at least I have been doing so!) When rendering in LUX Render this is critical and I have no excuse not to have spotted it for I met this brutal fact when using meshes as light emitters before, plus the fact that I struggled with the Glass shader not realising the simple solution was checking the normals. As a side: to check the normals, click the 'Hide Backface' option in the Assembly Room under the General TAB.
My apologies, once again - I must be getting old - LOL!
Applying what I've discovered thus far...
For comparison original posted here
You are saving us all huge chunks of life as you share your learning. You have no idea how much these threads are enjoyed and appreciated!
We are all getting old, but these shortcuts you share may mean we actually get some of this stuff done before we are ... too old ...
bravo!
--ms
..a quick word on the Cauchy B value...
IT'S COMPLICATED
Just joking...
But to be 'serious' I would say that a value around 1.2 gives a fairly acceptable effect for most materials.
If you want to push the effect, a ceiling of 4.2 should suffice
that prism-matic refraction/distortion you're getting out of it - very cool.
--ms
Metal2:Further thoughts...
Luxus comes with presets; Aluminum (this should be Aluminium - you can change it in the Lusux.txt file in the usual extensions folder); Amorphous Carbon; Copper, Gold and Silver. However, it is possible to specify your own SOPRA file, which a careful search on-line can procure you. The following are examples of Aluminium amalgates for comparison.
Aluminium
Aluminium Oxide (Palik)
Aluminium Arsenide
Aluminium Arsenide (Temp 626 C)
Aluminium Copper
Aluminium Oxynitride
Aluminium Antimonide
Aluminium Silicon
Aluminium Silicon Titanium
AreaLights
The cube is 5x5x5 and the following table shows the effect of varying sized planes set at a top distance of 12...
Size: 12x12
Size: 6x6
Size: 3x3
Size: 1.5x1.5
Size: 0.75x0.75
Size: 0.375x0.375
IES Files:
Lights can be further affected by IES (a good supply can be found here.)
Size: 3x3
IES: Corelite DIVIDE RECESSD LED 3000K
DRI-WD-1L30-UNV-22-T1-STD
Size: 3x3
IES: Corelite Z3 RECESSD LED 3000K
CCT Z3-WD-1L30-LD5-UNV-22
Size: 3x3
IES: Corelite R3 RECESSD FLUORESCENT
R3-WB-1T8-2X2
NOTE:
A sparce overview of the Rough Glass settings using red as a base in the form of one PDF...
I forgot to mention that the "Depth" parameter listed under LUX Rough Glass is infact 'Cauchy B' - you can change it in the Luxus.txt file in the usual Extensions folder...
..and the result...
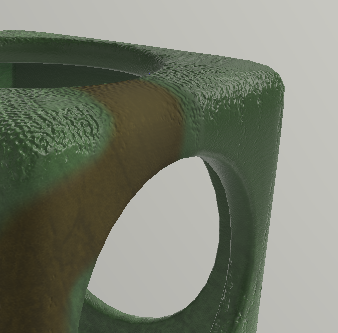
Bump, Displacement and Loop SubD
Bump
Displacement - No SubD
SubD Level 2
NOTE:
Nooooooo!!!
I'm just sharing what I'm discovering - anyone can use this info and make a 'pack' if they so choose. Besides LUXUS for Carrara doesn't interface with LuxCoreRender and a saved .lux file won't run in it either. So I'm probably "flogging a dead horse" as they say.
I did read somewhere that a shadowcatcher was going to be implemented in Luxrender v1.6, but I can't see that it was ever the case. LuxRender via LUXUS for Carrara had (still has) great potential, was not finished, has one or two minor errors (as I've highlighted) and is a lot, lot cheaper than the current favourite (Oc.......)
Thank you so much for your effort! This thread is amazing!!! Your findings are very helpful.
I set up a simple scene to use Luxrender and have found it very quick in rendering on my new rig. But I'm stuck with PBR shader set up. Don't know how to set up roughnes maps – what slot- and what Luxrender material is good for PBR shader set up at all. Any idea? Are you gonig to check it out some day?
Yes, it is abandonedware but very powerful and quick to render photorealistic images. Its' excellent online help is very useful. Much better than LuxCoreRender one. For Carrara users it is a very interesting alternative render engine. I hope more of them will test it and use in their projects.
It's a pity that there is no new Luxus for LuxCoreRender that seems to be a follow up of Luxrender. Maybe some day before everyone will convert to Blender EEVEE.
Hi makma,
Thanks for your comment... I'm certainly going to have a look at getting textures from 3D-Coat over to Carrara and out to LUX Render, but at this stage I don't know enough about the various maps AO, Gloss, Metal, Rough, etc and what they represent to know what to do with them. Feel free to post anything you discover...
INITIAL Experiments with Textures from 3D-Coat
IMAGE 1:
Textured box in 3D-Coat using a gloss and a matt layer (Click on detail to see the big picture!)
IMAGE 2:
Colour and Gloss maps produced and applied to model in Carrara
NOTE:
Simples !
..and
IMAGE 1
Gloss, Colour and Displacement. (Click on detail for the bigger picture!)
IMAGE 2
Maps applied to model in Carrara
NOTE:
hello bonjour selinita
39 tutorial for luxrender from one creator start here
de la part d'un des createur;
la playlist
https://www.youtube.com/playlist?list=PLujxSBD-JXgnGmsn7gEyN28P1DnRZG7qi
son site contient de petite perle
her web page
https://users.cg.tuwien.ac.at/zsolnai/
luxrender s'appelle luxcorerender et est toujours opensource
avec une bonne documentation du moins pour moi
https://luxcorerender.org/download/
Amicalement
@REIVAZ - C'est génial, ce video et le livre en-ligne! Merci encore!!
This video is basically an introduce to a course that may or may not be available, but there's an on-line book (Physically Based Rendering 3rd Edition) that some might find interesting at http://www.pbr-book.org/3ed-2018/contents.html. There are also very interesting videos by this same author, including granular simulations as applied to water, jello (jelly) and making the MonaLisa come alive...
I forgot to mention...
Original posted above
Gloss map inverted
NOTE:
Velvet
This take a long time to render and is prone to fireflies...
NOTE:
Homogeneous volumes
Hi, Selinita!
Thank you for an inspiration. I'm not a scientific mind but to learn Luxrender some systematic approach should help. Below there are a few of my attempts to get to grip with Luxrender PBR materials out of the map sets I've found around.
I put roughness map in roughness slots/channels and additionaly a roughness map in specularity slot. Changing brightness of that map I got different specularity effects. Furhtermore the light source makes a difference so I show you three sets with 0, 50, 100 % of brightness of roughness map in specularity slot below. Sun light, sky2, infinity.
Additonaly I rendered a metalness map in specularity slot with a second trial with inverted color of metalness map. Find the results below.
Not much but helps me to control the PBR materials with maps but numbers. Curious about the other materials in Luxrender. Next discoveries soon, hope.
Hi makma,
You're off to a great start! Thanks for sharing your findings - I like the metalness tests
Hi Selinita,
Thank you.
A glossy coated is the material I'm after, I see. With base material maps only: diffuse, hight-map in bump slot, metalness in specularity slot, IOR 1,3 (not sure is that necessary).
I can use roughness map instead for metalness but the result is different (left) and inverting it makes the material almost metallic (right)
And "flogging dead horse” again? No, The „horse” is still alive and happy to gallop. To me it gives me a perfect opportunity to learn more on unbiased rendering and the only method to get .exr file from Carrara so far.
My old file of candles project has come handy to learn area lights, glossy transparency and glass materials. Is seems to be OK. Took about 2 hours of rendering time. Unfortunately I couldn't set up path tracer for quick rendering the caustics. So I used a bidir engine thus eliminating the GPU rendering at all. The second picture is in real resolution.
On blenderartist site they discussed the best rendering engine for caustics with high appreciation on LuxRender caustics capacity. Curious to find out what it is in real I set up a simple scene to render caustics in Carrara. The result is below. With higher number of both eye and light rays.