Daz 3D is part of 
Connect
DAZ Productions, Inc.
7533 S Center View Ct #4664
West Jordan, UT 84084
Licensing Agreement | Terms of Service | Privacy Policy | EULA
© 2026 Daz Productions Inc. All Rights Reserved.
Comments
Lego noir!! luv it
i was browsing Boris Vallejo art images, it's overriding my regularly sheduled mental rainbows,
had another look at the samples in 1st post to recalibrate my mind to noir mode.
fixated a bit on the savage noir image.
gotta love lego... except when you stand on it!
Holy Bat Blast!
@DesertDude, great modeling! Although I'm not familiar with this genre, I really like your model.
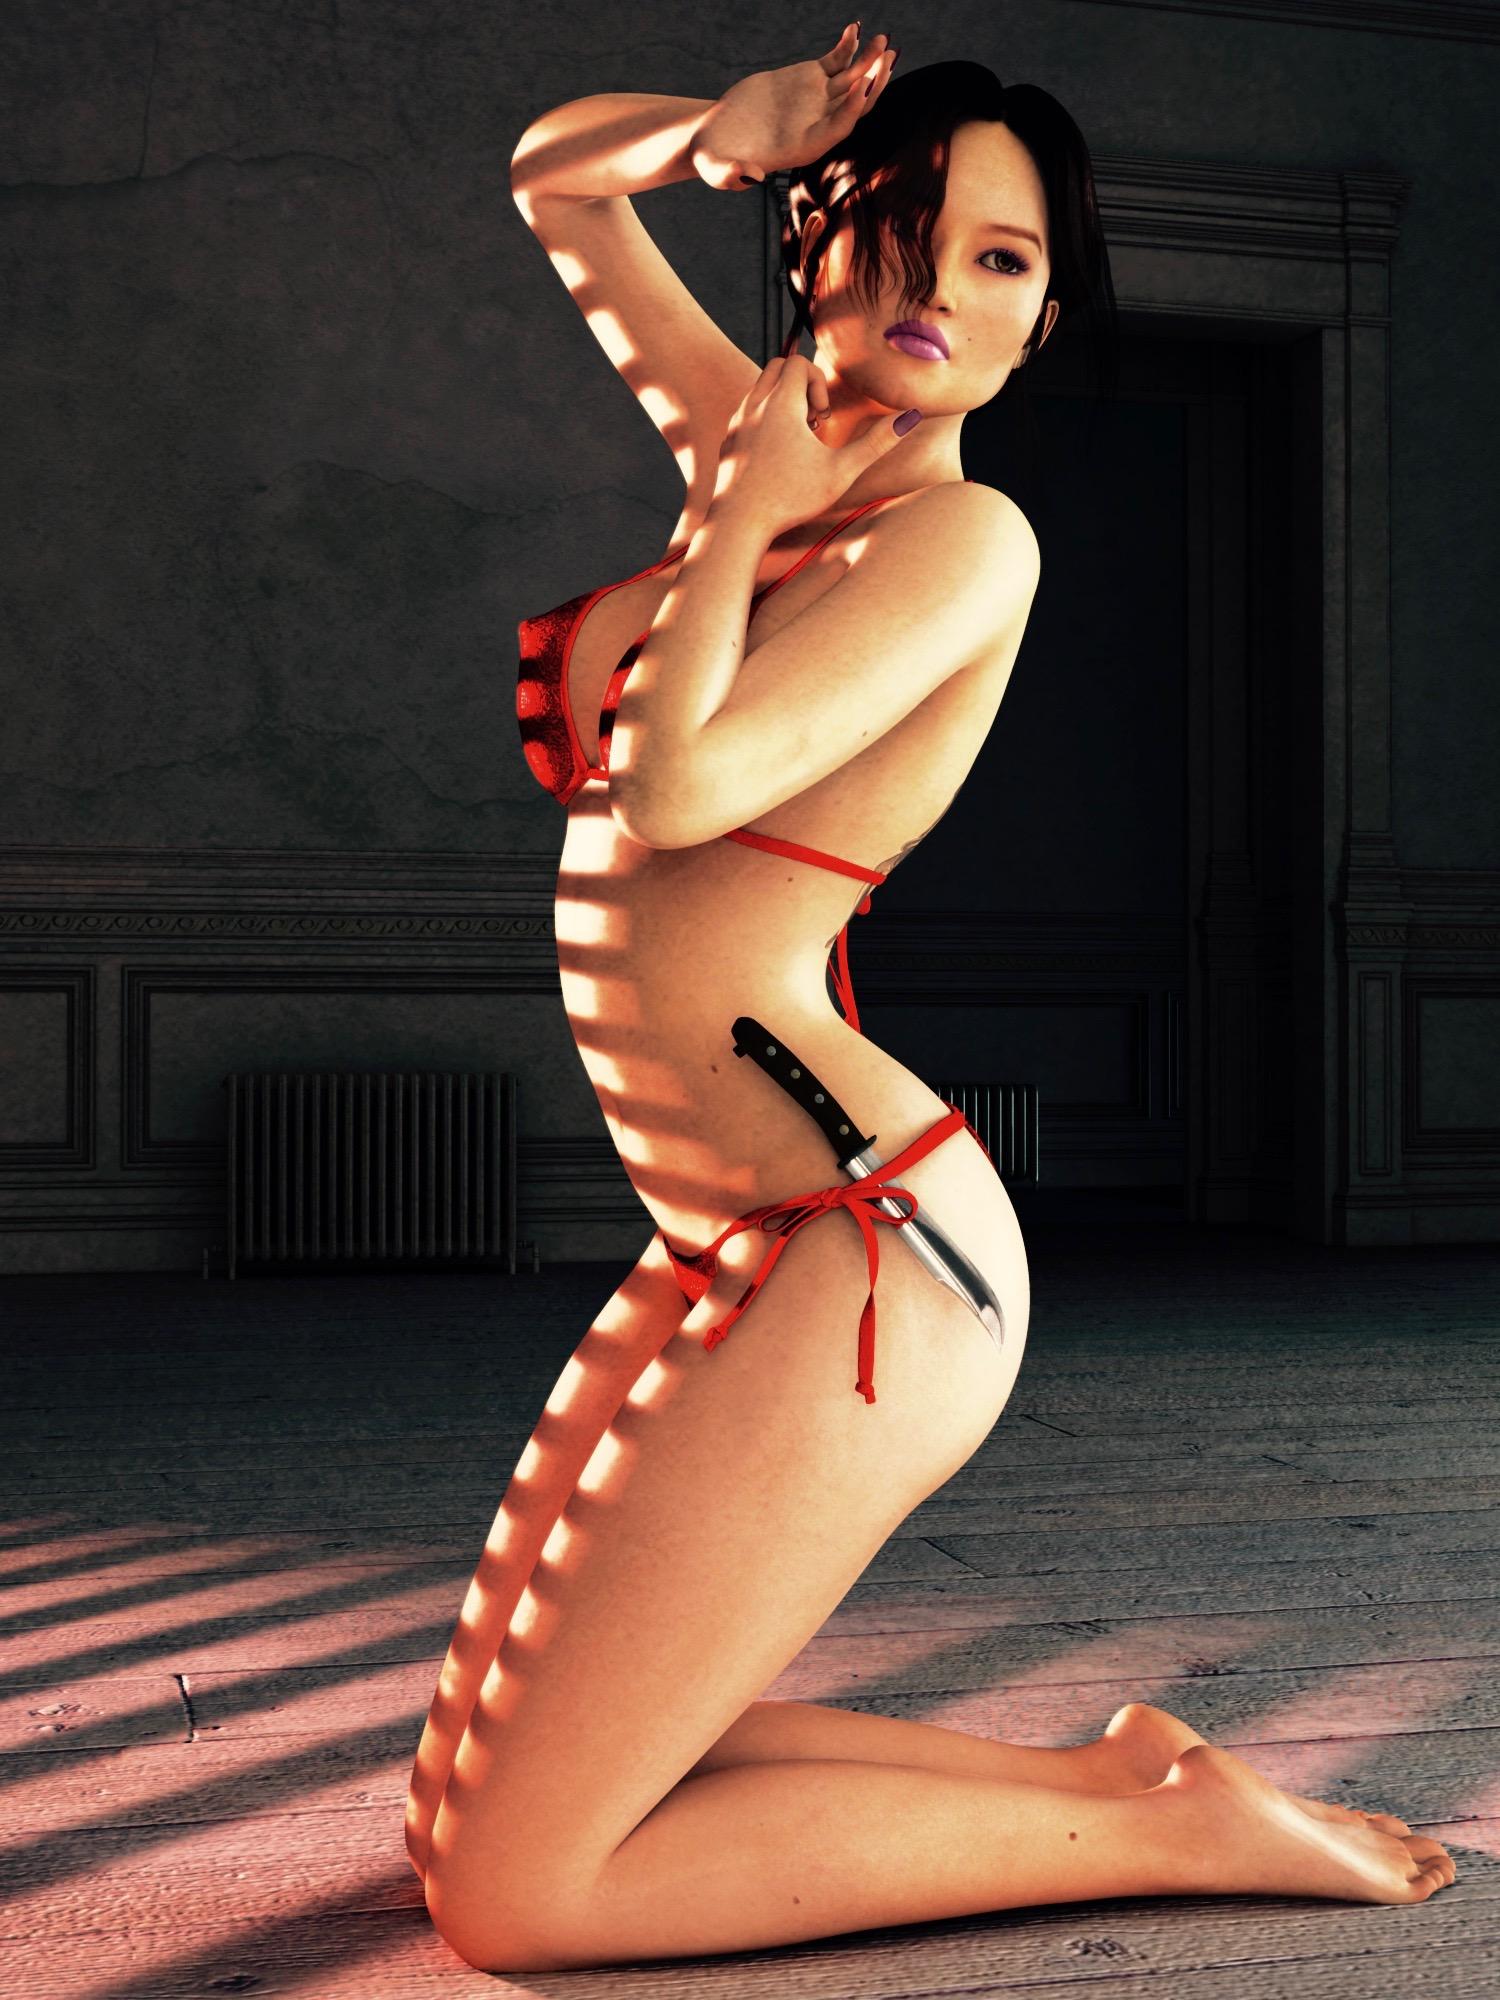
Very nice work everybody! I'm still wading through the posts, but there is a lot of great information in there. My first attempt will be a pin-up style render. I have had C8.5, but haven't really worked with the Gen figures or their included textures. I decided to work on that angle and the lighting. Like some people, I found the blinds function under the light gel effect to be problematic for what I wanted to do, so I made my own gel/image map in Affinity Photo. I wanted soft shadows, so I blurred the gel. I wanted the lights to showcase the texture work I did, so the light with the gel is high intensity and set to the rear a bit to highlight the skin surface. I will post my scene and light set-up later.
I used a knife, because with all that is happening in the world, I am hesitant to glorify guns.
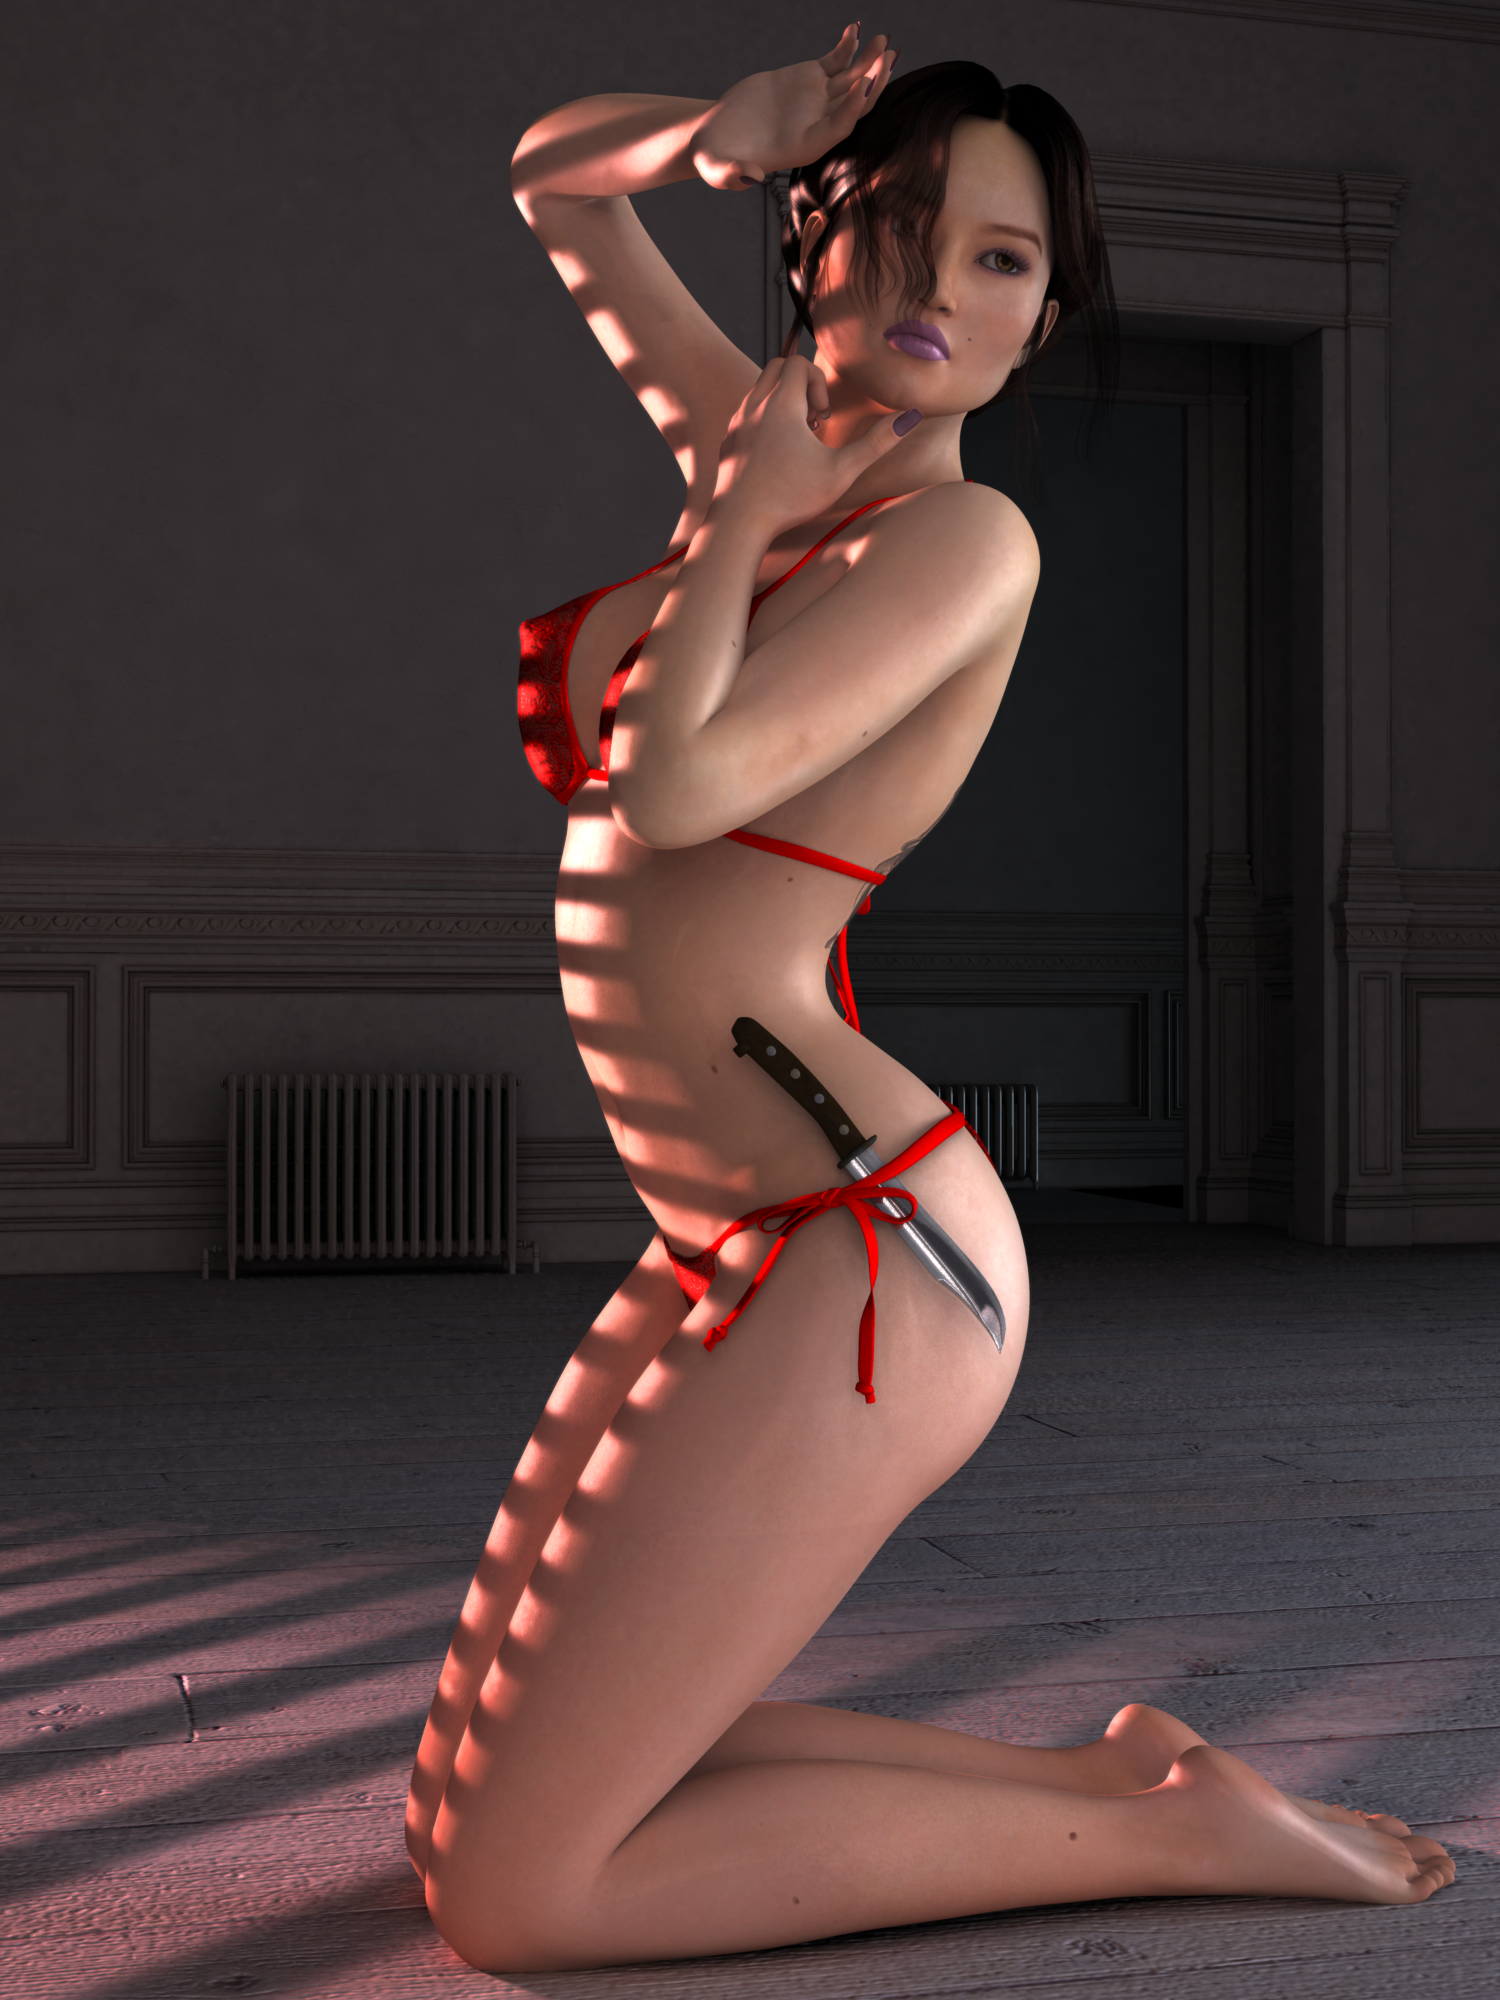
This is a rare one, in that I used pretty much all pre-made content. However, I did do a lot of texture and lighting work. This is straight out of Carrara with no postwork. I will be doing some on it, to enhance the "nior" feel, although I love the color pop on the reds and the light, so I won't go black and white with this one.
I do have another idea that will uitilize more original content.
.
there's radiators?..... oh yes, there they are
.
@Vyusur - thank you for the nice words. I'm also not familiar with the genre, but looking at all the examples on the web makes me smile - it seems one can make a caricature of any person, yet still conform to a rigid universal model. Don't know if that makes sense...
@evilproducer - wow! First, great to see you here, and second, what a great render 'out of the box' Carrara. Hope to see more of what you have in store for us.
@Selina - thank you, yes something brewing here. Every time I make a quick sketch it looks awful from what I see in my minds eye, so I think I just need to assemble a bunch of assets and move the camera around and relax.
@Stezza - okay, I give up. :)
Not at all. Critiques are useful and welcome. In this case though, I'm done with the image except for the postwork I want to do. Using full GI is a rarity for me, and I wanted to see how my computer handled it time wise vs. visual payback. It took awhile to render so I am not inclined to do another of the same subject.
Next on the agenda is using postwork to grunge up and age the image.
.
Making a camera-prop.
Hopefully I will be able to find time to enter in something this time.
Using my old Minolta camera as a reference.
.
Two variations of my Hero ..
Using GMIC filter Black&White and Pencil.
NIce. Going back to your method of rendering using absorption to create a black ans white image (overly simplified), have you tried caustics and a red, blue, and green light? If you have three spotlights in exactly the same spot, oriented the exact same way, then set them to pure red, pure blue, and pure green, you will get a white light. Now, shine that light rig through an object with refraction and enable caustics in the render room, and it will split the light into a rainbow, similar to a prism. Use a single white spot, and it will not split. It is not 100% physically accurate, but it simulates it well enough. Do not use gamma correction.
So, here's my lighting and scene set-up:
I set up my figure first. I will detail the shading work on her in another post.
I knew I needed a room for reflected light and for reflections. I wanted a room to suggest a faded opulence, like an old building built in an formerly prosperous area or time. But now, fallen into decay, on its way to becoming a ghetto. I kit-bashed the Rural Chateau, and added a couple vertex walls with "windows" because the ones that were included with the set wasn't what I wanted.
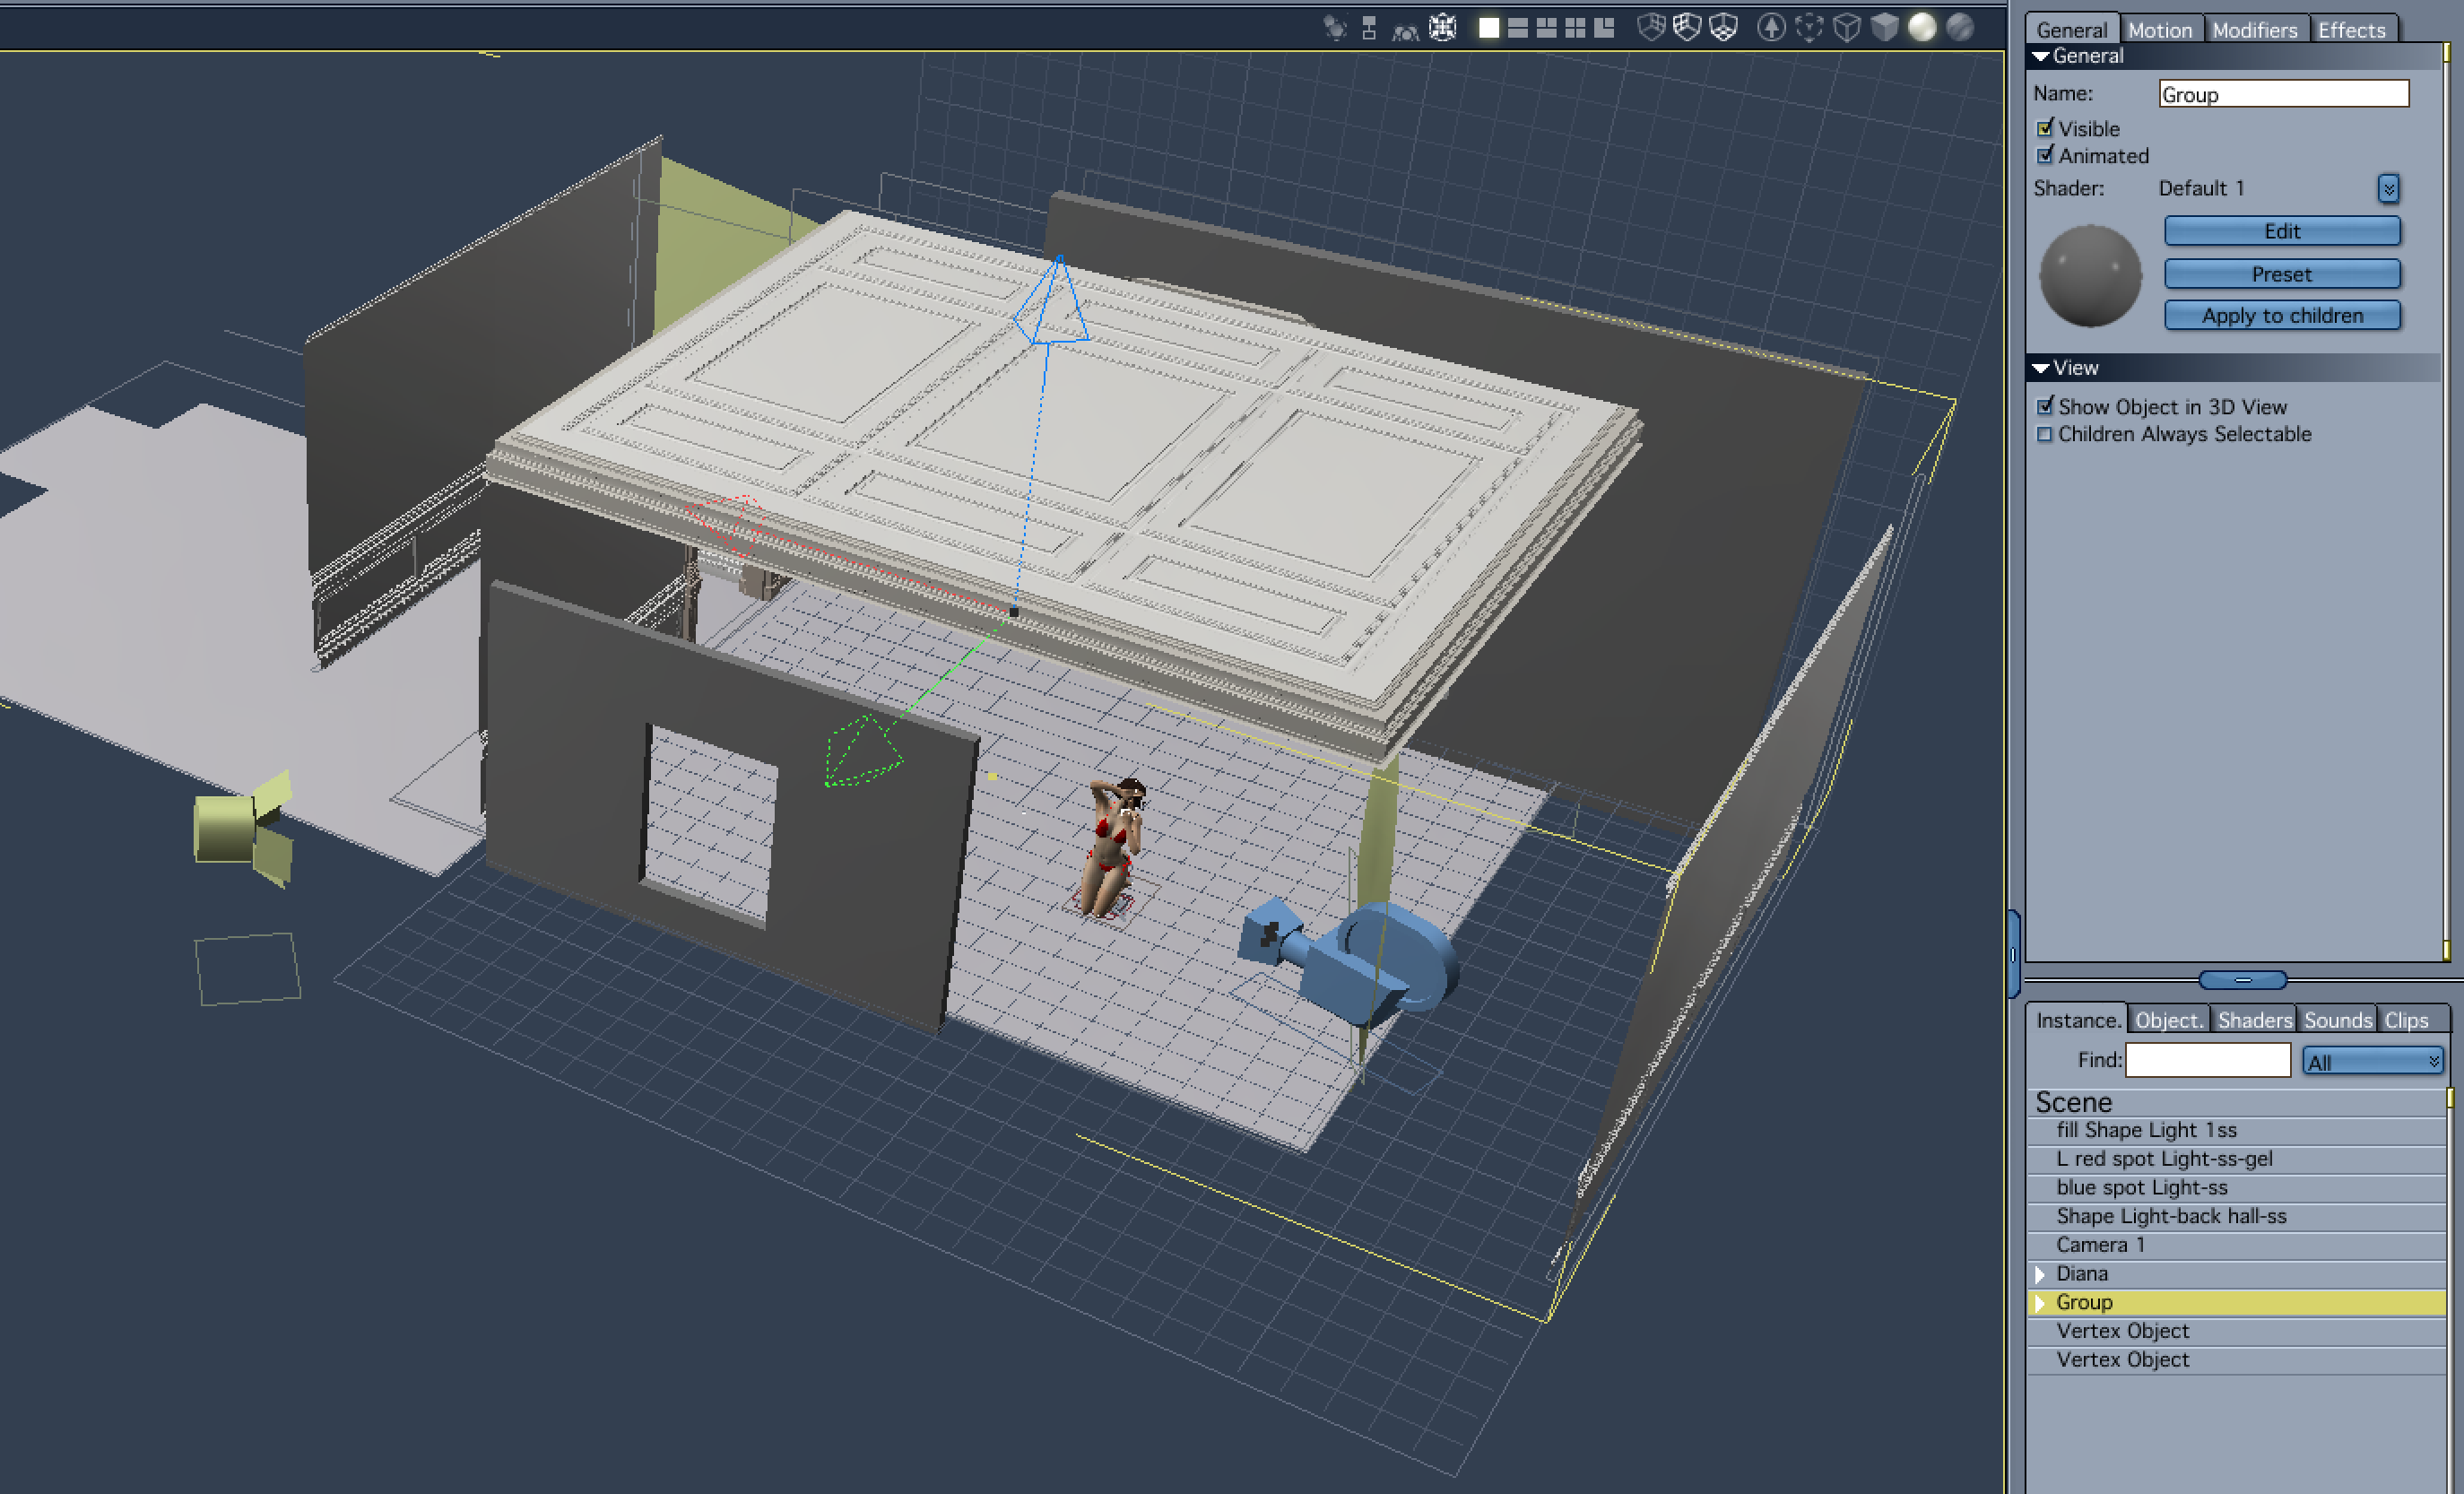
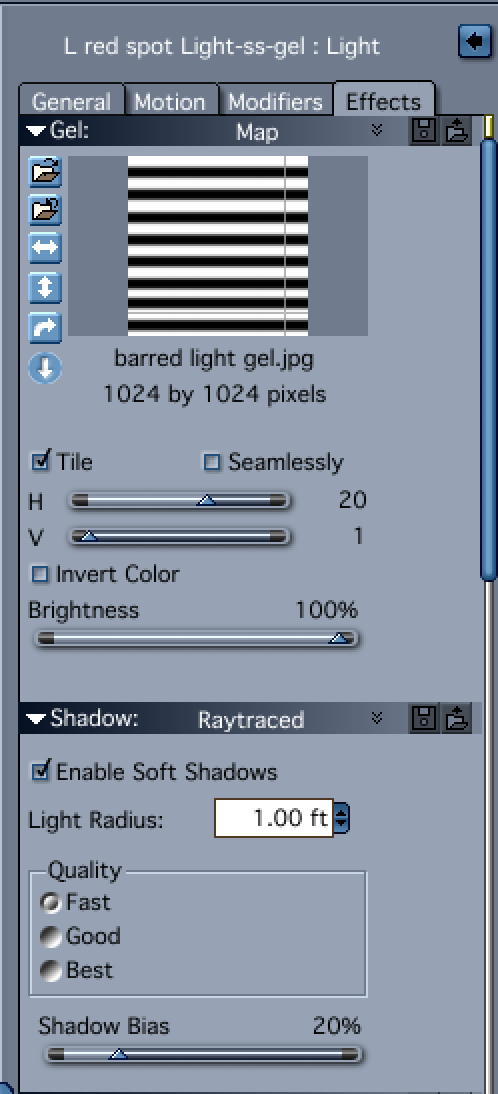
I was having problems getting the blinds I wanted using the effect under the effects tab, so I made my own alternating solid black and solid white bars in Affinity Photo. I then blurred them quite bit so I would have an effect that worked with the light's soft shadows. I tiled it around twenty times.
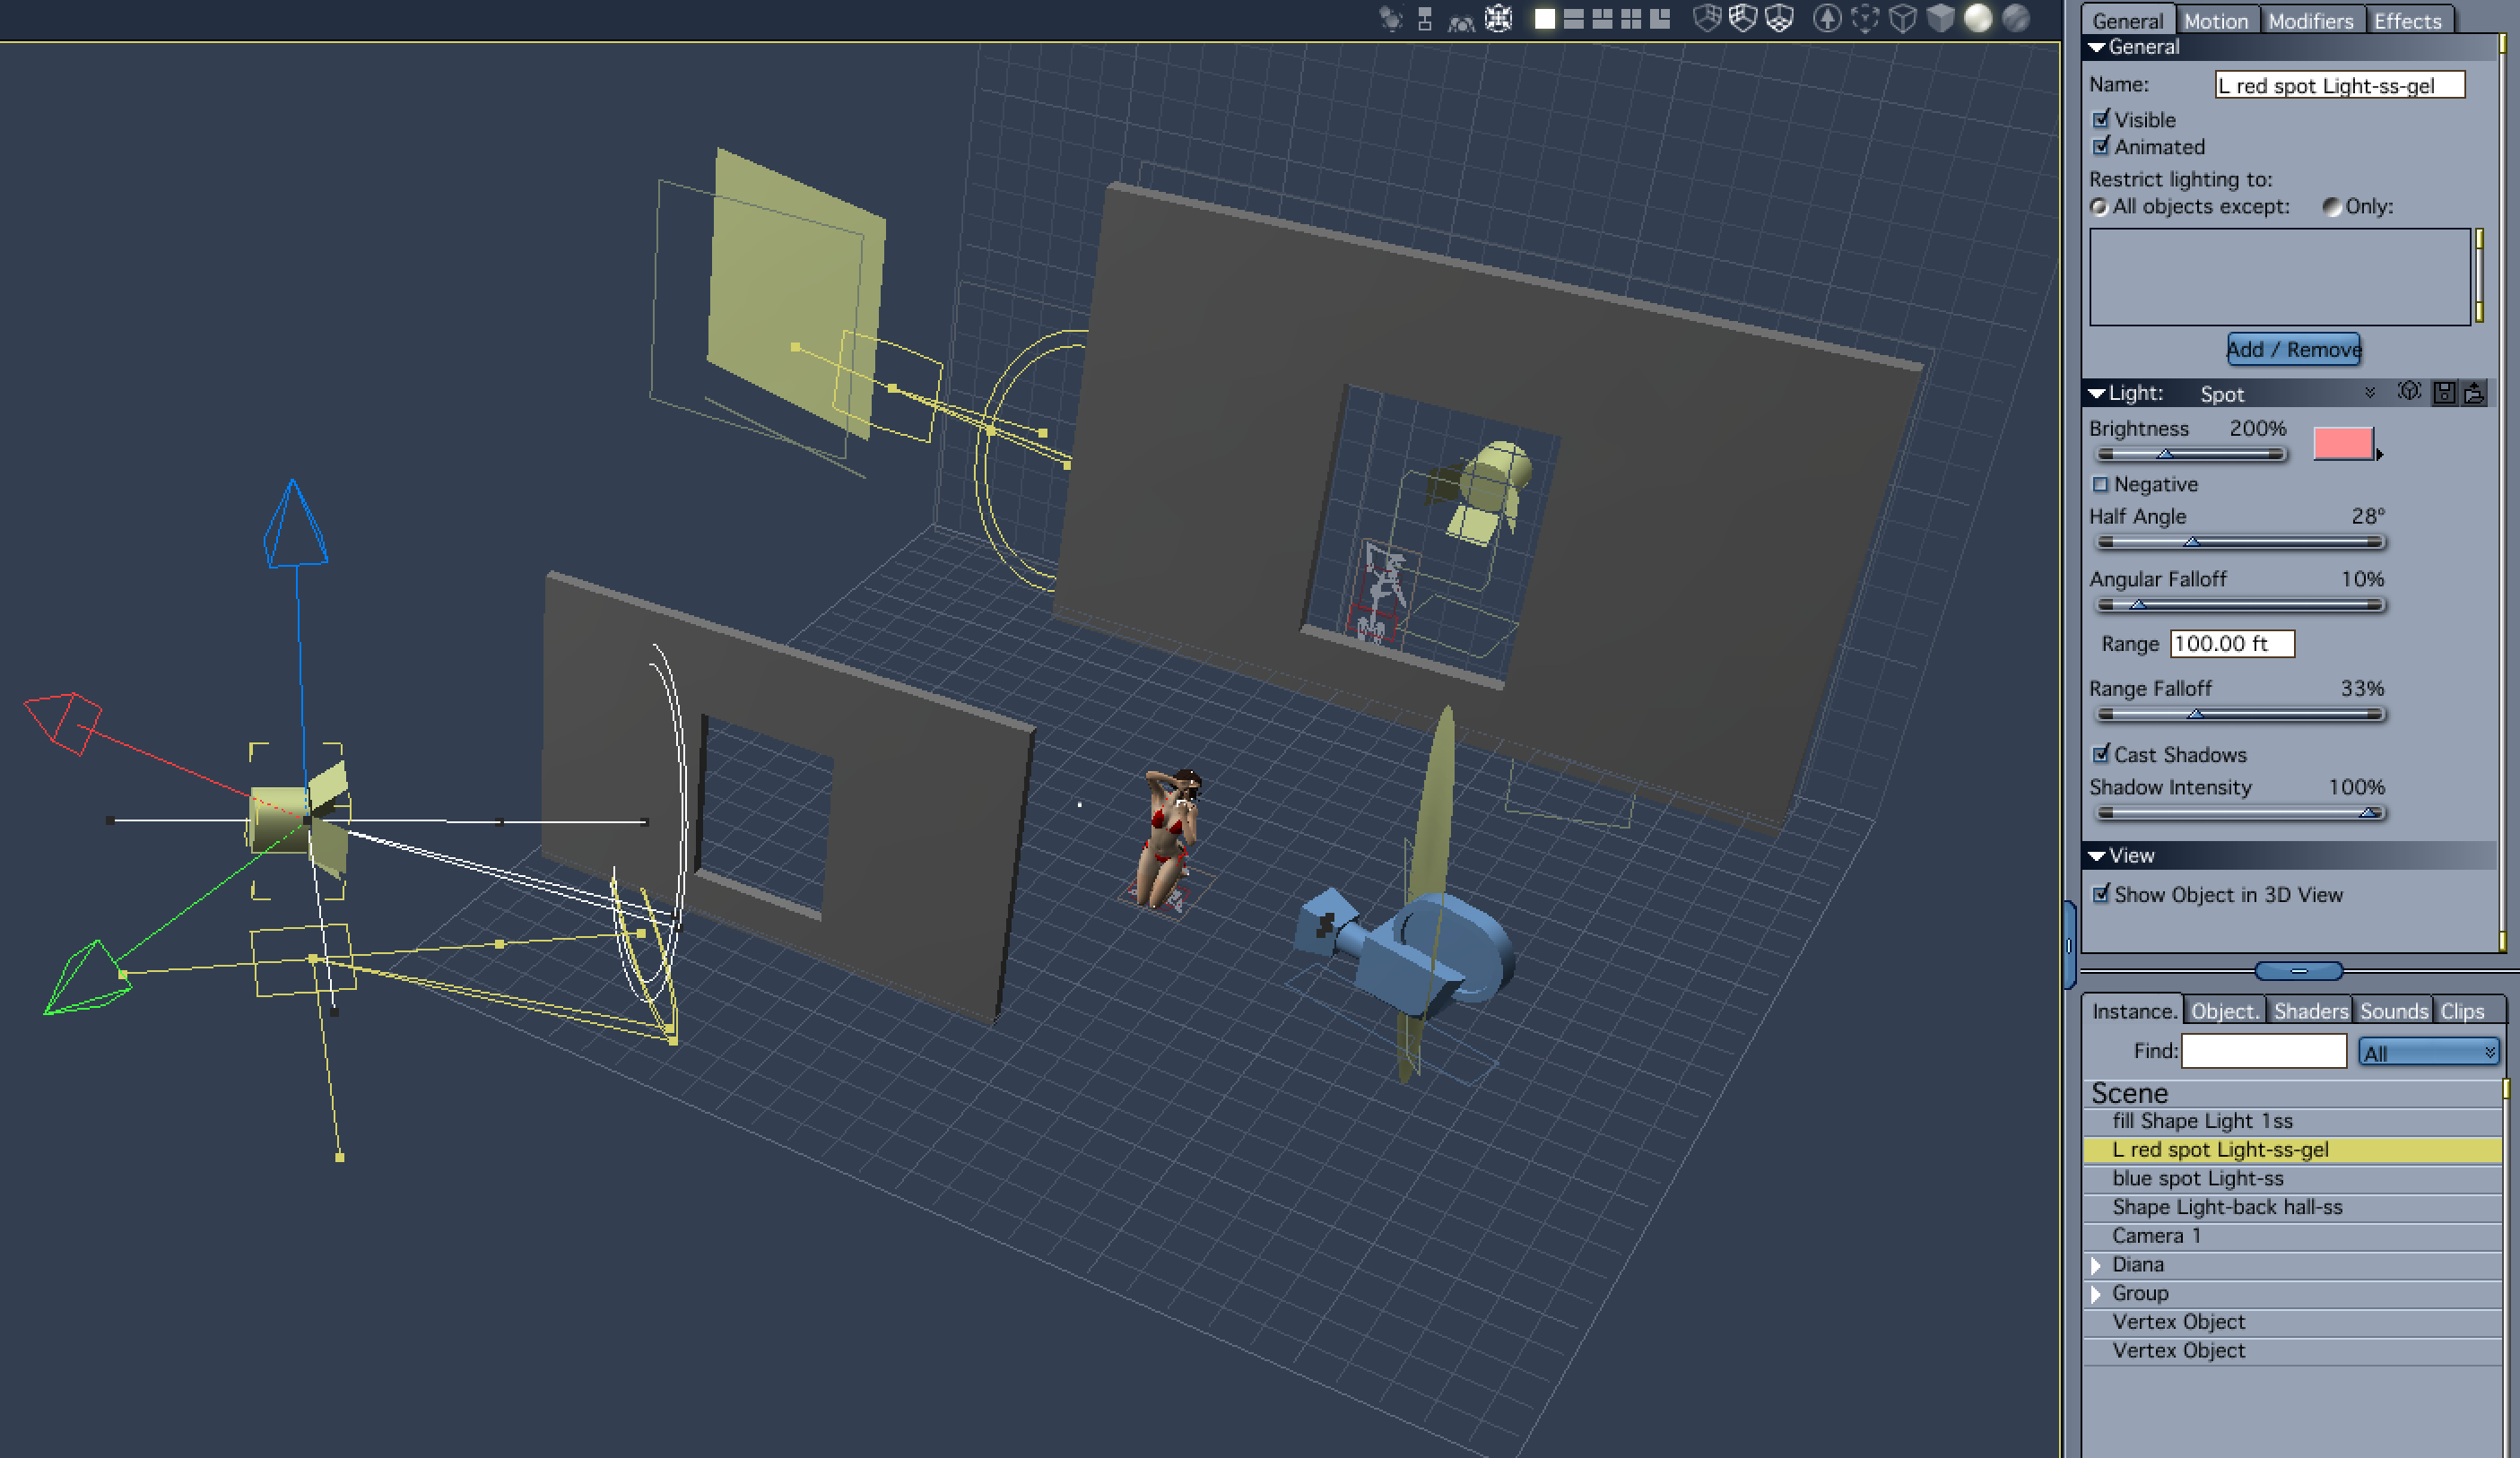
I set the brightness of the light very high and placed it at an oblique angle to shine across the skin and highlight the shader work and also the figure's musculature. I shown the light through one of the "windows" so that it was framed. The falloff and the soft shadows help to sell the effect of maybe a garrish neon sigh showing through a window with open blinds.
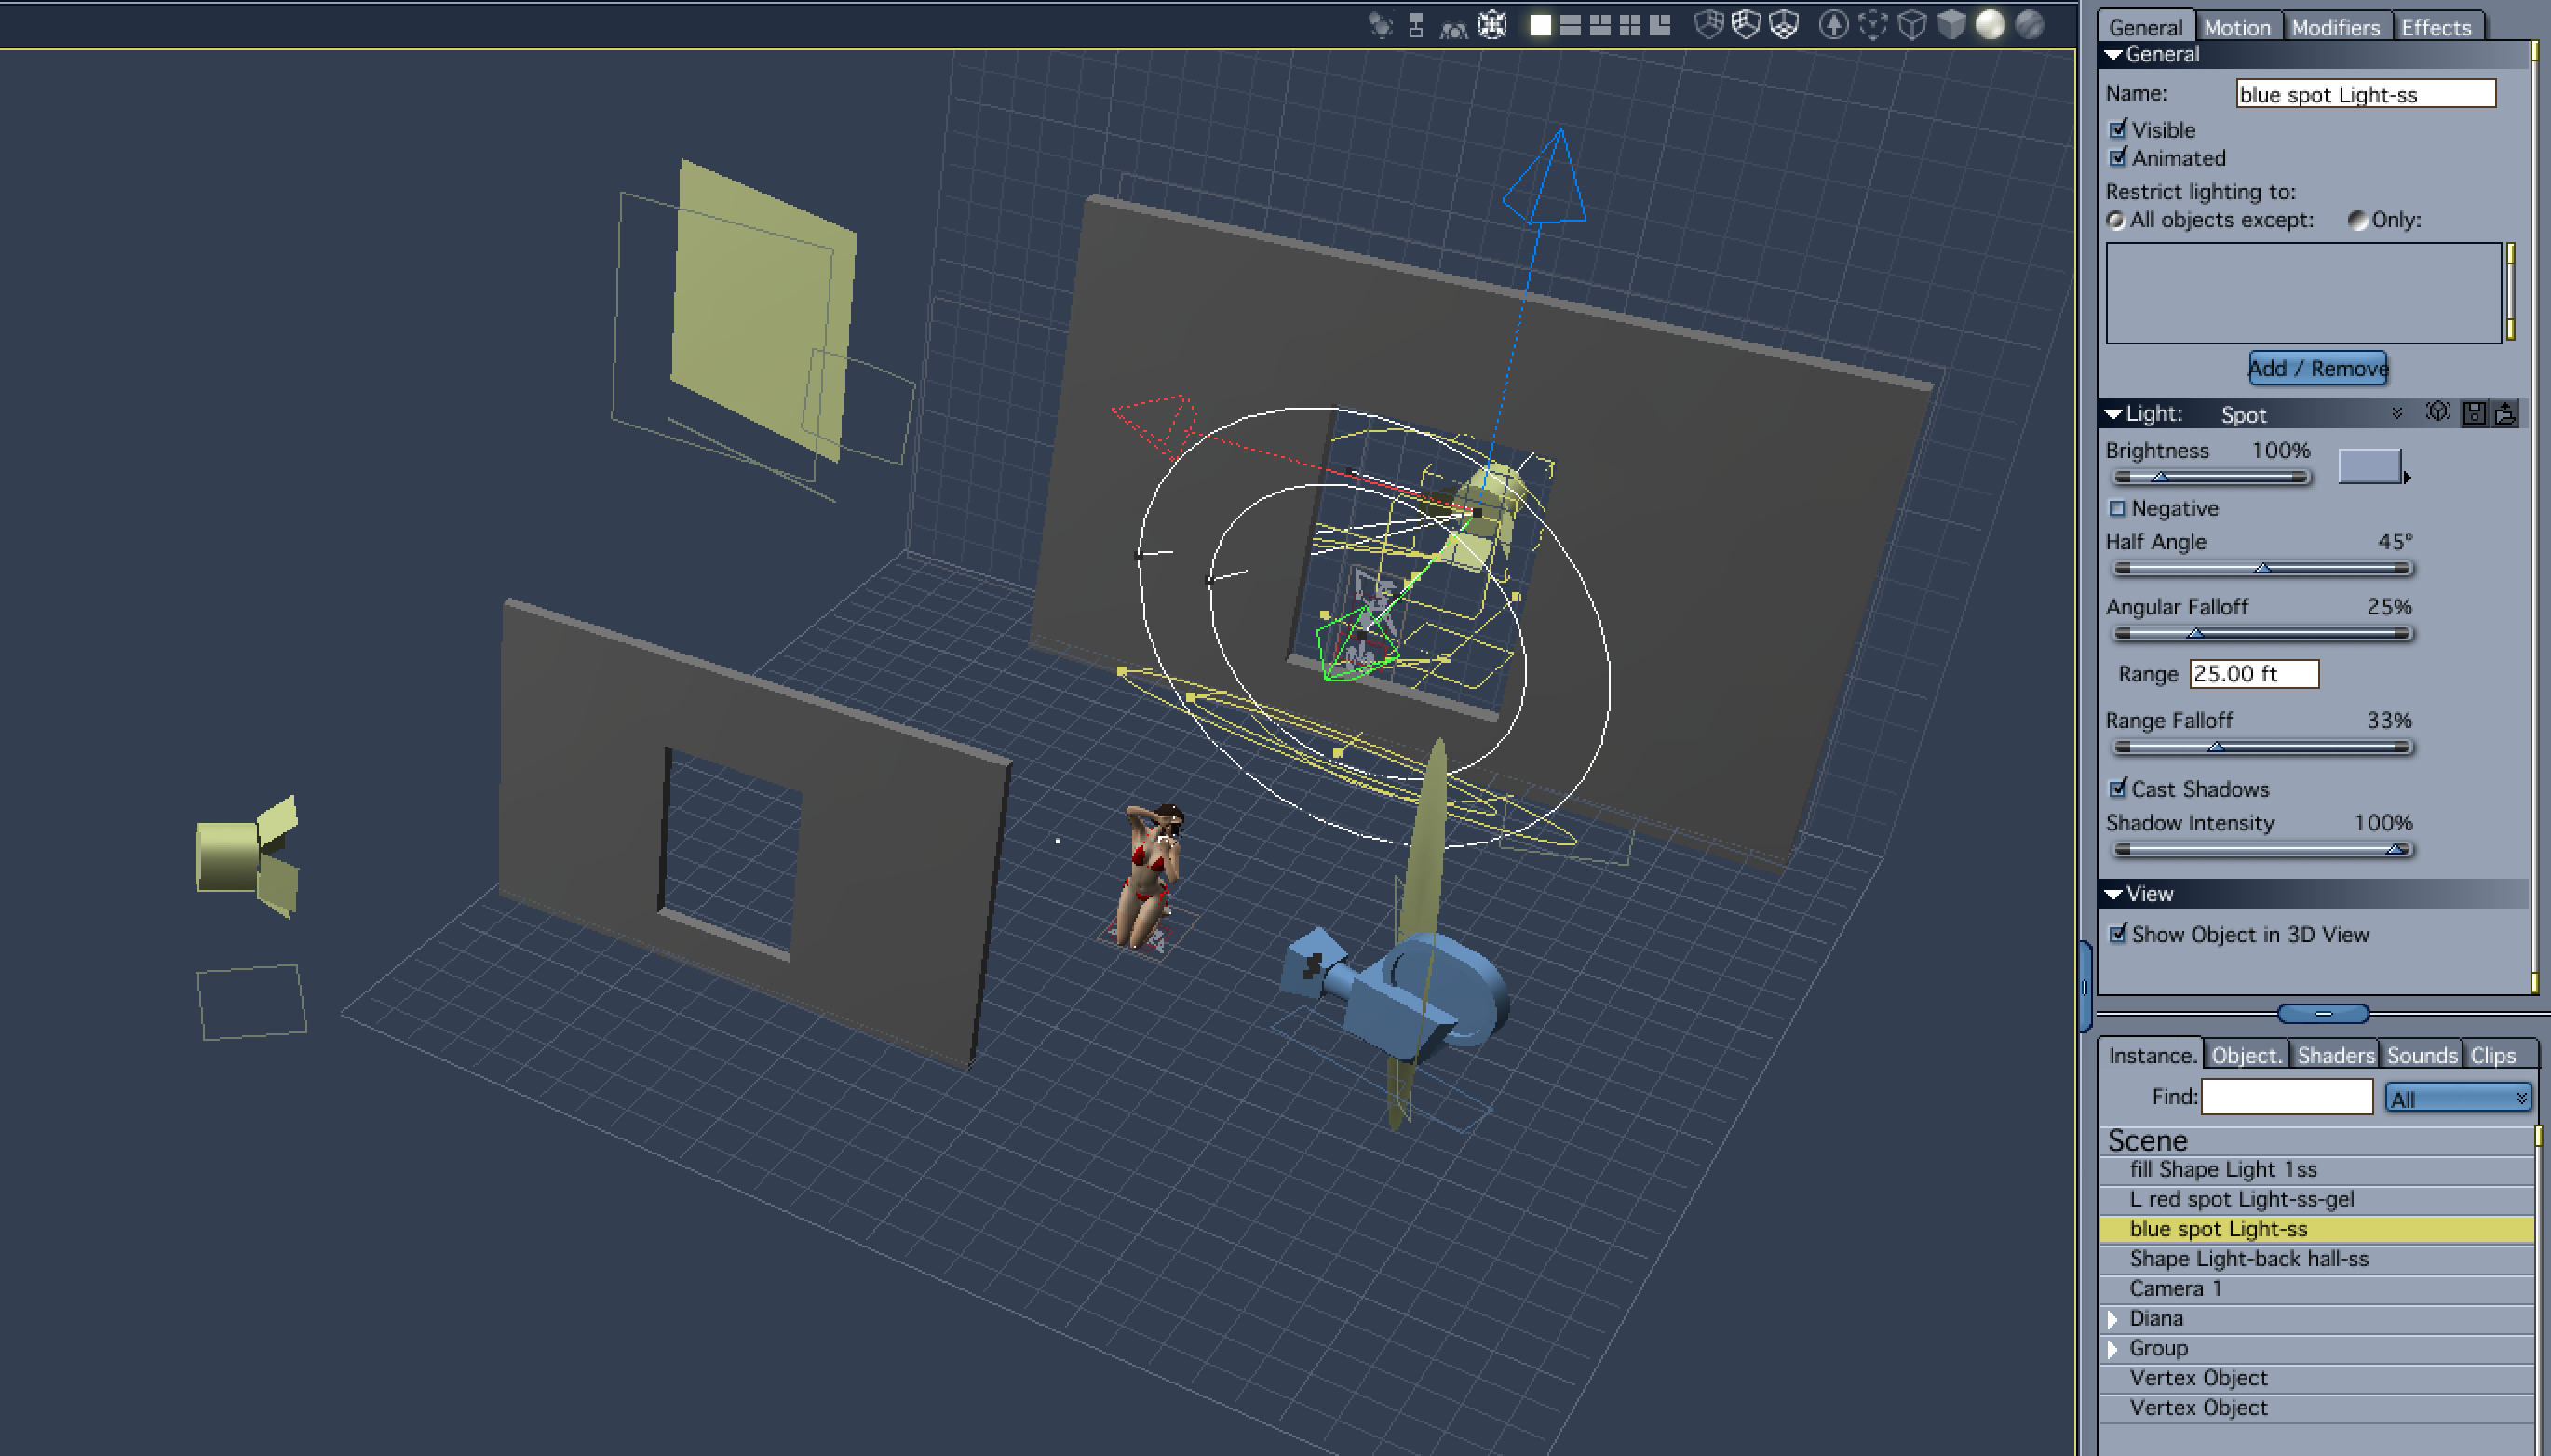
I set up another spot light with a cooler blue color as a counter point to the red light. This is supposed to suggest night lighting coming in from another window on the opposit side of the room. I also wanted it framed by one of my "windows." Framing the two lights lke that, also helped me control where and how intense the reflected light from the Indirect lighting would be.
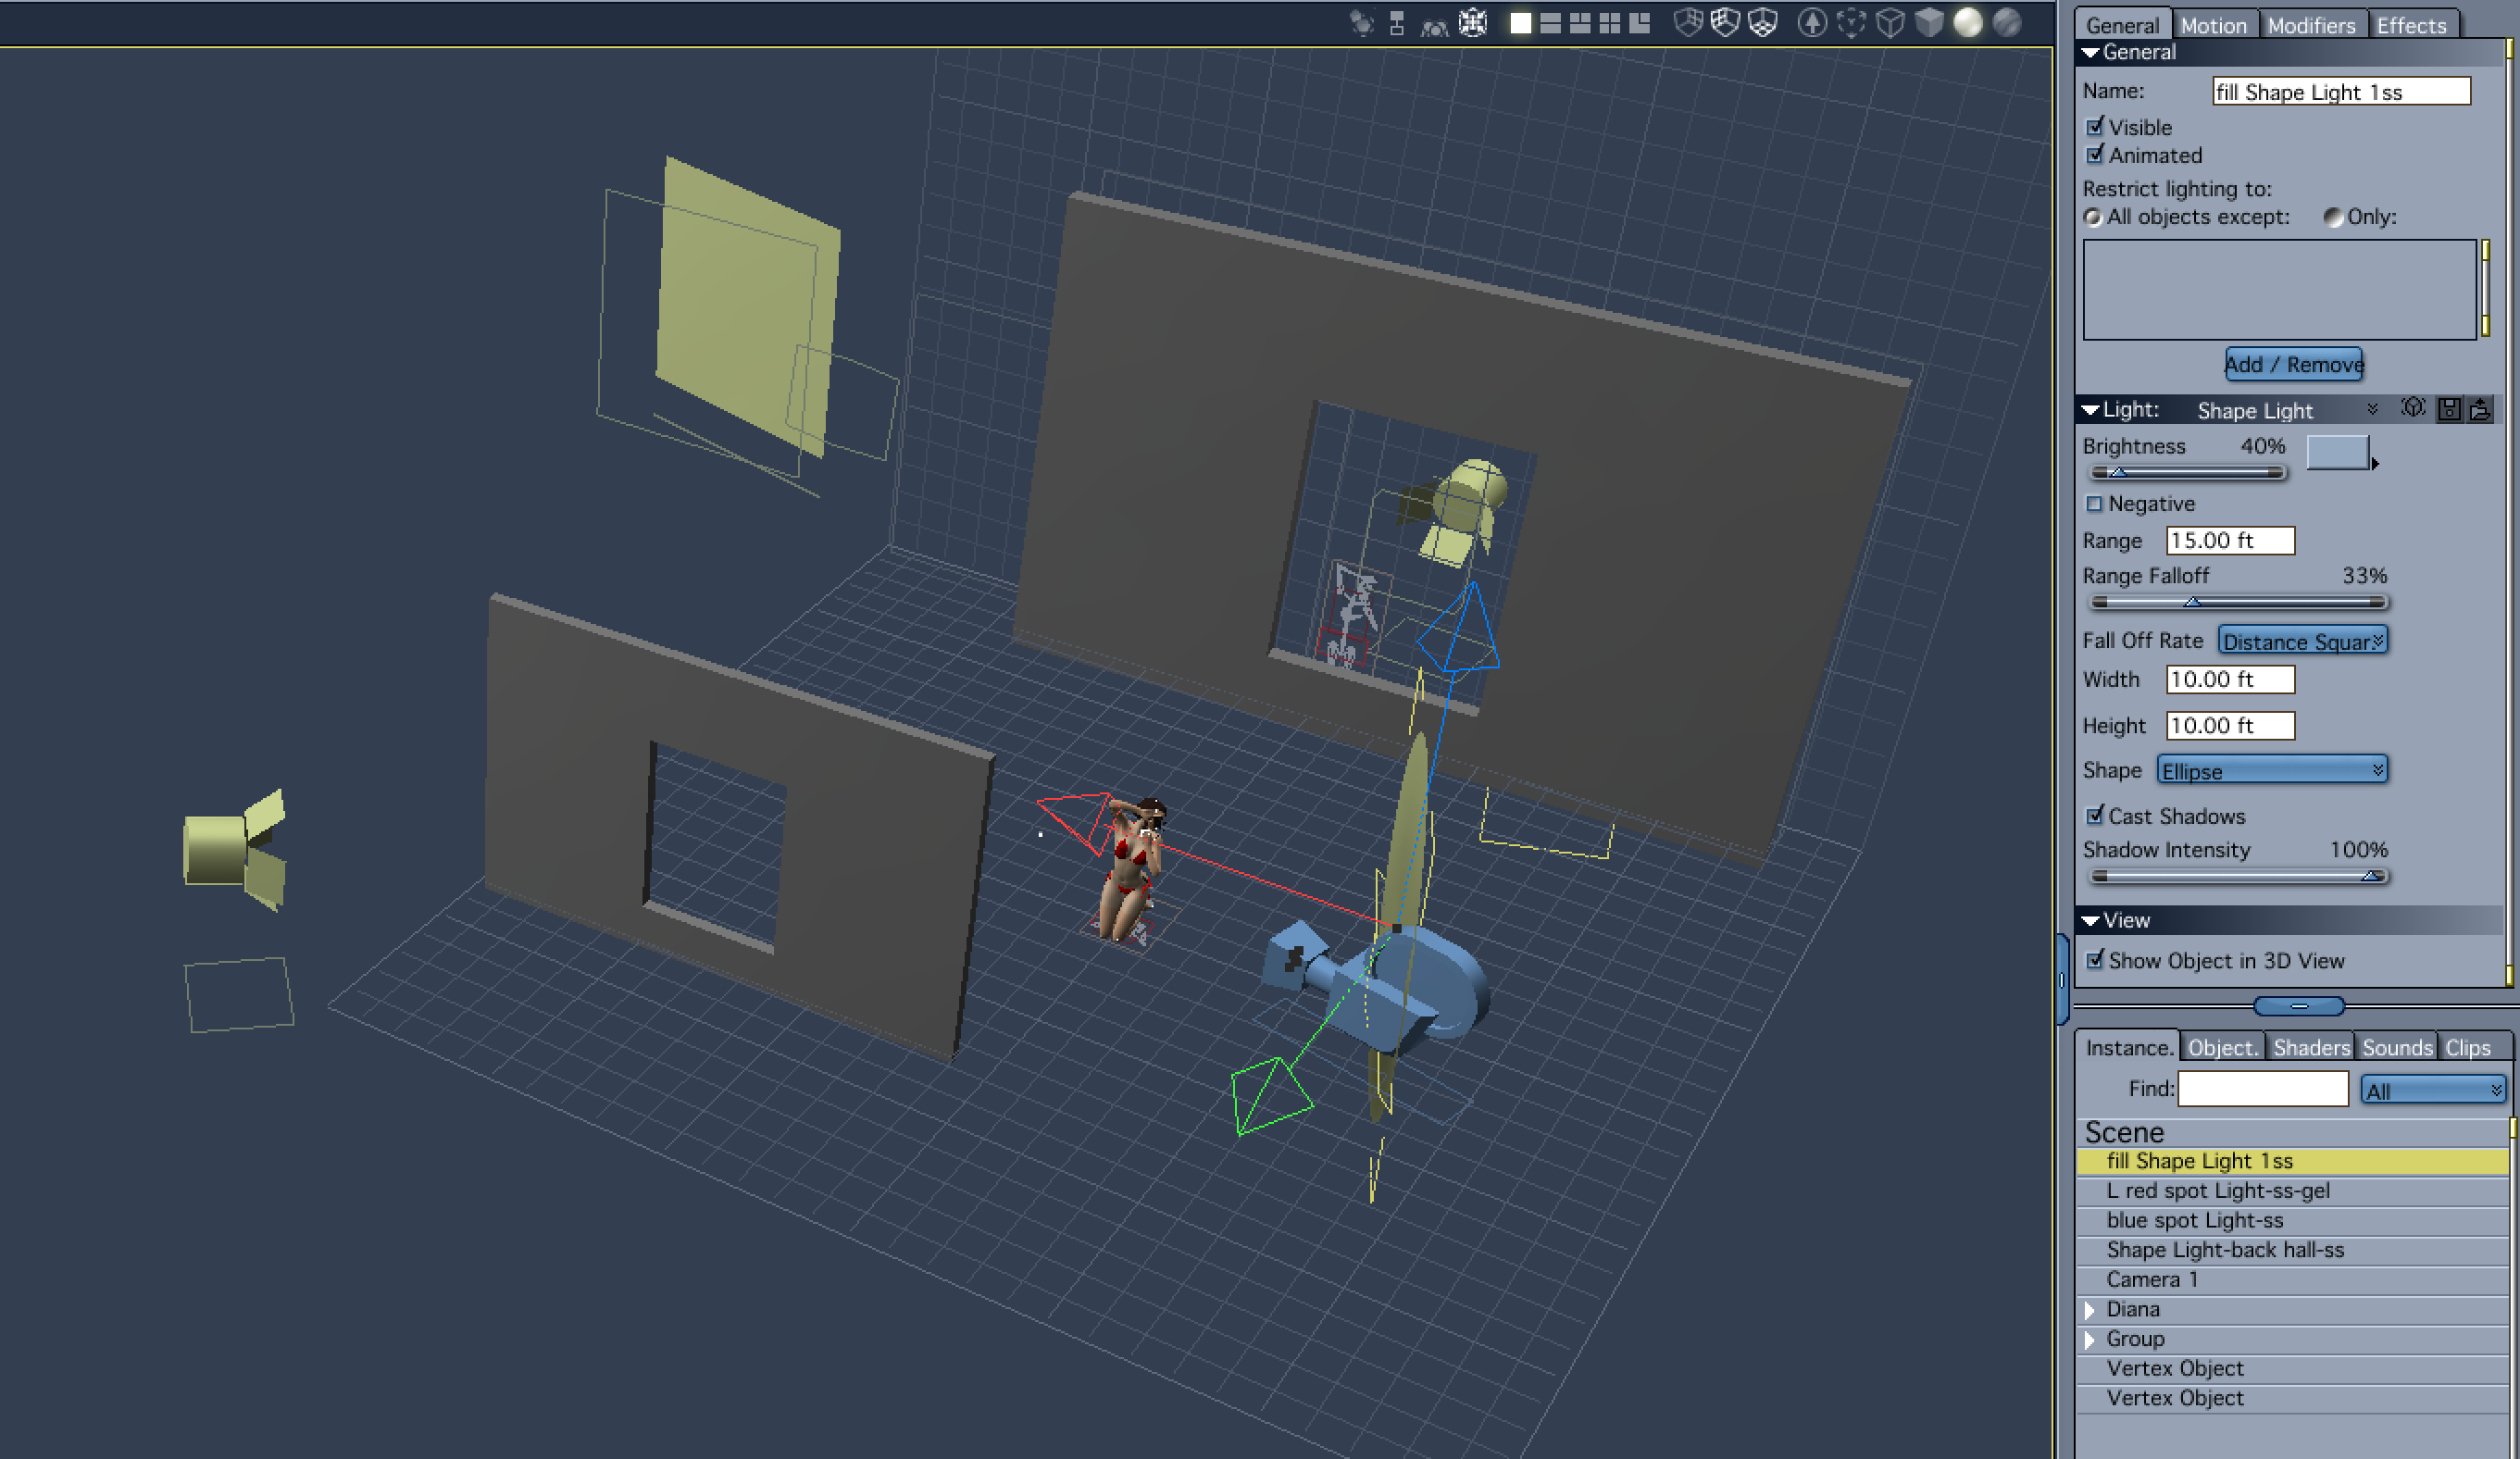
My next light was basically a fill light and aimed more or less directly at the model. It was set at a much lower intensity than the other lights. It also has a fairly strong distance fall-off. Also, since it is a shape light, I could use distance squared for the falloff.
My final light is a very low intensity shape light meant to provide a little illumination to the back hallway.
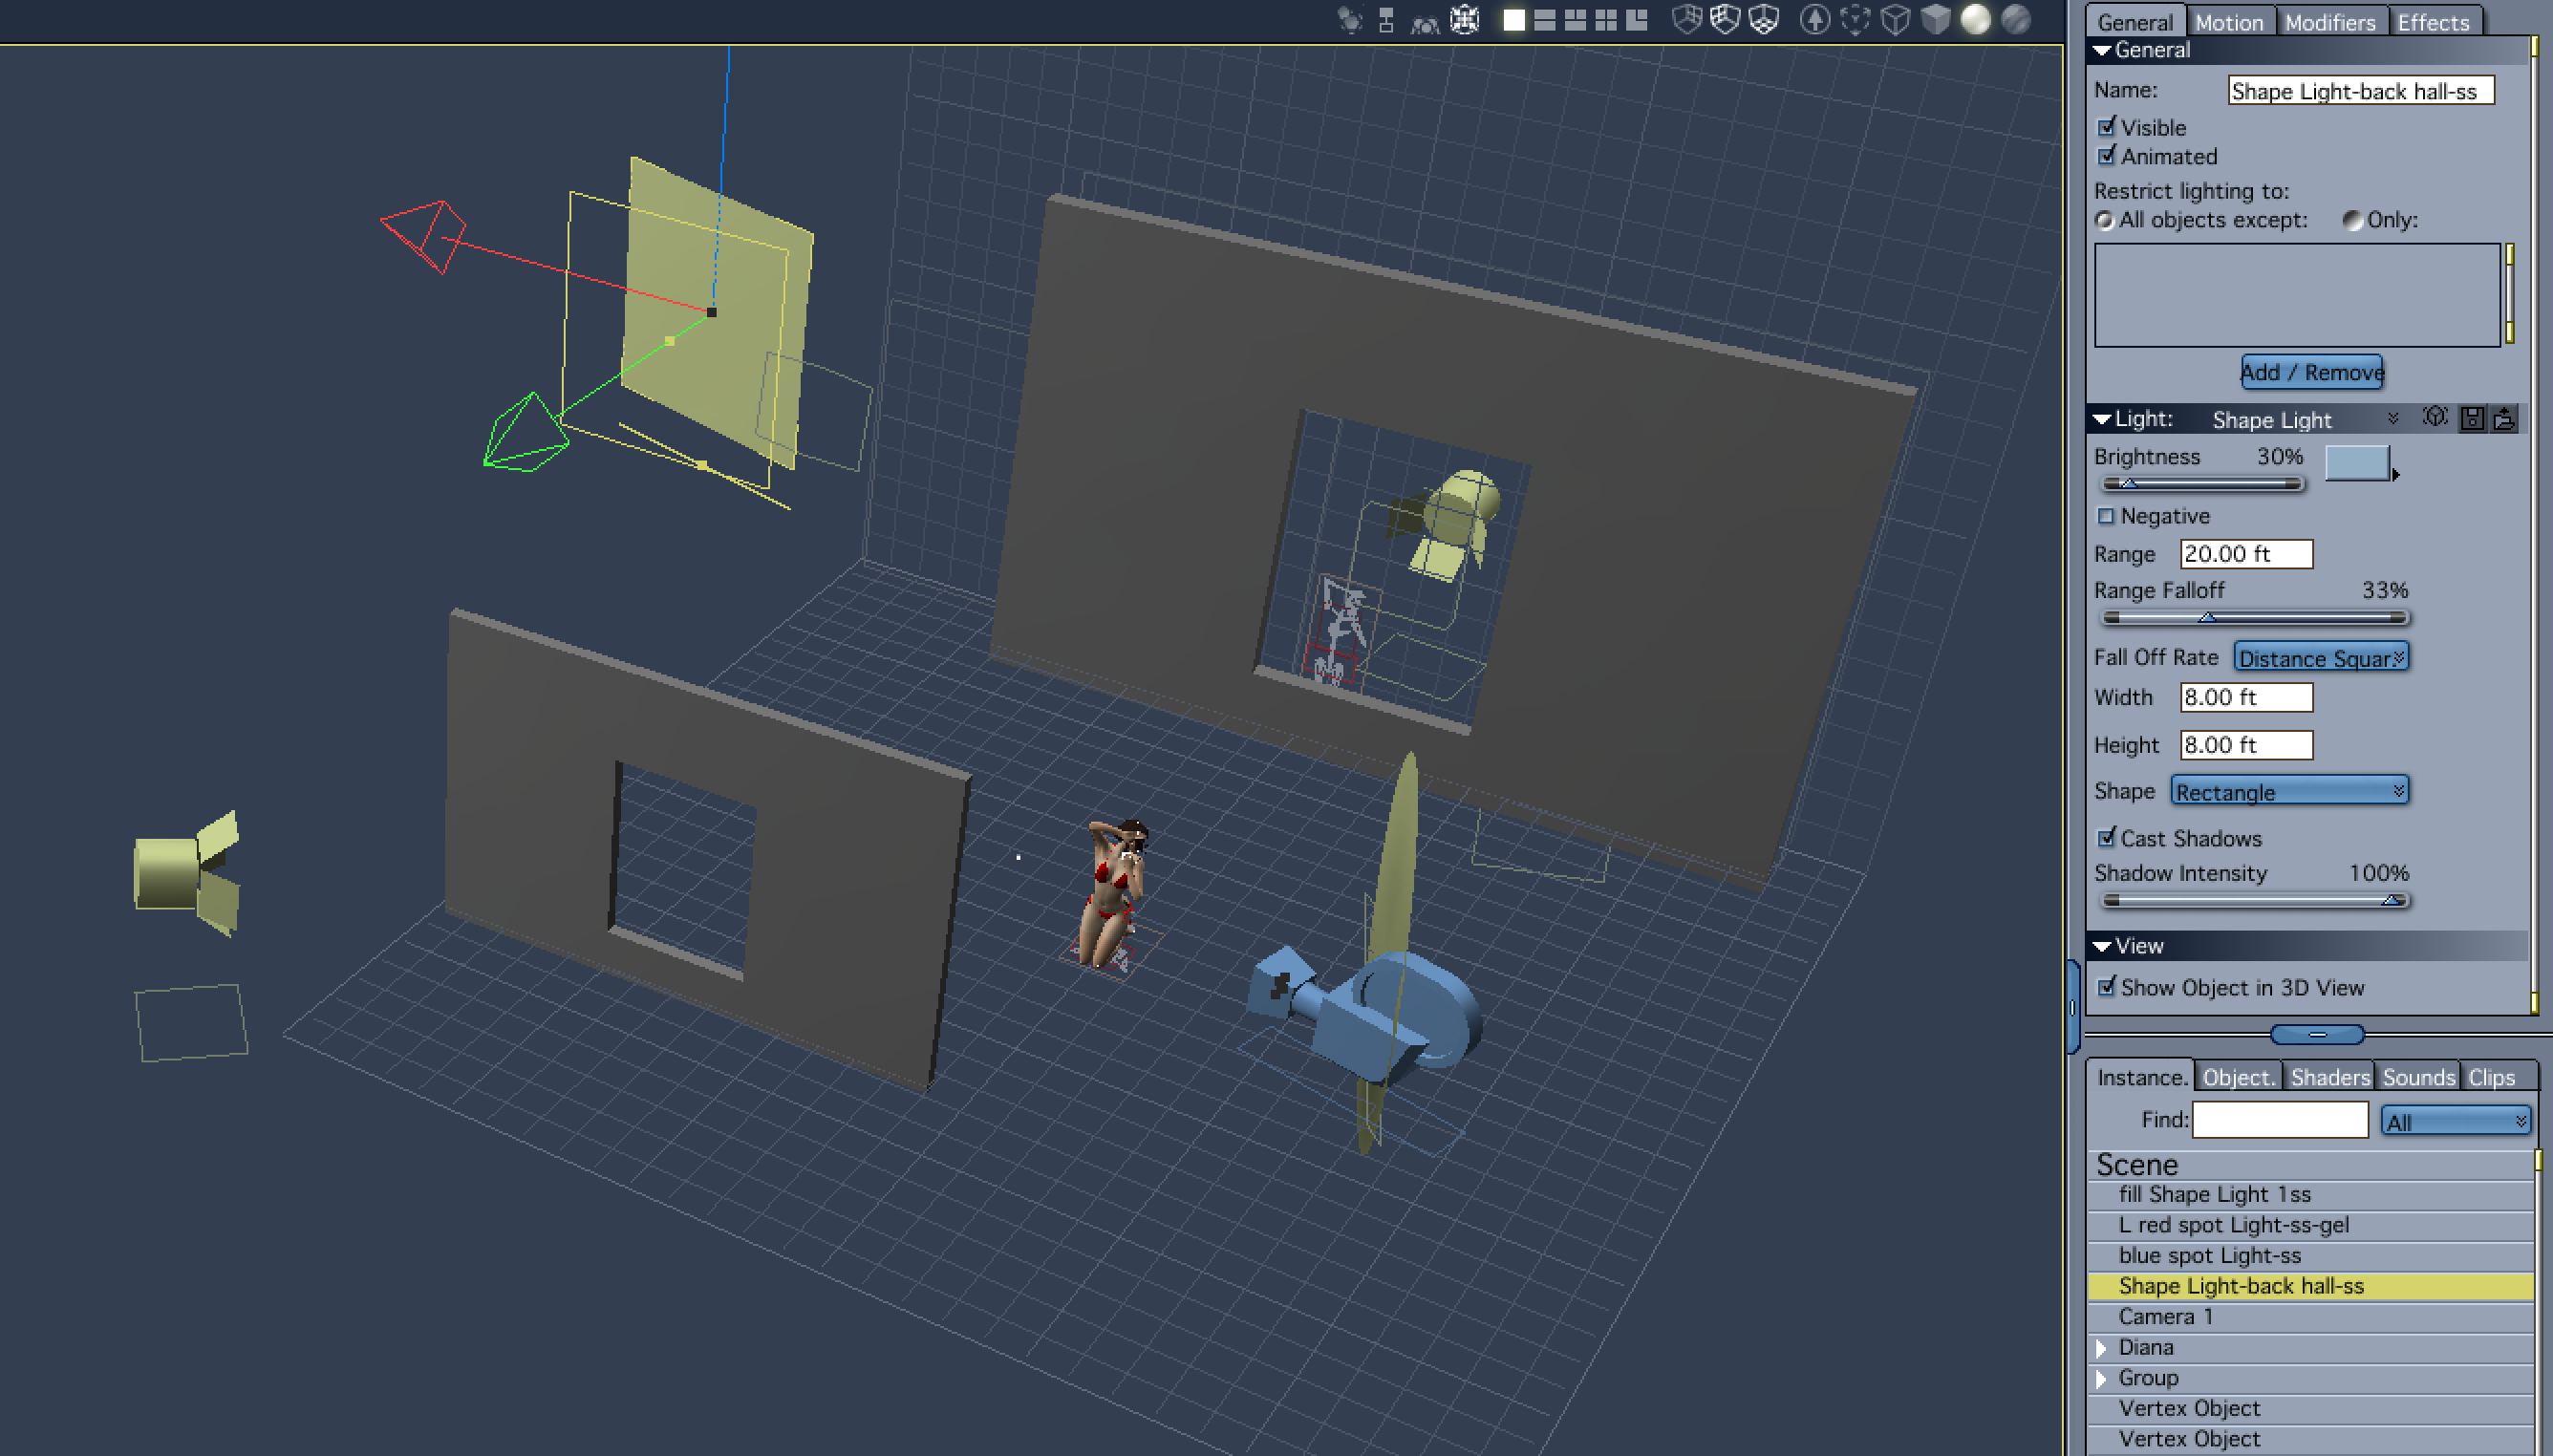
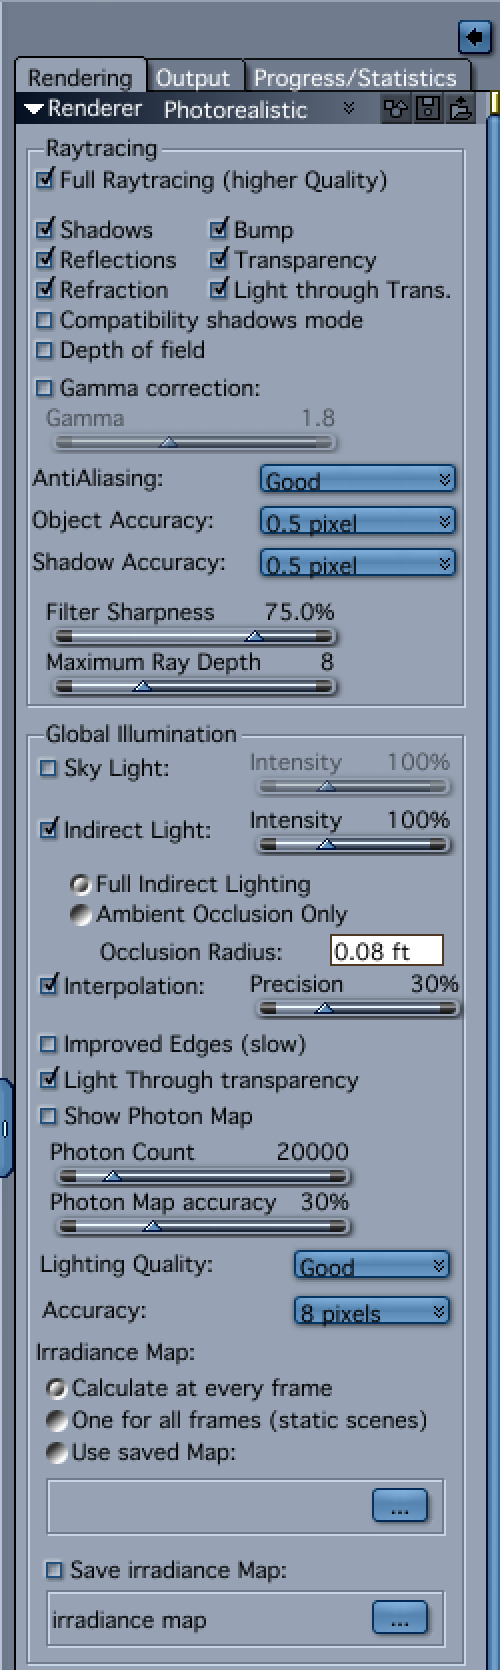
Indirect Lighting did the rest.
So, here's a couple postworked versions.
The first version is an oversaturated version I wanted to look like an old transfer print.

The second is an attempt to make it lool like an old tinted photo.
superb work here from everyone,.
Selina,. glad to see you're getting into shaders,.
One nice thing that Carrara can do for you.
,.. if you make a plane,. create a procedural shader,. apply the shader to the plane and export it as an OBJ,. Carrara can "convert the procedural shader to a texture map".
just delete the plane.Obj and Mtl files after export,., and drop the exported shader image into your textures library.
for example,. creating gel's for lights,. like the venician blinds,.
use a mixer of a scanline or wires,. blended with a Tile (see pic)
the "curve filter" operator is really useful to clamp the values, or control the repeat of gradients.
you can use that to adjust the space between the blinds.
thanks. never noticed curve filter before.
wuh oh entry thread opened. i bettah get krakken!!
Portrait category - how about the femme fatale's ex husband? - not an entry
Wanted to try some caustics with the glass, liquid, and ice cubes. G2M with Air Defender turtleneck and jacket.
Hair modeled in the dynamic hair modeler on a custom hair cap. Cigarette and other props modeled in the vertex modeler.
B&W is a result of the GMIC film filter, using the Kodak TMax 3200 preset.
Some postwork in Photoshop elements to reduce brightness and increase contrast, which I guess could also have been done with GMIC filters.
My cable TV and internet service is knocked out, so I have to go out to get internet access until it gets fixed. Holiday here in the States so no luck scheduling an appointment.
Worst customer service, ever! They actually hung up on me. No, I was not ranting or otherwise rude when it happened.
Simple 3 point lighting setup.
wip 1
the charmed hair went on Janette like a charm.
heaven sent projected no fuss, but then i havent activated any body morphs
next steps
try to simulate a breeze on the hair
do a gel i'm happy with
mebbe add a couple Aikos
fix the ground
eek almost 1am, shoulda been asleep an hour ago doh
@Varsel that looks pretty cool - both of them
EP great wips ... great radiators
@selina c'mon.... catch up .. great animation examples.. @diomede that's one creepy looking dude!
Misty... this is coming along nicely.. I like your thought processes.
Card Shark
used gels, replicators for the munnies the building render from earlier images.. recycling
and Ron's brushes.
@Mistara, nice picture! Your girl reminds me of Mylene Farmer.
.
Excellent work by everyone !!!!!!
Homage to Blade Runner
Carrara setup
Raw render
Post work
.
@Bunyip02, very touching picture, and characters are with obvious likeness. The only thing I lack in your picture is a bright dramatic rim light (with soft shadows of course).
@Bunyip02, are you using shadow buffers on your lights or maybe less than 100% shadow intensity? I like the concept, it is pretty cool. Blade Runner is the perfect mix of sci-fi and nior. To me, the lighting is flat and the open mouth on the Rutger Hauer inspired character looks like his mouth is lit from within- a telltale sign of using a shadow buffer. Take a look at the picture of Rutger Hauer you posted, and you will see a rim light on the right side of his head, and a light source coming in from the left that illuminates maybe 3/4 of his face. The rest is in deep shadows. Keep in mind the scene layout you have is different, so what works for the reference image may not work for yours. The idea though, is to provide seperation from the background.
Not much time tonight. I have to go to a meeting with my theatre group to plan a theatre workshop at one of our local libraries later in the month.
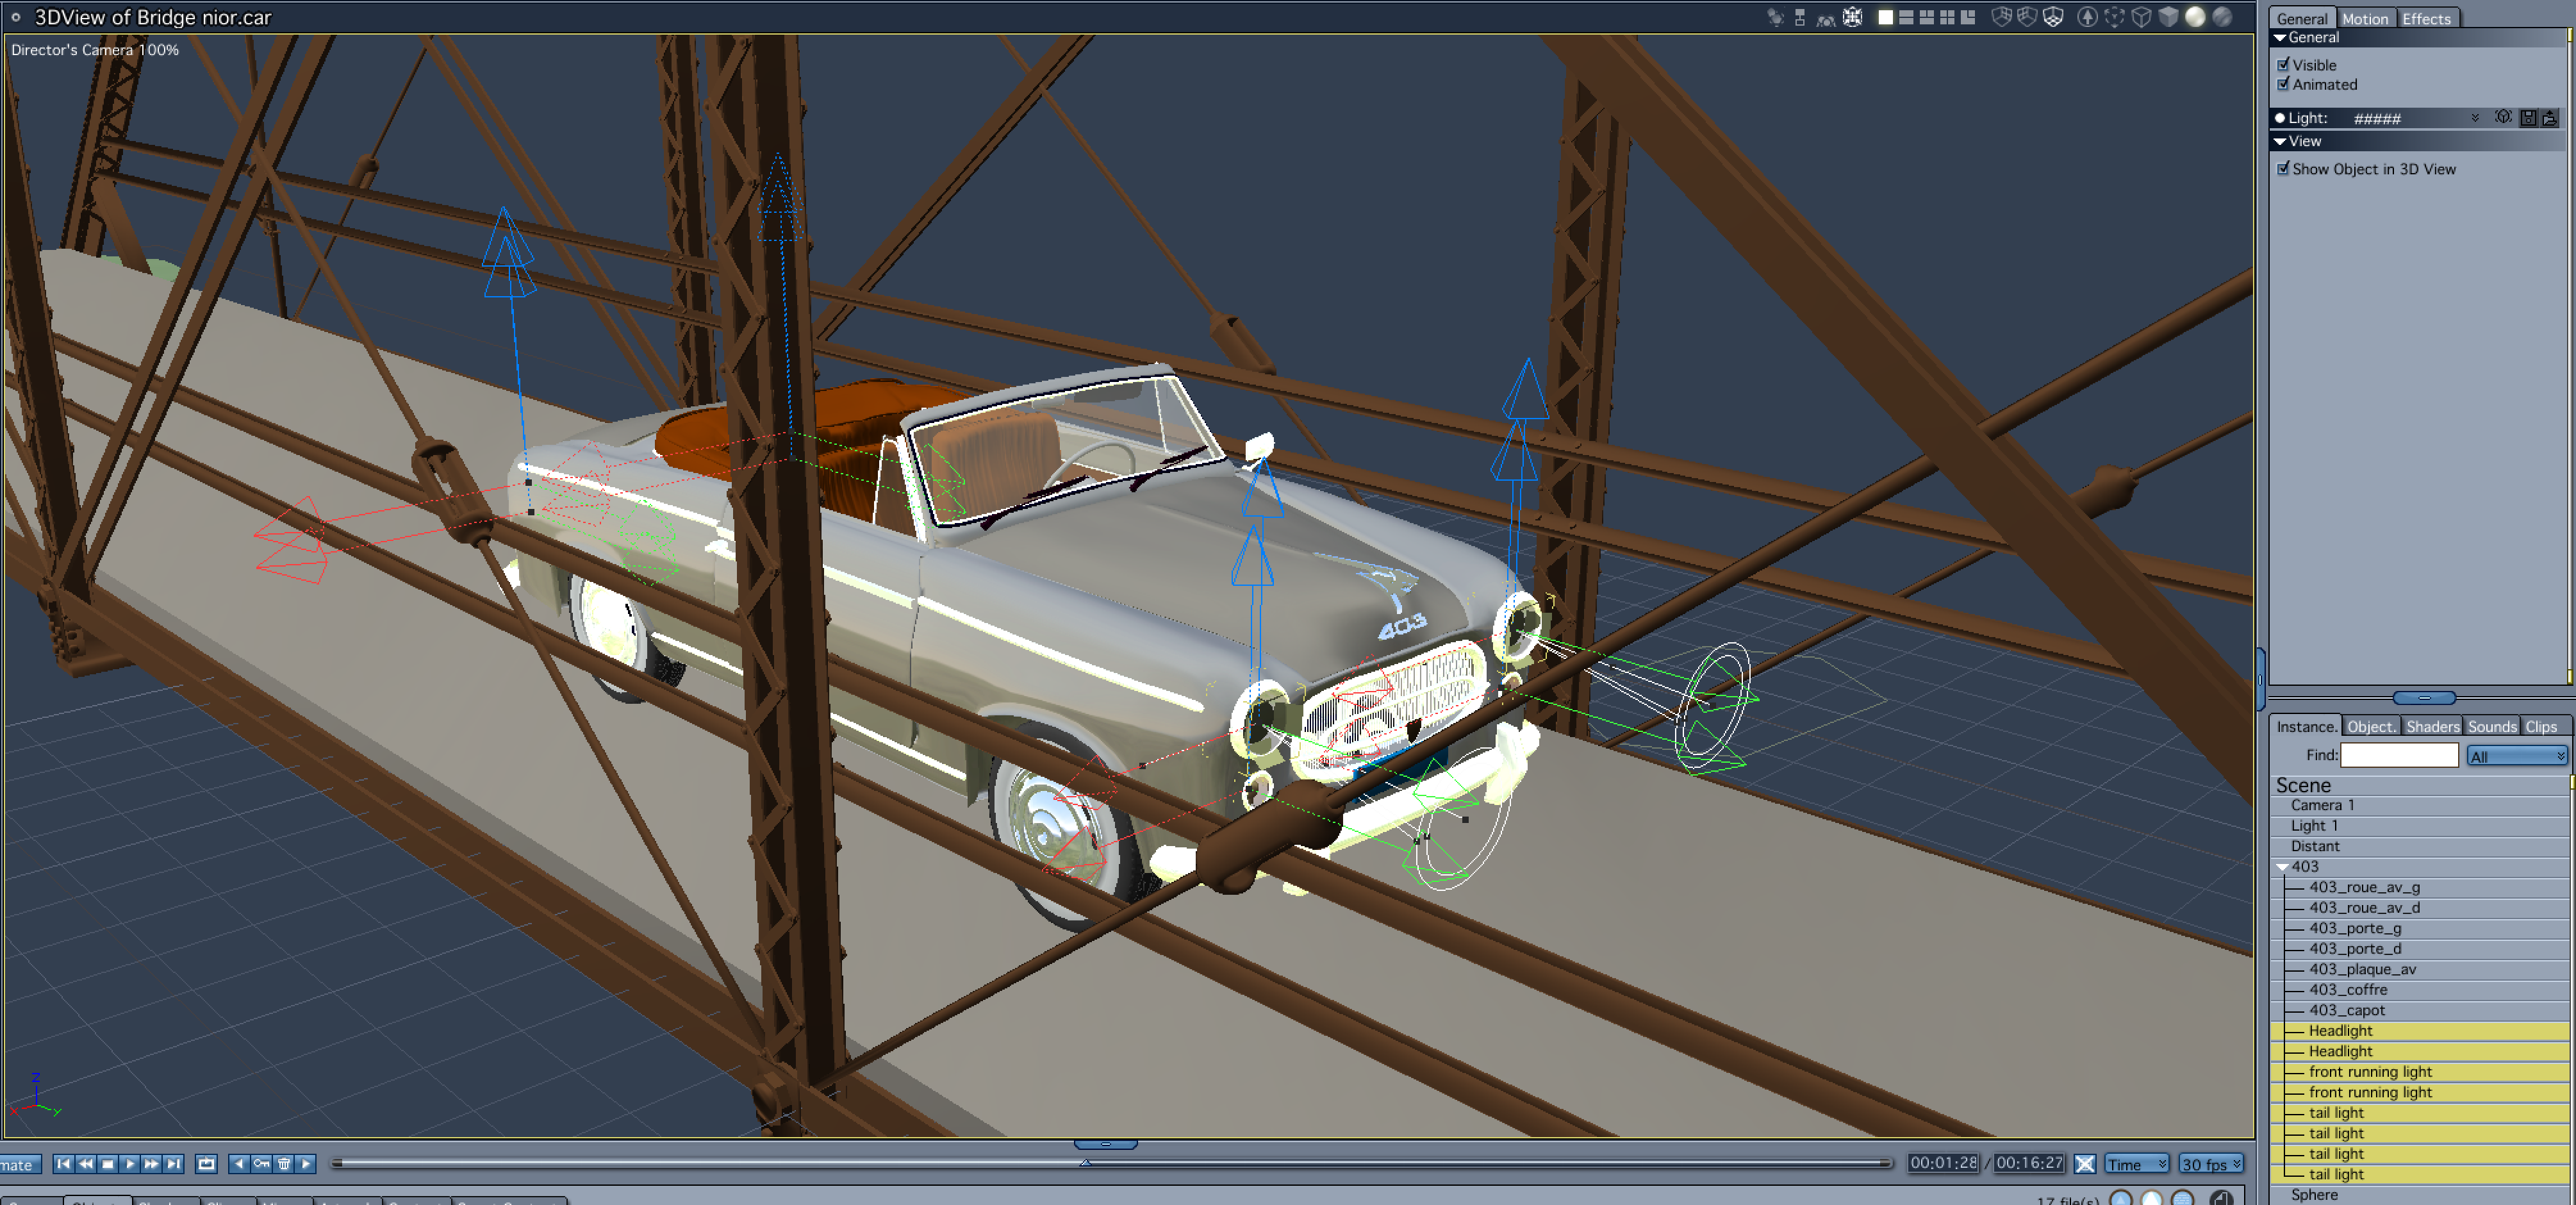
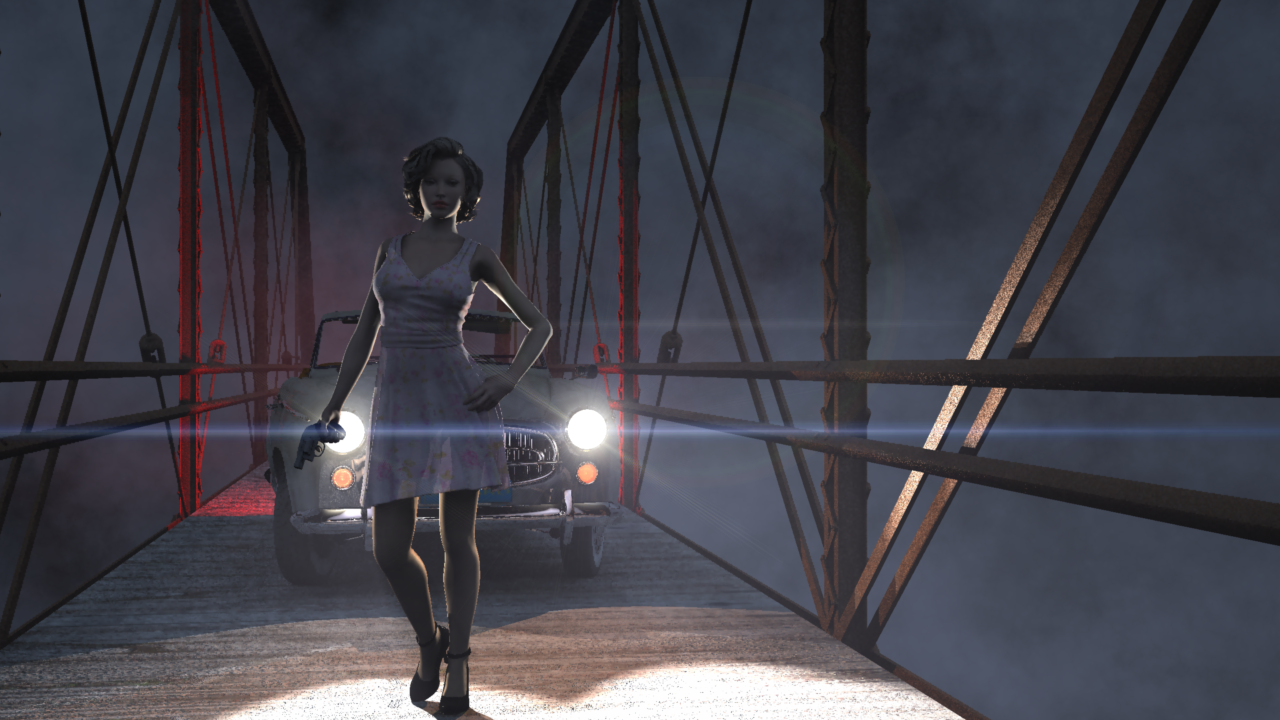
So, I have an idea for a secon scene. I don't know what category this will fall into yet. I just know I have a vision in my mind. To start, I am in the process of lighting up a vintage roadster. I only really have just the car lights at this point.
Gosh, I'm getting behind. But that's a good thing when its caused by a surge of interesting renders.
DesertDude and Selina, thank you for the nice comments on Thug Wars! There is a final version which I haven't posted yet.
These are great buildings!
Now that's one creative batmobile. :)
Great tips and render, EP! Thanks for joining in.
Your experiments are always impressive, Selina, and this is no exception. So, now it's time to get busy on an entry.
Looking good, Varsel. I wish I could see the hat better, and see everything else darker. Have you experimented with the basic controls (contrast, etc) in GMIC? Stacking filters is such fun. :)
More work with lighting and atmosphere. I used light linking to enhance the rim light effect. Lots more work to do on skin and other textures. I have an idea I want to try, but I'll wait until I see if it works before I mention it.
Low anti aliasing and resolution test render.