Daz 3D is part of 
Connect
DAZ Productions, Inc.
7533 S Center View Ct #4664
West Jordan, UT 84084
Licensing Agreement | Terms of Service | Privacy Policy | EULA
© 2026 Daz Productions Inc. All Rights Reserved.
Comments
Thank you @Diomede and @Wanderer for taking the time to comment on my submission.
I was a little apprehensive when I first posted so I didn’t include much specific information on my method, however due to the positive feedback I will share my process for “Check Please!”. I’m going to ramble a little first, the information pertinent to this render will be located in the last paragraph.
(forgive me if any of this info sounds simplistic or condescending, It’s not intended to be. I really don’t know everyone’s experience level in Daz Studio. Most of what I’m saying might be common knowledge to everyone.)
First, I know this isn’t lighting related, but I have gotten into the habit of always working with the thirds guide on. I would attribute the sense of composition balance in the picture to that tool (if you are unfamiliar with the thirds guide, it can be turned on by clicking on the button in the upper right corner of the viewport and selecting “show thirds guide” from the drop down menu). I’m no expert at the rule of thirds but there are plenty of good tutorials on that subject just a google search away if needed.
This really is my first serious render attempt since finding Daz Studio about 2 years ago, but I have spent that two years reading tutorials, and learning how to navigate the software. The one thing that baffles me is how deep this software is, I can choose a thread on any technical topic and still hear people using terminology that is over my head. I wasn’t really hooked by Daz until I learned about the “surfaces” tab and how to swap the default textures on any item for your own textures. For example, the jeans and shirt textures on my character are ones that I edited myself. That level of customizability is what has me still spending my free time in Daz. All that to say, I know everyone is different, but I couldn’t jump right in and start creating until I felt properly oriented.
Now, for the lighting. I don’t fully understand everything under the “Render Settings” “Lights” or “Cameras” tabs, but there are some tools that I have found invaluable while dabbling in Daz. Keep in mind that if you don’t want to spend money, you can learn to do all these things through studying up on the tabs and menus in in Daz. These are just time savers I enjoy to use.
DA Real World Lighting: For exterior lighting, this product is a nice short cut to dealing with the “sun-sky” options under render settings.
Real Lights for DAZ Studio Iray: This product is a great short cut for dealing with light emissive surfaces.
Iray Ghost Light Kit: When emmisive surface lights and exterior lighting don’t seem to be enough and you don’t want to rely on the camera light or spotlights to make up the difference I would recommend this product.
(If you’re new to the daz store, one thing to keep in mind, new toys don’t always equal easy use right out of the box. It is just like adding another tool to the ones already provided in Daz, and usually requires the same amount of learning to use properly. If I had been aware of the Daz forums when I first started, I would have saved myself a lot of money. Also, it pays to wait and be patient for sales, it doesn't cost anything to put something in your wishlist and wait a month or two.)
There are two light sources in my render, I used Iray Ghost Light kit for the interior room (the room is completely enclosed except for the window, so no other light source is mixing with the ghost light), and DA Real World Lighting to select my sun and sky settings. I would attribute the soft shadow to the Iray Ghost Light Kit. And just to clarify, there is no light being projected from the camera headlamp or environment map.
Night678winG Wow! Thanks for the insights. I would like to start doing more shaders/surface materials of my own. Nice. All three of the images I posted in this thread use Real Lights for DAZ Studio Iray in some way. I find it one of my best investments. Since you endorse the other two products, which I haven't personally used, I'll consider them more seriously than I might otherwise have done. It makes me feel really good to hear you talk about your approach, learning, etc. I'm sure I'm not the only one encouraged by what you've shared. I've been lingering around forever, but I'm much slower than you to learn various aspects of the tools we've got here. Way to hit it out of the park on your first serious attempt.
This looks wonderful. Wish I could make such cool godrays, but it seems never to work when I start another try.
Great job!
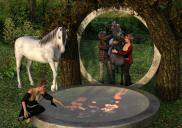
I absolut like the background lightning. What does the guy in the background fire? Looks like energy disks. I don't sure about the dark silhouette from the guy in the foreground.
At one side it looks cool, but on the other hand, he is so close, that I think, I should/will see more of him.
What, if one off the energy disks passes him and light him up a little?
Ah, thx for the link. To bad that I have no time for another render.
Now that you say it it's so obviously. she don't look wet. I totaly forgot her, or more to make the shaders on her a little glossy.
On the other hand... I saw so many cool and better entries this month,than mine, that I think, it would not help much.
I can definitely pick out the Real Lights for DAZ Studio Iray in your "Terminator Red Eye" and "Cross" renders, it's use in your "GlitterBrightBetrayalFin" is a little subtler, I'm guessing it might possibly be applied to the eight pointed star at the front of the sanctuary? All great renders btw, I've been facinated by the use of godrays in renders but haven't had the fortitude to attempt them yet. Any suggestions on where to start with godrays? Products or tutorials you found helpful?
Thanks again, daybird. Don't think like that. Your pic is nice. You never know what might do the trick. Never give up.
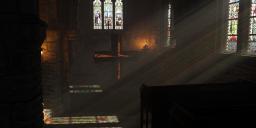
Now, about the godrays, it wasn't easy. I kept giving up. Then, just on that one image with the knight in the temple, it clicked. I don't know exactly how or why. The devil, as they say, is in the details. I think my problem was a combination of the wrong numbers in the shader for the godray effect cube and the lighting being incorrect. In the end, the trick for me, was to set the basics of the scene, add the cube primitive so that the camera was just outside of it, give the cube the uber shader, set the numbers as shown in one of Sickleyield's amazing tutorials, set either camera as sun node in sun sky only or set the location, date, and time. If you use a camera as sun node, I found it works best to have it not too far away and at least outside the cube like the picture camera is. I do many sample renders on the order of 500 x 500 or 1000 x 500. Nothing too big. If it doesn't produce some rays, the problem is likely either in positioning (sun, camera, or both) or shader numbers on the cube. Once you get your rays to show through plain glass, then take a look at the link I shared to Connatic's thread where he shows his actual shader settings to get stained glass to work. If you cannot get the sun-camera node thing to work, try going with the global coords/date/time method. I stick an object outside on the ground to help me figure out where my shadows are going from the sun. I also use an external cam to look at the cube from outside the building to see where the sunshafts will go if they are working. Wonder if I should attempt a video tutorial of this.
@Wanderer, welcome to the lighting challenge. Your images are great examples of more complicated lighting. Thank you for posting your descriptions of how you achieved them.
Reminder: Today is our last day, since February is a short month.
Yeah, Night678winG, (and thank you) in that one, you're right, in part. I made the star in an old free program called Anim8or by Steven Glanville that's been around for just about ever. I positioned the star and applied a diamond shader from Mec4d, then duplicated the node, shrunk the duplicate down and positioned it in the center of the larger star then applied a real light from that set--but turned down the lumens a lot to keep from washing out the scene and godrays. I decided in the end to make light a third character in the scene, so as you can see that the central shaft of light associated with the knight is bounded by cooler blues in the godrays, which is echoed by the lady on the left, and there is another implied presence on the right which is generating the light in the scene which is flashing on the dagger blade as well as the highlights appearing on pews and columns to offset the golden light of the star doing the same. So there are in fact two lights from that set in that scene. You're spot on with the other images though, probably (Did you notice the lights of the Big Bill Truck reflected in his sunglasses approaching from the right? Those are from that set as well.).
Hopefully I already answered some of your question before seeing your post in my previous post. But there are some links in my post that I've highlighted above. Those gave me the missing links to make it happen.
How do I make it address someone with an @ symbol at the start? I don't know how to do this.
@barbult -- Thanks for the welcome. If anyone has any questions about how I did this and want to message me... sometimes I'm slow to answer, but I'm happy to help. If there's enough interest I might try my hand at a video tutorial just to show what I did.
I tried it a hundred times after seen Sickleyield's tutorial, but it never came out good, no matter what I do with the three main settings.
One time I have to much particles in the air, wich erased the light in the room, the other time, the effect nearly vanished after minimal change in the adjusting.
@daybird First, the one on the left might not be as strong as you like, but it's kind of nice. In Cross, I pushed the Transmitted Measurement Distance and Scattering Measurement Distance up to 150. I'm not sure if that would help you, but when my effect was just kind of bleh, I found going up over 100 did a lot. It might be too well defined now for some tastes, but that helped me. If I knew how Connatic did his snap of the settings for his stained glass shaders, I'd just show you mine. In both images, those are the settings I used. I also had SSS amount set to .05 and SSS direction set to .5. SSS amount controls the amount of dust, and direction sends the effect either toward or away from light source... so it must be positive amount. If you get some effect to show like that one on the left, try altering the distance first. If that doesn't do it, you can try upping the dust, but I'm not an expert. Like I said, I did it over and over again until something clicked. Then I just used the same settings in both images. Please let me know if any of this helps.
Puhh, I think that must wait, because with my old comp the first pic rendered over 17h and I break it at 17%
K, I know there are some memory tricks that can help reduce render times, and there's a product in the store. Also, graphics card does matter on this if you can fit it in the memory of same. Try doing it with just the building/walls first and render to a small size. Once you get the lighting to work, then go back to your full scene and larger render. Anyway, hope I was helpful.
One last thing, if you like the effect I achieved in "Cross", I replaced the original candlelights in the scene with primitive spheres, altered the scale to make the spheres more oval, then applied the Campfire light shader from the Real Lights for Daz Studio Iray. After I had one completed, I just duplicated the node and moved it from candle to candle and duplicated it for each. As someone (I think Night678winG) pointed out, you don't have to buy anything to achieve these effects, but it's a very handy product to have.
Thank you very much for explaining how you did the candlelights. I suspect the harshness of my shadows are because I inserted generic lights from the top menu, which I suspect are point lights. I won't have time today to do any more changes after all, but I will try replacing my lights with something similar after this closes.
Thank you Diomede for the kindness. If I had realized it would be helpful, I would have shared earlier in the day. I hope it proves useful.
... and I have an entry for this month!!
Program Used: Daz3d (No postwork, signature added in GIMP)
Title: "Mr. Quackers" (OTHER SUGGESTIONS WELCOME, PLEASE!)
Products used:
Medieval Princess Dress for Genesis 3 Female(s) (including using the included poses as a starting point)
Iray Ghost Light Kit 2
Small Room Kit: Bathroom Props - Rubber Duck prop
Small Room Kit - b/c I needed a dark box to put her in
Fantasy Hair for Genesis 3
Teen Princess Leila for Genesis 3 Female(s) - I just used the eyebrows from the character. Yes, I kitbashed eyebrows.
Jepe's SpecialZ Part I - used just a little of one lightbeam effect behind her. That's what gives shape to the blue-ish light from behind her. The light itself is from a blue-colored spotlight positioned high up and behind her. I aimed it at the back of her head to give some depth to the image.
Other light sources are 3 planes (colored blue, yellow, and red, and positioned along the lines suggested by @KnittingMommy), some very dim spotlights, a inverted dome ghost light right over her head, and - of course - the rubber duck.
The ghost light is there to try and mimic the bright yellow light I got from the duck when the duck was the only light source in the image. I had a great deal of trouble getting the duck's emission levels low enough to show texture but high enough to still actually emit light. I'm not 100% thrilled with the result, but without postwork I'm not sure how i could have done any better. I think the problem may be that rubber has very little texture as a material.
I would have loved to have had more time to do fix up some of the non-lighting issues (like the sleeves of her dress!), but I'm pretty happy with the lighting. It's a pretty far cry from the HDRis and vendor-constructed lighting presets I've been using to date!
Feedback is always welcome. :-)
The February challenge is now closed. Thank you all for participating.
See You in March for the Next Challenge - Posing
AAArgh. I am still having trouble getting light to shine on the sets behind my main characters. I know the lighting challenge is over, but if anyone has the time, I'd appreciate some help.
https://www.daz3d.com/forums/discussion/comment/3414041/#Comment_3414041
February 2018
Showcased Participants for the February Lighting Challenge
You Brighten My Day
For this Showcase we looked at the artist that used the most innovative lighting.
For those reasons we have selected Wanderer to showcase
What That in the Shadows!
For this Showcase we took a look at who we felt used lighting in a way that created unique or interesting shadows.
The New User we felt best showed that this month was Tynkere
Visualization is the Destination

For this Showcase we took a look at who we felt demonstrated out of the box thinking when it comes to lighting
The New User we felt best showcased those things this month was Chameo
New User - Welcome
asums and LaPetiteVerita
CONGRATULATIONS TO EVERYONE! Everyone who participated did an amazing job this month! I thoroughly enjoyed looking at all the progress everyone made
Congratulations everyone for another great month or learning and rendering!
Same from me :)
Congratulations to everyone. Thanks for sharing your work and experience
Congratulations, folks. Love these images.
Congratulations everyone!
Am I reading this correctly? Wow!
I celebrated a birthday last week, so what a nice belated birthday present! If I'm that lucky I'm also going to go out & play the lotto.
Seriously though, thank you very much. Due to the potential for controversy, I really didn't think it would have any chance of being considered. Project was a very very important project to me for personal reasons.
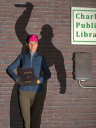
Also like to think it was a group effort. "KnittingMommy" pointed out an easy solution by moving actress forward a little-- duh! Obvious once someone else points it out. ; )
Daybird helped me with an idea that really made it come to life.
It still wouldn't have worked without the help of Daybird, High Elf and Linwelly who helped with German translation.
Finally, if someone from DAZ hadn't given the go ahead-- wouldn't have been much at all!
My thanks then, to everyone who helped on it.
Congrads too for Wanderer and Chameo.
All the members who challenge themselves here set the bar very high. I'm fortunate (or lucky) to have been featured.
Thanks again!
--Bruce
Congratulations to all. :)
Just now seeing this! Wonderful!
Congratulations to all in the showcase, and to all who improved. Your efforts are not unnoticed (or in vain so long as you never give up) even if you didn't get showcased.
Thank you to all who helped my ongoing personal quest to learn and improve--especially Linwelly. I didn't understand that lighting was the thing I needed to focus upon (as in focus WITH), while I was focused upon lighting--not just in how to make it work, but the why and to what end, AND they clearly did. I appreciate the invite to join this ongoing challenge. I could not have done this without help and a reminder to use the light to help guide the eye.
Special thank you to barbult for guiding us over the month.
Extended thank you to all who participated. It's about community in the end, so we ought to remember that at the beginning and middle. After we're gone, the impact we've left on others is all that we've left behind and all that really matters to those who remain to carry the torch. We can either help them by passing it on with faith and good cheer, or we can fight them to hold on to the bitter end, and risk strangling the flame if we do.