The Material Zone~ Geometry Tool Tutorial & Shaders
 Novica
Posts: 23,925
Novica
Posts: 23,925
If you've ever experienced these thoughts about material zones, materials, or shaders- this thread will be fun for you...
"Oh great. That's not a separate material zone."
"There's got to be a better way. What tool though?"
"That stupid thing's in the way, I'll just hide it. Wait...why did the polygons get selected anyway?"
"Uh oh. Didn't mean to do THAT. Now what?"
"Wow, that shader did great for clothing."
"Who knew that would work!"
So welcome to The Material Zone!
I'll start the thread with a tutorial on creating material zones, and keep it simple. The tutorial will be different, however. I am deliberately going to create two errors so you can see how to fix them. There are 22 screenshots, and it is step-by-step. For those who have zero experience with the Surfaces pane, I have you covered with a post explaining the Surface Tool and Surfaces pane. I'll also address why material zones are found there, and not in the Scene tab.
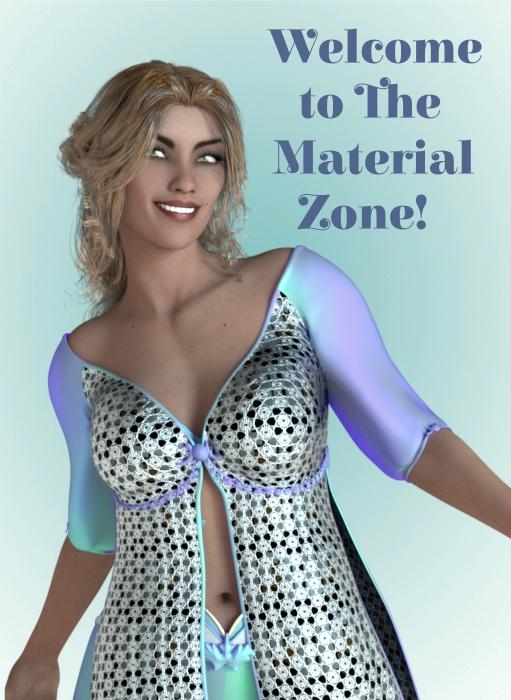
Why I started this thread- Simple. I was using an outfit called Artemis Moon (pictured below) and both of the forearm sleeves were the same material zone. Well, that works fine until you're trying to use a shimmery shader, then you can end up with one arm pink and the other arm blue. (Any pearlescent shaders will go wonky.) So while I was changing the sleeve to it's own material zone, I decided to show you how to do it, and what pitfalls to avoid. (Turned in to an entire day thing LOL)
So the first goal was to get everyone up to snuff on how to create zones, in the most basic way. If you have any questions on using Geometry Editor, creating material zones, or anything else related to that, feel free to ask. Tips? Post those too.
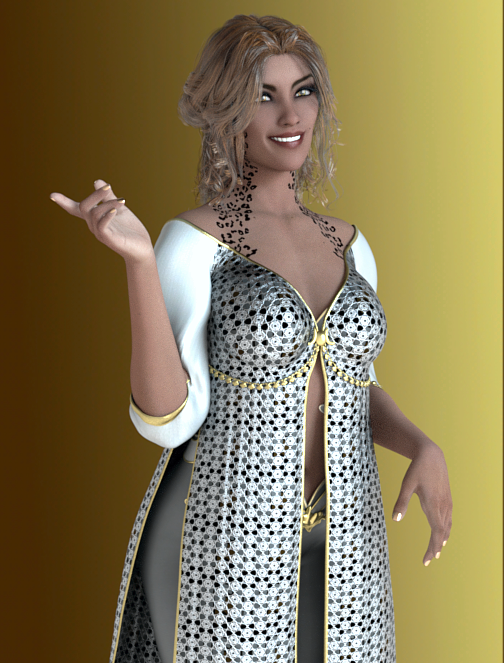
The second goal, which will be fun if people take the time to share- is showing each other the great shaders in the DAZ store. The third goal- showing shaders outside their designated use. For example, in the images above, you are seeing the Costume Jewelry Shaders for Iray used on the dress, and the Pearlescent ones from that product on the sleeves and pants for the first render. (The Welcome to The Material Zone.)
So share (with links to the products) what you've discovered, and also show us your renders with the shaders in use!
Guidelines:
In your post: Link to the product(s) but please use the New Window option so people can simply X out. See instructions below if you don't know how to do links. Next, provide the render or a link to your render (including the DAZ gallery) so people can see how the shader or materials were used. Please be specific for us so we don't have to guess. The shader(s) or material(s) should be prominently used, easy to see.
Tell the vendor! Share the love. PAs who do characters and sets get attention, while these artists, it's hit or miss. If you put the product name and @ the vendor, they'll possibly come take a peek. It's always nice to see how your product is used. And PAs, feel free to share examples too.
If you're commenting on what someone posted: when you reference their post- instead of just hitting quote and reposting the entire thing again, (which clutters up the thread with repeats) click on the image they posted, and go up to the image icon (the mountains and sun) and put 300px or so in either the height or width. That's a good reference image size.
How to do links: Type the name of the product. Highlight the words by holding down your mouse, go up to the link icon that is to the right of the ABC checkmark, directly above this textbox. Click it. Enter the URL.(You highlight the URL by holding down your mouse and going over the URL words. Then right click/copy. Then in the URL text line, right click/paste.) Then click on the second tab while the popup is still open (called Target) and in the dropdown, select New Window (_Blank)
Daz 3D is part of 
Connect
DAZ Productions, Inc.
7533 S Center View Ct #4664
West Jordan, UT 84084
Licensing Agreement | Terms of Service | Privacy Policy | EULA
© 2026 Daz Productions Inc. All Rights Reserved.
Comments
Creating Material Zones Tutorial
If you have Artemis Moon then you can experiment as you follow along. I tried applying a luminescent shader to the sleeves, which were both one material zone, and ended up two distinctly different colors on the sleeves. Anything shimmery with multi-colors doesn't play well with one zone sleeves.
This tutorial covers how to create a material zone, how to fix it when you accidentally leave out polygon surfaces, and how to take out polygons that you didn't mean to select (even AFTER you have assigned them.) It's easy!
Before we start- if you don't have the Tool Settings as a separate pane ,you need to grab it and attach it down in the work area. Go to Windows>Panes (Tabs) and find it there. I keep mine on the left. I have Scene, Parameters, Content Library, Surfaces in that order, on the right. I find it helpful to have them on different sides.
So how do we create material zones? We select the polygon surfaces using the Geometry Tool. (Found in your Tool Settings.)
Before you rush to start selecting those suckers- you want to reduce the chance of selecting polygon surfaces which you don't want.
Start with this: It doesn't hurt to get in the habit of NOT having anything behind/in view of what you are selecting/coloring in with your mouse. If I am selecting a ring on a finger, I am going to put that hand out in the "open" without the body, arm, or anything else in view. But there's additional things you can do about avoiding polygon surface selection. We're going to hide the polygons.
VERY IMPORTANT: hiding the polygons in Scene Pane DOES NOT KEEP THEM FROM BEING SELECTED. (Closing the eye icon, located by the name) You must close the eye of the section in the GEOMETRY EDITOR.
I am going to take you through the tutorial and show you why hiding polygons of bordering areas should be done FIRST. (I'm not going to. I will do it as we encounter problems.) But first, here's the upper sleeve, and how I have it extended out into the "open" with nothing behind it so it's easy to work with and avoid other areas.
1. Get your figure posed.
2. In the viewport, to the left of "default camera" is a dropdown. Select Wire Texture Shaded.
3. This would be where you should hide the trim of the sleeve or anything else that is likely to be selected, so you don't do it by mistake- but I'll really show you WHY that's a good idea. So instead, go into your Tool Settings Pane, and click on Active Tool>Geometry Editor. At the top, for Selection Radius, try 5. It's better to go smaller, than larger.
4. Right click in your viewport. (NOT ON ANYTHING. Get in the habit of clicking out "in the air." That way you don't accidentally select polygons if your fingers slip on the mouse.) For Selection Node, note the following:
Marquee and Lasso select polygons ALL THE WAY THROUGH. If you select those in the front, the backside is also selected.
The only one that doesn't do that is Drag Selection. (not shown.) If you have your model posed so there's nothing behind it (like I told you!) or have hidden everything (using Geometry Editor) then you can speed things up with either the Marquee or Lasso.
Using Marquee (which draws a square) click and hold your mouse and make a square in the middle of the sleeve- don't get near the trim/edges! This selected polygon surfaces in both the front and back of your sleeve.
5. And here is why you want to hide the trim/adjacent polygon surfaces, and anything else sticking up and in the way. UGH. Even zooming in, that's a nightmare to get those teeny, tiny, slanted polygons. So go up to your Surface Selection Tool (the three sheets of paper) and select it, then click on the doja-ma-floppy that is sticking up and blocking your efforts to get to the polygons. It will be highlighted in gold. (second image below)
In the next post, I will tell you why you do that.
The reason you want the doja-ma-floppy highlighted with the Surface Selection Tool is so you can see what the name of it is in the Surfaces pane. Then you'll know exactly what to hide. That doja-ma-floppy is a Sleeve Buckle.
Shown: the Surfaces pane.
6. Now we'll take that information and hide those polygons using the Geometry Editor. Go to Tool Settings and in the Geometry Editor, where it says Group Name, click on it and pull that column to the right so you can read any letters which are hidden. You'll probably see Face Group with items listed, then Surfaces and items listed. Shut the eye on your object (in this case, Sleeve Buckles.)
Now, when you select polygon surfaces, these CAN NOT BE SELECTED. Remember my tip- closing the eye in Scene pane will NOT keep the polygon surfaces from being selected, you must do it in Geometry Editor.
And this is what it looks like now. It's easy to select the polygons.
Next, rinse and repeat for anything else you want to hide. (Click on it with the Surface Selection Tool, go to Surfaces pane and see what's it's called. Then go to Geometry Editor and close the eye there.) Show below is the trim hidden.
7. Now to get the rest of the polygons. As you recall, we used the Marquee Selection as our Selection Mode. (We right clicked out in the viewport.) That selects polygon surfaces all the way through, and we need to fine tune our efforts and be more careful now. So right click in your viewport and this time, for Selection Mode choose Drag Selection. This only chooses the exact polygon surface your mouse selects. Carefully hold down your mouse and select the rest of the polygons. Be SURE and rotate your camera, get under the object, and look at it from different angles.
Tip: if you can't select a polygon surface, it's the your angle. Rotate around in the viewport and try it again.
Tip: Oops, you accidentally let go of the mouse. And you clicked on a polygon, and everything you selected vanished. No problem, use CTRL + Z and they will come back. But now you must hold down CTRL as you mouse the polygons. This is also handy when you have to let go of the mouse to move around to different areas.
Tip: If you accidentally select a polygon surface, ALT + Mouse will erase it.
I've deliberately messed up a few things and we are going to save the errors so you can see how easy it is to fix things. One thing you need to remember- polygon surfaces can only belong to one group, so if you accidentally select some, it's easy to reassign them. Another common error is to miss a few polygons- and again, it's easy to add them. So I've done both those things. Let's save our selected polygons and the errors. (I hate tutorials where everything goes smoothly- that's the best case scenario. You need to know how to fix errors.)
8. Make sure your main object is still selected in Scene pane (in this case, the dress.) That way, when you create this surface, it will appear in Surfaces pane UNDER THAT OBJECT. (I want my sleeve material group to be under the dress, obviously.)
While still in Geometry Editor, right click in the viewport. Geometry Assignment>Create Surfaces From Selected>a popup appears. Name your material group something unique. I chose "Sleeve Right Mine." Click Accept.
So let's check the Surfaces pane and see if my material group is there under Dress (which I had selected in Scene pane when I made my material group.) Yes, it is. (See below.)
9. Still in the Surfaces pane: With your new material group still selected: In Diffuse, click on the color and when the color picking section comes up, choose a bright one. I did green. Now inspect your material group (for me, the sleeve) and see if you have missed any polygons, and look around to see if you accidentally selected polygons from elsewhere. (Remember, I did both.)
10. To see it better, you can get rid of those selected polygons.
Out in viewport, right click Polygon Selection>Clear Selection. The yellow hatching covering your selected polygons will disappear. Now you can easily see there are polygon surfaces that were missed, and two which were selected from a hidden sleeve. Ask yourself- how could those be selected if they were hidden? (You should know the answer! (Because they were hidden using SCENE and not Geometry Editor- and that's a no-no!)
Let's tackle those two "floating" polygons that were selected. These are the steps you need to take to remove unwanted polygon surfaces:
11. First, we need to find out what material zone those polygons should be assigned to. Use your Surface Selection Tool (those three sheets of paper above the viewport) and click on one of the two polygons.
Tip: You'll see they both get outlined in gold IF they are in the same material group. If one highlights and the other doesn't, you're dealing with two separate groups and you'll have to do this for each one. In my case, both squares highlight so they will be sent back to where they belong together. (Example- maybe one is part of the hidden trim, and the other one is part of the hidden sleeve. Again, this would be if you mistakenly used Scene pane to hide them, instead of the Geometry Editor.)
12. You know the drill- next you go to Surfaces pane and see what surface group has these polygon surfaces. We've got two polygons from LongSleeves so now we're going to reassign them back. It's easy!
13. Right click out in your viewport and select Geometry Assignment>Assign To Surface>LongSleeves. You don't want to create a surface, or create a surface from selected, because the surface already exists. These menus really make sense!
14. You will see your color disappear (mine was green) as the polygon surfaces go back to where they belong. They are, however, still selected, which will be a problem if you do not clear them.
TIP: Remember polygon surfaces can only be assigned to one group. If we forget to clear these, they'll get added to the next group we do!
15. Right click out in the viewport. Geometry Selection>Clear Selection. Your cross hatched polygons should disappear, and now they will stay put. See how easy that was?
Time to tackle the opposite problem- missed polygons. The process is simple. We need to highlight them and assign them to our custom material zone. The good news- you've already created the zone, so this is easy. But first, let's hide other material zones that bump up next to the surfaces we are going to highlight. In this case, it will be that strip. Do you remember how to find out what it's called?
16. Use your Surface Selection Tool>click on the surface>go to Surfaces pane and get the name. Then in Geometry Editor, shut the eye. This means the surfaces can't be selected. In this case, DressTrims.
Now we're ready to get those missing polygons!
18. We last had our Selection Mode as Drag Selection, leave it alone. (To check, right click out in viewport and look at Selection Mode.) You don't want polygons selected all the way through, we're fine tuning so we only want the surfaces we're dragging across.
Carefully select the polygon surfaces, holding down your mouse. If you need to skip around, remember to hold CTRL+mouse. To deselect polygons, it's ALT+mouse. Rotate your viewport!
Tip: You don't need to deselect polygon surfaces that you accidentally mouse over which belong to the sleeve we're adding these to. They already belong to the sleeve and won't go anywhere. I deliberately moused over some of them in the image below, and will just leave them where they are. (The forum is REALLY butchering these photos today. The yellow crosshatch is barely showing up. Can't do anything about it, the images are crystal clear.)
19. Next, right click in the viewport. Geometry Assignment>Assign To Surface>Sleeve Right Mine (whatever you have named YOUR new surface material zone.)
And poof! All those polygon surfaces turn whatever color you're using for your zone. (mine is green.)
I got in the habit of clearing my selection when I get done assigning polygons (right click in viewport> Geometry Selection>Clear Selection just in case I had other polygons to work on. In this case, I don't, but it's a good habit. 20. Now, to save your material zone, you can do it as a Material Preset.
First, when you save it, make sure the figure is posed and clothed appropriately in your viewport, because that is the screenshot the program will make.
Second, make a file beforehand with so it's easy to put your preset into. I used the file path of Content>(all mine start with content)>Presets>Materials>!Novica>Artemis Moon Sleeve In case you don't know it, the ! moves your file to the top of the list.
Last, go up to File>Save As>Material Preset and make sure all the items are checkmarked which you want included, and browse to the folder you already created and put it there. You're done!
Hope this helps you. As always, happy rendering!
Cathie
NEWBIES: Scene Vs Surfaces Pane / Tab How To Quickly Find Material Zones
What is a material zone? It's polygon surfaces which are grouped together to react to shaders, materials, Surface tab inputs (such as changes to maps, colors.) etc. (Keeping this simple.) For more on surfaces and the Surfaces Pane- this is the Documentation Center explanation.
When you are in the Scene Pane, you'll see the objects and characters listed, but those don't necessarily include all the material sections/zones. To put it simply, those items in Scene focus on bones, or how the objects move.
For example- you might have a dress with buttons and trim, but the buttons and trim aren't listed in Scene. If you select the dress in Scene pane, and open your Surfaces pane, you'll see a list of all the separate material zones, including Buttons and Trim.
However, get in the habit of using the Surface Selection Tool (the three sheets of paper above the viewport) by clicking on the tool, then clicking on the object in the scene. It will highlight it in gold, and also over in Scene IF IT IS LISTED. If the object isn't listed, the object it is associated with will be highlighted. Make it a habit to ensure the item is selected by the Surface Selection Tool AND in Scene.
For example, if I click on the buttons out in the viewport with my Surface Selection Tool, there's none listed in the Scene pane, but the Dress will be highlighted in the Scene pane. When I go into Surfaces Pane, under the Dress, the Buttons ARE highlighted. Think of the Surfaces pane as being more nitpicky.
TIP: You'll need this later, in the tutorial. Clicking on an item with the Surface Selection Tool is a nifty way to find out what it's called in the Surface pane / what material group the polygon surfaces are assigned to.
Saved for listing Iray Shaders.
Costume Jewelry Shaders for Iray
Sleeves And Pants: Gemstones>#26
Body: Gemstones> #18
Tiling on both: 1.0 default.
Sleeves: Pearlescent>#14
Pants: Gemstones>#11.
Pants Tiling 60 / 60 (Horizontal/Vertical)
Body: Gemstones>#6
Tiling: 80 / 120
While the original pattern is very swirly for both #11 and #6, when the tiling is increased significantly, it makes a very different pattern.
Thank you SO MUCH for this! I love all the clear instructions and the screenshots! The kids are insane right now, but I will try to work my way through this tomorrow. I know this took a lot of work. Thanks so much for doing it for us.


Really good tutorial Novica. You might be surprised to find out I have only just learned most of this stuff myself this past year or so.
If I could offer a few tips that have helped me out, the Select By and Deselect By functions can be extremly useful and huge time savers, especially if you accidentally grab polygons already assigned to something else, like your do-ja-ma-floppy thing. Deselect by Sleeve Buckle and there they go. (This will of course only work BEFORE you've assigned those stray polygons to the new group. If it is after the fact, see #11 above.)
Holding ALT and hitting the Plus (+) key will increase your selection. Holding ALT and hitting the Minus (-) will decrease your selection. Time saver if you are working with large areas.
Getting in the habit of clearing the geometry selection before doing a new group is not just a good idea, it is a fantastically excellent idea. Much lost time and many headaches can be avoided by doing this one simple thing. Don't ask how I know this.
@destinysgarden That's good to know about the deselect- I wondered how that worked! I don't doubt that people are finding the different tools after using the studio for quite awhile- I did this a year ago for on e or two things, then stopped using it and got distracted/onto other things. (Rigging, never used Joint Editor before and I made a toon creature in Zbrush.) Thanks for the tips!
Just had a chance to take a quick look at this. Thank you!
very useful. I have been meaning to go in and make parts of certain hair a material zone. I have a bit of trouble with the skullcap which extends over the chracter's face casting a shadow, even though it shouldn't, I can see it being more grainy where it is in the rende. I'm wondering if altering it as a new zone will make this issue go away!
It should work. (for newbies- You can create a new zone then put the opacity at zero to hide it in Surfaces pane)
Nice work, Novica! My first exposure to using the Geometry Editor to create new material zones was when I was working with DZFire's Nurnies & Greebles to make quickie models. Once you get comfortable with the process, it's actually rather fun, IMO.
Some geat tips here! I always find when you haven't done some of these steps for a while, your forget some of the watchouts and time savers, and by the time you remember, you're done.
Oh, I have those- thanks for the reminder. IIRC, they're one material zone. I think I played with them one time, that's it- and they were absolutely fun!
[Reposted on Novica's request from her "Tips and Product Reviews" thread]
I picked up DestinysGarden's Iray Bling It! Shaders yesterday and was trying them out today. This is Olympia 7 in the Midnight Club for G3F outfit, completely retextured with those shaders. Midnight Club I think has been reviewed in here before - like all Fisty & Darc clothing it has plenty of material zones so is easy to retexture. The garments trims and shoe soles/heels are using metallic solid colour settings, the main fabric of the top is one of the sequin settings and the pants and shoes some of the beaded ones.
It's funny you should say that, because I messed with creating new material zones about a year or so ago too, and thought it was fantastic to be able to do it. I'd have so many more options in the future and the things I'd already bought would be so much more versatile. This knowledge would be quite a game-changer. And then I promptly forgot all about it :)
I did re-visit it after reading that you were about to create a tutorial on the subject and found it to be a lot easier than I remembered. I probably left the idea abandoned for so long because I remembered it as a lot of messing about, but in reality it's not much more difficult or time-consuming to edit a material zone than it is to edit a typo.
Anyway, no edited material zones in this one, but the thread seemed like a good opportunity to give a shout out to some of my favourite shaders (I'm a total shader junkie and this doesn't come anywhere close to all the sets I use regularly). Here's G2M, having ditched his tux in favour of an attempt at the twenties' sportsman vibe. G2M Tuxedo reshaded with ParrotDolphin shaders on the fabrics, and with with Mech4D shaders on everything else (shirt buttons etc).
@astracadia Very nice! I like those pants too, good morphs at the bottom and they look fluid and soft.
Very helpful information in this thread. Thank you.
My pleasure. Hope you can have some fun with it!
I have a question. If you don't remember to have the main thing selected when you create a material zone, (think a finger that you want a different color- and you didn't select the Hand in Scene pane) then the finger isn't hierarchied under the Hand in the Surfaces pane. How do I restructure the Surface pane to get all the fingers under the hand? I looked at the Geometry Editor but I'm not seeing anything obvious, and I really don't want to just start clicking around.
Oh no. There are pop quizzes in this thread! LOL. That is a good question. I hope you were not asking me. I could do this in Hexagon or Carrara, but I am not familar with Studio's tools. Yet.
LOL, no, it was a question for anyone who could answer it.
Great advice here, I certainly will be refering to this thread a lot. Thank you for doing this.
@darklordmidnight You're welcome, hope you can use the information!
Here's before and after using Book Of Spells. (the book on our right.)
I used Ceramics for Iray for the hinges and the center, the Raku settings are so much fun! The cover was Costume Jewelry Shaders for Iray number 18. I first Uber Based both of these.
TIP: remember to hold down CTRL when you are applying shaders if you want to keep the other details in the surface. A popup will ask if you want to Replace or Ignore, and choose Ignore.
Oh, wow, I just found this!
Wonderful! There's so much in geometry editor that I didn't understand - and so many mistakes and resulting frustration I had.
Thank you so much for doing this! You totally rock!
Wow! I had no idea you could do this inside Daz studio I always thought I had to use hexagon to get this done. Thank you very much!
@dracorn @sandmanmax You're very welcome. It's fun once you start playing!
Me, too!
Now I know where to send anyone asking how to use the Geometry Editor! I do have one time-saving tip for you, though. Somewhat related to DG's tips:
When you need to separate a material zone like the upper Sleeves of Artemis Moon, select the dress in the scene tab, then right-click in the viewport and drill-down in the menu to the Select By->Surfaces options and click on Sleeves. You will see the polys of both sleeves highlighted. Rotate the scene as necessary so that no part of the sleeves overlap. To Deselect the polygons of one sleeve, hold down the 'Alt' key and use either the Marquee or the Lasso tool around one of the sleeves. Now create your new surface, naming it something like SleeveR, or whatever. And if you want to, double click on "Sleeves" in the Tool Settings, and rename it to match, like SleeveL using my example. That will keep them together.
There are a lot of times, perhaps most of the time, when the existing material zones will not make things easier for us. When that happens, we have to rely on grunt work like you show in your tutorial. It's definitely a great primer for learning how to use the Geometry Editor.
(I've learned a lot from trial and error, and I'll be happy to add my "ah, ha" moments to the thread. And, frankly, as much as I've learned, I still feel like I'm only scratching the surface of what this tool can do.)