February 2017 - Daz 3D New User Challenge - Lighting
 Kismet2012
Posts: 4,252
Kismet2012
Posts: 4,252
February 2017 - Daz 3D New User Challenge - Lighting
Sponsored by DAZ 3D
Are you new to the 3D World? Are you at the beginning stages of learning 3D rendering? Have you been around for a little bit but feel you could benefit from some feedback or instruction? Have you been around awhile and would like to help other members start their creative journey? Well then come and join the fun as we host our newest contest...
_____________________________________________________________________________________________
"Lighting"
This challenge is a general render challenge with the focus being on how you use light in your image. We're providing you with links on Lighting from a variety of sources. Where composition is key to pulling a viewer into your image and leading their eye to where you want them to see things, lighting is what defines and enhances the viewer's experience when looking at an image. Lighting helps a viewer to "see" the story. The presense of light or the lack thereof are elements that provide us with the ability to believe the world we are looking at. It can tell us if an object is round, whether it is close or far away, what colours were used and even if the surface is reflective. As an artist it will be your mastering the use of light that will set you apart from the others. Your ability to control, where, how much, and what kind of light is used in the image that will make a well composed image become exceptional. Below is a source list of lighting tutorials, articles and videos that will help you understand how to use your software, the different techniques used to light a scene, and the theory behind why lighting is needed. This list is not compreshensive but a starting point.
How to Use Your Software:
DAZ Studio
VII - Lights
Light Editor
Point Lights, the Basics
http://www.daz3d.com/forums/discussion/25899/ (ideal for those who have purchased Gia 6, but the lighting tips can be used even if you haven't)
http://www.daz3d.com/great-art-now-step-5-lights
Modifiers to Basic DAZ Studio Lights -IBL or HDR type lighting environments
UberEnvironment2 - Made Easy
UberEnvironment2 Basics
Learning UberEnvironment 2 Return to Topic
Uber Area Lighting: The Basics
Iray
Iray Magic Light Box
Creating and Lighting a Scene with Iray in DAZ Studio by SickleYield
Lighting and Tone Mapping in Iray by SickleYield
DAZ Studio Iray: Undercover Way of Lighting V6 While Getting Stunning Results Quickly & Easily by Dreamlight
Ghost Lights: Interior lighting Tutorial
Poser
Poser – Lighting 101 https://www.youtube.com/watch?v=9QWWXZ64ZiM
Poser Lighting 102 (Attenuation) https://www.youtube.com/watch?v=ofj-vOgbwsQ
Poser Lighting 103 (Shadows) https://www.youtube.com/watch?v=CbHQTXiGrx0
Poser Lighting 201 (Ambient Occlusion) https://www.youtube.com/watch?v=7GZbHV7MJD4
Carrara
Chapter 14: Setting Lights
Bryce
Artist’s guide page 125
Bryce: http://www.youtube.com/watch?v=C772CuZ6RgI
Bryce: http://www.bryce-tutorials.info/bryce-tutorials/lighting-and-skies.html#
Bryce: http://www.youtube.com/watch?v=sH58aGjCfR8
Bryce: http://www.youtube.com/watch?v=s_mzhnLRx0s
Bryce: https://www.youtube.com/watch?v=e-Pe-IVp_dY
Theory:
Mastering Lighting in Blender the first 25 minutes of the video.
Lighting Basics:
http://www.amaanakram.com/lightingT/part1.htm
https://software.intel.com/en-us/articles/the-basics-of-the-art-of-lighting-part-1-simple-principles-of-and-techniques-for-creating-artful-lighting
http://www.3drender.com/light/3point.html
http://bensimonds.com/2010/06/03/lighting-tips-from-the-masters/
Examples of Lighting:
Some Examples
I will be checking in as will the rest of the Community Volunteers to try and help with anything you all may need.
For a list of the current challenge rules, please see this thread : Challenge Rules
__________________________________________________________________________________________________________
Closing Date: February 28th 2017
Daz 3D is part of 
Connect
DAZ Productions, Inc.
7533 S Center View Ct #4664
West Jordan, UT 84084
Licensing Agreement | Terms of Service | Privacy Policy | EULA
© 2026 Daz Productions Inc. All Rights Reserved.
Comments
Here's what I have to start with. Still needs some texture work on most of the enviroment and what not. Lighting is Iray emissives.
To those who want to learn more about the Uberenvironment for 3Delight, I have made the quick introduction Uberenvironment made easy in Knittingmommys Laboratory.
The quick introduction might be helpful before you read the more detailed Learning UberEnvironment 2 Return to Topic linked by Kismet2012 in the first post.
ooops ... double post! :-(
Thank you MN-150374. I added it to the link list in the first post.
MN-150374 did a great job with that. I still refer to it now that I'm trying to get a handle on 3DL. It's really helped.
Thank you both! Hope it will help more people!
I'm really looking forward to seeing how this progresses. What happens if you increase the emmissives on the red lights? I think it needs more but it will be a fine line between upping the glow and blowing out.
A great start as always Shinji but, for me, the blue is a little strong. But I like the contrast between the overall blue effect and the red of the eye display. It really draws the eye to your character.
I am looking forward to seeing what you do with this.
Here we go...after much pondering, I read the tutorials and am trying to create a scene specifically to learn lighting. So I created a simple still life - a candle on a shelf. No starting PA scene - just a blank scene adding a plane for the floor, cube for the wall, cube for the shelf, and the candle I made last month. Added a spotlight and the flame is emissive. Test render - oops headlight looks like it's on, so I turn that off. Then 10 or so successive renders tweaking the only two light sources. Same results. Then I noticed the light coming in my own window from the sky outside, and wondered if something was going on with the environment. So, being ham fisted, I built walls on the other three sides and added a ceiling and voila - solved the problem. Or at least boxed it in. Then I added a cube with emissive surface as a bounce fill light.
I know the composition is spartan and rough for now - I really want to get the basic lighting decent and then build from there.If last month is any indication, I have no idea where this will end up when I start adding/changing and getting great suggestions, so I'm purposefully going to start minimal :-)
I'll attach some of the early failures below so you can see my frustration...
“I have not failed. I've just found 10,000 ways that won't work.”
― Thomas A. Edison
I used to get extremely frustrated with lighting...still do. But what I have found works for me is to not focus on 1 element too long. I have learned to vary the jobs, ie: placing props, posing, lighting, back to adding props or accessories, tweaking posing, lighting again. This helps me not to get frustrated with any 1 element.
I like your idea of starting with a minimalist scene and kudos to you for starting from scratch. Do keep in mind, however, that lighting will be affected by other props. If I could make 1 suggestion it would be to add a mirror on the wall. It will help reflect the light (and a few other things too )
)
Thank-you Kismet. I'm well on my way to Edison's quote at this rate :-)
Indeed mirror was one of the things I was thinking of...so your suggestion just moved it way up on my list. Among other things, it will reflect not only light, but the sources will show up (I've ruined oh so many family photos back in the day by having the flash be a big dominant light in a mirror in the room that I hadn't considered). But this is supposed to be a "challenge" so challenge accepted :-D
[updated]
I've added a mirror and a vase, both of my own creation (i.e. really really basic)...and incremental step forward, and I'm starting to see what Kismet was talking about. Clearly more needed, and the lighting will need adjusting.
As an aside, if anyone is interested, and someone will tell me how to do it, I'm more than happy to share any of these simple objects with anyone who wants to use them.
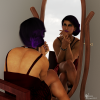
I love playing with lighting - it can really bring an image to life. Here I've tried 2 variations on the same model. One is a single-source setup, the other using just emissives.
I really like both of these. But the emissive one is very striking. Can I ask how long you let this one render? I'm wondering if you let it render longer, a bit of the grainyness(sp?) may disappear. My only other suggestions would be to maybe try bit of a rim light to help separate her from the background. Very subtle though because the lighing is very cool the way it is.
Watching with great interest. I really like the green vase and the green shadow it is throwing. I don't really feel like your candle is throwing out enough light, but that may just be me.
I have no idea how to bundle up objects to share but I am sure someone will come along and explain how to do it.
I like the idea of taking it from the beginning and I think you are on a good way.
As you mentioned that the flame of you candle is emissive I believe you are woking with Iray. From that I will give a few pointers. For one there is a shadow of the candle flame on the wall from your spotlight, this shouldn't be happening. SO what you can do is dial the emissive up until you can see a bit of the light shine on the wall, that should cover that shadow ( for 3delight one could turn "cast shadows" off in the paramters tab for the candle flame or add a linear point light parented to the flame)
Try to add a refection value of about 1.5 to the surface of your bottle glass and turn caustics on in the render settings, tha should result in an interesting light flow through the glass that could be seen on the wall.
A word on mirrors (iray and 3delilght) a mirror needs something to reflect or it will be black, so it was a good choice to have your place boxed in. For the 3delight users: for reflections to look good in 3delight you need to turn the raytrace depth in the render settings to 4 ( for test renders use a lower value, for high quality even higher might be necessary) raytrace determines how many times something would be reflected for two facing reflecting surfaces.
Here's my first draft for this subject.
Thank-you @Ice Dragon Art and @Linwelly.
Man, I've added liquid oxygen to that candle and finally got it bright enough to fade the shadow (as well as turning on caustics and reflectivity as suggested). In doing so, it started casting enough light that the photographer's reflection is now showing up in the mirror ;-)
I like the feel of this visually, but tactically, you can see why emissive HUDs (Heads Up Displays) would attract unwanted attention and targetting ;-) Usually, low-light operational lighting is red (not blue) as it preserves night vision and isn't as visible from a distance...at least for humans. Something tells me there's a heavily armed cheetah about to bring a world of hurt to this person. My suggestion would be the blue lighting would most likely be red, and the HUD might be green (mostly because green says "computer monitor" based on the old DEC VT52 days).
You were right, IceDragon, the rim brings her out a little better. I let this one cook a little longer too.
Any thoughts on this scene?
There's not going to be any "Hentai Noir Snuff" films shot here tonight if she had any say about it.
Oh that looks really good now!
This has nothingto do with lighting but her body posture looks very relaxed. She doesn't necessarily need to look afraid but maybe a bit more on the ready side. LOVE your bad guy (or hey, maybe she is the bad guy)
This, this is wicked cool. Actually very creepy. I love it! I'm not sure I have anything to suggest on this one. It did take me a minute to realize it was a dead body in there, but I kind of feel that actually added to the whole experience so to speak. I'm afraid if you light the face any more then that will be lost. So, I'm going to stick with I love it and let everyone else chime in.
Impressive!
I'm not real good at poses yet. I honsetly have no idea how to add more tension to her pose. Then there's the constrants of her legs poking through the skirt if they move much further than they are.
As for who's the bad guy / gal, that's always the question in Noir fiction, right?
Ya, the whole I can only move my character half a centimeter before dealing with poke through is a regular pain. Posing can be tough, I sometimes google photos of poses that I am trying to recreate. I have found that while there are a lot of really good pose sets, I still tweak most of them to get things just right. Maybe if you lean her top half forward just a bit and instead of having her hand behind her, have it flat against the wall like she is bracing herself against it? I don't think it will take much to change the intent of the pose.
That looks positively gruesome with that broken mask and kind of mummified face. I think it might have more of an impact if the space background didn't looks so pretty and sparkly, kind of upbeat. You might consider using a different background. It can still be pretty, but in a more subdued or even sinister way. There are a lot of space images for free from NASA that would probably work great with that type of image. They have an image gallery you can search for stars or something and they are all public domain images. Which render engine are you using? Looks like it might be Iray. I like the lighting on the face, but the rest of the body might be a little too bright, maybe?
Looks like a fun image. I think I'd try to put more of her lower half of the body in shadows and have more lighting on her upper body or maybe just her face. Play with it. I love Noir, but I can never get the lighting just right myself. It does help to use a photo reference for posing and lighting so do some google searches and see if you can find something close to what you want and then do your best to copy it.
*Hihi* The longer I work with DAZ, the more difficult it seems to handle.
My intention was to create a melancholic Scene, but it's not easy to find a good camera position and I have also problems with the light. Maybe I should reduct the enviroment light a little and find another position for the spotlight in the room. Another problem is the skydome texture. First I tought it was a nice idea for the whole scene, but now I have realiced, that I have nearly nothing in my content, that fits in the scene...especial for a focuspoint outside.
Ah and I have a big problem with the free Window prob. It seems not possible to implie a stone texture on the red wall in this freebie. (Free Bay Window by Adam Thwaites)
Have someone a idea, what it prevents?
I think the camera angle is good. The wide shot really isolates the character, but i'd move her maybe a little farther toward the lower left corner. Of course, then you might lose what looks like a cat at her foot, so i'd have the cat sitting where the vase is in the window, either staring out the window too or staring at the character, maybe licking a paw to show her ambivelance to the world. the scene outside is a bit too bright for melancholia -- maybe dial down the environment to more of a dusky feel.
i don't know why, but the empty chair at the bottom right really adds an element of loneliness to the scene. It's a great start! i look forward to seeing how it evolves.
Stopped this one early because I noticed an odd wrinkle at the right shoulder. Also, it's really taxing my poor system. I need an upgrade...