Daz 3D is part of 
Connect
DAZ Productions, Inc.
7533 S Center View Ct #4664
West Jordan, UT 84084
Licensing Agreement | Terms of Service | Privacy Policy | EULA
© 2026 Daz Productions Inc. All Rights Reserved.
Comments
I so love the beastman KM, it is kinda like vincent from beauty and the beast series that used to be on tv. All your renders are just stunning KM!!!
Great summary! Do you mind if I steal the idea for my one year anniversary next month? I think its a great way to see progress over the year and set some goals in writing where everyone can see it and hold me accountable to at least try lol.
I have really appreciated your friendship, your kindness and all the good advice you have shared with me since I got here. I look forward to seeing what kind of trouble we all can get into in the coming year lol.
Actually, if you are making good progress with Blender (and it looks like you are) then I can't in good conscience divert you to Carrara. Use whatever works to get the results you want. It is just that Daz has these programs (Bryce, Hexagon, Carrara) that offer many of the functions that people naturally ask about as they become more experienced Studio users and eventually want more customization than Studio provides as a stand alone. Yet Daz doesn't support them and the result is that people end up being referred to non-Daz products. Frustrating for those of us that actually are comfortable with Bryce, Hexagon, or Carrara and feel like we have to relearn the same functions in an alien user interface. I will stop ranting in your thread. Have really enjoyed trying to follow along and have appreciated all of the great tips you and others have provided.
.
LOL, steal away. I look forward to reading all about your journey! :) Such nice words! I think I'm lucky to count you as one of the friends I've made here and I'm sure there is all kinds of trouble we can get into. We still have to see what we can do with Skin Builder and those Recipe Cards. I should really add that to my list!
Well, considering I have the program, I would like to know how to use it even if it doesn't become my main rendering platform. I'm a curious sort so I'll be diving into it at some point. As for the others, I agree that DAZ needs to support their other software better. I like Hexagon and I don't plan to abandon it just because I'm learning how to use Blender. I've actually done some pretty decent things in Hexagon and I think learning that first was one of the best things I've done while getting my feet wet in modeling. I still have a couple of clothing projects in Hexagon that I still have to finish, but it is the getting it into DAZ and figuring out how to do the rigging part that has prevented me from finishing. I'm hoping to get those finished in the next few weeks.
I was actually just in Bryce today and managed to pull out my best render from there to date. I was proud enough to actually put it in my gallery. It's just a very basic beginner type render, but it's the best thing I've done in it to date. It is best at full size.
Great job on the Bryce render. You can actually combine the Daz programs in many ways, despite my whining. Here is a free tutorial by Cripeman on bringing Bryce terrains into Carrara along with the ground texture, which can then be combined with G2F and G2M and Carrara's strand-based hair and other features.
Thank you for the video link! I hadn't seen that before and I learned a lot. It's nice to know that I can make landscapes in Bryce and use them in Carrara once I figure out how to use it.
Since this is my anniversary month with DAZ Studio (see previous post), I thought it would be nice to update my avatar. I made my current avatar with Sadie for Genesis and used the cat face dial in one of the morph packs for Genesis with a couple of slight modifications using some other dials to get the look that I wanted. I used the skin from Raw Art's Cat World Regenesis Jaguar to give her some the look and feel of a Jaguar. That image, btw, didn't use the LAMH preset for Cat World Regenesis Jaguar. At the time, I couldn't figure out how to get the Raw Art's preset onto my character so she was kind naked. I mostly just wanted to see if I could do it and what she would look like. I figured since they were both Genesis it should work. Yes, even back then, I experimented. I liked how she turned out and did a fairly good render in 3Delight. At the time, she was one of my best renders in 3Delight despite the fact I didn't know what the heck I was doing. She got a whopping 6 likes in the gallery. I fell in love with how she looked and that's how she became my avatar. I haven't really done all that much with her, despite ideas for several renders for her. I think it was mostly because she was a 3Delight type of figure and, at the time, I didn't want to do more with her until I could be sure I could do her justice in 3Delight. Of course, as most of you know, I fell in love with Iray and I didn't do as much in 3Delight after that.
Well, it is time to dust Jaguar Sadie off and give her some new life. That new life includes a new fur coat. For anyone unfamiliar with LAMH, it stands for Look At My Hair and it is a great plugin for Daz Studio by Alessandro_AM and Kendal Sears, both vendors here at DAZ. There is a Look At My Hair Free Player so that anyone who doesn't have the full version can still use LAMH presets that are available on some animals and figures available in the DAZ shop. In order to make your own presets, you need the full paid version of the plugin. I've learned a lot about using LAMH in Iray while working with AM's animals. I love his animals and I have most of them. Of course, my favorite is his Wolf 2. I use LAMH fairly well, but I've never made any of my own presets. I figured if I want to give Jaguar Sadie new life in Iray, she has to have the LAMH fur, too. So, I'm making her a preset. I've been playing around with it for a few hours and watched quite a few of Alessandro's videos showing how to use it. I have the manual easily accessible, too.
I thought it would be a cool idea to document the growth of Jaguar Sadie's fur here on the thread from start to finish. Anyone reading this should be able to follow what I'm doing and learn how to create a preset of their own, too. Once I'm done, I'll be doing a nice little photo shoot and getting a new picture for my avatar. First, though, I think you should see Jaguar Sadie in her original full size view. I posted her image in the Meet the Muses thread that @divamakeup started because she is my muse and she inspires me each day that I log into the forums. I figured I should show her off here, too. So, this is the original Jaguar Sadie image that became my avatar in full size.
As I said, I've been playing around with LAMH today just to get a feel for the interface and how to actually grow the hair. Up to now, the most I've done with it is take a figure with an LAMH preset into it for a little grooming. For anyone who has seen my wolves, you've seen a little of what I've done. I did some grooming and clumping of fur to give them an all over scruffy look and ruffled some fur so they looked like they had possibly just been in a tussle for dominance. I've learned a lot from grooming those wolves. Hopefully, I've learned enough to groom Jaguar Sadie in her new fur coat.
The following images show what I did today. It doesn't look great, but I didn't expect greatness. I just wanted to grow some fur and take a look at how I want to work on Jaguar Sadie's coat. I think I'll abbreviate her to JS as I'm already getting exhausted typing out her full name already. I can only image what I'll feel like after several posts!
I've learned a few things with my preliminary playing. One, I need to split up the fur zones so that the body, arms, feet, tail, and face are each separate fur zones for more control when growing the fur and grooming. Two, I need to grow a lot more hair than I thought for a decent fur coat. Three, I need to make a density map for JS's face for more control over the fur in that area. Wacky things happen when you just use the face skin material. Fur gets in the eyes and stuff. I need more control than that so I'll have to use a density map. I'll need to figure that out as it isn't something I've in LAMH before. I may have to use more than one fur zone for her face, too. I think here nose needs to be separate from the rest of her face as that might help get a more realistic styling in line with the nose on a real cat and the fur needs to be shorter there than on the rest of her face. The close up of JS isn't the one with all the wacky fur in her eyes as I didn't do an image of that. The close up shows the basic fur with the full back of the head selected and just a few faces selected between the eyes and around the ears.
Hopefully, in a few days I'll have the next installment of JS's fur coat with screenshots of her inside LAMH.
Hi Knittingmommy
I am so happy you are working on a LAMH project, I have been thinking of trying to use it for several animals for awhile now but haven't been able to get a good grasp on it. I'm hoping by following what you do here I may have a chance to use it myself. If it's not too much trouble can you explain how to make a density map? Or point me towards a tutorial or something? Thanks so much for making your laboratory series available here. -Cathy
I have both and I need to learn Carrera as well. I watched a video on sculpting in Blender the other day too and it was amazing. Looks really intuitive. I need to quit my day job so I can learn all this stuff...Oh wait..
that means I can't afford to buy anything at Daz lol.
I was working on my Fenris wolf in LAMH, and splitting up the material zones is a must. I think there is a spot where you can exclude the mouth and the eyes from growing hair but I am not sure off hand where the buttons are. I'm at work today and my daughter bought me an hour and a half massage for mothers day that we are doing tonight so I won't be able to look at it until at least tomorrow afternoon. You might hop over to the LAMH thread and ask, they tend to answer questions very quickly.
Looking forward to this. I've been playing with LAMH and (separately) Hair Particles in Blender. I got a fair way down the path in blender, only to realize there's no easy way to export the hair as an .obj. Back to LAMH. I have been playing with it, and slosh's UHT iray shaders. Gets pretty good results.
@CathyM Welcome to the laboratory! I'm a Cathy, too, or sometimes Cat. I'm still looking at the density maps, but they shouldn't be too much of a problem. I'll explain in detail when I do the face and show exactly how I end up doing them.
Sonja - There is a way to exclude things like the mouth and the eyes themselves if you use the surface zones as the selection for where the follicles grow. However, it doesn't exclude close enough to the eyes and odd hairs tend to still get stuck in the eyes if they are that close. It is better to do as much as you can with surface zones and then do things like the face around the eyes and mouth by selecting the actual follicles in which you want to grow the hairs.
@TabascoJack I'd be very interested in seeing what you've done with it. Are any of the images on your thread done with LAMH hair? I don't recall any. If not, you can always post what you've managed to do here if you want. I'd love to see them even if they aren't fully render worthy yet.
I'll be working my LAMH preset more tonight and tomorrow and grabbing screenshots while I'm working. I should have the first installment posted by Sunday sometime. It's nice to know others are interested in learning how to better create their own hair! :)
The hair on her chest looks pretty good already. Looking forward to following along with your progress!
- Greg
I'm loving the fur! It's really adding lovely dimension to your character!
Ya I will be happy to have time to do some simple renders or work on a couple of post work projects over the next week. The boss is out of town til Wed. which means yours truly will be working his ours as well as my own. (being second boss is nice until someone goes away and you are stuck covering lol) It would be nicer if I wasn't on salary and I got overtime lol.
This is some hair I whipped up this morning, rendered with Slosh's UHT. (I also used the scalp surface from Dove Hair for G3 with the UHT shader and set the rest of the hair to opacity=0, to avoid scalp bleedthrough...although I'm not certain I really needed it).
Nice Tabasco Jack! I think that once we truly figure out all the ins and out of this its going to be incredibly useful.
I think she's going to be a real beauty when you are done with her Cat
That's nice, TJ! I haven't tried doing a human hairstyle yet. Jaguar Sadie will be my first attempt at hair and it won't be that long. When I'm done with her I'll have to give a human hairstyle a try. So, did you use the Dove hair scalp for the outline to grow the hair follicles? I read where Will Timmins said he did that in the LAMH thread to grow hair. I thought it was a cool trick and definitely one I will want to try out when I'm done with JS. I did notice when I was testing things out with JS that selecting the faces in JS's framework don't give great results in some areas as it gives a very squared off look which is why using density maps makes so much sense for some areas like a hairline or to have more control selecting where the hair grows around the eyes and mouth in JS's case.
No, I just used the faces on the G3 figure. It never occurred to me to use the scalp surface from an existing hair product. Which, now that I think about it, makes so much more sense. I did use two shave groups, one for the shorter hair on top and one for the longer hair in the back. You can see where I didn't blend it completely halfway down her head. That was just me rushing through stuff and not paying attention to detail.
@algovincian Thanks, Greg! The fur on the torso and legs are pretty easy to grow and then subsequently groom. The harder parts are the arms and tail sense they go in a totally different direction when in the T-pose. I'll have to play with the tools inside LAMH to figure out the best way to do things. My first assumption is that I should use different hair groups, but that may not necessarily be the case. I'll know more when I start playing with it later tonight and tomorrow.
@divamakeup Thanks. I think it will be a fun project.
Oh, Sonja! Sounds like a busy time. Hopefully, you'll get a little bit of time for yourself while the boss is away!
Jaguar Sadie's New Fur Preset Installment 1:
Step 1:
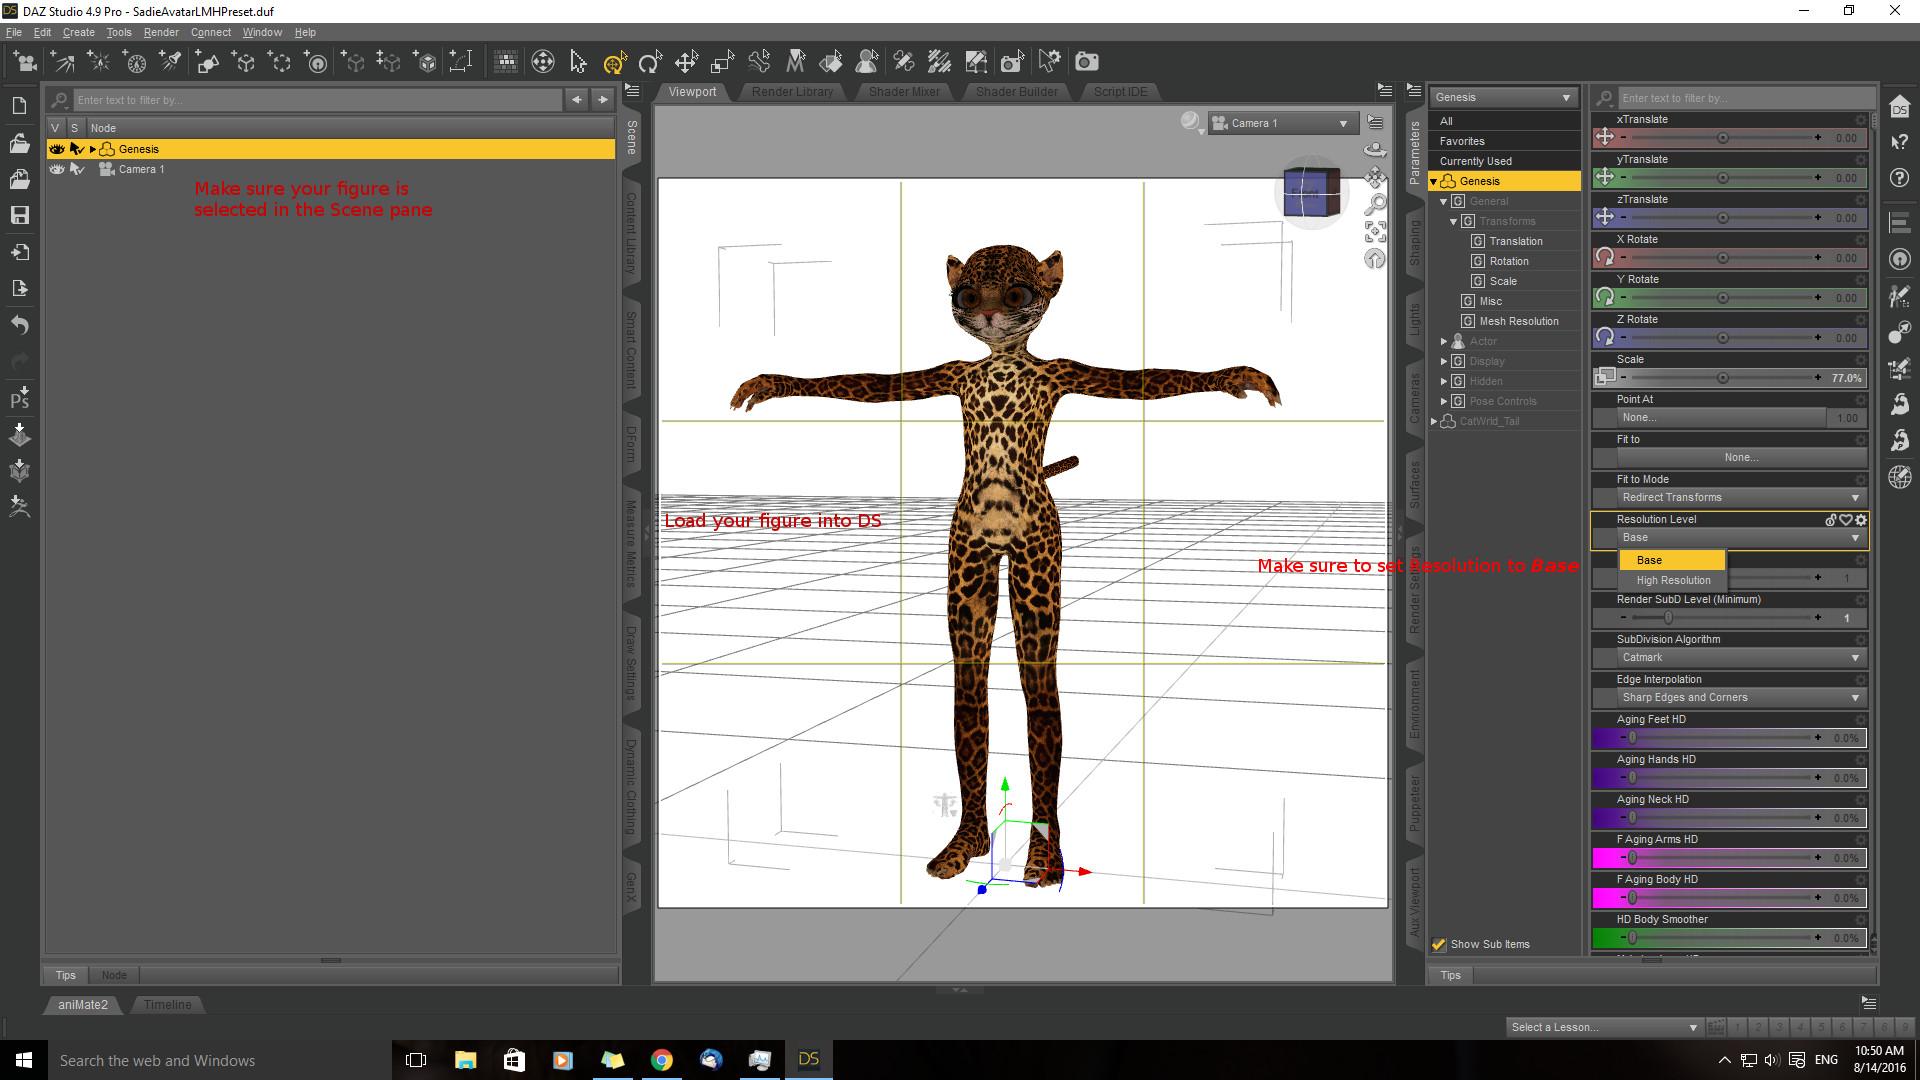
Load your figure into DAZ Studio. I’m working with my Jaguar Sadie (JS) character and she is a Genesis figure. The same steps I take will work with any figure. However, your surface names may differ depending on the figure with which you are working. Once you have your figure loaded, make sure it is selected in the Scene pane. Go to the Parameters tab, scroll down until you find Resolution Level and change to Base if it isn’t already selected.
Step 2:
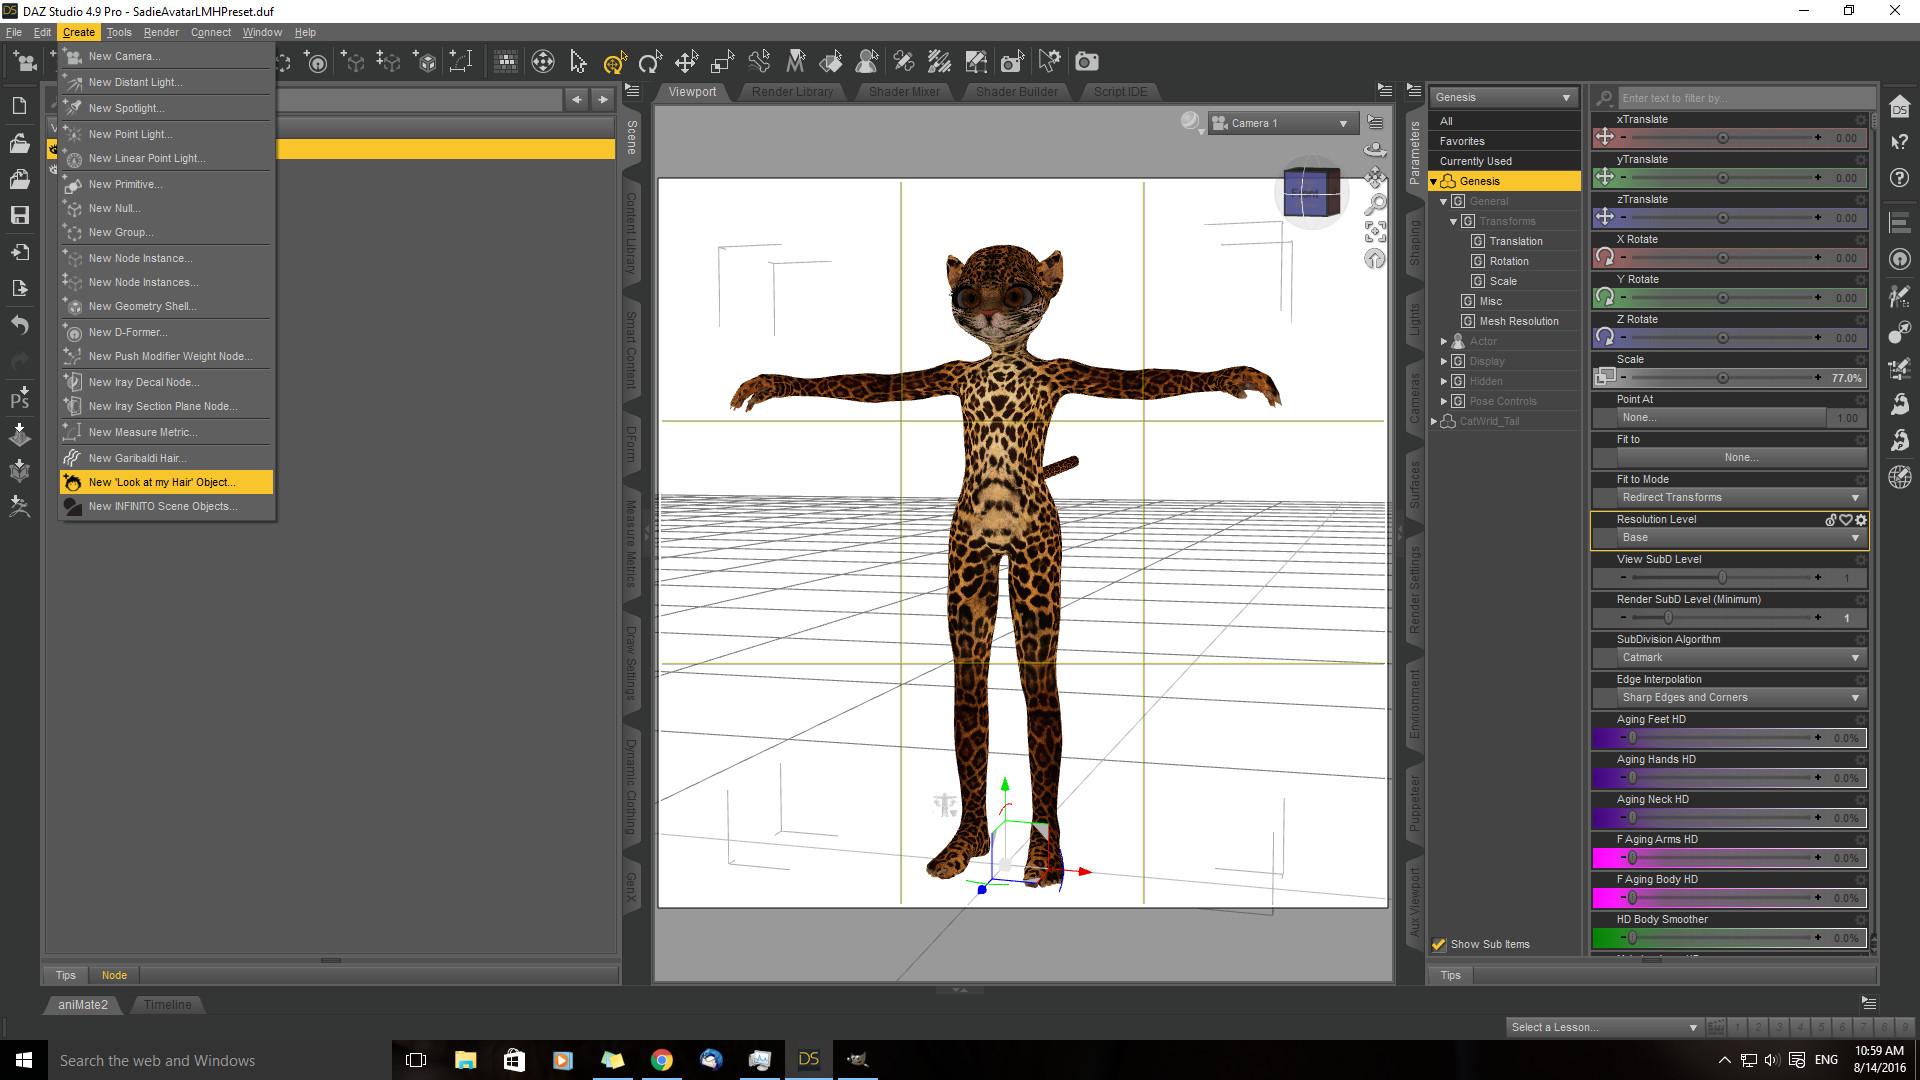
Go to Create>New ‘Look at my Hair’ Object and click. You’ll probably get the busy icon and then you should get a new window with the LAMH workspace.
Sometimes, it opens up behind DS. So, if you don’t see it, click on DS on your Taskbar and see if there is another window behind DS and click on that.
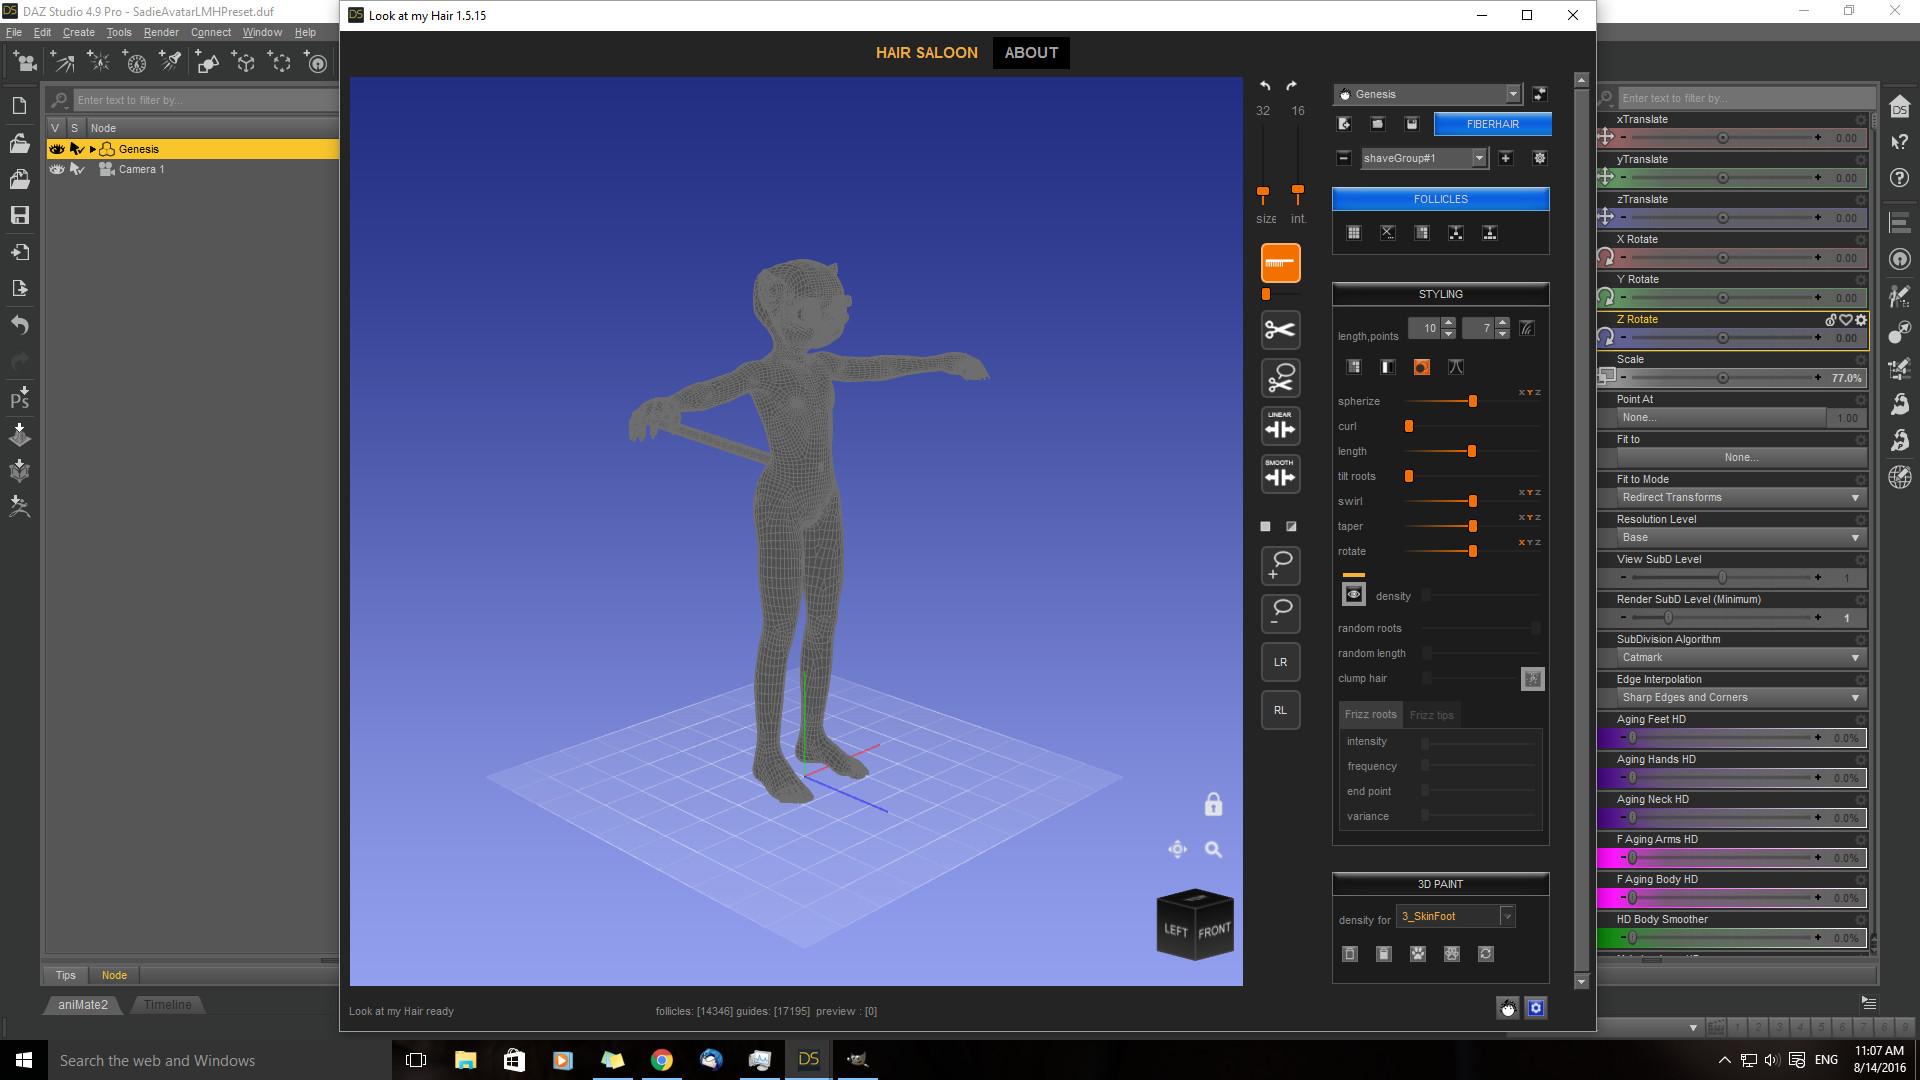
Some things to know before you start. Occasionally, LAMH will open and it doesn’t look like you figure is there. Over on the top right corner of the LAMH workspace is a drop-down menu. There you will find all of the figures in your scene. If your figure didn’t seem to load with LAMH, make sure the figure you want to use is selected and click on the double arrows button to the right of the drop-down menu and your figure should pop up in the center of the workspace.
Moving around:
You can rotate your figure around the workspace with the cube in the lower right corner of the blue screen. Just click on the cube with the left mouse button [LMB]and hold down the button. You can rotate in any direction.
To move your figure up and down, use the icon just above the cube that looks like a circle with 4 arrows by clicking and holding down the LMB. You can move your figure up, down, left and right.
You can zoom in on your figure in two ways. Either use the mouse scroll wheel if you have one or click on the magnifying glass above the rotation cube with the LMB and hold down while sliding your mouse forwards and back until your figure is in the position you want.
Selecting Faces:
Your figure appeared inside LAMH as a mesh. Each of those squares in that mesh is called a Follicle by LAMH. You select the follicles by simply clicking on the follicle you want with the LMB. You can deselect by holding down the Shift button and click the LMB. When follicles are selected they turn red. Red follicles grow hair, grayed out sections will not have hair.
To select more than follicle, you can use the lasso tool which is found to the right of the blue workspace. The lasso tools are the two icons that look like a circle with a plus and minus symbol. The plus lasso selects follicles and the minus lasso deselects follicles.
You can also select follicles by using the options in the box to the right called Follicles. In the box you have five buttons.
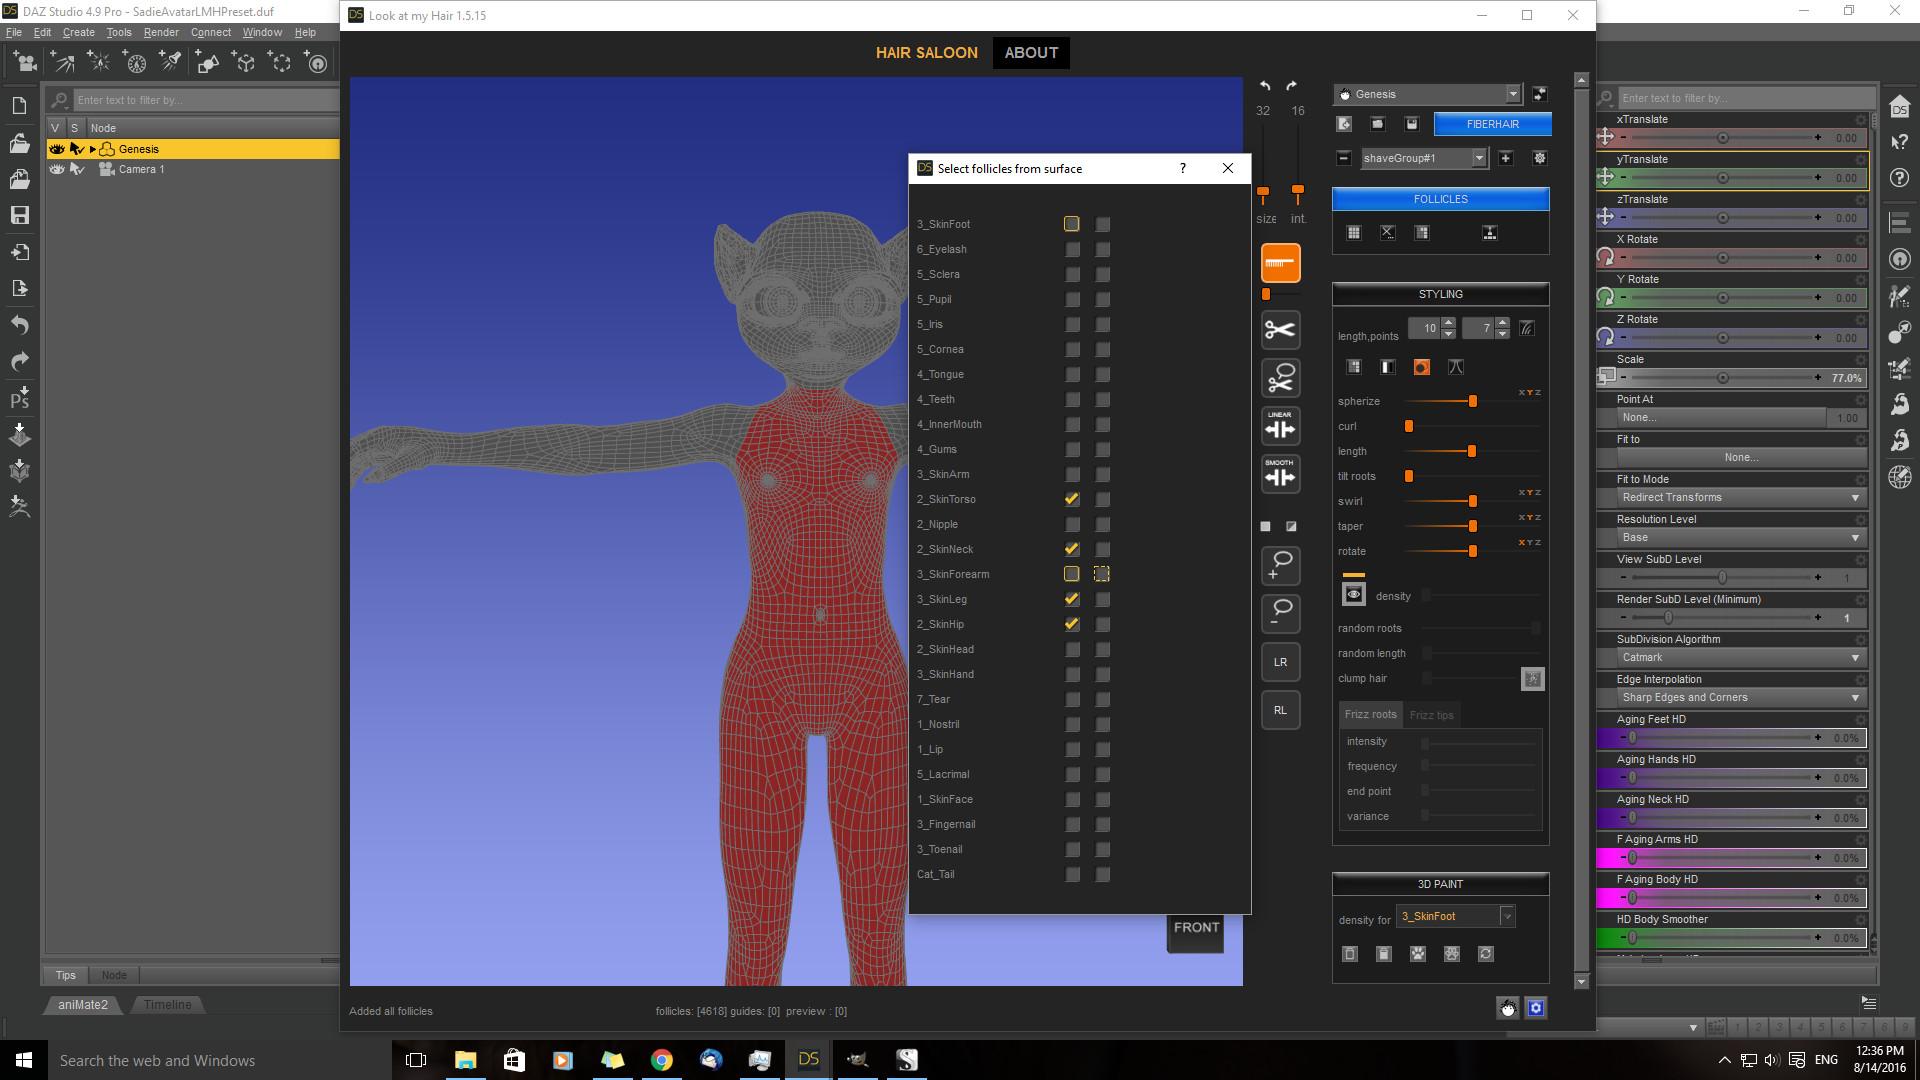
Button 1 (button with the 9x9 grid) selects all follicles on your figure. Click on the button and a pop-up appears asking if this is what you want. You chose yes or cancel. If you decide you don’t want to keep any of the follicles you have selected on your figure, then Button 2 (the one with the big X) will Delete all Follicles. Or you can select follicles by surface names. Button 3 (partial grid pictured) opens a box which has the names of all of your figure’s surfaces. You have two options inside that box. You can chose which surfaces get fur with the first column or you can hide surfaces with the second column by selecting or deselecting with the LMB in each of the boxes.
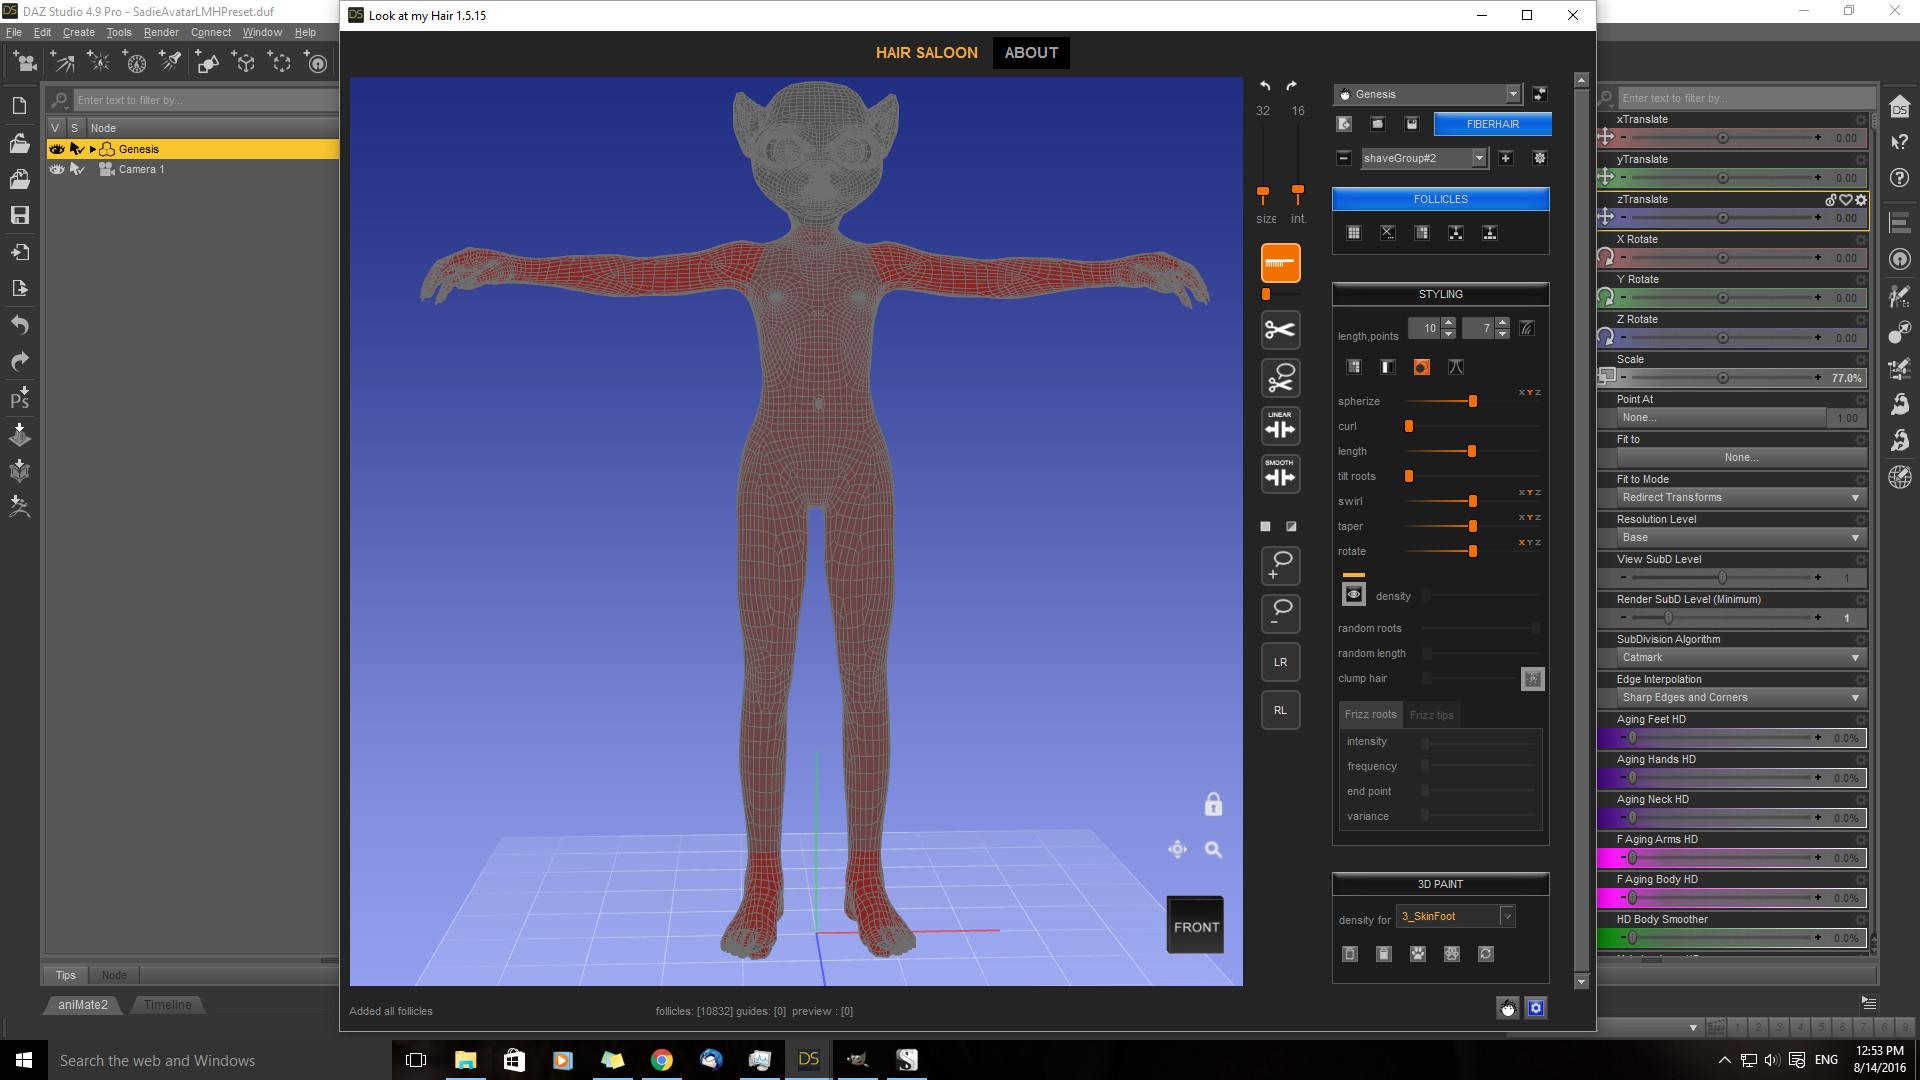
As you can see with Jaguar Sadie, my first shavegroup is going to be her torso, neck, hip, and legs. All of those follicles will be going in the same direction when I’m ready to groom the fur so I’m keeping them in the same shavegroup. When you start up LAMH, you are given a default shavegroup#1. In a lot of instances, you will only need one shavegroup. If you have a more complicated project where you need a group of hairs to be groomed or behave differently then you will add shavegroups for each type of hair you want. You can have two shavegroups with the same follicles selected and have each group groomed or behave differently. In my case, I’m using shavegroups for hairs that go in different directions which I hope will make grooming easier when I get to that part.
So now, I have my first shavegroup. To add another, I click on the + button next to the shavegroup drop-down box. A shavegroup#2 will be created. For shavegroup#2, I’m going to select by surface names again and chose skinarm, skinforearm, and skinhands. Shavegroup#3 is going to have just JS's skinfoot surface selected. And, finally, JS's tail is going to be selected for shavegroup#4.
As you can see in the screen-shot, I know have two different colors of red on my figure. The shavegroup which is selected will appear darker and brighter and the groups not in that shave group will still be red, but the color is now muted.
Saving your Project:
If you happen to be following along with your own project, now would be a good time to save your project. Over to the right of the workspace at the very top is a set of buttons under the drop-down menu for the figure selection. These icons are where you can export hair, load a project, save a project or export FiberHair. Exporting hair will put your finish hair into a .obj format for use in other programs. Load a project will load a saved project file with a .lmh file extension. Save a project will save your project in a folder as determined by the parameters in the setup. On my computer, this is in Knittingmommy>Documents>DAZ 3D>lookatmyhairAM>presets.
That’s it for this installment. JS’s head will be done separately with a different type of selection not mentioned in this installment. The next installment will grow the hairs on the shavegroups I currently have set up and groom them. I'll show you how to load your saved project since no FiberHair has been grown and put on the figure, yet, in DS. If you have questions on what I've covered in this installment, please don't be afraid to ask. While I am trying to include all of the steps that I've used, please remember that this is my first preset, too, and I may forget to mention something that you think is important information.
Excellent explanation very easy to follow!
Thanks for the explanation. I just picked up LAMH and have no idea how to use it. This will be very helpful.
Thanks. I'm glad it is helping. Dentist appointments and kids got in the way of doing the next installment, but I promise to have it up in the next day or two. It won't take you guys so long to follow the steps, but doing all of the screenshots and making sure I don't forget to write down a step really adds to the length of time it takes to write up the tutorial! :)
Yes tutorials do take a lot more time than people sometimes realize. Much much appreciated! I have to go have a chat in the LAMH thread, mine started crashing all of a sudden. Every single time I load it and try and work on even a preset (just picking a part of the wolf to lengthen hair made it crash. Three times then I gave up in frustration). Started after the update so I am wondering if I need to uninstall and re install it and see if that helps. Will try and get over there when I get home from work and after dinner. Or maybe tomorrow lol.
Ah, can't help you there. I must be lucky. I've never had LAMH crash on me, yet. I've had to deal with a couple of corrupted files which made DS crash with LAMH. Still not sure what happened there, but I was able to sort of recover somewhat. I hope you get it figured out.
Yes DS crashes completely. I will check over in the other thread tomorrow, too tired to try and deal with it tonight.
So, I got distracted a little bit by some Plushies. Now that DS is free again, I'm working on the next installment of Jaguar Sadie's new fur coat today. I should have it posted by this evening sometime.
Original Iray image:
Post with 3 FF filters: Skin Softener, Fantasy and Dreamy
A combination of 4 FF filters: Skin Softener, Fantasy, Dreamy and Crosshatch Drawing
This was sort of an experiment using the previous two images to keep the crosshatched image for the background and use the other image for the Plushies. Kind of cute and not exactly what I was trying to achieve, but overall not bad.
Hi Knittingmommy, I took a break for a few weeks. Looks like I have missed a lot. It will take a few days to catch up.
So far, very good modeling work in Blender. And belated congratulations to your anniversary. Funny plushies scene, very nice effects! :)