Daz 3D is part of 
Connect
DAZ Productions, Inc.
7533 S Center View Ct #4664
West Jordan, UT 84084
Licensing Agreement | Terms of Service | Privacy Policy | EULA
© 2026 Daz Productions Inc. All Rights Reserved.
Comments
Ah, well since I don't do well in 3Delight, yet, tips on lights and render settings are always helpful. I'm trying to do my latest wolf render in 3Delight and, so far, it isn't looking all that great yet. But, then neither is the Iray version so it might be the artist and not the render engine. So, I've put it to bed for a few days while I work on my new user contest entries.
If you want to write up some tips, go for it. I think it would be handy to have in the thread and I love having others participating in it, too. I do try to read that 3Delight tips thread, but there is so much information in there that I sometimes feel like I'm on overload when I leave there. I do have to say that I do learn while I'm there, though, as some things have stuck while I'm playing around in 3Delight.
I just visited your gallery - love "Barbult's Workshop." I have two little budiges, and I know full well how they can get into trouble. I've had papers in my purse chewed up. Love to get a budgie for Daz, but I haven't found any that look real for close ups.
By the way, I had wanted Noggin's Real Macaw, but never bought it because the promo page says "Poser Only." How did you get it to work for Daz Studio?
@dracorn I loved working on those Barbult images and I think the workshop is my favorite. I've never had birds myself, but my brother-in-law had some for a long time. I think his were two cockatiels. They were the smaller ones not the bigger ones. Very cute birds, but they could really get into trouble, too! Very funny birds.
I had some technical issues with some poses, but I managed to work them out. Manually posing them was better than using the included poses with the set. Every time I posed with an included pose, I got these weird geometry glitches where I had things flying out in unexpected places. I haven't tried all of the poses yet so I don't know if they all act that way. It was just quicker to do my own poses. I've never seen anything like that before so I'm not sure what the issue was. As for textures, those seem fine. The ones I used were just the default in the pack with the Iray Uber Shader applied. I assume that they would work fairly easily in 3Delight as well. It was on my wishlist for quite awhile. I like Noggins animals. When his store went on sale and there was a good excuse to go ahead and get the Macaw, I also picked up a couple of other animals. I haven't tried them out yet, but I believe they were listed as both Poser and DS compatible. I'm not sure why the macaw is listed as Poser only. We'll see.
It just says "Compatible Software: Poser" and at the bottom it says: "Note: this product works in Poser only." But If you got it to work, then I'm going to get it!
OK, so here's another question. I've been searching all over for instructions to create links in my signature. This much I have been able to figure out:
1) Type the desired text and format it.
2) Copy the desired link. Click on the Link icon and paste the URL info in the box.
So what to I put on the Target tab?
Look for SBRM Pet Shop by Ken Gilliland at Hivewire3d ...
Not as good, but free: http://www.lynescreations.com/lynefree34.htm
This is a free prop: http://www.most-digital-creations.com/budgie.htm
So, instead of working on my entries for the New User Contest, I've been playing in 3Delight. I know that might shock some of you, but I have. I was inspired. There have been all of these great images in the Non-photorealistic Renders (NPR) thread. I, especially, love the things that @algovincian manages to create. He does some amazing work! However, there are some other really talented people showing their stuff off in that thread, too. I love the images even though I don't usually do that sort of render. Which, of course, makes one wonder why I have managed to collect a lot of utilities and tools for making them! I have no idea why I collect some things despite their not being exactly in my wheelhouse. Anyway, with the new sale today, I happened to see the Poodles and Soxs by SilverElf on sale in the stuff that was 80% off. Since I was already getting DraagonStorm's new Motion Blur for Iray, I picked it up. I thought it would be perfect for a render in Miranda's Ice Cream Parlor by SloshWerks. I love that set. @Slosh did a great job with it. And I've actually been working on a couple of different images using it. Nothing is ready for my gallery yet, though. I think the set is amazing and I plan to have lots of fun with it. Anyway, the Poodles and Soxs outfits are for Toon Girl Sadie and Toon Boy Sam, the original ones, by 3D Universe. While I have Sam and Sadie for Genesis, I thought I would challenge myself with the original figures as I have practically nothing in the way of morphs or expression packs for them. All I have are what come with the basic packs. I also have Toon Gramps and I threw him into the ice cream parlor, too.
Anyway, I thought I would experiment with the toon stuff that I have. Here is the basic image that I started with:
This image is just with the regular 3Delight camera. I like it and it's a good render, but I wanted to play with some of the toon stuff. So, first up was Camera Magic: ToonyCam Pro by Zigraphix. I liked the results and there are a lot of options. I just ended up trying a lot of them to see what they looked like. Somewhere along the way I broke the cameral. I'm not sure what I did, but it stopped working and I got a lot of shader brick errors. I have no idea what a shader brick error is. Luckily, I had saved so I just closed out DS and reloaded my scene. I went on to do PWtoon which is a DAZ Originals and then came back to the ToonyCam later and it was working again. I, also, took that first image that was done in just a regular 3Delight camera and took it into FilterForge and played with some of the toon shaders in there. I got a couple of interesting looks. Anyway, it was an interesting experiment. I liked some of the results I got. I don't know if I'll be doing anymore NPR type images, but it is nice to know I can get some cool effects.
So here are the images I got and the tool I used to create each.:
Camera Magic: ToonyCam:
FilterForge: 21st Century Pop Art
FilterForge: Comic Book:
FilterForge: Crosshatch Drawing:
FilterForge: Crayon Master v2:
FilterForge: Comic Stylize:
If you want to see the full image, just click on it. I made the images smaller than usual because I wasn't sure how the forums would react to so many pictures in one post at the usual 800 px. I think my two favorites are the Crosshatch Drawing and the Comic Stylize. This last one is the one I'm going to put up in my gallery. I noticed that Comic Stylize and Camera Magic: ToonyCam both have similar styles. However, I like the way the Comic Stylize in FilterForge turned out just a little bit better.
I might have to do this again sometime. It was fun. One nice thing about Slosh's set is that I didn't actually have to do much in the way of lighting. He did it all for me. I just had to reduce the intensity of the lights a bit because they were rather bright for the comic effect I was going aiming at. I do have to say that I love a set that can make me look good in 3Delight!
@dracorn Good question. I have no idea. I went in to mine to double check and I left that blank. I'm not sure what is suppose to go in there. However, the links will work without a target set as long as you have the link in the box for the link.
Thank you for the Filterforge examples @Knittingmommy , although it did cause me to go into a Filterforge filters download frenzy!!
You're welcome, @KA1! I really like FilterForge! I imagine it will take a little experimenting as not all of the filters looked that great on my image. I don't know how much impact a specific image style or content affects how the filters are laid out by the image. While I had some great effects, not all of the presets for any given filter worked well. Or, at least, I didn't like how some of the presets affect my image. It is possible I would love the ones that didn't work with another image. I'll definitely play with it again. I just don't know when. But this was fun!
Of course, since I uploaded all of that well past my bedtime, I forgot to upload the PWToon version of the image. So, I'm adding that here rather than add it to the post above. It is rather full of images and I don't know if there is a limit length-wise for posts. It was really similar to the Magic Camera: ToonyCam version, however, there are some slight differences.
PWToon:
That looks really good! So far, I haven't tried pwToon yet (I do have it though), I've been experimenting with Visual Style Shaders mostly and some ToonyCam pro, for the Sapphire and Steel image in my gallery I actually composited both Toonycam and VSS renders together, iRay still snuck in for the background though (albeit processed through a FilterForge filter to get the finished effect):
Nice. I have the Visual Shaders and the Manga Shaders, but haven't used them much yet. I also have all of the Eustance Scrubb products. I have one image in my gallery that I did when the Skunkville Noir first came out. I had no idea what I was doing with it, but the image wasn't too bad for a first effort. I, actually, didn't know that DOF doesn't usually work well with this type of render and I used it anyway. I got a real nice effect. I haven't really played with it much since then, but I may give it another try sometime.
Rendering LAMH Presets in 3Delight
1. Scene Setup
2. Render Settings
3. Light Set
4. Postwork
As I promised I would like to give a few tips for rendering LAMH presets in 3Delight. Before I get lost in details and parameters, I chose to make a simple scene with a LAMH figure and provide a brief description of how it was made. In the following example the Wolf 2 by Alessandro_AM was used. You will find this preset in My Library => Animals => AM => Wolf 2 => LAMH Figures
The scene can be rebuild easily with any other LAMH-figure you might have. It is only important to have the LAMH-Free-Player or the full LAMH Plugin installed and the LAMH presets are loaded correctly. Please make sure only one of those is installed. Otherwise you will recieve error messages while loading LAMH presets.
In the following description I would like to explain, how this image was made:
Scene Setup
I have loaded the preset Wolf 2 - Brown and created the floor and walls using three primitive planes. The primitives are textured with free resources from the Pixar Library.
Render Settings
Preliminary a few tips on the most important Render Settings:
For more informations take a look at the Free Render Profiles for 3Delight by adamr001: http://www.daz3d.com/forums/discussion/16085/render-profiles-for-daz-studio-4-5/p1
Light Set
As basic light set I have loaded the free Light Set Standard Kit provided by Alessandro_AM, which you can download there: http://www.daz3d.com/forums/discussion/comment/819390/#Comment_819390
With this Light Set one Distant Light and one Uberenvironment2 have been loaded into the scene. At both lights no changes have been made. Besides rotating the Distant Light until I liked how the shadow is falling.
A general reference to Uberenvironment2 (UE2), if you have an UE2 in your scene and you wonder about long render times, it is most likely due to the parameters Shading Rate and Occlusion Samples.
For the Shading Rate in UE2, same thing applies as we have seen with the Shading Rate in the Render Settings: Low value brings higher quality and longer render times.
For the Occlusion Samples: High value means high quality and longer render times.
To keep this a short description I will not dig deeper into the UE2 parameters, for further information about the UE2 please take a look at the Experiments by adamr001 and the tutorial Uberenvironment2 made easy.
As a backlight an UberAreaLight - Plane was loaded and positioned to brighten the back of the wolf.
The Uber Area Lights can be found under the following path: MyLibrary => Light Presets => Omnifreaker => Uber Area Light
Because the UberAreaLights are based on geometry, first go to the Parameters tab and switch Cast Shadows to OFF. Depending on your scene, it may otherwise occur that unwanted shadows by this geometry will be caused from other lights in your scene.
The actual parameters of the light are in the Surfaces tab. Make sure the parameter Fantom is set to ON. With Fantom ON the UberAreaLight works only as a light source, but the geometry itself is not visible in the render.
In our example, I have set the parameter Falloff Active to ON. With the parameters Falloff Start and Falloff End it can be adjusted where the light begins to fade, and where it stops completely. I have both values adjusted and the light indeed lightens the back of the wolf, but will not hit the floor. Pay also attention to the Parameter Samples, high values will bring high rendering times.
Many more useful information about the UberAreaLights you can find in Szarks UberAreaLight Tutorial.
Now I wanted the face of the wolf a little bit brightend. For that reason a Linear Point Light was loaded. ( Create => New Linear Point Light )
The advantage over the default Point Light is the useful Falloff option, same as we have already seen in the UberAreaLight parameters. However, the parameters for the Linear Point Light are this time in the Parameters tab. The option Shadow Type should be set to Raytraced (Software Only).
And thats it about the lights. The Final Render looked at first like this:
Postwork
In the next step the Final Render was loaded into Gimp and duplicated twice ( Layer => Duplicate Layer ). The Layer Mode of the first copy was set to Screen and for the second the Layer Mode was set to Overlay . Now I have played with the Opacity of both Copy-Layers until I liked the result.
To create the vignette you need a new layer ( Layer => New Layer ). I clicked the Elliptical Selection (red) in the toolbox and pulled a rectangle from the upper left corner to the lower right corner of the image. Next step is to invert the selection ( Select => Invert ) and fill the area with black color using the Paint Bucket (green). The selection needs to be disabled afterwards ( Select => None ).
Now go to Filter => Blur => Gaussian Blur to soften the edge of the vignette. I chose a value of 100 in that example. If you hide the other layers your result should look something like this:
Now adjust the strength of the vignette effect with the Layer Opacity.
And finally, there we have the Final Image again and I hope this explanation was helpful!
Back to the start.
A German Version of this Description is available in the German FAQ / Eine Übersetzung ins Deutsche gibt es in den Deutschen FAQ
-----
Edit1: Added the link to the free Render Profiles by adamr001 in Render Settings and added more precise GIMP commands in Postwork.
Edit2: Added the link to the follow up tutorial Uberenvironment2 made easy in Light Set.
Edit3: Someone deleted MyGallery. Render reuploaded.
Thanks for the tutorial, MN-150374! It will come in handy since I have a wolf render I'm actually trying to do in 3Delight. Somehow I missed that particular thread so thanks for sharing it! I know I bought the foxes, but somehow missed the commercial thread. I appreciate you putting this up on the thread for me! I know I'll be referring to it as I go along because, so far, my wolf isn't looking all that great in 3Delight!
Well, I tried to keep this as general as possible. It is easy to get lost in the interaction of all the details. Just look at my description as an inspiration. Nothing is set in stone and what seems logical for me maybe is confusing for you. So further questions are welcome and I will edit what is missing.
And believe me, my own workflow isn´t that straight forward like the tutorial may suggest. I made the render and wrote down the single steps. The structure came afterwards. :-)
So, I have an apology to make to @Dimension3D. I started this thread off by talking about my experiments with converting Daemones by MortemVetus from M4 to G2M using Genesis Generation X2 by Dimension3D with the GenX2 AddOn for Genesis 2 and yet never once did I provide a link nor did I credit Dimension3D with being the vendor of the product. I've since updated my original post and added the links to the product. I'll, also, be updating the tutorial I did so that all links to the program are provided. So, my apologies to Dimension3D. It is a great product, by the way!
@knittingmommy asked me to post some information in the laboratory on using Iray canvases. Rather then duplicating part of a larger tutorial that I just posted in my thread, I'm simply going to link to the specific post on canvases.
Thanks, @TabascoJack! I saw you start that tutorial earlier in the day. I had a chance to read the first post before I got side tracked by everyday life. I'll have to go read the whole thing now that you've finished. I already know the first post was awesome so having a link to your thread about the canvases is very welcome! I can't wait to learn how to use it so I can try it out!
So, among a crazy busy life and a suddenly, sullen, angry teen, I managed to get some experimenting done with Tonal Rage - Tone Mapping Kit for Iray by DimensionTheory. I couldn't resist doing some more work with the new man in my life, M3D Landon HD Morphs for Michael 7 by Male-M3dia. I used him for my Harmonica Soul image in my gallery which I thought turned out fairly well. I like his rugged good looks and he has some distinctly asymmetrical features. So far, I've only used the first head and body shape. I have plans to try them all out eventually. So, I reworked my pose with that character and I dressed him in some PJ's and redid the textures to something more unique. I adjusted my lights just a little more, but kept the same basic setup. I do have to mention that I did make a change during this whole process. I like using Mec4D Unshaven. It is a great beard with a ton of styles. I am not always successful in getting it to play nice with some G3 males. The mustache was doing some strange things and I ended up trying out Whiskers for Genesis 3 Males during this whole process. I really like that beard cut in Unshaven, though, and it isn't an option for Whiskers. In the end, I used both Mec4D's Unshaven and the mustache from Whiskers to get the look I wanted. I'm not happy with it. Now that I'm getting better with LAMH, I may take Landon in there and try to give him a beard in there.
Once I was happy with everything I ran a render in Iray. I really liked how it turned out. No snickering over the name I gave my files! I happen to think Landon is very sexy!
Final lighting used with all other Tone Mapping presets (I had to tone the light down from the original just a smidge on one light):
Then, I used Tonal Rage, but kept all other settings the same. I have to admit I just jumped right in and I haven't tried tracked down a readme as I don't think there is one. There isn't one listed on the Product Page in the Documentation Center. So, I don't know if you are suppose to reset all of the values before trying another. I'm assuming, not, at this point because all of the presets seem to take care of making sure all of the tone mapping settings are where they should be for each particular preset which is good. That means I just get to push buttons and see what happens. I love that quote. I forget who has that in their signature in the forums, but I get a chuckle every time I see it. So far, the MutedD preset is my favorite of the bunch. I do love being able to do the B/W as a render, though. I'm thinking I need to totally rework that one image in my gallery where I tried to do a kind of Noir P.I. piece that kind of fell flat. I did the B/W in post, but I don't think the lighting was quite right and it didn't translate as well into B/W as I would have liked. Here I can see on the fly how my lighting looks in B/W and change it which is great. One of the things I was impressed with is that all of the tone mapping settings show up in nVidia mode in the viewport as well! I love that. I wasn't sure if it would, although, I thought it should since having that nVidia option in the viewport usually shows what the actual render should look like.
Tone Mapping-PunchyB preset:
Tone Mapped-MutedD preset:
Saturation 0.0 preset:
White Balance -A1 preset: It is really hard to tell a difference between these two, but there are some very subtle differences.
While I have a favorite at the moment, I plan to use the same setup and try some of the other settings so that preference might change. At this point, I don't know which version is going to end up in my gallery. You'll know when I do. I have to say that this is definitely opening up some possibilities I hadn't thought of because I've only ever played with a couple of the tone mapping sliders. Most of them I don't know what they do. I have a feeling I'm going to learn, though, while I play with this little gem of a script. The fun factor alone was worth getting this, but learning how to use the tone mapping and, what the final results are, is the end goal. I don't think this will be the last you see of this project. I have some other experiments in the works that will be popping in soon, but I'll come back to this as I play with more presets.
Okay, so while I was writing this piece, I thought I would run one last render for this post as I hadn't run any of the harsh settings. Again, I didn't reset anything so I was starting from my last B/W render settings. I chose the Tone Mapping-HarshF which in the icon pic looks like it should still be in color. The render wasn't, it was still in B/W and yet it looks like the other settings changed as the look is definitely harsh and kind of giving off a brooding and mysterious tone which was not the look I was originally going for with this piece. Brooding, maybe, mysterious, not quite. Originally, I was actually going for a brooding/sexy look. I have to say that I kind of like the image that is popping out though. One good thing about the b/w, it renders so much quicker than a full color render! I'll have reset all of my setting to the default and retry that HarshD setting.
Tone Mapping-HarshD(from a White Balance-A1 preset): This one really needs to be seen full screen since it is so dark.
I'll be doing more experimenting with this one. So far, I love playing around with it to see what I get.
I like the hard black and white best, its a really nice effect. What I noticed and wondered about is that I have the impresseion that the SSS or Translucency (not sure what it is for Iray) seem rather high. When I look at his left shoulder and upper arm there is a rather high amount of light shining through him making his skin pinker than I would expect, The way on his right side is more what I would expect.
I kind of like the really harsh black and white one the best as well. I picked this up as well, haven't really had a chance to try it out in full though. I am looking forward to learning a bit from this as well...
I used Ragnar's skin which comes optimized for Iray already. I like how the skin looks without tweaking. In Iray, there is still Translucency and SSS. I did a screen capture to show his surface settings which I haven't touched from Ragnar's default settings.
There is something eerily cool with him coming out of the darkness like this!
Isn't there, though? When I saw MN-150374's image, I thought that would be a great lighting situation to play up some more! I do like what he finally ended up with, but that image is very cool!
So, I went back into DS and opened up my last SexyLandon file that I was using last night. I reset all of the render settings back to default which reset the tone mapping. Someone really should have that as a separate option to reset just the tone mapping because using the reset button resets ALL of the Render Settings so I had to go back and redo all of them. For now, I've noted what the tone mapping defaults are and I'll think about trying to create a custom action for that while I'm working with the Tonal Rage.
Anyway, I wanted to see what that last setting, HarshF, would look like from the default set with my lighting. I got this:
Not bad, but not something I would have intentionally tried to create. That will be all I can play around with this for now. I really need to get started on my entry for the New User contest. I've had an idea for a few days now and I've worked on one part of it. I haven't, however, started on the figures for it and I really need to get it started and uploaded to the WIP thread. I'll revisit Landon again with more presets. For now, he's stuck here in the lab, not being uploaded to my gallery.
For sure it is an interesting side product. :-)
By the way, I have edited a few things in the tutorial. The free 3Delight Render Profiles by adamr001 are in there now and some GIMP commands became more precise.
Thanks! This will come in handy when I try to finish my wolves in 3Delight. I had to put them on the back burner for a little bit. But having those links will certainly come in handy!
Uberenvironment2 - made easy!
Introduction
Some time ago InaneGlory has posted a short but very good description of the Uberenvironment Light (= UE or UE2):
These words are here and now maybe torn out of context. Nevertheless, they convey how and why the UE2 in DAZ Studio/3Delight can be used. The UE2 adds to the scene an overall lighting. This works even without Environment Map. This color filter is only an additional function commonly used, but not a basic requirement.
The UE2 can do even more! It also mimics the behavior of light in the real world, which is called Bounce Light. In the real world light can not get lost. It is reflected from any surface it encounters. The light will bounce from one surface to the next until it no longer finds something to bounce off.
These instructions will only cover the most important settings and parameters of the UE2. With this basic knowledge, it will be easier to explore the further possibilities of UE2 and carry out your own experiments.
To find a detailed description of the UE2, please take a look at Omnifreakers Homepage, the programmer of the UE2:
http://www.omnifreaker.com/index.php?title=UberEnvironment
http://www.omnifreaker.com/index.php?title=UberEnvironment2
At the DAZ Forum Adamr001 has made a detailed documentation about the UE2. There you will find a large amount of test renders, which illustrate most of the individual parameters: http://www.daz3d.com/forums/discussion/5320/learning-uberenvironment-2-return-to-topic/p1
The following description is a translation of the tutorial Uberenvironment - leicht gemacht! posted earlier in the German FAQ.
Overview
Please make sure that you have installed the package Default Resources for DAZ Studio 4.9+ from your Product Library.
If you have this package installed correctly, you will find the UE2 under the following path: My Library -> Light Presets -> Omnifreaker -> Uberenvironment2
In this folder are located the UberEnvironment2 Base (marked in red) , many presets for light (blue) and quality (green) and a former useful tool that is called HDR Converter (yellow).
By double-clicking the icon UberEnvironment2 Base the UE2 with Environment Sphere is loaded into your scene.
The UE2 is already operational. The Environment Sphere will not be rendered by default. The initial purpose of the Environment Sphere is to serve as a preview, when an environment map is used.
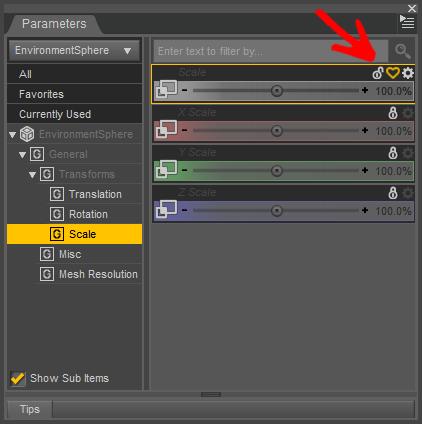
If the Environment Sphere is in your way, you can hide it in the Scene tab. Or scale it down to a bearable level in the Parameters. The locked parameter Scale needs to be unlocked before.
If you select the UE2 in the Scene tab to take a closer look at the Parameters tab. You will see more subcategories in the main category Light.
Now, if you start to apply different presets from the Uberenvironment2-Folder, you will notice that certain presets always change the same parameters. Actually, it happens nothing exceptional. It is only depending on whether you applied a Light or Quality Preset , what parameters will change and also what parameters remain unchanged.
In the screenshot above, those subcategories were marked in blue, where you will find changes by applying a Light Preset. Marked in green, there you can find changes by applying a Quality Preset.
Light Presets
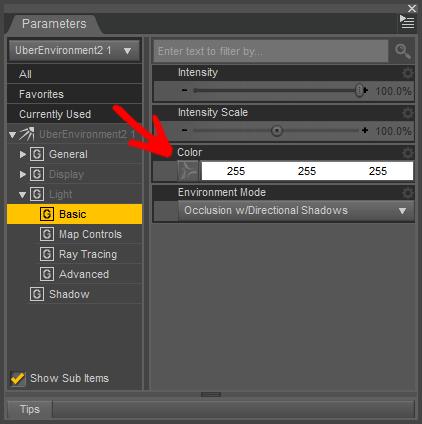
By applying the Light Presets the possibility of Image Based Lighting (IBL) will be activated and in Basic an image is added to the parameter Color.
Like InaneGlory told us, this image is the Environment Map which is used as a kind of color filter. Since DAZ Studio 4.7 any HDR-Image can be used there. In older versions only an image file with the file extension .tif was recommended there. The HDR Converter mentioned above is still capable to convert .hdr-files into .tif, but we do not need this anymore.
In DS usually so called LDR (Low Dynamic Range) images are used. These LDR's work in RGB color space, the color gradations works with "only" ca.17 million (256x256x256). The HDR (High Dynamic Range) files work in a larger color space and have therefor even more color levels.
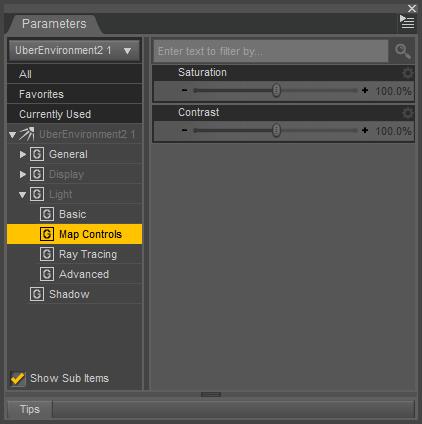
In the category Map Controls no changes will take place through the Light Presets. But with the parameters Saturation and the parameter Contrast the effect of the Environment Map can be adjusted.
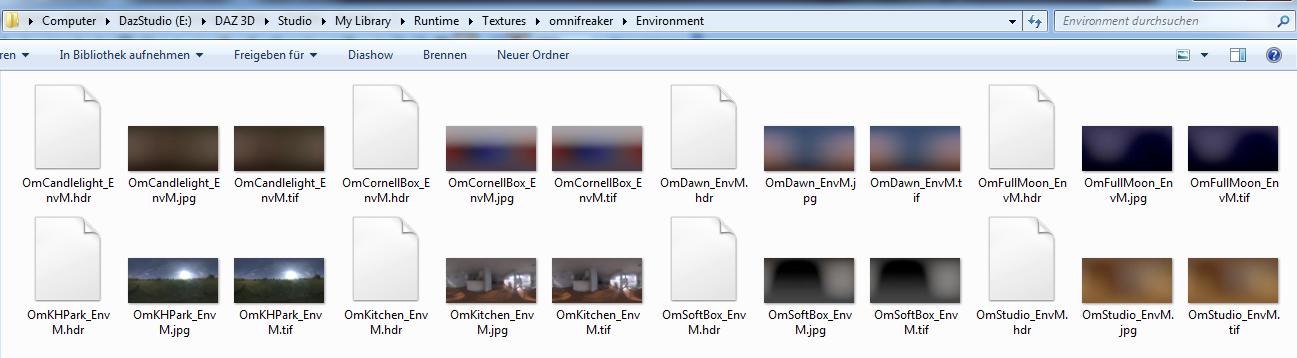
To get a better idea of the Environment Maps, you may check out the original image files outside of DAZ Studio more closely. You can find these files on your hard disk under the following path: \ DAZ 3D \ Studio \ My Library \ Runtime \ Textures \ omnifreaker \ Environment
Please note, the UE2 as IBL needs to be activated with one of these Light Presets, it does not work by default. If you would like to make use of different HDRIs ( Pixar-HDRIs , HDRLabs.com , etc. ) activate the IBL option with a Light Preset, now you can change the image file in the parameter Color.
Environment Mode
The parameter Environment Mode (1) in the category Basic remains unchanged through the presets. Again I would like to point out Adamr001 and his UE2 tests. He tells us among other things, that the settings Occlusion w/Directional Shadows and Indirect Lighting w/Directional Shadows come closest to what we would aspect from the common light around us in the real world. While Occlusion should be used only in connection with DS standard lights, the Indirect Lighting could be used without DS standard lights as standalone.
Another important parameter in the category Basic is for sure Intensity. Here you can adjust the brightness of light as it is with all the lights in DAZ Studio.
Also the parameter Color (2) works just like you are used to from the DS standard lights. The color can be chosen regardless of whether an environment map is used or not.
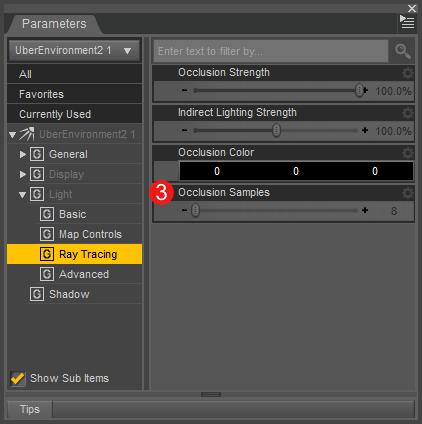
Quality Presets
In the Quality Presets you can find five different levels. Are these applied one after the other, the following changes occur in the parameters:
In Raytracing the value of Occlusion Samples (3) will be changed: High value = High Quality
In Advanced the value of Max. Error (4) will be changed: Low value = high quality
Also in Advanced the value of the Shading Rate (5) will be changed.
Even if the presets suggest a high shading rate leeds to higher quality, the Shading Rate in UE2 behaves exactly like the shading rate that you can find in the Advanced Render Settings. So it applies: Low value = high quality. ( See also Adamr001s comment: http://www.daz3d.com/forums/discussion/comment/67985/#Comment_67985 )
High quality equals long render time
By closer examination of the Quality Presets, we can determine some practical advantage.
In the 3D world higher quality equals higher render times. In the DAZ Shop there are plenty of very beautiful light sets that use the UE2. The creators of such light sets offer you a >Double-Click Solution<. Keep in mind, those light sets are already adjusted with a very high quality. But that can be very uncomfortable as long as your are in the stages of scene composing and adequate test renders.
If you are using one of those ready to render light sets, next time write down the values of the Shading Rate, Max. Error and Occlusion Samples. Afterwards to speed up your test renders, use one of the UE2 presets for lower quality along with the light set. When you have completed your test renders and aiming for final quality, you can return to the original values.
Final Words
Hopefully I did not promise to much with the headline Uberenvironment2 - made easy. It was the intention to provide a quick introduction to the most important parameters and functions, so your future work with the UE2 can be more easy.
The UE2 in action you can see in the following ready-to-render scenes:
Fiery Genesis 1
Fiery Genesis 2
Barefoot Dancer
Dragon Slayer
Day at the Beach
Inside the Asylum
If you have these scenes properly installed you can find it in the folder: MyLibrary => DAZ Studio Tutorials
Have fun with your own experiments! :-)
Additional Links:
The Environment Sphere as Skydome
Using Uber Environment 2’s Sky Dome
There is a Bug: Uberenvironment2 IBL map axis is wrong
There is the Bug-Fix: IBL Transformer for UberEnvironment2
IBL experiments: UE2 - Can Anybody Explain The Result Of This Simple Test?
HDR Labs - Archiv
Free Pixar-HDRIs
Omnifreaker - Pixars Stinson Beach Set (19 HDRIs)
Redspec HDR Pack
Zbyg - HDRI-Pack 1 / HDRI-Pack 2 / HDRI-Pack 3
DAZ-Forum HDRI-Freebie-List
HDRIhaven
Back to the start
----------
Edit: Added infos about IBL with different HDRIs in Light Presets. More informative links and free resources in Additional Links.
Thanks for putting this up. I still try to get a handle on 3Delight when I'm not actively trying to render in Iray. I think i understood most of what you said in your posts. I'll have to give it another go in 3Delight while referring to your posts.
I've been busy and haven't had time to actually upload any of my recent experiments. I hope to have some posts about them up soon. However, I'm glad to see you adding to the thread. Hopefully, others who wish to contribute will also feel free to do so as well if they have an experiment or just have some basic knowledge to share that others may not have figured out or heard about. I love seeing others share their insights!
My pleasure! Since writting the Wolf-Render-Tutorial, I felt bad to skip all the informations about the Uberenvironment Light in the scene. So this shortcomming is now corrected. Further questions are always welcome. If smoething is not clear enough, I will try to provide more informations. Or maybe rephrase some passages as good as I can. :-)
Looking forward to your own experiments be it in Iray or with 3Delight.
Oh my gosh thank you. I have been trying to get a handle on what each type of lighting is called and what it does (I have notebooks, lots and lots of notebooks lol) This will help fill in the blanks. Its gotten VERY confusing, half the time I have no idea if people are talking about 3delight or Iray.