G3M G3F, Q and A. V7 welcome as well.
 ZarconDeeGrissom
Posts: 5,414
ZarconDeeGrissom
Posts: 5,414
I just wasted an hour of my time reading the other (V7 complaint) thread,
http://www.daz3d.com/forums/discussion/58026/
and now want to get back to why I was reading that thread to begin with. lol.
What is Genesis 3, and what are the tips-n-tricks for using Genesis 3 in Daz Studio.
I did not Start this thread, just to moan and groan about whatever, I want to know how to use Genesis 3, and that is the purpose of this thread.
I was blindsided by an email regarding a new generation, and have no idea what or whom this Genesis 3 is. I have a flood of stuff in DIM I've been installing over the past few days, and Genesis3 is not there, I just checked again.
So, is G3F part of V7 (Victoria 7), or is it separate? (No, G3F is separate. V7 is an add-on to G3F)
Is the posing similar to G2F/V6, or is it completely different? (yes/no)
Is V7 and G3F only for Irya, or is there a way to keep using 3delight with them? (tbd. G3F comes with 3delight AoA mats, ?Iray?)
I do recall pose-bones in the tong being mentioned, tho I'm quite confused by what is being called "points of articulation" with the Facial expressions? (Pose dials shown below and Face pose bones next page)
If G2F stuff is supposed to work with G3F, dose it show up in the Smart tab with G3F selected, or dose it only work threw the content library? (No, it is just as bad as using Gen5 stuff on gen6)
There is a curious page at the store that reads more like bluet-points rather then an explanation. In fact almost every single sentence just raises more questions, lol.
http://www.daz3d.com/genesis-3
Yes, my questions as of now are endless, and I'm sure others are asking similar questions.
(EDIT, added answers to some of my Qs, and a screen-cap of the auto-fit process. G2F->G3F only atm)
Daz 3D is part of 
Connect
DAZ Productions, Inc.
7533 S Center View Ct #4664
West Jordan, UT 84084
Licensing Agreement | Terms of Service | Privacy Policy | EULA
© 2026 Daz Productions Inc. All Rights Reserved.
Comments
think their servers got overloaded or you would have G3F in your sweaty little hands as I have after opening DIM when I first saw V7
then your questions would be answered
About bones, check here.
http://www.daz3d.com/forums/viewreply/843620/
About the poses, I suggest you check the pose converter promo images, which illustrate things nicely.
http://www.daz3d.com/genesis-2-to-genesis-3-pose-converter
I was just reading here, appears logical to stagger the G3F/M downloads.
http://www.daz3d.com/forums/discussion/58039/
I have 2 more things waiting in DIM after my last set of installs, all of it from the former generation (Not complaining, just pointing out I've had DIM open several times already).
Also, over the weakened, they snuck-in an update to Studio as well. I just installed that.
Add to the list of questions.
http://www.fxguide.com/featured/udim-uv-mapping/
After reading that magazine article about UDIM vs UV vs Ptex, are texture maps no longer 2D image based (TIF, JPG, BMP, etc)???? What kind of 3D image file is UDIM using?
(EDIT, clarification)
The article about half way threw starts talking about UDIM, as if it's arranging pixels/voxels the same way that is used in JPG/GIF compression with the number of repeating pixels/elements, yet the rest went way over my head with that file-name thing. Sounded like a separate file for every few pixels, that just sounds insane on any filesystem (FAT/NTFS/UFS/FFS/etc).
Well the pics look cool, it doesn't realy show a Bone tree, or anything like that. And the list of DUF files in the one promo image is all alien language to me.
Now, the promos do show quite graphically, that something is drastically different, akin to the V4 to Genesis conversion. Is it just some XYZ rotations reversed/swapped, or is it more then that? How many more joints did they add to the spine, just two?
There's two more bones in the spine, and extra in the toes, and other stuff.
About swapping, I don't know.
Someone just posted a foot-bending pic here. http://www.daz3d.com/forums/viewreply/843917/
That thread also specifically deals with the rigging.
Yeah sorry, they wanted to see the bones and iClone 3DX6 showed them very clearly so I posted that screenie.
Show bones in DS makes them rather big.
Pose controls in DS 4.8 for G3F (part 1 of 2). Impressive and also lacking any add-on dials, that's good for a look at a blank slate.
(Edit 03Jul2015)
Added the basic 'Expressions' category. Yes, expression dials are back.
Head Pose Controls part 2. Expressions of a sort. I wanted to see a bit of the tongue wire-frame, yet the dials would not quite get the tongue out there see, lol.
Also, I'm seeing a lack of facial expression bones in DS, fascinating.
("O", I forgot about all the other dials, for the body) tbc.
So, what is there for bones in the scene tab for the body, it's not quite as bad as I first thought. There is more bones, tho not overwhelming.
(Edit 04Jul2015)
There is s a screen-cap of the included shaping dials on page 5. I had forgotten about them when I was making these screen-caps)
http://www.daz3d.com/forums/viewreply/848076/
And the neck and torso Pose dials. Looks like all the usual dials are here, plus a few more for the feet (screen-cap in the former post).
So it should be some what easy to dive into posing G3F, as long as you have some experience manually posing G2F with the bones and Dials. (I've yet to do that, I fell asleep at the keyboard making these screen caps last night, lol).
Fitting cloths was the same with no surprises (not without problems, just nothing different from former generations). The G2F hair looks good on G3F (yet to pose with it tho), and the Sandals also work with minimal grief (High-heals will be quite different without dedicated Gen7 foot poses).
That posted, time to get some coffee, and try to wake up :coolsmile:
(EDIT, yes I have questions after seeing this, yet there is so much more I want to get into as well)
like this new UDIM. Don't bother with that magazine article, it is confusing as all mayhem, and dose not describe anything that would be helpful for working with G3F/G3M in DS. To recap what litle I was able to understand from that 'Interview' in text form. UDIM splits up Voxels into blocks of repeating pixels almost like how JPG and GIF compression works, and then it stores each block as separate files!? I must have misunderstood something there, and it tells me nothing about what daz studio is doing with the different zones on the figure body. Besides, the last time I looked, a diffuse map is still a single 2D image file, not fourteen-million files for a single 4k map, lol.
Well, at first glance, the surface tab is not that much different from former generations. We still have the "Default Templates", "Skin", and the independent "Surfaces".
We now have a "Nails and a "Skin-Lips-Nails" category as well. From the fussing around I was just doing this past week with making AltShaders for some Gen6 figures, these extra categories are a very welcome addition. No more selecting the "Skin", and then Ctrl-Clicking the lips and nails, just to adjust a backing color for a set of maps on the figure. Thank you daz.
Oh, and look at that, a familiar shader to go with it (AoA Subsurface). Now I'm sure the AoA shader can not load multiple files for each map, they must still be good old fashioned 2D image files (JPG, TIF, PNG, BMP, etc). PA's don't need to throw out All the old tools and start from scratch with new ones (an update to support UDIM may be all that's needed).
No, pleas don't read that as a confirmation from me that a V6 map can be stretchered in PS/Gimp to fit the gen7 UV mapping. We all know from experience that dose not always work so well. So no, don't expect me to be able to take FW Eve's (or Wachiwi's) maps, and distort them in Gimp into a new set of Gen7 maps (not my figure, I don't have the source material needed, and I'm not that good by a long shot. Not my cup of tee.)
Because of the rearrangement of areas on the maps (ears are on the head map not the torso map, etc), An automated G2F to G3F skin map converter is not possible. It would require redoing the map images from scratch. And some things like eyes, don't even have similar geometry to go on.
Breadcrumb time. The Templates.
Template 1, Head.
Template 2, Torso (now a single zone).
Template 3, Legs and Toenails.
Template 4, Arms and Fingernails.
Template 5, Eyes (Cornea, EyeMoisture, Irises, Pupils, and Sclera).
Template 6, Eyelashes.
Template 7, Mouth and Teeth.
(EDIT 28Jun2015)
In Daz Studio 4.8, Scripts, can’t access Hexagon (or any other external 3D modeling program) to make a UV automatically? Scripts can't access PS/GIMP to redo the image layouts pixel by pixel? And Scripts can't add and rearrange zones to G3F’s surface tab?
Every way I look at it under the hood, it’s impossible in Studio alone with just a script, to automatically do a clean G3F UV conversion. It will require a lot of manual work on each map outside of Daz Studio to clean up edges, and relocate stuff on the map images, to convert them to UDIM.
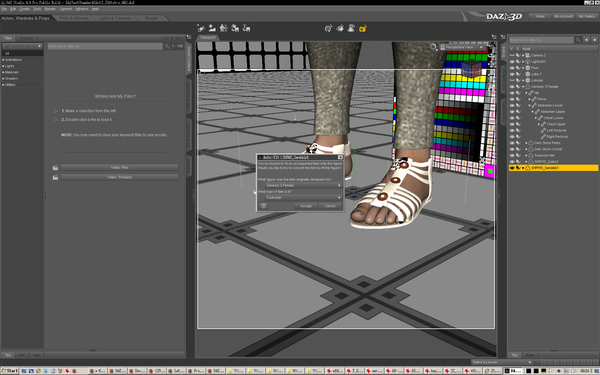
Here is an interesting screen-cap. It demonstrates the tediousness factor of AutoFitting stuff from another generation.
When dragging the Earrings out of the Smart tab, they decided to fit-to the camera instead of G3F, lol. Then there is the selection as well, what do I select for the "What type of item is it".
For earrings (at-least for the first attempt), "None" was a good choice, lol.
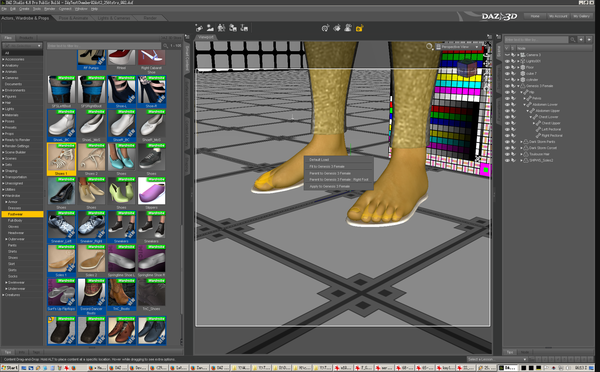
I just had a slight brain storm, to whittle down all the non-G2F stuff out of the smart tab when nothing in the scene is selected.
1, load a plane-old G2F figure into the scene, and move the figure to the side (out of the way).
2, Select that G2F figure in the scene tab.
3, brows threw the smart tab for the items you would like to load onto G3F.
4, Simply drag the item from the smart tab, over to G3F in the view-field.
5, select the appropriate Auto-Fit settings for the item.
Polygon tearing around the neck. It is something I've noticed with some V4 hair styles converted to Genesis (and G2F).
So far I have yet to notice any hint of that with G2F hair Auto-Fit'ed to G3F. I still have a few more styles to try, tho I suspect the tearing was more a combination of joint rotation reversals and mesh-misalignment between V4 and Genesis.
(EDIT)
Enough of this. The claims in the other thread, that you need to through out ALL your generation6 stuff just because V7 has arrived, is NOT holding up to scrutiny with Hair at least. The Auto-fit from G2F to G3F is working flawlessly with all the hair I tried thus far. Earrings are also working just as well, some with a pleasant surprise of not even going threw the Auto-Fit process as with the Wind Earring by EmmaAndJordi (Elemental Jewelry).
We all know that high-heals need specific foot poses to work with the figure, and that is why the Auto-fit fails with them so miserably. That is nothing new. And the no-heal stuff in the Patchwork sets works fine threw Auto-Fit as well (Patchwork 1 and Patchwork 2). Moving on, or not entirely. I have a thought for all those out there that are 'Devastated' by not having there preferred G2F footwear styles. Put your G2F high heals on plane-old G3F, Pose the feet till it looks good, and save that foot pose as your very own Pose Preset. There is already a thread discussing this.
http://www.daz3d.com/forums/viewreply/845349/
and a tutorial thread by SickleYield
http://www.daz3d.com/forums/discussion/32242/
O.K. Now I'm moving on.
That's probably got more to do with the new bones and surface groups than any actual improvement in AutoFit.
If you look at the ones that experience severe 'blech' you'll notice that they are trying to cram as much as possible to the bone/group structure...because essentially they are the 'same' names, but much different influences. And it almost always occurs at a junction or edge. sometimes, the last few rows of polys along an edge will be left out of the weight map...which causes horrible tearing between them and the ones in the mapped area. A lot of the problems (Genesis/G2F) can be fixed with either using the Transfer Utility or playing with the weight map brush after the fact.
That's probably got more to do with the new bones and surface groups than any actual improvement in AutoFit.
If you look at the ones that experience severe 'blech' you'll notice that they are trying to cram as much as possible to the bone/group structure...because essentially they are the 'same' names, but much different influences. And it almost always occurs at a junction or edge. sometimes, the last few rows of polys along an edge will be left out of the weight map...which causes horrible tearing between them and the ones in the mapped area. A lot of the problems (Genesis/G2F) can be fixed with either using the Transfer Utility or playing with the weight map brush after the fact. That's understandable, and As I put in my Edit (before noticing the your post), It simply is not happening with hair Auto-fitted from G2F to G3F. So if there is a problem, it was there before, or the wrong hair length was selected in the Auto-fit dialog thing (short/long), lol.
I also expected a possibility of earrings having a similar issue because of the extra bone in the neck. Not the case at all, it works fine.
I also expected a possibility of earrings having a similar issue because of the extra bone in the neck. Not the case at all, it works fine.
The length didn't much matter, if the polys weren't in the hair to make the transitions smooth. Nor did it matter for the edges...they were going to mess up because of the weight mapping, regardless. For perfect fits, extra work needed to be done...AF is just a tool to get a good start on fitting most things...and often enough, the results are 'good enough for government work'...but not, necessarily the best they can be.
ZDG thanks for starting this thread. I got more information about Genesis3 in here than there is in the 40 pages V7 discussion. That discussion over there got a bit derailed and off topic.
Victoria 7 is really gorgeous! Sooner or later she will join V4, V5 and V6 in my runtime. ;-)
And I´m aware who is clicking the >Place Order< Button at Check Out, so no complaints about Money Grabbing from my side. :-)
Auto-Fit. Well it looks like I found a pitfall. The ponytail of one of these styles use to have bones to pose the thing, and it's not there after being auto-fitted to G3F. Also the sleeves on the Time For School shirt had some specks of poke-threw (scale set to 101% fixed that).
FW Ja-Long HD, and the G3F dance crew,
Live at the Modular Lounge.
As You Wish outfit, Time For School outfit (Imagine This Leggings), Ghawazee outfit (Faylinn Leggings). Casual Streetwear sneakers. Sporty Braid hair, NJA Ponytail Hair, and Sora Hair. All G2F stuff Auto-Fitted to G3F.
Well, I´m not in hurry. For sure there will be good deals in future sales. And of course we can expect more crazy sales for Genesis2 content and the older Generations. Bargain-hunters will celebrate. :-)
Those renders look pretty good. Auto-Fit seems to work fine. :)
Continue what you are doing, it is better to not distract you.
That entire bit about "twice as many points of articulation" on the face just dose not appear to be, well, tangible at the moment. There are a handful more dials in some areas at the expense of an 'Expression' section. I'm not sure if that is a step forward or back at the moment. I need to look at the G2F and G3F dials side by side, and make some notes.
Looks like the new "Mouth Corner Back" control is a nice addition, and the Joker Smile has been nudged back to a more believable 'U' rather then a 'V'.
"Mouth Open" only moves the lower jaw and lip. Good for many things.
"Mouth Open Wide" also moves the cheek a bit in a more realistic way for that particular pose. I like. I wish I could make a gif of this (face and dial), lol.
As far as I know, to make the bones visible in the viewport, you have to activate the Joint Editor Tool.
See around 3:18 in this video: : https://www.youtube.com/watch?v=8cV3VaC7eIs
It depends on your layout if you have this menu bar. You can always find it in Tools => Joint Editor.
... but there should be some bones in the scene tab in the first place. Don´t know why they are not there in your screenshot.
O.K. so the stuff is there, it's just not exactly "User accessible" to an extent.
(EDIT)
There are bones on the ears, yet no dials??? It's like a null place-holder with no properties, lol.
Maybe they are hidden by default. Take a look at the the Scene Tab options => Show hidden properties ???
http://docs.daz3d.com/doku.php/artzone/pub/software/dazstudio/reference/pt_options
(EDIT)
Thinking about this for half a second, it's good the face pose bones are hidden by default in the scene tab, especially for buisy scenes with lots of stuff and figures.
(EDIT2)
There are so many face pose bones, I'm not bothering making a screen-cap of every single one in the scene tab. Now for using them, there is that XYZ rotation (front-back, twist, whatever) dials in the Parameters tab. As pointed out before this edit, "Show Hidden" in the Scene tab is an easy way to get to the bones.
To move multiple bones at the same time.
In the scene tab, select a bone, then hold the CTRL key as you click the other specific bones you want to move.
Then in the parameters tab, hold the shift key as you click down the list, to highlight all of the bones there.
Then just spin the dials for them.
Parameters tab - display menu - show bones on/off for bones visibility in viewport.
Time dose fly by when having fun. I have been at this for 17 hours nonstop, so let me make a short recap of what I found out about the Face Pose dials.
The extra "Points of articulation" was noticeably better with the smile and "Mouth corners" dials. The tongue dial will need to have the limits set beyond "-100" to get the Tongue to stick out of the mouth (attached screen-cap). Some dials are reversed as well (eye side to side, tongue in-out, etc).
Not having some basic full-face expression dials to start from is a drawback.
Enjoy, I'm off for some shut-eye. :coolsmile:
(EDIT 04Jul2015)
There was an update to the Genesis 3 Female Starter pack, yesterday. The update put the "expressions" category back in, and added a few basic expressions to the folder. The concern that there was no way at all to Dial different expressions at different levels to mix them, has been alleviated. Thank you so much Daz3d and crew.
Interesting how easy things can be. :-)
Thanks from me too! :)