Hair converter add-on for Blender
 Cinus
Posts: 118
Cinus
Posts: 118
Install the add-on like you would install any other blender add-on.
The add-on can now convert most hair made of “hair cards”. The hair cards must consist of faces with 4 vertices (quads). It cannot convert hair with triangles or n-gons. It will also fail to convert cards that fold back on themselves or cards that do not start on or near the skull. Toulouse hair is an example of such hair. It will convert the hair, but some cards do not start at the skull, so the generated root particles will be wrong.
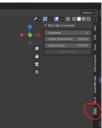
Once the add-on is installed, you should see a “Hair” menu in the right-hand side of your 3D view (assuming you are using the default layout). It should look something like what is depicted in the attached Hair.jpg image.
How to use:
Import a Daz model with hair using either the Diffeomorphic or DazToBlender add-on or whatever other method you prefer. Most of my testing was done with the Diffeo plugin. I am not sure the hair converter will work if you use DazToBlender with the “Size * 100” box checked when importing the model.
You must separate the hair cap from the main hair for the converter to work. It’s the same process that Thomas Larsson documented very well here https://diffeomorphic.blogspot.com/p/hair-version-15.html
Make sure you are in Object mode.
Select the hair mesh.
Switch to Edit mode.
Select any face on the hair cap.
Press Ctrl+L and then press P and then Enter.
A new mesh should have been created. Rename the new mesh to Cap, or “Hair Emitter” or something similar. The name is not important. The “hair cap” will become the particle emitter.
If there is a Subsurface modifier on the hair cap, remove it. It’s not strictly necessary, but I think particle hair looks better without it. Blender seems to have issues if you disconnect and re-connect hair with a subsurface modifier on it.
Once the hair and cap are separated, you can convert the hair.
Switch back to Object mode.
Select the hair mesh and while holding in shift, select the hair cap. It’s important to select the hair mesh first.
Select the “Hair” menu on the right-hand side of the 3D viewport.
The hair converter has three parameters:
Segments: Number of segments to create per particle. The default is 10. For shorter hair, you should decrease the number. For very curly hair, increase the number. Max is 20, but 14 should work well even for long curly hair.
Single Strand Width (m): This value is used to determine which hair cards will be converted to single particles with no children. If you set the value to 0, then no “single hairs” will be created. If you set the value to the max then most of the hair particles will become “single hairs”. The default value of .001 should work for most hair, but for AprilYsh hair I get the best results by setting it to 0 and then using the Random and Threshold settings under Roughness to add loose hairs.
Strand Radius (m): This value will be used as the child particle radius. If a hair card wider than 2 * Strand Radius is encountered, additional particles will be created in order to fill the card with hair. A value of .008 works well for most hair.
In order to kick off the conversion, click the “Convert Hair” button.
After a few seconds, the converted particle hair should appear.
The converter will hide the original hair mesh once the conversion is done.
You should see a “hair-01” and possibly a “single hairs” particle slot in the Particle Settings panel when the hair cap is selected.
If you want to have all of the particle roots directly on the hair cap, you can use the “Disconnect Hair” and “Connect Hair” option in the particle settings. This will change the look of the hair. It usually lifts the hair up a bit because a lot of hair cards start well below the hair cap.
The converter will create a material for the hair particles called “ParticleHair”. It uses a Principled Hair BSDF shader for Cycles and several nodes for Eevee. In order to change the hair color for Cycles, change the Melanin value. Smaller values for light hair and larger values for dark hair. See this for more info https://docs.blender.org/manual/en/latest/render/shader_nodes/shader/hair_principled.html
For a better hairline, especially for darker hair, use j cade’s node setup. It improves the look of the hairline considerably, but does increase the render time somewhat. You could also use a thinner root than tip as @Krampus suggested, but that will change the look of the hair and you may or may not like it.
For Eevee, change the colors in the Diffuse BSDF and the Glossy BSDF nodes to get the desired color.
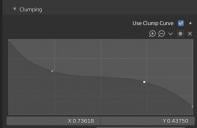
You should play around with the hair settings to get the best look. The Clumping section together with the “Radius” under Children can have the biggest impact. I suggest using a “clump curve” that looks something like the one in the attached “Clump Curve.jpg” image.
Changing the Endpoint (under Children->Roughness) to .001 or .002 can improve the look too, but that depends on the type of hair.
To add “loose hairs” for meshes that do not already have a lot of thin cards, use the Random and Threshold settings under Roughness. For most hair, a Random setting of .05 to .07 and a Threshold setting of .6 to .7 works well.
The material for the original hair cap is left in place. Sometimes it looks better without the hair cap. If you do not want to render the hair cap then switch off “Show Emitter” in the particle settings of the first particle slot (can be found in the Viewport Display and Render sub panels)
Take a look at this video https://www.youtube.com/watch?v=Ge1qWMG-U90. It’s a little annoying, but it explains the hair settings thoroughly.
It is now possible to create several different particle systems for the hair if you choose to do so. If you select a subset of cards before running the conversion, the converter will only convert the selected cards. It will not remove any converted particles, just add new particle slots for the selected cards.
This is handy if the hair has braids. You could first select all the non-braid strands and then run the conversion. Then select all the cards that make up the braids and run it again. You will end up with another particle system for the braids that will allow you to tune the braids to your liking.
This is also handy if you want to create separate particle slots for bangs, etc.
I tested the add-on in Blender 2.83.3 and 2.90.1.
Good luck with your hair conversions. Your computer should not explode when you run this converter, but I make no guarantee :).
Please post pictures of successful (or not so successful) conversions here.

Daz 3D is part of 
Connect
DAZ Productions, Inc.
7533 S Center View Ct #4664
West Jordan, UT 84084
Licensing Agreement | Terms of Service | Privacy Policy | EULA
© 2026 Daz Productions Inc. All Rights Reserved.
Comments
Wow. Very nice. I hope to have some time this weekend to try it.
Thank you, Cinus, can't wait to try it out, and study the code.
Minor coding suggestions :
Add the standard User Preferences Sidebar (N-Panels) switching code to allow users to add your single panel tab to another tab such as Diffeomorphic, Daz-to-Blender, or another hair addon tab.
If you do add the above, you might consider renaming your panel to something other than just Hair -- Maybe Cinus Hair, or Daz Hair Converter.
Also, don't know how much you want to work further on it, but you could automate a number of functions to streamline the workflow.
These are just suggestions, but I am biased, and are a reflection of what I like to see in addons in regards to end-user experience and what I code towards...
Thanks again, for all your hard work -- This is a great asset to the Daz to Blender workflow for everyone.
@Cinus
Thanks so much for that! I hope to try it tonight.
Anyone else thinking that there are enough useful Daz/Blender tools to warrant a single place to find all of them?
This is great! Really appreciate the time and effort put into this. I'll be trying it out as soon as I have a little extra time.
@DaremoK3 I have no idea what "Add the standard User Preferences Sidebar (N-Panels) switching code" refers to, and a google search did not shed much light on it. If you have a link to some documentation I will take a look. Thanks!
Back with bug reports, and to report hair conversion failure on first hair conversion try with Genesis2Female Toulouse short hair.
Bug reports :
1. (not really bug, just standards modifying) -- If changing addon folder name to Blender standard lowercase-and-underscore defaults to addon not initiating. This one has me stumped with your single module import that appears dynamic, but somehow tied to hair-converter (hair 'hyphened' converter), yet neither __init__ or hair modules yield 'hair-converter' anywhere.
How did you tie that in when there is only a module call to 'hair' ?
I have been fixing this for years, and yours is the first I have failed to fix without any apparent reference to change.
2. Actual bug ; You changed your 'ConvertHairOperator' class operator from 'jbd' to 'cinus', so it does not propagate and shows console error warrning for the missing RNA operator -- I changed mine to cinus to work. I believe that is what you intended ?
Not part of bug report, but hair conversion operation failed and only Info Tab shows Warning message of 'Conversion Failed' with one other ops before it (ops global deselect).
I followed directions and separated the hair cap from the hair mesh in Edit Mode via face selection (By the way, you only need to hover over a face, vertex, edge - and press 'L'), then in OBJ Mode I selected hair mesh and then Shift-selected (made active) my renamed ('hair cap') hair cap mesh.
Then I set the parameters in the addon (Segments to 3 and CWC to 0.0000), and with the Properties Particles Tab open, pressed the Convert Hair button.
Very quickly, the button greyed-out and the selection went from both with hair cap active to just hair mesh selected/active with warning in info tab.
I performed the op several times with different parameter settings, all yielding in same failure result.
* EDIT : Tried with AprilYsh's NorthHair for G2F, and same results -- not working... Using Blender 2.83.2 LTS
@DaremoK3 Thanks for the feedback and bug reports.
1. When I have some time, I will try to figure out why it does not work with an underscore insead of a hyphen. It does work fine for me with the hyphen though.
2. Yes, I renamed it from 'jdb' (my initials) to 'cinus' at the last moment. Thought I tested it after making the change, but guess not. I fixed it and updated the zip file in the original post. Apologies to all that downloaded it already. Please grab the updated version (hair-converter.v2.zip)
3. The converter can currently only convert hair made of cards with single faces in the linked "chain". Older hair often uses wide multi face cards, so it will not work for that kind of hair. Maybe a future enhancement, but since I do not own any hair older than Gen 3, I kind of doubt it. Note that the conversion will only fail if no single face cards can be found. All single face cards will be converted.
I'm sure my description is rather confusing, so I attached some pictures that will hopefully clarify it a bit.
@Cinus I believe it would be useful to anyone interested if you could explain what advantages your plugin has over the "standard" diffeo hair converter. It may also be that Thomas could improve the diffeo conversion based on yur plugin if it has interesting features. Thank you so much for sharing your work.
Absolutely!!!!!!!
@Padone My converter has a few advantages.
1. It creates particle hair that looks like hair without the user having to fiddle with a lot of the particle settings.
2. It interpolates the strands and breaks them up into a number of segments specified by the "Segments" setting. This makes the hair take up less memory and disk space and makes it a little simpler to groom afterwards (arguably :).
3. It detects the really thin strands that a lot of modern hair has and places them in a separate particle slot. The single hairs can then be kept or removed and the roughness settings can be used to add rough hair.
4. It creates a better shader.
5. It runs much faster.
I created my hair converter because I thought it would be an interesting exercise. The Diffeo converter is more flexible and has the major advantage of being able to deal with most hair sets out there. It should be fairly easy to modify Diffeo and incorporate 1-4. Speeding the Diffeo converter up will not be that simple but I do not think that's really important. Hair conversion happens once, so if it takes a bit of time, not a big deal.
I do agree that it makes more sense to enhance the Diffeo hair converter rather than to have yet another converter.
Thanks!
This is what Whitney hair from AprilYsh should look like when using the default settings to convert the hair (you have to disable "Show Emitter" in particle settings to hide the hair cap before rendering).
@ Cinus :
Sorry about that, I should have said the Tab Category (bl_category) switching in User Preferences first created by Mano-Wii that ideasman42 (B2.7x addons_contrib maintainer) was trying to unite all addon devs to include to help with the crowded tabs issue (especially for single panel tabs).
Example :
You can find the master script by Mano-Wii here :
https://github.com/Mano-Wii/Addon-Change-Category/blob/master/ui_change_category.py
I have modified your addon to include the stripped down bare minimum version I use in my addons (from ideasman42 addon_contrib fixes).
I documented the changes -- You can see what and where changes are needed/used.
Modified hair-converter folder with changes to hair.py only here :
http://s000.tinyupload.com/index.php?file_id=03191550255521133940
Example changing your 'Hair' tab to join your Hair panel with another Hair addon tab :
And, thanks for explaining the need for single rowed hair card strips.
Yeah, all the hair I have tested are all hair card strips, but double to quad rows, so now I know the error and can make changes to hair strips to get it working.
Will post later after conversion...
That AprilYsh hair result above looks fantastic!
Okay, after long, tiresome, hand cutting multi-quad hair cards into single card strips -- Success!
It is working great, and was pretty fast on the G2F Toulouse hair.
Before (single row hair cards) :
After :
Now, I just have to learn how to make it look pretty like in your image above, but I am happy with a working result for now.
@DaremoK3 Thanks for making the changes to the hair-converter! I am impressed that you were able to turn the Toulouse hair into single row cards. I tried a few things to turn "wide" hair cards into narrow ones without success. I still have a lot to learn about Blender ;)
Have you tried the Diffeo converter on the Toulouse hair? I think it should work well for that hair.
Below is an image of Monica hair that I converted. This is what I did after conversion:
1. There are over 4000 hair cards in Monica hair and this causes some dark blotches when rendering the hair with a light color, so I removed about 2000 particles from the "hair-01" slot.
2. Moved some of the particles at the hairline to try and get a better look. I think the hairline can still be improved.
3. Replaced a few of the "hair-01" particles with single hairs, tweaked a few settings and changed the color.
4. Switched on "B-Spline" under Render->Path in the Particle Settings panel.
5. Switched off Denoising (in the View Layer properties panel).
That looks amazing!! nice job!
@Cinus Thank you for the nice explanation. Point 3 and 4 are interesting. I'm not sure about the other points, I'll need to test.
@jeff_someone Thanks Jeff!
[Gosh], just tried this out and it's insanely good! Not only is the conversion near instant but it looks REALLY good. Thank you so much!
@tapanojim I'm glad to hear that you found it useful!
I have now tested it
First of all THIS IS AMAZING!
I decided to test Marlene hair by OOT as I figured it was a pretty good test case - relatively complex, and I really wanted to see how it would handle bangs, as styling bangs suuuucks
loaded it in, seperated out the cap, clicked the button
some minor tweaking and getting distracted with other things aaaand
The conversion was very fast! I have definitely experimented with hair conversions that lock up forever on any halfway complex hairs
The default settings are good. I did some tweaking, but its as much personal preference as anything
really minor nitpick It might not be a bad idea to keep the skullcap texture around and applied. obviously the ideal is the strands at the hairline are so good its unnecesary, but depending on the hairstyle its a useful backup (one can re add it, but from an ease of use perspective keeping it around is nice)
I shall definitely continue using it. I definitely want to experiment with more complex - things like updos or braids that would be hard to style otherwise
j cade, this may be asking a lot but is there any way you could share a blend file of your eye shaders? I cannot get mine to look anywhere near as good!
Amazing result. Love it!
@j cade Your render looks fantastic! I really like what you did with the hair.
Keeping the materials for the hair cap around and assigned is definitely a good idea. When I have some time, I will change the code to keep the mats around.
I doubt you will be able to convert braids with my converter. I do not have a lot of hair with braids, but the one's I looked at all use wide multi-quad hair cards for the braids, and my converter skips those.
You could convert the braids themselves into single card strips manually, but that's a bit of a tedious process.
Yeh this free tool is great! My first attempts using it...
@jeff_someone Incredible renders Jeff! Especially the second one. Are you using your own skin shaders or the Diffeo one's?
@jeff_someone I'm definitely interested in what you do with blender. You know personally I don't like your use of point lights in iray, since I believe they fake the shadows. But nevertheless I agree your results are very good especially with characters.
@jeff_someone - Very nicely done. The hair transfer tool by @Cinus looks like it is working well. I think the eye reflections look great too! ;)
These are custom shaders (nothing fancy) and textures done w/Substance Painter. Been fun trying to learn Blender... makes you appreciate all the stuff Daz Studio does for you automatically.
Its the same setup I posted the nodes in the other thread but here you go
Sclera/Iris and Cornea/EyeMoisture + bonus real simple skin
Things will be purple as all actual maps are stripped out
also worth oting a big part of how the cornea looks is using the cornea bulge morph - since refraction bends light relative to the surface, if the shape is wrong the light bends wrong. Using an iris depth morph (or, if you're going all out to the nth degree, some actual physical displacement on the eye) can also make a difference on the interaction with the light