Let's Learn Advanced Ambient and Spot Lights
 Scott Livingston
Posts: 4,352
Scott Livingston
Posts: 4,352
Thought I would post some of my experiments with Age of Armour's Advanced Ambient Light. Later I'll probably add the Advanced Spotlight too. I'm not a lighting expert and this is not a tutorial, but I'm happy to share what I have learned in the hopes that some will find it useful. Feel free to share your own renders, discoveries, tips, and questions!
I also recommend checking out Jabba101's video on the Advanced Ambient Light. I just watched it (after having already made the first couple dozen renders that appear below) and found it to be really helpful. And of course the official User Guide is a very good resource as well.
The main thread for these products is here...that's the best place to go for information and questions about these lights. If you're having trouble installing these lights, or if they don't seem to have all the settings that they should, please see this thread. Age of Armour has been active in both of those threads.
I'm using the "Dragon Slayer" ready-to-render scene that comes with DS4 (Genesis Starter Essentials) since everyone should have that.
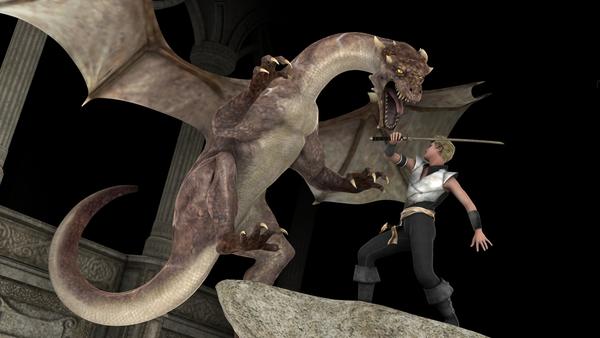
(0) Here's what the scene looks like with it's default lighting, which consists of one UberEnvironment2 light, two distant lights, and one linear point light. I'll be using this result as inspiration while playing with the new advanced lights, though I am not attempting to copy it exactly.
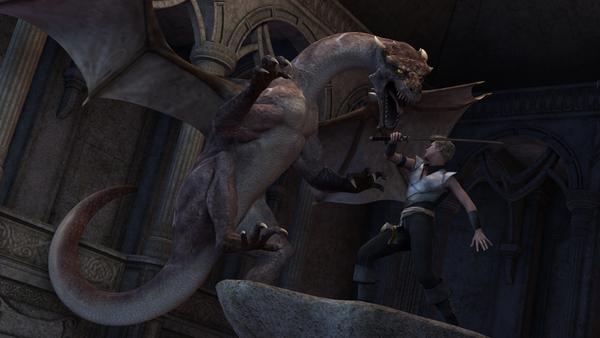
(1) The second render shows the same scene, with all those lights turned off and one Advanced Ambient Light added. Not a bad starting point.
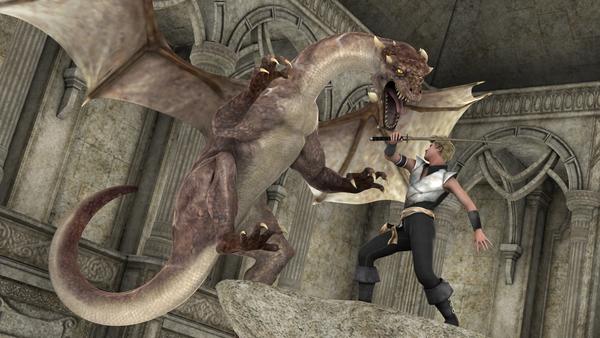
(2) Now, I have set the Light Radius to 0 (if you select the Advanced Ambient Light, you'll find this setting, and the others I'll be using, on the Parameters pane or Lighting pane). With a radius of zero, the light will illuminate the entire scene evenly.
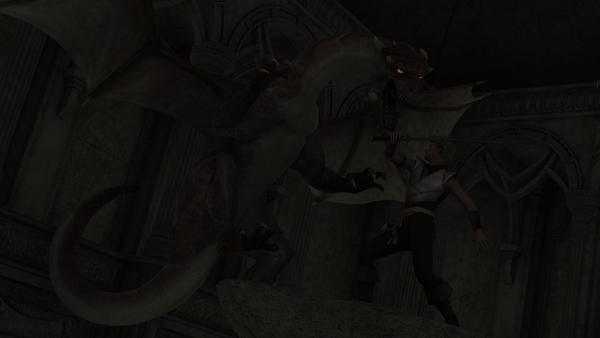
(3) Here I have changed the Intensity to 15%. At full strength, the scene would quickly become too bright once I start adding additional lights to it. This dim illumination will do for now.
Edit: the forum seems to be re-ordering the images in this post. The top one is #3, the next is #2, the one below that is #0 (default Dragon Slayer), and the one at the bottom is #1.
Daz 3D is part of 
Connect
DAZ Productions, Inc.
7533 S Center View Ct #4664
West Jordan, UT 84084
Licensing Agreement | Terms of Service | Privacy Policy | EULA
© 2026 Daz Productions Inc. All Rights Reserved.
Comments
(4) Now I have added a second Advanced Ambient Light to the scene. Let's call the first one AAL-1 and the new one AAL-2.
(5) I changed the Intensity of AAL-2 to 50%
(6) I've changed the color of AAL-2 to a light blue hue (192 222 255). This gives the whole scene a nice, cool feel to it, and provides contrast with the warm-colored lights I'll be adding later.
(7) I changed the coordinates of AAL-2 to: x-translation 0, y-translation 550, z-translation -250. The thing to keep in mind with the Advanced Ambient Light is that it works like a point light in reverse: rather than light radiating out from a specific point in space, light is converging on a single point. For our first light, since it had no radius, it doesn't matter where it's actually located--everything is illuminated evenly. AAL-2 will have a radius and falloff, so it does matter where it goes in the scene.
(8) I changed the Light Radius of AAL-2 to 3 meters.
(9) I changed the translation of AAL-2 to x-trans -150, y-trans 600, z-trans -250
(10) I set the Falloff Color to an indigo (8 4 64). Falloff color is the color of the light outside the Light Radius.
(11) Now I wanted to experiment with Falloff Blend. In render (10) the Falloff Blend is set to 50%, the default value. Here I have changed it to 25%. You can see how the mix of light blue and indigo is impacted by this change.
(12) Here I have set the Falloff Blend of AAL-2 to 75%.
(13) After comparing the previous renders, I decided to set Falloff Blend to 40%.
(14) Being fairly satisfied with the position, color, and falloff of AAL-2, I set its Intensity to 25%.
(15) Time to add another Advanced Ambient Light to the scene. Let's call it AAL-3.
(16) Set AAL-3 Intensity to 20% and color to orange (255 192 64).
(17) AAL-3 is going to serve as dragon's fire. I set its coordinates to -34, 434, -295, Intensity to 200--it needed to be much brighter--and Light Radius to .15
(18) I set the falloff color to a dull red (64 16 4). Oops...not quite what I was going for.
(19) Got rid of the Falloff Color for AAL-3 (in other words, reset it to black) and added a fourth AAL to the scene (AAL-4). I changed the translation values of AAL-4 to match those of AAL-3. Set AAL-4 color to 64 16 4, and set AAL-4 Light Radius to 1.
(20) I changed AAL-4's Intensity to 50% and Light Radius to .5 meters.
(21) I changed AAL-4's translation values to -42, 448, -304. I set the Intensity to 400 and the Radius to .25 meters.
(22) I added one more Advanced Ambient Light (AAL-5). I set its coordinates to 20, -375, -275 and gave it a Light Radius of 2 meters. I set its color to (255 255 128).
(23) I changed AAL-5's Light Radius to 1 meter and Intensity to 30%.
(24) I decided the scene is too dim overall. I changed the Intensity of our first light, AAL-1, to 20. Pretty pleased with how this is looking now, though there is certainly a great deal of room for improvement...
At this point I figured I'd stop for a bit, to see if anyone has any:
* Feedback on what I've done so far
* Suggestions on how to improve the lighting, or on what direction to go from here
* Requests to cover additional settings or features that I haven't explored here yet
* Any general or specific questions on using the Advanced Ambient Light
* Any of your own renders or tips to share.
That is super-cool. I admit I haven't messed around much with some of the AA's fantastic properties, but when I do (because sooner or later I will need this stuff) I'm gonna come back and reread what you've done. No point re-inventing the wheel. :)
For my day-to-day indoor renders I've settled on a pretty straightforward rig. The caveat: I am doing comic-work, meaning that I have to get a lot of renders done (8-10 a week) and most of 'em will be shrunk down quite small, meaning detail work and realism aren't worth as much time to me as making sure character expressions and motions are very clearly visible. But it might provide a barebones rig for more complex stuff.
For most renders I use 3 lights:
- The central light. 100% strength, very light orange color, 96-128 samples, primitive hitmode. Cast Shadows is set to Respect Object Settings, Flag Shaders is Any with the slider at 99%, If Surface Is Flagged set to Don't Illuminate.
- The background light. 200% strength, very light blue (I like my surfaces to look a bit grungy), samples 96-128 and AO Shading Rate of 32, primitive hitmode. Cast Shadows is Always AO, Flag is Diffuse 99% and If Flagged is Illuminate Only Flagged. What this lets me do is separate out anything I consider background -- usually the walls/ceiling/floor of a room -- and light it a little differently. In particular I like to turn off the Cast Shadows property of a room. Lighting it separately and then using the Always AO Shadows option means I can have the room look pretty realistic without getting funny shadows all over my characters' faces or important props.
- The hair light: a duplicate of the central light, except with Shader Hitmode. The flag is Ambient 99% and Illuminate Only Flagged. Then I set hair and anything the hair directly shadows -- face, sometimes neck/headwear/jewelry -- to Ambient 99% to get rid of those ugly transmap shadows (pretty well all my hairs are transmapped).
So yeah, for my purposes this gives me an obscene amount of control over what gets lighting and what doesn't. I can run up the samples whenever I want to get rid of the grainy look, though as mentioned for my purposes it's not an issue. And the requisite dirty trick: in the render below I have swapped the Diffuse on that window you can see in the background back to 100%, meaning it's lit by the central light. I then set falloff on the background light to radius 25, blend 75% and falloff on the central light to radius 40. So it looks like a lit window in a dark building. I love shortcuts. :)
Oh great thread. I so need this. I'll be reading this tonight in earnest. Putting a message here so I can get the bumps as a reminder.
Thanks for your time on this!
Thankyou thankyou thankyou Scott for posting this tutorial. It will help certainly help me figure out these lights. Just want to let you know how much you are appreciated in the forums!
This is very helpful! I look forward to more lighting advice!!!
Thank you!
dbb
Hello, just DIMed the AA into my D|S4.6 and began to fight with. mmh... I think it must lead me to completely reconsider my way of lighting, which was before a pretty son of improvisation delight, a pitch of glimpse here, a touch of sheen there, etcoetera, all ad libitum. :)
Here we are getting some more Professional matricial approach. The use of flags is mind revolving. Though AOA's 99% channels flagging method is a GREAT idea, perhaps we could dream to a Daz-Studio 4.7 or later having something like the surface tool, named the "flag tool", lol, to do it without the need of using the channels sliders. Hope helps life.
Well, many many thanks to Scott for this thread and his full of interest try-outs. Thanks as well to Katfeet for this great straightforward methodological summary, a very usefull and future nerves-collapse saving speach.
All in all, I'm sure the AOA's very more conceptual approach will pay, after some first efforts on pre-rendering patience, in a matter of efficiency, productivity and even accuracy of our renders.
IMHO, that can be compared to the same leap in lighting scenes than the UberEnvironment has been in the near past.
Sorry for my poor English.
Thanks, katfeet for the excellent example and helpful description of your process! You are focusing on some of the settings that I have thus far ignored, which is kind of cool--you can certainly use the lights in a lot of different ways depending on your needs and on the scene.
And thanks everyone for the comments and kind words. I really appreciate it! :)
More renders on the way...maybe not until the weekend, though.
Scott-Livingston,
Your tutorials are great. I just found them and a single quick read through of your very first tutorial already helped me a lot. THANKS!
I purchased Advanced Ambient Light (actually Advanced Light Bundle) about a week ago and I can't believe how much better every render looks with the default settings or some small tweaking of the 2 or 3 parameters. I used to struggle with the fact that other lights gave me silhouettes if I changed my viewpoint and never looked as good as all of the examples on the DAZ3D web pages, or those done by other people. Furthermore it is far faster than any other light I have ever used and is not over the head of someone who knows very little about all of the myriad and difficult to grasp concepts.
AoA also has the distinction having a link next to the product description for the User Manual. Rather rare and almost unheard of for DAZ3D, contrary to the readme.txt available with every product on Renderosity. It is a SUPERB product.
It's the single most important tool for getting really, really good looking renders. As expected I recommend purchasing Age of Armour's Ambient Light to everyone.
Thanks for doing this tutorial Scott and thank everyone for the kind complements on the lights.
One tip I have to offer is to set all the lights to Primitive Hitmode while setting up your scene. That is if your scene is one with very few transmapped surfaces like the Dragon Slayer scene. Primitive hitmode renders at an average of about 40% faster... More or less depending on a lot of factors.
Now Primitive hitmode will cause the shadows from transmapped surfaces to be too dark so the hair in the dragon scene might look a little weird. However, since the hair it is such a small part of the scene you could stili use Primitive hitmode to judge your lighting quickly while setting everything up then, when you go to do your final render you can switch the lights back to Shader hitmode. Or you can flag just the transmapped surfaces and the things that receive shadows from them, like the face and scalp, and have the lights use shader hitmode for just those surfaces.
I tend to do a gazillion test renders, making tiny adjustments in between each one. Using primitive hitmode can help save a lot of test render wait time.
With that all said, if your scene features transmapped surfaces prominently, like a portrait, Primitive hitmode may not give you accurate enough shadows around the hair for you to judge your fine tuning.
Switching everything to primitive hitmode did make a significant difference in render time: 34 seconds versus 51 for this scene, on my six-core computer. An extra 17 seconds may not seem like a big deal, but when doing a series of test renders, those seconds do add up. And if I were to use my other computer, which is a bit of a dinosaur, 30%-40% faster would probably be a matter of minutes or even hours, depending on the scene.
Here's the render with the lights set to primitive hitmode. The hair looks significantly different, but everything else is pretty much identical as far as I can tell. For test renders at least, primitive hitmode seems like an excellent choice.
One more hitmode test:
A different WIP...my first attempt at a portrait featuring Advanced Ambient Light. One AAL and four distant lights. The hair is Guillaume by Neftis3D: a fibermesh hair model. Haven't gotten the eyes right yet...
With primitive hitmode, this rendered in about five minutes (image posted below). With shader hitmode, it's at 13% after 15 minutes...so sometimes primitive hitmode is much more than 40% faster.
if you take the hair out and redo your render test you shoudl see a much closer render time
at the same time, you can flag the hair and tell it to use Shader hitmode on that and primative on the rest
Good idea...this seems like a good scene to experiment with flagging. I'll experiment with a few options and post my findings...
Oh, the other render finished in 54 minutes:
Temporarily switching scenes to Fiery Genesis...another Ready-to-Render scene that comes with DS4.6. Thought this would make it easier for most people to play along, versus my custom scene as shown above. I'll be returning to the Dragon Slayer scene later.
1. Here's a render with the default settings and lights: one UberEnvironment2, two spotlights (the basic ones, not the new Advanced Spotlights), and two distant lights. Render time: 2 minutes 32 seconds
2. Replaced the UberEnvironment2 with an Advanced Ambient Light, color set to 255 235 194, illumination set to diffuse only, hitmode set to Primitive. Render time: 39 seconds
3. Same as #2 but with hitmode set to Shader. Render time: 2 minutes 22 seconds.
4. Set Aldora Hair diffuse to 99% (on Surfaces Pane). On the light, set:
- Lighting Control: Flag Surface Shaders With: Diffuse Strength Of...; Diffuse, Ambient, or IOR Value: 99% (default); If Surface Is Flagged: Use Alt Samples
By default, AO Samples are 128 and Alternate Samples is set to 16. Render time: 53 seconds
5. Same as above, but changed "If Surface Is Flagged" to "Use Primitive Hitmode." Render time: 47 seconds
I redid my flagging attempts from the previous post, as I wasn't doing it right: instead of using Flag Surface Shaders With: 99% Diffuse Strength, I should have used "Flag Surface Shaders With: Diffuse Strength Of..." and then set the next parameter to 99%.
If you want to experiment with flaggin, under the "Flag Surface Shaders With" dropdown, select one of the following:
None
Diffuse Strength of...
Ambient Strength of...
Index of Refraction of...
Garibaldi Hair Shader
Any of These
...and it should work. The last two options in the list, "Diffuse Strength 99%" and "IOR 1.1" flags are not working, as they have been superseded by the above options, and I think a future update is supposed to remove them from the list.
Intro to Flagging
Since I needed to go "back to basics" in order to figure this out, I thought this might be helpful for others who are just starting out with this function. Kerya posted some nice instructions here that are worth checking out. Spotted them after doing the following renders--fortunately what I figured out and what Kerya posted seem to be consistent. :lol: Jabba's videos (linked previously) are worth a look too. They cover flagging and much more, besides.
(1) Basic scene, consisting of four primitives: a plane, a sphere, a cone, and a cube. If you haven't worked with primitives, they are very easy to do: just click the Create menu, choose "New Primitive," and then select the shape and size. The light is a single Advanced Ambient Light with default settings--no flagging yet.
In the Surfaces pane, I set the cone's Ambient Strength to 99% and the sphere's Diffuse Strength to 99%.
(2) On the light, I enabled the following settings:
Flag Surface Shaders With: Diffuse Strength Of...
Diffuse, Ambient, or IOR Value: 99%
If Surface is Flagged: Don't Illuminate
(3) Same as above, except set "Flag Surface Shaders With:" to "Ambient Strength Of..."
(4) Changed that back to "Diffuse Strength Of" and set "If Surface Is Flagged" to "Illuminate Flagged Surfaces Only."
Back to the Fiery Genesis scene.
6. Set overall hitmode to Primitive. Set "If Surface is Flagged" to "Shader Hitmode and Alt Samples." The user guide recommends this setting for transmapped hair. Render time: 45 seconds.
7. The same light settings. Changed a few things on the Render Settings pane, for better overall quality:
Shading Rate: 0.2
Pixel Samples (X): 8
Pixel Samples (Y): 8
Render time: 2 min 24 sec.
These settings yield a much better result: note the even skin tone, and look at the Magus Jacket too, especially the shoulder area.
Note the little purple render artifact in her hair? That's due to the fact that some of the basic lights use Deep Shadow Maps instead of Raytraced Shadows. I could attempt to tweak those lights to eliminate the artifact, but this thread isn't called "Let's Learn DAZ Studio Lighting," and it isn't "Let's Fix It In Postwork" either. So instead...let's bring on the Advanced Spotlight. That'll be the next update. ;-)
Im learning as well that it is better to use flagging to help decrease render times.
8. Looked in the Scene Tab to see the various lights in the Fiery Genesis scene. Aside from the Advanced Ambient Light I had added, and the UberEnvironment2 light that I previously turned off, there are also two spotlights and two distant lights (the distant lights are set to "specular only").
Let's exchange those two spotlights for Advanced Spotlights.
First, I added an Advanced Spotlight to the scene. Then, on the Scene pane, I selected the first spotlight ("light - side left"). I hit Ctrl-C to copy the parameters. I then selected the Advanced Spotlight and hit Ctrl-V to paste the settings. IMPORTANT: then I changed the Shadow Type to "None" on the Advanced Spotlight. This doesn't mean that the light won't cast any shadows...the advanced lights just handle them differently, and with the shadow type set to anything but "None" the light won't work.
I then added a second Advanced Spotlight and used the same process to copy the settings of the second spotlight and paste them to the second Advanced Spotlight. I then switched that one's Shadow Type to "None" also.
Then, on the Scene Pane again, I turned off the two non-advanced spotlights and rendered. The result is the top image below.
Render time 4 min 18 sec.
9. Changed Shadow Softness of Advanced Spotlight 1 to 50%. Changed Shadow Softness of Advanced Spotlight 2 to 100%.
Also changed "Flag Surface Shaders With" to "Diffuse Strength Value Of..." and "If Surface Is Flagged" to "Shader Hitmode and Alt Samples" for both Advanced Spotlights, for faster rendering.
Render time 3 min 3 sec.
10. The shadows still seemed a bit harsh, so I changed Shadow Strength to 50% on Advanced Spotlight 2.
Render time 3 min 1 sec.
11. For this one I changed Shadow Strength back to 100%, but changed Shadow Softness to 200% on Advanced Spotlight 2. Also changed Shadow Softness to 100% on Advanced Spotlight 1.
Render time 3 min 9 sec.
12. At this point, all the original lights in the scene have been replaced by Advanced lights, except for the two specular-only distant lights. We'll be replacing these with Advanced Spotlights.
I loaded two more Advanced Spotlights and set the Illumination of both to Specular Only. One of these had its Intensity cranked up to 150% to match the intensity of Light Specular 01. Then I changed the view (viewport) to look through each of these lights in turn, and positioned the two Advanced Spotlights to match the approximate angle of the two distant lights, then moved each spotlight such that the face was centered in the viewport while looking through them. I ended up with the following translation and rotation values:
Advanced Spotlight 3 (Intensity 100%) translations: x -188.20 y 161.05 z 78.73; rotations: x -0.80 y -59.82 z 0
Advanced Spotlight 4 (Intensity 150%) translations: x 146.45 y 152.63 z -61.91; rotations: x 3.32 y 103.82 z 0
Render time 4 min 53 sec
13. Now I feel like we are getting somewhere, so let's take another look at the default ready-to-render scene with it's default lights (no Advanced lights). For an apples-to-apples comparison, we're going to crank up the render settings (on the Render Settings Pane) for this and the following renders to these values:
Pixel Samples (x): 8
Pixel Samples (y): 8
Shadow Samples: 64
Shading Rate: 0.1
This is what the default scene and lights look like with these values. Note that we're seeing some of those Deep Shadow Map render artifacts again. Render time: 16 min 21 sec.
14. And here is our new lighting setup, with all the lights replaced with Advanced lights as described above. For this render, I made an additional change, to decrease the intensity of the specular lighting: I changed the Intensity of Advanced Spotlight 3 to 70%, and the Intensity of Advanced Spotlight 4 to 100%.
Render time: 8 min 6 sec.
15. At this point I realized I'd forgotten to set the flagging on the two specular spotlights. So I changed the following settings on both Advanced Spotlight 3 and 4: changed “Flag Surface Shaders With” to “Diffuse Strength Value Of…” and “If Surface Is Flagged” to “Shader Hitmode and Alt Samples." AND realized I'd forgotten to change the overall hitmode of all four Advanced Spotlights to Primitive, so I did that too. Render time is much better but check out the difference in the shadows on her face. That's because I didn't flag the skin surfaces, so I guess the shadows from the transmapped hair that are cast upon the skin is therefore calculated with primitive hitmode.
Render time: 4 min 59 sec.
16. Went to change the Diffuse Strength of the skin surfaces to 99% so that they would also be flagged, but noticed that they are already set to 80%. So instead I changed the Ambient Strength of the skin and the hair to 99%, and changed all the Advanced lights to: Flag Surface Shaders With: Ambient Strength of... (instead of Diffuse Strength). Also changed the Intensity of Advanced Spotlight 1 to 75%. Result is the "lovely" image below. I think the reason it looks bad was that the Alt Samples don't work so well on the skin.
Render time: 6 minutes.
17. Reversed all of the steps taken in 16, except the Intensity change and setting the Ambient Strength of the skin to 99%. Added another AAL and four more Advanced Spotlights to the scene. Used Ctrl-C and Ctrl-V to copy the settings of the first Advanced Ambient Light to the new one, and to copy each spotlight as well. Changed "If Surface Is Flagged" to "Don't Illuminate" for the first AAL and the original four Advanced Spotlights. Changed "If Surface Is Flagged" to "Illuminate Flagged Only" for the new AAL and the four new spotlights. Set the new AAL and all four new spotlights to Shader Hitmode. On the second Advanced Ambient Light, set AO Samples to 16. On the four new Advanced Spotlights, set Shadow Samples to 2.
Now we have one Advanced Ambient Light and four spotlights set to illuminate everything except the hair...these are set to Primitive Hitmode with a high samples level. And, we have another Advanced Ambient Light and set of four Advanced Spotlights set to illuminate the hair only. These are set to Shader Hitmode with low samples. This is looking better, but because of the way the shadows fall on the face, I'm wondering if we'd be better off sticking with Shader Hitmode throughout. I'll give that a try next time...
Render time: 5 minutes.
these look great and I am seeing the advantages to the lighting , but one question...why do her eyes look so dead? there is no sparkle in them at all that I can see. I have noticed this when I was transferring some skins to genesis from V4 also
Yeah, I know what you mean...I see it a lot in renders (mine and others'). She actually does have some sparkle in her eyes (a bit of a specular highlight in the sclera) but I'm not totally satisfied with it either.
When transferring skins from V4 to Genesis part of the problem could be that Genesis lacks one of the material zones that V4 has (the "Eye Surface"). If the V4 skin is set up to have the "sparkle" on that surface, it'll be lost after converting to Genesis. Note that G2F doesn't have that problem. There's a new product in the store that gives Genesis that feature. Plus other products like Eyeris etc. that find other methods of dealing with the issue.
Other factors at play include the lighting, the shadows (to an extent her eyes are shaded by the hair), the textures to an extent, and the surface settings on the eyes. Plus there's nothing in the scene, aside from the lights themselves, to create reflections in the eyes.
Thanks for the feedback, though--I'll take a closer look at it next time I work on the scene. :)
I actually thought it was something I was doing wrong either in lighting or transferring mats. Good to know its a known glitch and not just me :)
You will have to change the surface settings for pupil, sclera and so on to make up for the loss of the Eye surface - or buy above mentioned product.
Yes, reducing shading rate in the UE settings has no effect on the surfaces bumps/displacements, at the difference of the same in Global Render Settings.
This is tactical:
- if you need unspotted and softer shadows only, better change UE shading rate only.
- If you have (like here) to render a portrait with best skin granularity, better lower the Global shading rate at the price of having to reduce high bumps/displacements settings on some surfaces, like the costume here, where we get disgracious quasi-artefacts on the shoulder.
- changing both of them is (Under exceptions) superfectatory and slows down rendering performances at no results.
Not really a "glitch" but just the fact that the eyes for Genesis work differently than the eyes of other figures, meaning that for conversions (as Kerya said) you would either need to make some additional adjustments or buy the new Eye Surface product.