How do I improve this Iray rendering?
 3dGordon
Posts: 43
3dGordon
Posts: 43
 Greetings,
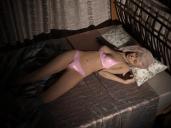
Assuming the image attached is presentable for this forum I would like to get some advise on how to make this image as photorealistic as possible, using Daz 3D and photoshop, though I am willing to buy other probrams.
This is the first scene and render on my new CyberpowerPC computer.
I rendered this JPG out in only 1 minute and 15 seconds, at 4:3 ( 9 x 12 inches), and used the iRay Photorealism choice in Daz Studio 4.10, in Windows 10, 64 bit.
I have searched everywhere on Yutube and here to find out how to make this render beter, with no luck.
In some articals I see that it takes 3 hours or 3 days to make a great rendering.
I want to make money with my new Boudoir creations, and have them printed out at 9 x 12 inches, so I want them to be as high quality as possible, and I would like to offer them at larger sizes.
Any help would be appreciated.
Thanks! 
Gordon
Daz 3D is part of 
Connect
DAZ Productions, Inc.
7533 S Center View Ct #4664
West Jordan, UT 84084
Licensing Agreement | Terms of Service | Privacy Policy | EULA
© 2026 Daz Productions Inc. All Rights Reserved.
Comments
There is acutally lots to like about this render.
Pose, camera angle, the way the lighting falls on the figure, the hair doesn't scream '3d'.
Gimp and Photoshop would allow you to easily adjust the contrast; you could try using curves, contrast and vibrance and seeing what you like.
The thing is, what do you want the image to look like? What is it you are trying to do? Why don't you like it or think is wrong with it?
Personally, two things scream 3D render; the bed is perfectly flat (no indention from the model's weight), and related, the pillow could use some indentation too, although less noticeable. The clothes look like plasic, and the crotch on the panties looks odd, probably positioned a little unrealisticly - although that probably relates to the model's figure not moving in relation to the pose.
Fixing those, would highlight other issues; the hair isn't quite right, and the skin (which might look better after photoshopping).
Then worth a minor tweak, is the pose so the arm doesn't intersect the cloth in a strange way.
The shadows on the curtain look a bit too sharp.
Fixing those would have you looking at the image again, and you would see something else wrong - it is the nature of the beast that is art.
I'd also position the breasts of the model; basically they should fall slightly to the sides of her body; it is unlikely that any bra is so restrictive of movement to prevent gravity having some input.
That is after all the hard work is done (and quite possibly on a CPU only machine); waiting for it to finish means you're happy with the results; previews should take much less.
Edit:
BTW, as part of story, eyes closed are fine; they can be a problem in static renders though... But they can work. :)
Edit2:
I've been looking at your image, and I can't imagine what story you are telling - where should the viewer's eye be focussed? Depth of Field can help here; also read up on the Rule of Thirds. It's a rule so it is ok to break it, but the viewer needs to know you are deliberately breaking it (and usually picks up on it subconsciously I believe). There are also other rules, that don't follow the Rule of Thirds, such as one that deals with the mathematical effect called The Golden Ratio.
One of my favourite explanations: https://www.blenderguru.com/tutorials/understanding-composition
I think to make it look realistic
1) Underwear is too shiny
2) The color of the blonde hair and the tone of the tan aren't cooperating. Go for a platinum blonde, dark blonde or light brown. Falling that, make her skin much paler.
3) Try to use dForce on the pillow to make a head resting impression. Likewise with the bed matress too.
4) She looks very uncomfortable. She is not lying settled in bed.
5) Both the bright light and the angle and position of the camera make it look like she is in a spotlight search, make the light about 2700K and more softly and diffusely lit around the face, as if a lamp was on a nightstand sitting beside the bed. Now, lower the camera to view more from the side of the bed, as if it was a person sitting at a table looking at her. That will increase the impression of a person viewing a real scene and decrease the impression that a technical 3D render has been created.
6) There is something that looks completely flat and wrong about the headboard. Are those mirrors?
I am using Daz products right out of the box and did not see a way to change them, as you suggested. With more study I am sure I will find out.
I have a lot to learn.
Yes, it's more learning than it looks. The changing of the shape of the bed & pillow is best tried with dFormers or dForce.
Here is a thread about dForce:
https://www.daz3d.com/forums/discussion/208141/how-to-use-dforce-creating-a-blanket-draping-clothes-on-furniture-and-much-more#latest
Personally as my computer is so slow, I avoid complicated things such as the scene you are working on.
It will never stop. :D
As nonesuch00 said, it is quite complicated, the scene you have put together. I'm guessing you had a story in mind when you came up with it? If not, you need to think about what you're trying to convey; look at what others have done.
(For composition, look at the great artists (including photographers) have done.)
One of the hardest things to learn is to be self-critical (I don't mean being unhappy with it; self-critical is the ability to analyse the image and determine what is wrong), with the ability to realise it isn't working and start again. I would suggest you keep some (maybe all) of your earlier renders, and look back at what you've learnt.
The image you're creating (be it a single render or part of a series) is telling a story; try and have a basic story in mind when you start. Sometimes though, dropping a figure (or my favourite) an object such as a prop in the scene sparks an idea. I find it helpful to make notes - my drawing sucks and doesn't help the creation process.
Without doing anything... (Assume that is the image you want, and just want it "better"...)
You need to render it longer.
Things that will slow-down a render, to provide more detail are... (In your Render settings)
[Filtering] -> (Pixel Filter Radius) Set that to 1.10 {Default is 1.50, which makes the whole image blurry. It is blending pixels to make one} You want some blur, or your edges will be hard-line pixels, instead of soft-edge alpha-blends. It will look horribly pixelated. They have it way too high, for most uses though. 1.10-1.20 is as far as I would push it.
[Environment] -> (Environment Lighting Resolution) Set it to 2048 {Default is 512, which limits shade-values in light from HDRI.}
[Environment] -> (Environment Lighting Blur) Set to ON {Default is OFF, it will slightly soften the values between harsh pixel-shades of HDRI light.}
[Progressive Rendering] -> UNLOCK the limit for MIN SAMPLES, set that to 3000 or more... Stops a render from finishing WAY before it is actually ready.
[Progressive Rendering] -> MAX SAMPLES, push it to 50,000 (Don't expect to hit it...) Remove it from stopping renders early at 5000
[Progressive Rendering] -> MAX TIME, push it to 75,000 (Don't expect it to be hit...) Again, it stops it from cutting your render times short
[Progressive Rendering] -> RENDERING QUALITY, I woudl set it to at-least 4.00, {Default is 1.0} More is obviously better. It will will wait for more "corrective hits", per pixel, before counting a pixel as "resolved".
[Progressive Rendering] -> RENDERING CONVERGED RATIO, Set it to 100% {Default is 95%, that last 5% may take about as long as the whole time it took to hit 95%}
With all of those done, you will get better reflections (Usually less strong and more realistic.) You will get less noise, obviously. You will get softer and deeper shadows. You will get more accurate "textured" reproduction from the 4x quality and 1.10, low-blur pixel-filtering. You will pull-out some detail from the shadows, where light is struggling to render things in the darkness, without harming your dark shadows. (Like post processing would do, if you adjusted the gamma or brightness.)
One last tip... Everyone LOVES shiny materials... Chance are, all your materials are more shiny than any realistic material in the world. Add some dullness with the reduction of gloss-level and soften them (and any top-coats), by adding more roughness to them. (Maybe adjust the reflectivity from the default of 0.50 to 0.25, too.)
If you have a decent card...
[Render Settings] -> (ADVANCED TAB) -> Set both "Medium threshold" and "High Threshold" to 2048 or 4096 (5000 is a common image size I see too.) Which will stop your images from being forced into compression, when used to render the scenes. Default, I thik, was 512 and 1024, or some rediculous low numbers.
If you want ot push it more... turn-on the models "HIGH DETAIL" base model, and bump-up the "Render SubD levels to 4", Default is normally LOW DETAIL and 2 for SubD levels. That will also let your bump-maps and normal maps and displacement maps have more polygons to shift around for more detailed surfaces sub-textures. (More wrinkles and muscle-tone, cloth-folds, etc...)
I'd have to quibble with some of this.Bump and normal maps are continuous functions in UV space, and their quality should depend only upon the quality of the UV mapping and the resolution of the texture maps. Surface subdivision will, as far as I know, have no effect on them. I suspect that normal maps will be particularly badly effected by down-scaling, so I definitely agree with having high values for the texture size thresholds.
The biggest suggestion I'd have is: use references. There is really no substitute for emulating how real human bodies react to real-world physics. Find a woman with a comparable breast size and bra style, and see how her breasts deform under gravity. In your shot, the bra appears to be trying and failing to compensate for a gravity vector that's in completely the wrong direction for the pose.
After that, I'd suggest throwing away 99% of the hair props out there, as they aren't realistic enough, and find one of the few that is convincing. (I have high hopes for the Neko Hair that was released just today, possibly used in combination with dForce simulation to properly adapt to the pose. However, I haven't tried it in action yet.) After that, just obsess over all of the scene details, which will matter more than the amount of time you spend rendering. dForce can help your cloth lie naturally, but you'll likely still need to use deformers or morphs to avoid intersecting other surfaces. (I actually export the posed figure and garment to ZBrush to make final tweaks, but that's a pretty hefty investment.) Ditto for deformation of pillows, mattress, hair, curtains, etc.
With respect to rendering, I find that you get more bang for your rendering buck if you render at 2-4 times your desired final size and then rescale in your photo software after post-processing.
Add some depth of field to it.
Thank you all so much for your guidence!
Here are three photos showing how I am using your suggestions, and I will continue posting photos of my progress as I use your thoughts to make this render much better.
Hopefully this might serve as a tutorial to help other artists figure out how to make their renders and compositions better.
I looked up the Golden Ratio and the Rule of Thirds and find the Rule of Thirds very helpful, and will implement it in future posts.
What I have done now is to apply the DForm tool to make a dent in the pillow, and will continue to do this with the bed. I have used the Dform tool before so I used it here, but have not tried the DForce tool yet.
I also changed the hair from Voss Hair to Sophia Hair. The Sophia Hair is made by the same company as the Neko Hair (as mephoria suggested). I applied the Sophia Hair straight on to Cannandra as she was lying on the pillow and have not chaned anything yet. It looks a little like a wig, and I do not know how to use the Blending tools, or anything else yet to make it look more realistic.
Next, after DForming the bed, I will work on Cassandra's skin, do you think I should use this for the skin? EcVh0 Iray Skin Shader for Genesis 8 Female(s)
Thanks again!
Hair is usually way more glossy than it should be. I would add more roughness, turn the gloss level down a bit, play with the top-coat if one exists... If not, then add one with more roughness and matching the anistropy of the gloss, which should both be around 0.75 and it should be just a few shades righter than the hair-color. Also, make sure your gloss is not pure white.
For a bonus, you can make the opacity about 0.95-0.85 (Unless you want to double-up the hair, and make one about 0.15-0.35, with the other being 0.85-0.75 )
Pose-wise, I would relax her hand a bit more... she seems unnaturally tense and grappled against gravity in her wrist.
The light could use some softer shadows, or something blocking the lighting, so it looks more like a hall-light casting through a doorway. (Make a fake doorway with primitives.) To make softer shadow lights, turn a sphere or a plane primitive into an emmisive surface and just make it larger. Smaller = pinpoint rays, Larger = soft shadow edges.
May also be that the light fall-off is too wide, and it should be more narrow, like a house-light. (Falloff is an art in Daz, because it doesn't actually follow reality, due to the inacurate scales that Daz uses, and the scales that IRAY uses. Iray uses real lighting values, but because Daz models are gigantic in size, or microscopic... I forget the corrections I had to make. The falloff and luminosity values do not reflect real-world values, when set.)
EG, it almost seems like you are shooting a white lazer-light, or a 12,000,000 candle-power airplane spotlight into her room, instead of an incandescent or florescent light. (I would guess that you are using the default Daz lights, which are horrible for actual lighting.)
Just a follow-up...
This is a 12' x 12' x 10' room, with a sphere as the light-source, 2.5" in diameter, like a standard lightbulb. The surface was set to emission pure white, 6500K temp, single-sided, no profile, luminance 1600 (100 watt bulb), Luminance units "Watts", Luminous Efficacy (lm/W) 17.50 {100 watt filament light}
The pictures show that the "default scale" of Daz is horribly inaccurate. The 100 watt bulb, without a cover, barely lights-up the ceiling. The room paint is off-white, and setup with actual paint-like "flat" surface. (Nearly no gloss and gloss-diffused heavily.)
The following pictures are scaled by 50% (Scaled everything in the whole scene) Light-falloff is getting more realistic and luminance is becoming more realistic...
The following is 25%, and just about there... Still a little dim for a 100-watt, uncovered lightbulb.
Next is 15% scale of the daz-world... Perfect... That is what you expect a 100 watt bulb to look like, uncovered, in a 12x12x10 foot room. However, people use 60-watts standard, covered with something. Two or three, if they like it super-bright.
The last two are 15% scale, and a 60-watt bulb. One with a person in the room, which looks correct and has the expected soft shadows.
How do you get the whole daz-world scaled correctly? Put it all in one "GROUP" and scale the group. Now all your lights will look correct and behave like they should, when you punch-in real-world numbers for the settings. (Wiki is a great resource for real-world values, since Daz doesn't supply standard settings and they don't even use lights correctly themselves, as per IRAY doccumentation.)
Before you ask... NO, you can't just make the light brighter, because that doesn't change the "Real world light decay" (falloff), of the light. It will always look too bright at the source and like laser-light at a distance. Like your models are giants and the lights you are using are from another alternate reality. (Falloff, the "glow strength" decay, seen on the ceiling and walls.)
@JD_Mortal
The Daz view doesn't replicate your eye. The view is more like a standard camera view, so 100 watts isn't that much. It also really doesn't matter what the units are. You need to set the scene to light the way you want the scene, regardless of the absolute value of the luminosity.
What were your tone mapping settings? The defaults are not going to do anything for a room lit by a single bulb, anymore than their equivalent in a physical camera would. Didn't we have this duiscussion in another therad in which you advocated scaling the scene down?
Take a photograph of a 100 watt bulb in a room, hung from the ceiling, uncovered, and tell me that it looks like the first image. I did exactly that, for various bulbs, when I first setup the corrections to compensate for Daz's oversights. Twice, because they changed some settings since they first launched IRAY. That first image is nothing a camera would spit-out, with the settings that Daz has for the default photo-metrics in the camera segment of the rendering settings. It will look like the picture scaled down to 15%. The purpose of IRAY, is to simulate exactly what you "SEE WITH YOUR EYES", and "SIMULATE WHAT A CAMERA MAY CAPTURE". No-one makes a rendering-engine to decimate the view to a camera's lower quality, on purpose, as the primary output. That is a novelty that can be mostly simulated in faster post-processing, and more correctly, since photography is a post-process of the light you "see".
So, you are incorrect. IRAY simulates photo-metrics, eye and has camera-like post-processing. The units matter for scale, which is based off "specific unit lengths". Decay of 1 watt per "meter", will not be the same if your model is 100 meters in scale, when it should be 1 meter in scale. The above images couldn't be more clear. There is a reason the IRAY uses specific scientific photo-metric values. So you can type them in, and create scientifically accurate photo-metrics. Otherwise they would be using ghetto old-school names, like 3Delight uses, "brightness" and "intensity", and those have no relation to anything in the real world.
The atmosphere, occlusion, and light-decay, all depend on a specific measurement to be "fixed" and "accurate". Daz uses 1-unit = 1-meter... What it sends to IRAY, and IRAY uses, is NOT that measurement, clearly seen in the above example. No real-world light values work, because of that. Even when you use the sun and sky.
At the end of the day, it is what makes a default setup look like a default setup, and fake. While a professional setup looks, well, realistic and professional. Use the tips or don't...
I am attaching an image that uses all the tips I stated, to get that better realism, without having to actually change anything in the actual scene. It also includes what the "default" setup spits-out, with the exception of adjusting the lights to a "similar brightness", so they actually render something visible. They had to be pushed-up to unrealistic values, just to look normal-ish... from 17.5 to 400 luminosity. (Or roughly a 80,000 watt light-source, trying to light a 200' tall woman standing in a 250' x 250' x 300' room.)
Just ignore the skin-tone... It is the default Gen3 model and default IRAY skin, which is horribly lacking in living-human flesh-tones. Seems all early skins have slight rigor mortis setting in. (I don't think they adjusted her skin since they changed the IRAY shaders. Originally, she use to be kind-of orange-ish. But I still see her SSS is a bit high. That nose just glows! lol.)
The focus should be more on the hair, looking less like a wig, and less "wet/oily". The shadows being more realistic and undefined. The obvious lack of noise all over. The sharp and not a blurry final composition. The gradients of the light across the walls and through the shadows, being more accurate, instead of one solid shade-value. Actual correct occlusion in the room corner, at this distance from the light, in the light and in the shadow. No super-glossy lacquered lips. No "freshly oiled" skin. No shiny "cloth", making it look like latex/plastic or felt-paintings on rayon. No reflection of the character on the wall, or reflections of the walls on the walls (hard to see at this camera angle). Realistic back-lighting, without having to add a fake back-light source.
I would go so far as to say that this, without any further post-processing, is ready for production use. Not that it is a worthy scene for use in anything worth publication, unless you are selling military-rim glasses to working moms.
Adjusting the "camera settings", does not change the "falloff" of the physical light. It simply produces the same exact result of the second picture, with the incorrect lighting falloff. (Exposure 8, shutter-speed 4), is the same thing as turning up the light-sources to unrealistic values. You are still trying to light-up a 200' model, standing in a 250' room, with a candle... then trying to compensate by setting exposure times that are used for night-time photography.
A 100 watt bulb is enough light to illuminate ANY 12' x 12' x 10' room, up to the corners, with those default camera settings. You are correct, more would be better, for an artistic camera-shot. We were talking about reality, not "glamour shots" from a photography studio. More lights would just add more sources of incorrect lighting. We could honestly argue this all day long. Like I said, he can take the advice, or not. I am sure I have mentioned this before, when someone asked a similar question, or when I was complaining about the lack of continuity between the default daz light values and camera lights, and the actual IRAY light sources.
Your observation is that the default camera settings (which are not in a camera, but attached to the rendering settings), are horrible for display of standard lights, and that the lights are "correct". However, they have nothing to do with light falloff. (How much light decays from the source, as a measured distance. Even with the wrong camera settings, the measurements would be exactly the same, and they are... both incorrect. With the default settings or with an exposure of 8 and shutter-speed of 4, but not when you scale the whole scene down, so 1-meter in daz, is actually 1-meter in IRAY. Then the falloff of x-watts per meter, displays correctly.)
You shouldn't need 80,000 watts of lighting to simulate a 100-watt source, with those camera settings.
It honestly comes down to... Change a bunch of settings you know nothing about... and blindly end-up with something that sort-of works...
or... Change one setting (scale of the whole scene), and everything looks better and more correct. (Excluding the render-quality settings, which is the other half of getting the correct values out, without "doing anything" to the scene itself to make it "better looking".)
If this were a "no holes barred" situation... I would say... Get a better model, better hair, better bed, better room, better lighting setup, faster computer, better poses and hit render. But playing with shutter-speeds and post-processing garbage, is NOT going to do anything to "make it better". It will slow-down the render, but not give any better rendering quality, only less, as it completes with less iterations.
P.S. I just noticed that Daz super-compressed the JPG images... they were NOT that horribly compressed... loading the original PNG images below. It doesn't compress PNG. :P
It will if you don't have the correct exposure. DAZ"s default exposure is for outdoors in the sun, of course this does not look right with one single lightbulb indoors.
Try an experiment, do another series of images like your first, but instead of scaling the scene down, decrease the exposure value, like you would with a real camera.
Try using a camera in manual mode and set its shutter speed, f-stop and ISO to match DS - then take a picture of your room lit by a 100 W bulb. I did this last time you posted this stuff, even the light source was barely visible let alone the desk it was standing on or the walls of the room. Alternatively take a photo of the room, open it in your editor and note the settings used -then apply them to the DS render settings and try rendering.
As for fall off, that is inverse square no matter how bright the light - turning a light up doesn't affect the fall-off in any way, though if the exposure settings are not adjusted it will affect how many areas are blown out to white, which may make you think the fall off behaviour has changed.
I basically replicated the room setup described, though I didn't get the camera quite identical. I then rendered with only one change to "standard" settings -- I plugged in exactly the camera settings that my midrange phone chose for my similarly lit living room. (f/2.0; 1/20; ISO 1060) I also achieved similar effects by "blindly" changing the exposure value setting to 3, which seems a lot more logical than changing the size of the entire world, and doesn't require me to change my scene.
I've done a lot of playing with Iray shaders, including "world coordinate" systems, and have seen nothing to indicate that things are mis-scaled in DAZ. The renderer knows that the coordinate system is measured in cm (not meters), and everything works exactly the way you'd expect. [The candela to lumen calculations do use meters, but I suspect that has everything to do with the definition of candelas and not with the world coordinate system.]
For completeness, I also kept absolute default render settings and tried the "shrink the world" trick. It worked, though I had to scale to 3% instead of 15%. The lesson isn't very profound, though. It basically just says that for a 100-watt bulb can light a 4-inch box "as bright as day", but it can't do the same for a 10-foot box. This isn't surprising. What is surprising is that the 4-inch box didn't catch fire from the waste heat.
@RichardHaseltine: I suspect that newer users would end up a lot less confused if there was a mode that worked just like my mid-range phone camera. If I could set up standard lights using the correct units and then just say "do an auto white balance", I would presumably get results comparable to my phone camera. I could still tweak it to the level of a professional photographer with an SLR, but I wouldn't need to wade through lots of complicated explanations (and figure which of those explanations was correct) just to get a reasonable image. This would, frankly, have saved me about 5 hours of head-desking in the beginning.
The little exposure +/- icon that appears next to th view mode sphere at top-right of the viewport in nVidia Iray preview mode is meant to do that, though I can't say I have had much success with it.
While I was at it, I played around more with adding to the realism by more fully emulating typical real-world conditions. Thus, we still have the 3-meter room, but there's now a single lighting fixture in the center of the room with 2 60W light bulbs and a semi-transparent cover/shade. Then I "sweated the details" by giving a bit of texture to the plaster walls, and adding baseboards as well as a wooden floor ('cause we aren't barbarians). I dropped in a female model wearing the latest in Pennsylvania haute-couture and rendered. The result is nicely subtle, with everything illuminated but a fair number of soft shadows.
On the other hand, the render took 2 hours and 10,000 iterations. This is because most of the lighting ends up coming from diffuse reflections, with at least six ray-trace "bounces" before fully illuminating (for example) the model's eyes. This will always be computation-intensive. If I had used a professional studio 3-point lighting system, with ultra-bright focused lights, I could have fully rendered in a minute or two. It would have been a highly realistic studio photo, but not at all realistic as a living room photo.
Since the original stated goal was to do boudoir shoots, you might be able to get away with a formalized studio lighting setup. You could also provide artistic graininess by doing a fast render with soft lights and cutting off before it converges. (In this case, I'd probably render at 4x the desired size and then scale down, so that you end up with graininess but not "fireflies".) But this sort of experiment demonstrates that if you put physically accurate lights in physically-plausible locations, and leave in all the required walls, ceilings, etc to reflect the light realistically, and use the right real-world camera settings, you can get pretty good realism in your lighting.
Thanks a lot for posting this information, it helped me a lot :)
Is there any way to "force" the use of more RAM with Iray? My idea is, well, maybe using more RAM the process will go faster. Using 3DLight I try to set the bucket size higher so my computer uses +90% of the RAM, but with Iray is using only the 30%. I have no idea if is something good what I'm doing with 3Dlight though.
1. Made two dents in the bed and one in the pillow with the DForm Tool to sink her down a little in the bed.
1a. Moved figure down a bit in the frame to conform with the Rule of Thirds.
2. Moved the default Daz spot light I added back and enlarged it.
3. Relaxed the hand and fingers.
4.Changed the hair to Louise Hair.
4a. Added EcVho Iray Skin Shader.
5. Added DOF (depth of field).
6. Decided to keep shininess in undies to pop the figure out. I am starting a series of Boudoir sexy images, so I am not going for realism, just high quality detail and renders.
7. Used the IRay render settings that JD_Mortal suggested.
8. Render took 20 minutes with a CyberPowerPC - BattleBox Ultimate Desktop - Intel Core i7-8700K - 32GB Memory - NVIDIA GeForce GTX 1080 Ti - 240GB SSD + 3TB HDD
9. Photoshop - Contrast, Sharpen and darken around the edges.
What should I save the renders to since I am going to sell prints: PNG, TIF, BMP ?
Thanks again to everyone, you have been very helpful!
Gordon
Thanks for posting these settings and their explanation. Sometimes 3D artists are as cagey of their settings as a cook with a good recipe.
First of all Thank you!
Second, please excuse this Oddyssey of a post, this gets very "inside baseball," for daz3d iray.
I sometimes randomly do searches regarding daz3d + iray + "insert a variable here" because of curiosity, a problem, or to verify something that I have noticed that seems odd. This time the variable was "pixel filter"...because I noticed a larger number was delaying the first few itterations by a substantial amount of time (for me) but I found gold, rather, lighting gold, with your explanation of scale. Thank you so much for solving this one for me. I always wondered why the "real world lights" seemed awfully ineffective (thank you for explaining with the humble 60 watt bulb) in their job. I never thought to play with scale, that's impressive! Care to "double check" G8F proportions while you're at it, somethings seem "off"? Have you made Daz aware of this lighting issue? Rather than scaling the whole scene, there might be a way on their end to apply this fix in the next beta. Thank you, thank you, thank you. I now have my afternoon's work cut out for me.
Updating, didn't want to make a new post, so bear with me for this wall of text. Character is nude (because I want to test how the characters stand up to this), so I don't see myself doing a screenshot unless I do some censoring. Looks nice so far, recreated the scene with a primative cube, used matte paint mat for the walls, and dropped my G8F model into it, using same "light bulb" settings as perscribed. Looks nice after an hour in most aspects. The scale down to 15% for all objects in the group wasn't much of an issue, but I do know that with poses where parenting one figure to another will probably create headaches for uses, but that can be solved by unparenting and adjusting poses if you are using premade interacting figure poses that have been moved around slightly. One big issue that I have noticed is my G8F now has seams in the areas where component (arms, torso, upper legs) mats join and the SSS is quite overpowered in areas like the nose and ears. I will re-apply the mat settings (I save them as presets) for my character and maybe do another test; should that not work, this scale trick might
fundamentally be broken right out of the gatefor characters that have exposed skin in the areas where component mats meet: nevermind, see below. Even if so, for fully clothed and covered figures, this is a game changer. If anyone has a solution to the "seam issue", feel free to speak up, but I suspect I will do some searching as the first test continues.Okay, The "Seam Issue" has to do with Spectral Rendering (which I have used since it was introduced), and others have had it https://www.daz3d.com/forums/discussion/186251/olympia-8/p8 > though my character is not Olympia, it seems spectral rendering breaks G8F and probably other characters mats somewhat. Guess I'm not going to be using that again, though I might retest when the next beta comes out. Shame really, cause I think this rendering feature helped out quite a bit, but seams are pretty damned ugly and create undesireable post-work creep into my creative pipeline.
Update, did some quick renders, second one was cut very short (I am excited to try this on several projects I have on the go!), but the issue I mentioned had nothing to do with the fix, so the Adjusted for Light Scaling down of a scene yields some impressive results. On the other hand, shame about that Spectral Rendering which appears broken in the latestest Beta build > yes, I like bleeding edge, just not visible bleeding edge. Once again, thank you to JD_Mortal, you saw a target that I completely missed, despite the fact that scale abnormality has been mentioned in several places I've researched in the past.The results, even on these quick renders, make "corrective scaling" my go-to solution for all serious renders using Daz3d Iray. Would be nice if we can get things to behave (like dforce simulation - just don't even try it at the reduced scale) at this reduced scale, but you can always re-scale, do the simulation and then go back down for the render.
Yet another point to consider on this "Corrective Scaling Technique" as I am going to call it, is that when you reduce the size of your items, you have to take into account how this affects rendering variables. I'm fairly sure tone mapping is unaffected (thank God), but others are changed. For example, the f/stop on your cameras will in turn also be affected, meaning the numbers you would normally use with Depth of Field need to be scaled up relatively, and visual focal point appears to be "lying" now, so while you can see your focal point, it does appear to be off in your render. I should attatch some screen shots of the image I have been working on for two days, while blast-testing this technique; in my current image, I have doubled the focal distance (camera settings) from where it visually sits to focus on what I want it to focus on (eyes - it's always the eyes!) and gotten the subject of the image into focus, but this will vary and I'm wondering if just scaling the distance up by a factor of 85% would work as a universal formula, as opposed to just doubling it. In my recent image which I have started rendering more times that I would care to count, my visual focal point is about 60 and every time my character came out blurry in the face. When I doubled it to 120, the face became clear, but if I take the 60 and scale it by 85% I arrive at 60 + (85% X 60) = 60 + 51 = 111, so doubling is fairly close, but I would imagine that there is a point at which doubling (too keep the math simple) only works within visual tolerance at a certain range only. To help this, raising camera f/stop will also help this as it expands the volume of coverage for your focus. Also from what I see, your bloom filter (yes I like this affect) variables either need to be scaled up or down depending, for example, in my current image, the bloom filter number had to go as high as 44000 to keep the effect from distorting the details of the image outside of my asthetic boundaries; bloom is nice, but too much and you wash out critical (to me) details. Your Iray preview will be invaluable if you use depth of field, as you adjust to this new micronized world, and unless daz can re-jig their formula, I'm staying here and I won't look back. I might post my final render here at a later date sans postwork and perhaps a comparison to a nonscaled version to show the difference, but of course the lighting would have to be changed so that's quite a bit of work.
I can't thank JD_Mortal enough for the tip on scale. Part of me wishes I could just play around with DAZ3d full-time and ignore the rest of the world, and I could gradually improve my art with just myself some serious study and research, along with some serious patience, but at the moment I cannot; so having a forum like this allows people like JD_Mortal to help the rest of us get that extra bit of realism, that additional iota of beauty to our creative works.
- Yet another edit to this response. New info after using this style for a month.
Camera DOF is easily done, just make sure to have the scene at regular daz scale, drop the camera in, parent it to the group. Then, turn on DOF and line up the sight as per usual, then, scale down the group to 15% percent and go ahead and render, no math, no guess work, just works. Cannot drop in a new camera and at this scale becasue the camera is huge, and adjusting the focal point at 15% does not work visually.
Also this, Dforce hairs will for the most part work so long as the simulation happens at 100% daz scale, but as far as I can tell, strand-based hair breaks the simulated result when scaling back down to 15%. As per known issue, cannot run a dforce sim at 15% scale, though, because strand-based hair is getting to be more available, a workaround for these specific hair types would be useful. Possible solutions that come to mind involve edditing gravity and possibly structure settings in the surfaces tab.
I'm trying to think of a reason why everyone doesn't use this scale at this point. My renders are not perfect, and never will be, but the results so far leave my previous work looking even more imperfect.