Show Us Your Bryce Renders Part 10
This discussion has been closed.
Daz 3D is part of 
Connect
DAZ Productions, Inc.
7533 S Center View Ct #4664
West Jordan, UT 84084
Licensing Agreement | Terms of Service | Privacy Policy | EULA
© 2026 Daz Productions Inc. All Rights Reserved.
Comments
Thanks Horo, Slepalex and Hansmar, for the comments and suggestions.
Mermaid - The fruit bowl has improved a great deal from the first one..It really shows the difference lighting makes to a render.
And talking about lighting, I know that a lot could be done with this one.but I'm not quite sure how to go about it... I just purchased bryce vegetation from Horo and David and couldn't wait to make something with it
Thanks a lot for your great comments on my Forest Stream picture!
As promised (from a long time), I'm publishing a link here to let you download "Alaska Sky", my widest Bryce picture. File size : about 8 mb.
https://www.dropbox.com/s/u65k9sx8q9sn48w/Alaska Sky 7200x2000.jpg?dl=0
vivien: Nice start. I think you have to increase the general light level, because even the sunny parts on the columns are not very light. And the vegetation is a bit dark and therefore dull. So, as a start, I would increase general light. I would also like to see more variation in the light on the trees. Maybe remove one or two that are not too much in view and take out a lot of light, preventing te others to have a nice light. I think others can give much better advice, so hope for some of the real masters to help you
vivien - very nice picture. Apart from Hansmar's suggestion about the light, I would reduce haze which I think is a bit thick here, and rather blue. I like the thick vegetation, if you keep it, the leaves should be set so that they have some translucency.
c-ram - outstanding Alaska Sky render, Marco. Thank you very much for sharing it here.
The other day I said "I am now done with this scene - time to move on" ... but I add a bit of animation with Animation Shop and PSPX7. Still have to learn Bryce animation.
Why is the image size so strange, as if it's pressed in?
EDIT: Horo, thanks for the tip - now better. :)
.
launok - very nicely done. If the image is wider than 800 px, it will be rescaled to 800 px wide, but not the height. This seems to be the case here. You can set the width to 800 in the image dialogue (Edit), then the height adjusts to the correct aspect ratio.
Vivien – nice render. Lighting and the correct choice of materials are the two most important aspects for a good render, and it’s something I’m still having difficulty with. I’m grateful for all the help we get from the members here.

C-ram – thanks for sharing the beautiful render.
Launok – lovely animation, well done.
The Fruit Bowl re-rendered after I got additional help from Slepalex. Thanks a ton for your help, I really appreciate the help.
mermaid - lovely still life - fruits very realistic!
That is PERFECT! Direct light is perfect. Indirect light is perfect. Saturation levels are perfect. Even SlepAlex would be proud!! The shaded regions have exactly the correct amount of light, without ever appearing flat or glowy. For my view this has reached the pinnacle of Bryce's fake GI capacities. The wine goblet has a slight appearance of floating above the surface of the table a slight bit. But that could be an optical effect illusion caused by reflection settings.
The next step, if you're willing to take it, is to come up with a more specific surface for the table itself. Knowing SlepAlex as I do, I am certain that pretty much any texture you load onto the ground plane will look convincing as the tabletop under such well considered lighting. Perhaps some sort of wood or stone. Not a bad idea to try to find a free photo resource, as whipping up something convincing from the Mat lab takes a good deal of familiarty with the DTE. What you will likely find, as you start tossing better lighting at your models, that most presets just don't look very good once lit appropriately. Most of them were designed before the days of good lgihting were feasible for Bryce. I understand the inital consideration, that we dont want the ground plane to compete with the basket for the viewer's attention, I get it. But for me, as long time Bryce user, I just feel like being specific looks better than being general. Clearly, you dont want a distracting texture as the tabletop, just a convincing one. Or leave it as it is, it's already amazing!
With the advice of SlepAlex, the Dome Lights operation and capacities and applications should be making pretty clear sense to you now, enough to consider improvisation of your own. And the lessons of Domes translate extremely well to IBL as well as the magical 3D Fill. That's what I love about Bryce; it has so much internal consistency, all trails lead to the same place eventually. Mastery of a single Cluster light form makes you an expert in all of the others. Excellent work. The improvement is visible.
As you have probably learned, it takes a good deal of lights to make a scene appear photorealistic. Why didn't anyone tell us sooner just how many dim lights we'd need to illuminate a model properly from all six sides? Our job is to get as many rays as possible flying around in as many directions as possible to draw out the details of the target model in a natural looking way. Back in the day, when rendering was so slow, the idea of using dozens of radials to produce indirect light seemed unfeasible. Now, with elegant tools like Domes and 3d Fills to automate the process, I think awesome results are so much easier to come by than they used to be. GREAT work!! Fun fun!
In my opinion you've done several things right. You've understood well the ideal of the vegetation, arranging it to appear natural. WE will get into indirect lighitng option ssoon. It is never too soon to try new things. So far, so good!
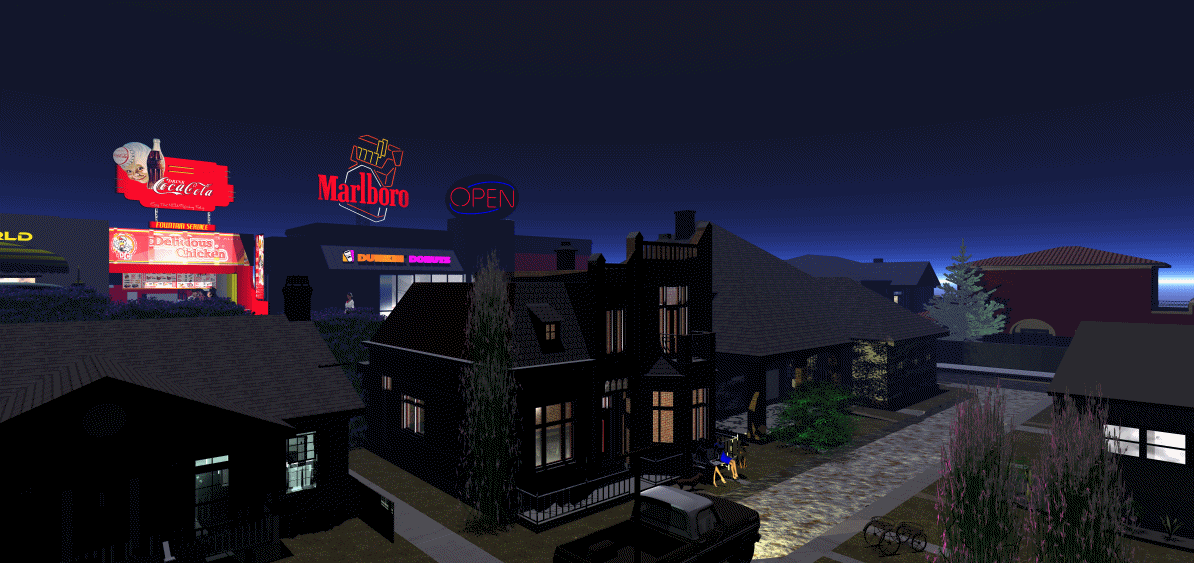
An animation!! All of a sudden the image started changng in my browser. I had to go back and read that it was an animation. Great. Firstly, the brightness levels on the glowing decals is exactly right. Whatever method you settled on, it was a good choice. Love the lights you've added to the windows of each of the buildings.
Rashard - Thanks for the comments. The full credit goes to Slepalex, he helped me with the materials as well as lighting.
Mermaid - it does really look great.
Mermaid: Wonderful still life. You're learning from the still-life-master here!
Rashad, thank you for your nice compliments. This just so happens by accident when I played more with Animation Shop which is also new to me. I had first asked for help in the PSP forum community on how to do this. But since they are a copyrighted zone I had to remove the scene from them due to the Marlboro signage, the Coke ad and Dunkin Donuts name and Chicken shop in the scene - all brand names and a no-no to them! On the end I went and search for tutorials but couldn't find exactly what I was looking for. Following some I have kind of figure out how to copy and paste the various layers from PSP to Animation Shop. I have done another animation to give the Coke bottle also a kind of sparkling effect but it didn't went too well with the rest of animation, interveres with the animation on Marlboro sign - not quite in sync. But this is how one learns I guess, trial and error!
These are three works from the DAZ contest.
Fried eggs
Render Bryce 7 Pro. Render Normal AA. Time 57:40.
Modeling: Bryce 7 Pro, Wings 3D.
Forest gifts
Bryce 7 Pro. Render Premium TA 36 rpp, time of 5 hours 45 minutes.
Lighting: sun, Radial Light.
Modeling: Bryce, Sculptris.
Apple orchard
Bryce 7 Pro. Render Premium, TA (soft shadows), 16 rpp, time 3:15:18.
Lighting: sun, Radial Light.
In the scene used Bryce trees and shrubs from the Bryce tree (only 5 pcs.). Mesh grass from the library.
Apples are created in Wings 3D and multiplied in Instancing Lab.
File size 40.1 MB.
Absolutely stunning work! Well done!
This is just a quick render with animation on my own Sketchup shop. Animation done in Animation Shop together with Paint Shop Pro to create different layers.
Launok: Nice animation, but the building is very dark on the outside.
Horo and Hansmar – thanks for the comments. I really appreciate all the help I get from the members.
Slepalex – your Stills and Landscapes are beautiful, really awesome. Thanks for helping me, looking forward to learning about using indirect lighting on landscapes.
Launok – cool animation, I agree with Hansmar the shop is dark on the outside.
I re-rendered the Ambient Occlusion and Clay Render using the Stanford Bunny instead of the dragon as Horo suggested.
@c-ram: your alaska sky is simply und truly impeccable. Bryce rendering at highest level.
@slepalex: Outstanding Bryce work, as usual. I love especially the outdoor scene with the apple trees. The faint haze in the background is just perfect.
@Launok: Nice animation. Beside the very dark building, your horizon look very bright for a night scene. You could reduce it, by selecting in the 4th skylab option a darker colour (in my example is it bright blue, which is might not be THE right choice for a night scene, but I am sure you can see my point. (besides you can see the usage in my scene below)

@Mermaid010: The bunny looks a bit jaggered, but nevertheless great render. Your fruit basket looks wonderful (apples are golden delicouse I assume ;-) and the outdoor scene, too
Lately I have bought DragonFly Hair and now I made a test render. Not very original, I confess ;-) Light comes from the Bryce Sun and from one of Horo's HDRI that comes with Bryce (Furka if I am not wrong). Rendered with Premium effects and TA 144. Render time about 1 1/2 hour, which is not too bad.
Slepalex - I've seen them before but those renders are so good that it is a pleasure to see them again.
launok - great effect, the animation.
mermaid - your AO simulation render came out very good.
Electro-Elvis - I'm always amazed how good your render of persons look. Just the skin of the legs looks a bit dry, but that's tricky to get right. Perhaps a bit of blurry reflection?
@Horo: Thank you very much. I guess a bit of sun lotion would do it ;-) To be serious: One of the easiest and also dramatical improvment for good looking skin is the using of premium effects with TA. Das ist schon mehr als die halbe Miete, (you have already won more than half the battle). But the effort is distributed quite unequally: Switching on TA = 10 seconds, improvment 85 %, adjusting the materials for skin, hair, clothes, eyes etc. 3 until 10 hours, improvment = 15 % :-D
Electro-Elvis, maybe you just have to increase the "Specularity" in the skin material to 100 and increase the Specular value into Sky Lab?
Forest brook 2
Bryce 7 Pro. Render Premium 36 rpp. Render time 14:44:40.
Lighting: sun and 2 Sphere Dome Light.
File size 29.9 MB.
********************
The painting was created based on works by Russian artist Ivan Shishkin.
Mermaid- Very realistic. I suyspect you're getting even better results than Horo intially envisioned. I've only now started readin the tutorial. Could be a game changer. I'd love to see what more you might do with this, develop it into an actual interior scenario of some sort. So far, very promising.
Elvis- Your mastery of all things Bryce never ceases to amaze me. I agree, TA brings out the warmth from the skin tines that is otherwise difficult to achieve. Time to start sharing some of that vast knowledge.
Alexey, I commented in the lighting thread on your newest and as always excellent landscape.
Electro-Elvis- thanks, your people renders are awesome.
Horo - thanks for the comment and all the goodies on your site.
Slepalex - another stunning render, love it.
Rashad - thanks. Actually initially I did work with an interior scene, one that I downloaded from ShareCG, but the results were not so great, then I turned to a still. Maybe I will give it another go if I find a better interior model.
Slepalex - beautiful render with the brook. When I first saw it I also thought like Rashad that a bit more sunlight would be good. But then, if the sun is partly covered by clouds, this is what you get. Perhaps a bit less vibrant but natural nevertheless. In the end, I think you made the right choice.