Daz 3D is part of 
Connect
DAZ Productions, Inc.
7533 S Center View Ct #4664
West Jordan, UT 84084
Licensing Agreement | Terms of Service | Privacy Policy | EULA
© 2025 Daz Productions Inc. All Rights Reserved.
Comments
Carrara setup.
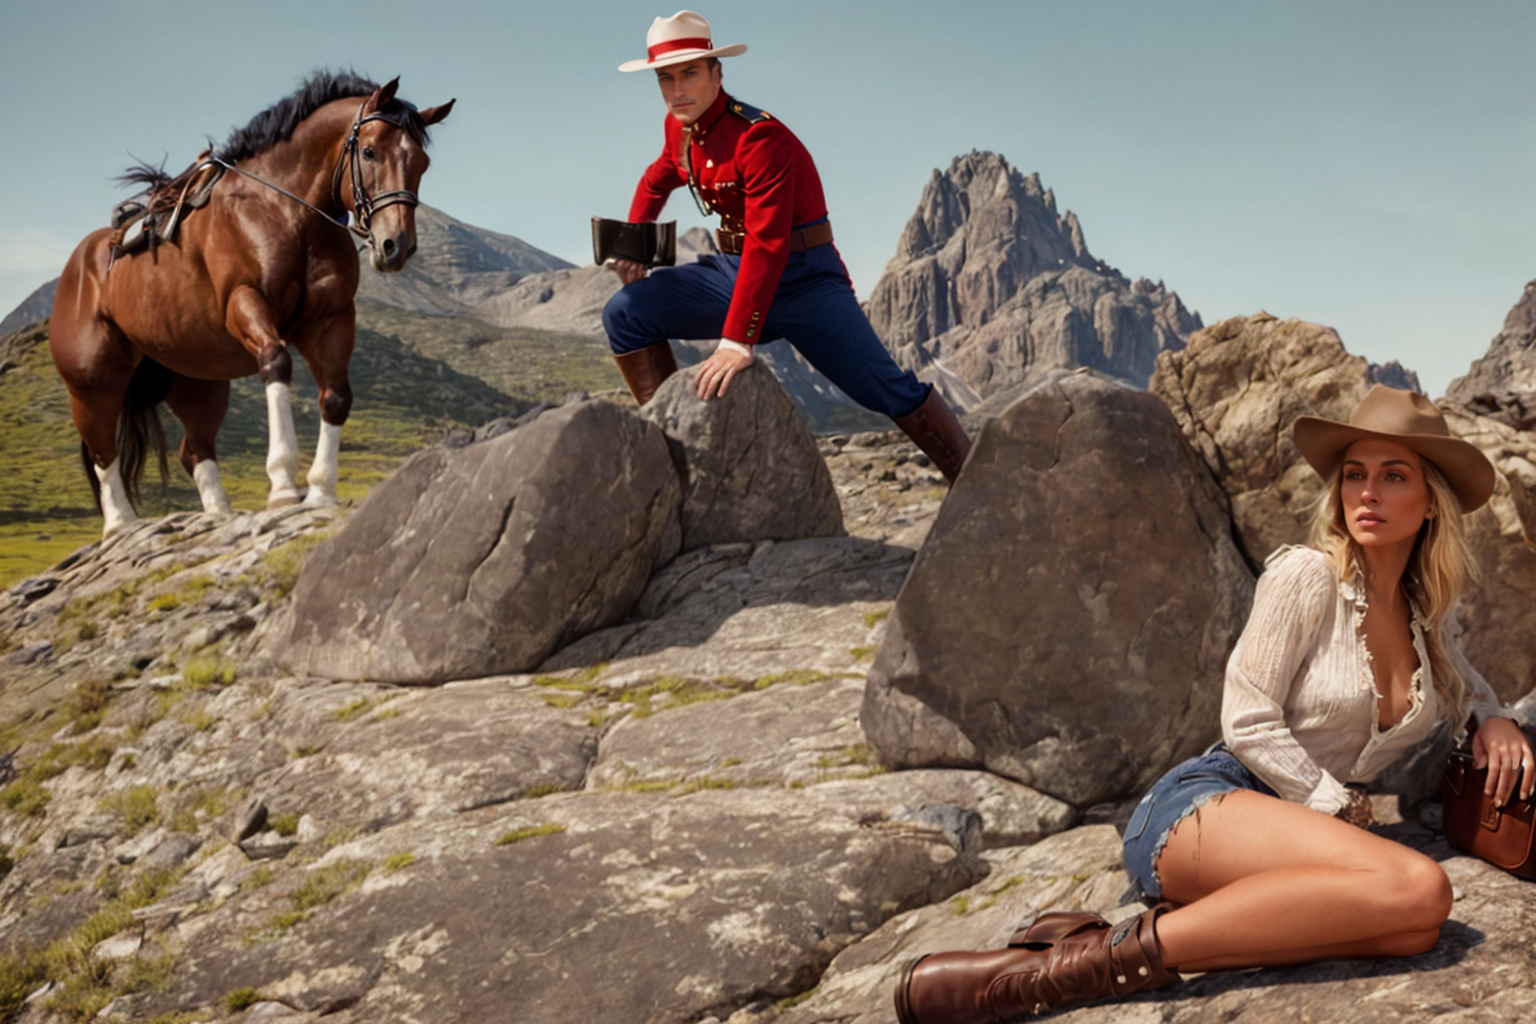
Simple scene. Note, intending to use an extension called 'Latent Couple' which can divide the Stable Diffusion canvas into areas for separate processing. So I am thinking of this in three basic regions. The left third, which is further back, has a horse. The center, which is midground, has a Royal Canadian Mounted Policeman. The right, which is closest to the camera has the exhausted and tattered desperado hiding behind a rock.
The scene has high ambient and the toon filter is on. I want to reduce the inmpact of shadows on the AI processor edge detection. I will be rendering a Toon III pass, a depth pass, a coverage pass, a diffuse pass, and a background pass.
Used Carrara terrain editor to create a basic hillside with rocks and ledges. Placed the old Daz Horse with reins and saddle in back left. Placed an M4 with the Content Paradise RCMP uniform in mid center. Placed a G2F with cowboy boots, hat, denim shorts (jeans with alpha) and blouse clutching bag in front right.
I used the Carrara hair modeler to grow strand based hair under the hat, and used Philemo's hair-to-mesh plugin (rememeber to reduce display percentage in the hair modeler). I selected the hair mesh and in Effects checked the Toon III over ride. I don't want the black lines for toon edges dominating the render of the hair.
Dimensions. Stable Diffusion models generally prefer either square 512x512, portrait 512x768, or landscape 768X512 dimensions. Therefore, I set my Carrara output to be a multiple of these dimensions. In this case, 1535x1024.
Toon III settings. I reduce the width of the edges, and I lighten the shadows.
The result is several image outputs. The toon render, the depth pass, the coverage pass, the background pass, and the diffuse pass.
The Toon III render is being used to help the AI 'canny' processor identify edges. Therefore, I have reduced the shadows which can yield false edges, and then I multiply the toon result by the coverage pass in an image editor. This reinforces many of the primary outlines.
The depth pass has to be inverted to be used correctly in stable diffusion caontrolnet.
I do some minor touch ups to the toon and diffuse passes if I anticipate some problem - such as a shadow edge fooling Controlnet that the edge of an object might be someplace it is not.
I also do a very minor blur on the depth pass to give the artificial intelligence a little wiggle room.
In this case, I used image2image in Stable Diffusion. Therefore, I took the diffuse pass and multiplied it by the coverage pass. I load the result in the image2image main area.
So, before I open the Stable Diffusion processor, I have three 1536x1024 prep images. Here they are for this example.
Carrara Output Loaded in Stable Diffusion Controlnet Processors
In this case, I am using image2image; therefore, the adjusted Carrara diffuse pass is loaded in the image2image box.
Controlnet 'Depth.' The slightly blurred depth pass is uploaded to a Controlnet tab. I also upload the depth as the mask, set the preprocessor to 'none' for depth.
Controlnet 'Canny.' The adjsuted Toon render (multiplied by coverage pass) is uploaded to Canny. Do use the Controlnet processor to use it to detect lines. Click the orange icon that looks like a fireball.
Canvas Portions - 'Latent Couple' Extension
The controlnet extension 'Latent Couple' can be used to divide up the image into regions for separate focus. For example, use the prompt 'new' for one region, and 'shabby' for another - or young vs old, or male vs female, etc. It does not have to be opposites, just giving examples. In this case, I want a horse in the left third, a Canadian Mountie in the middle, and a fugitive in the right side. Latent couple uses to accomplish this. In this case, I used
Latent couple uses a specific format in the verbal prompts; the keyword is AND in caps. In dividing the canvas, in this case 1:1,1:3,1:3,1:3 triggers four sets of prompts, the first of which (1:1) applies to the whole image while the other three apply to only 1/3 of the image. Latent Couple needs to know where to start each portion. In this case, the first set of prompts cover the whole image with a weight of 0,2, so this is the background. The next three prompts cover the left side, center, and right side respectively, with weight of 0.8. The first two start on the left edge. The second starts 1/3 of the way from the left edge. The final starts 2/3 of the way from the left edge. You can click 'visualize' to get a graphic of your instructions. The lighter the color the stronger the effect in that area. So the big light gray box is the background covering the whole image. The next three are black and white images applying to each region.
Written prompts corresponding to Latent Couple - Separataed by AND
Now that the processors are loaded, time to provide instructions.
The first line describes the background, then ends in AND.
The second set of lines describes the left third of the image. This describes the horse then ends in AND.
The third set of lines describes the Canadian Mountie then ends in AND.
The fourth set decribes the fugitive then ends in AND.
I also have a few stylistic instructions.
And there is a second box for negative instructions.
Variations on Output
You can set a number of iterations for each set of prompts you process. I generally do 4-6 per iteration. But I might do only 1 if I am still testing if something is working at all, or I might have moe than 6 if I have used a high denoiser, which gives Stable Diffusion discretion to depart more from my prompts. Here are two of the results from loading my Carrara renders in Controlnet and using my prompts with Latent Couple. In general, I like the image with the blue pants uniform better, but there are some elements from the other that I like as well. So I took these in an image editor to combine the elements that I liked. Note that the image is still relatively small (768x512).
So here you can see some of the rock and fugitive legs that I took from one image and put in the image with the blue pants.
Upscale and Reprocessing
At this stage, the image is smaller than I want, and it is still a little rough. So I load the composite small image in the 'Extras' section of Stable Diffusion, which has an upscaler. I upscaled this image from 768x512 to 1536 by 1024. But wait, there is more! I sent the upscaled result to the image2image processor. I then lowered the 'denoiser' and similar to give Stable Diffusion less discretion to change the image. I then restated similar prompts along with some instructions to amend the overall style of the image.
And so here again is the final result.
.
Nice scene but the right arm & hand of the Mountie look at bit out !
Have been exploring Krita AI for some render ideas.
Good point Bunyip.
I did a similar workflow for a simple fantasy art image. However, this time I addressed the hand not within AI, but by loading the image back in Carrara and rendering the hand which was used as the original blockout. Shadow catchers are awesome! Original blockout toon and depth renders also attached.
And how is Krita A.I. ?? + any info would be of interest + Thanx
Was a fairly big download to setup, I also downloaded a number of models from civitai.com, using up 30.6 GB of my C-drive space.
The initial download included two models, have expanded that to 5 checkpoints and 35 Loras. Topics range from Aliens to Landscapes.
Can get some interesting results just typing in a few keywords, some people also use AI Chat to come up with a passage description of their subject.
Some of the images are fairly crap, but there are also some gorgeous images rendering out. I can see why some people get hooked on using it.
Is it cheating ? Good question.
Also you can build models from sample images, so people like Headwax are entitled to protect their work.
Still got lots of exploring to do.
EDIT - Running okay on my GEFORCE GTX 1060
Yeah , man these exampls are good +
_ have 512GB SSD and 1TB standard Drives and GeForce GT 730 2GB
+ from sample images like Diomede is with Stable Diffusion , then ??
+ thanx very much +
My C-drive on what it's installed is 512GB
There are reports that it does not run on older cards, would suggest just installing the basic version and see if that works before downloading any extra models.
Krita AI is based on Stable Diffusion with ComfyUI
It's not without poor results, there are many iterations that I have not saved.
a very easy to use self contained SDXL installation is Fooocus
runs on Nvidia cards with lower VRAM
minimum 4GB VRAM
https://github.com/lllyasviel/Fooocus
https://www.maketecheasier.com/generate-ai-krita/
Sounds like the minimum card is 6GB
Interesting !!!
@Bunyip02 great examples! Thanks for posting them.
.
Carrara is much, much, much better of a partner with AI than Daz Studio Iray. In my opinion. I tried to put together a series of screenshots in a tutorial for people to use Daz Studio to create the blockouts the way I am using Carrara. It is so much faster to insert a Carrara terrain modeler and get the basic shape of desired background terrain than to search one's content collection hoping you have something roughly close to what is in mind. Or insert a vertex object or spline object and get the rough shape of a desired object. And the built in Toon!!! creates lines without having to go in and mess with the material IDs of lots of objects. I gave up on the Daz Studio screenshot tutorial because the entire point is to save time, and it takes too much time to mimic Carrara. No modeler!
Thanks !!!
I am planning on using the AI two ways in Carrara.
First of all is to generate a number of iterations on subjects that interest me, then I will use those images as a guide for setting up a scene in Carrara with my content library.
Second is to use Diomede's method of exporting a scene from Carrara into the AI to generate an image of it.
Also I am keen to get back into 3D modeling, will use the AI images as inspiration for the models. Have been doing a series of start/stops with the modeling largely as I have too much fun rendering.
I think that plan will work very well. Can't wait to see what you come up with. And modeling is always a good skill to have. I suggest a third way to use Carrara. After you have used any AI-related workflow to generate an image, use Carrara's shadow catchers, etc to add additional details. For example, AI is notoriously horrible at elements that have text - such as a road sign or a newspaper. Can add with a 2D image editor, which might be fine for a lot of purposes. But with Carrara, you get shadow catchers!
Installed Krita A.I. _ and it said this = Thanx
Another Carrara to Stable Diffusion Example. All custom Carrara models. No acquired 3rd party assets, purchased or otherwise.
You could try the Driver update. Also did you try hitting the Launch button to see what it will do ?
If it does run you could have long times to generate.
Thanks for the methodology !!! Nice render !
+ when clik laungh Givez the Error + did update Drivr And same Errors + Thanx
Sorry it did not work ....
Might be your video card is too old for it.
https://beta.dreamstudio.ai/generate
3rd way - Hmmmm
Save the Earth!
Great one.