-
[Released] OsoDreamer's FelineFolk
Richard Haseltine said:
Eboshijaana said:
AsuCafe said:
This is the best cat-like character. How can I apply the osodreamers-felinefolk model to G8.1? Unlike other G8 characters, it doesn't directly overwrite the G8.1 base figure; instead, it creates a completely new G8 figure.
I tried applying the felinefolk shape and material to the G8.1 base figure, but the fur is problematic. Only the limbs and head have fur, while the torso doesn't.
Additionally, I suggest that the new product could be made into a "Dragonborn" , preferably an Eastern-style one, like Shenron from Dragon Ball, or a raccoon man.
G8 and G8.1 use different UV maps. Hence, the fur doesn't follow act decently on G8.1.
I recommend finding a product for 8.1 has fur and applying felinefolk on that.Genesis 8.1 has the Genesis 8 UV set as well as its own, however the surface names are different - most presets DS will auto-transfer but scripts and other data will require some copy/paste or other manual adjustments
I know, AsuCafe was complaining about the fur that came with felinefolk not matching G8.1. Which it doesn't, because it only has G8 surfaces.
Anyone flip a hair product (left to right)Pendraia said:
barbult said:
This is how I do it (works for dForce hair):
- Load the hair into Daz Studio
- Select the Geometry Editor tool
- Export the hair to OBJ with Remove Unused Vertices and Write Polylines selected, as well as your normal export settings
- Open Blender (I have version 5)
- Import the exported hair OBJ into Blender.
- In Blender Object Mode, select the imported hair object.
- In Blender, Right click and select Mirror, X Global
- In Blender, Export the selected hair to OBJ
- Back in Daz Studio, with the Geometry Editor tool still selected, select Morph Loader Pro and import the Blender-exported-mirrored OBJ as a morph
- Wait and be patient. It takes my computer several minutes to import the OBJ
- Dial the created morph to 100% to verify that it works correctly.
- Set the min and max morph limits to 0% and 100% with Set Limits checked. Be sure default is 0%.
- Save the morph that is created as a Modifier Asset
Now you have a mirroring morph saved to the hair, and you can use it now and when you load the hair in the future.
I don't have Side Swept Glam Hair. Here is an example with Bixie Cut Hair (I only loaded and mirrored the Main hair, and didn't bother with the strays, but they can be mirrored with the same technique).
You can use this same technique to create morphs for dForce hair, by moving vertices around in edit or sculpt mode in Blender, instead of mirroring the whole hair.
Wow! That sounds so easy Blender normally makes my brain melt. I may have to give it another try.
Be sure you heed the Daz Studio part about selecting the Geometry Editor tool.
Anyone flip a hair product (left to right)barbult said:
This is how I do it (works for dForce hair):
- Load the hair into Daz Studio
- Select the Geometry Editor tool
- Export the hair to OBJ with Remove Unused Vertices and Write Polylines selected, as well as your normal export settings
- Open Blender (I have version 5)
- Import the exported hair OBJ into Blender.
- In Blender Object Mode, select the imported hair object.
- In Blender, Right click and select Mirror, X Global
- In Blender, Export the selected hair to OBJ
- Back in Daz Studio, with the Geometry Editor tool still selected, select Morph Loader Pro and import the Blender-exported-mirrored OBJ as a morph
- Wait and be patient. It takes my computer several minutes to import the OBJ
- Dial the created morph to 100% to verify that it works correctly.
- Set the min and max morph limits to 0% and 100% with Set Limits checked. Be sure default is 0%.
- Save the morph that is created as a Modifier Asset
Now you have a mirroring morph saved to the hair, and you can use it now and when you load the hair in the future.
I don't have Side Swept Glam Hair. Here is an example with Bixie Cut Hair (I only loaded and mirrored the Main hair, and didn't bother with the strays, but they can be mirrored with the same technique).
You can use this same technique to create morphs for dForce hair, by moving vertices around in edit or sculpt mode in Blender, instead of mirroring the whole hair.
Wow! That sounds so easy Blender normally makes my brain melt. I may have to give it another try.
[Released] OsoDreamer's FelineFolkEboshijaana said:
AsuCafe said:
This is the best cat-like character. How can I apply the osodreamers-felinefolk model to G8.1? Unlike other G8 characters, it doesn't directly overwrite the G8.1 base figure; instead, it creates a completely new G8 figure.
I tried applying the felinefolk shape and material to the G8.1 base figure, but the fur is problematic. Only the limbs and head have fur, while the torso doesn't.
Additionally, I suggest that the new product could be made into a "Dragonborn" , preferably an Eastern-style one, like Shenron from Dragon Ball, or a raccoon man.
G8 and G8.1 use different UV maps. Hence, the fur doesn't follow act decently on G8.1.
I recommend finding a product for 8.1 has fur and applying felinefolk on that.Genesis 8.1 has the Genesis 8 UV set as well as its own, however the surface names are different - most presets DS will auto-transfer but scripts and other data will require some copy/paste or other manual adjustments
Barbarella (Jane Fonda) look-a-like for G3/G8If you do a search over at ...hub using "Barbarella" there are four sets of clothing for G8F. I'm still looking for a G8F/G8.1F morph
Celebrity Look-a-Likes for 3D figures Part 4Haruchai said:
Georgehaze said:
I may be late to the game on this one but as anybody seen a (decent) Amy Adams For G8 /8.1/ 9 ??
I make no comment on whether you will find any of these 'decent', each person has their own perspective on that

There is a morph by magnus1781 which is free - https://www.deviantart.com/magnus1781/art/A-Adams-892862133
Denise by Vicey3D - https://www.daz3d.com/v3d-denise-g8f
Ada by Extraclones
Adele was pegged as her but that is for Genesis 3 Female - https://www.daz3d.com/adele-for-genesis-3-female
Will be interesting to see if anyone else has some I don't know about (or forgotten)
- Amelia by Feng
Celebrity Look-a-Likes for 3D figures Part 4Georgehaze said:
I may be late to the game on this one but as anybody seen a (decent) Amy Adams For G8 /8.1/ 9 ??
I make no comment on whether you will find any of these 'decent', each person has their own perspective on that
There is a morph by magnus1781 which is free - https://www.deviantart.com/magnus1781/art/A-Adams-892862133
Denise by Vicey3D - https://www.daz3d.com/v3d-denise-g8f
Ada by Extraclones
Adele was pegged as her but that is for Genesis 3 Female - https://www.daz3d.com/adele-for-genesis-3-female
Will be interesting to see if anyone else has some I don't know about (or forgotten)
Morph Masterbarbult said:
I don't understand what your error popup has to do with Morph Master. Are you posting in the right thread?
Matew posted a comment about several of his scripts and I responded without looking at the thread title. Never mind.
Morph MasterI don't understand what your error popup has to do with Morph Master. Are you posting in the right thread?
Morph Masterjmucchiello said:
matew said:
SaveGuard – It has saved me countless hours of work. That feeling when you're suddenly covered in cold sweat after realizing you just accidentally saved a new scene over an old one, knowing it would take an hour to recreate the scene from scratch — it's now a thing of the past.
Wearables Manager – I always use it when positioning a character and need to do something more complex than just slightly moving an arm, especially when working on animations. DAZ flies when your characters aren't weighed down by tons of props and clothing, accesories, geografts, and a couple of geoshells.
FlexiKeys – Honestly, I consider this my most fundamental creation, though for some reason, it’s the least popular. I just can’t imagine adjusting sliders anymore when positioning a character. When you control your character's bones using the keyboard, can rotate multiple ones simultaneously, switch between bones or toggle limits on and off on the fly — it’s just a completely different level of control.
Morph Master – I wouldn’t have even bothered with many things I can now do in just a couple of clicks. It allows you to take your renders to the next level without wasting a massive amount of time.
SaveGuard is better than the premiere autosave. I still see alerts when saving a preset because SaveGuard can't find the png associated with it because Daz doesn't generate an image file for something like a pose preset.
It should, unless it has been told not to in preferences.
I always forget wearables manager and morph master exist. I really need to integrate them into my work flow.
Flexikeys crashes Daz randomly on me.I have no idea what happens, but the flexikeys dialog where you can enter values popup and a second later Daz drops to desktop. So I've never learned the keystrokes. At this point I type numbers directly into the parameters fields. My dream interface would have mapped keys like flexikeys has with direct numeric entry and all presented on the Powerpose panel. But that would be remaking powerpose practically from scratch.
Morph Mastermatew said:
SaveGuard – It has saved me countless hours of work. That feeling when you're suddenly covered in cold sweat after realizing you just accidentally saved a new scene over an old one, knowing it would take an hour to recreate the scene from scratch — it's now a thing of the past.
Wearables Manager – I always use it when positioning a character and need to do something more complex than just slightly moving an arm, especially when working on animations. DAZ flies when your characters aren't weighed down by tons of props and clothing, accesories, geografts, and a couple of geoshells.
FlexiKeys – Honestly, I consider this my most fundamental creation, though for some reason, it’s the least popular. I just can’t imagine adjusting sliders anymore when positioning a character. When you control your character's bones using the keyboard, can rotate multiple ones simultaneously, switch between bones or toggle limits on and off on the fly — it’s just a completely different level of control.
Morph Master – I wouldn’t have even bothered with many things I can now do in just a couple of clicks. It allows you to take your renders to the next level without wasting a massive amount of time.
SaveGuard is better than the premiere autosave. I still see alerts when saving a preset because SaveGuard can't find the png associated with it because Daz doesn't generate an image file for something like a pose preset.
I always forget wearables manager and morph master exist. I really need to integrate them into my work flow.
Flexikeys crashes Daz randomly on me.I have no idea what happens, but the flexikeys dialog where you can enter values popup and a second later Daz drops to desktop. So I've never learned the keystrokes. At this point I type numbers directly into the parameters fields. My dream interface would have mapped keys like flexikeys has with direct numeric entry and all presented on the Powerpose panel. But that would be remaking powerpose practically from scratch.
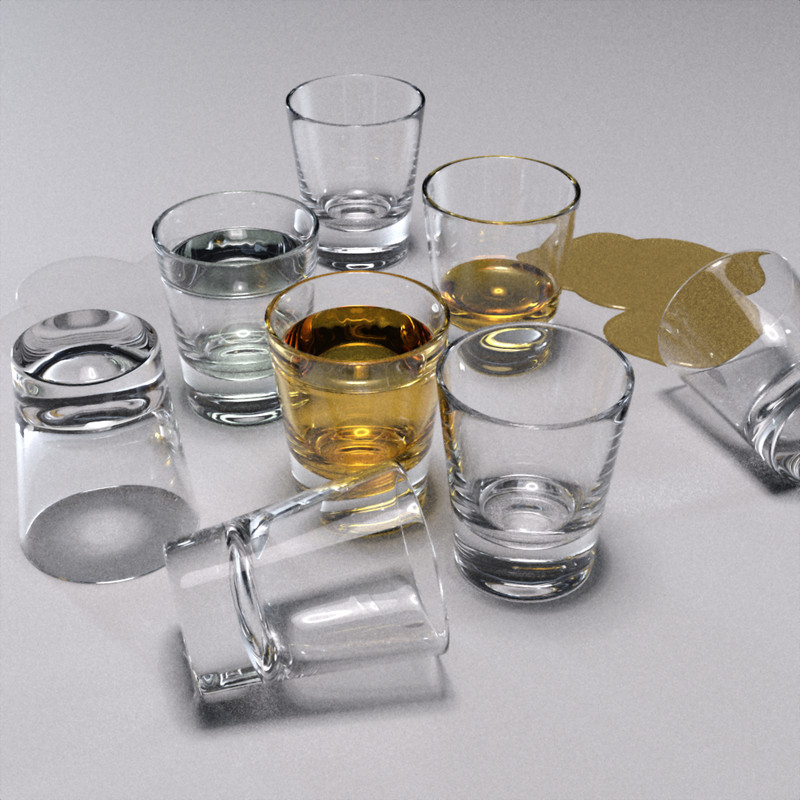
Shot Glasses Props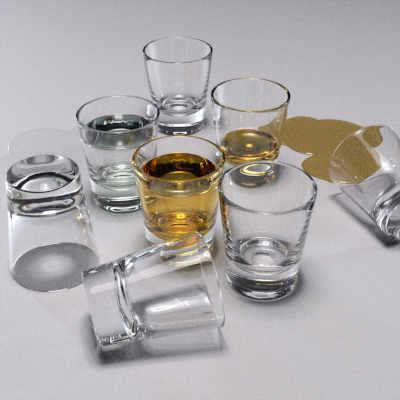
Shot Glass Props, a low poly high quality shot glass prop set up for Daz Studio + Iray rendering. Two versions of the prop are included, an empty one and one with contained drink geometry/materials. The Shot Glass + Drink has a morph to alter the drink level. A couple of material options are included for Whiskey and Vodka.
NB: These are super, extremely dependent on scene and lighting and render quality (REFRACTION, REFLECTION, CAUSTICS), please take this into account when setting up and rendering. The promotional and tip/icon images were done against a simple backdrop and floor with pretty standard HDRI lighting and a single overhead spotlight for the large image; you absolutely must have lighting and surfaces in your scene for the glass materials to react to.
Download: RenderHub (login required)
Download: Google Drive
 Splitting FBMs
VIArts said:
So maybe there’s a better way than splitting the morph just to put her gnarly head on Vicky or some other “secy” figure.
The shape splitter, together with the normal maps and other textures, might get you close enough. I've started with a supermodel character, then replaced her young texture with ones from an aged character, plus HD head detail morphs from two aged characters, and got an acceptable retired supermodel granny.
Hallelujah!
DiscipleGetting "Strength" morphs into Blender? (Genesis 9/Anime)Working on a anime-styled Genesis 9 figure, using (afaik) latest versions of Daz Studio (4.24.0.4) and the Daz to Blender Bridge (2024.2.17.107), using Blender 4.5 LTS for the Bridge step since it throws errors in 5.0.
Is there a way to get a working "Strength" morph into Blender?
I don't know the exact terminology - by "Strength morph" I mean ones like the Base Anime Eye Blink Crescent Strength pose control morph that relies on the Base Anime Eye Blink Crescent (Left/Right) morphs for its actual effect, which is to shape the curve of the already closed eyelids. The Strength morph does get brought into Blender over the Bridge, but it simply does nothing, while all the other presumably "normal" morphs that I've tried work as expected. I am exporting the entire Pose Controls category of morphs with the figure, no others.
I remember seeing a warning message that was related to this at some point previously when doing preliminary pipeline tests with other models months ago, something about making possibly destructive changes to apply these types of morphs before exporting, but that message no longer even shows up when using the Bridge exporter (I'm pretty sure I also answered yes to the changes every time it did show up?).
It seems this type of morph functions in some special way that maybe isn't compatible with Blender (or the Bridge?), but is there something that could be done to get it to work in Blender?
P.S. Also, just to have something that could maybe achieve the same effect, I tried creating a separate custom morph (dev load generic Genesis 9 figure, apply the anime crescent blink with the Strength morph at 100%, save .obj, load as a morph), but some information ends up missing in that process as well. The custom baked morph works identically to the original morphs on the generic figure, but when applied to an actual anime-proportioned figure, it no longer matches up (the eye only closes half-way). Trying to create the custom morph based on an anime figure instead of the generic one includes all the other shape changes (even if loading the morph .obj into the same figure it was created from), effectively doubling up all the sliders to create a horrific mess.
Tips on the custom morph baking front would be appreciated as well, if there's no way to bring the original morph functionality into Blender as-is ...
What is the best GPU i can buy now for Daz ?savagestug said:
If you are planning to get into generative AI, the 5000 series may be a better choice. You will just have to deal with many existing scripts not working with DS 2025
Do scene creation in DS 4, using CPU rendering to preview, then send it over to DS 6 for rendering - the only thing that won't transfer, unless you are a Premier member with Geometry Sculptor installed, is Mesh grabber Modifiers: those will have to be baked down to morphs in DS 4.
Splitting FBMsI don’t have that hag yet, but I really just want it for the unattractiveness of the face. I’m working on an animation where her body has to look like a supermodel’s in silhouette; so her posture has to look like a young woman, not hunched and crooked So maybe there’s a better way than splitting the morph just to put her gnarly head on Vicky or some other “secy” figure.
Splitting FBMsActually the seperate head and body morphs is one of the reasons G8F had such long load times, basically the more formula's DS has to process the longer the load times get.
I make my own characters as a single morph, in my G8F characters there are 1020 formula, yet when I check split characters I regularly find 500+ in the head morph and 900+ in the body, doesn't take a genius to realise that's way more than 1020.
Have a couple of dozen characters like that installed and it was no wonder DS was struggling to load G8F.
Remove JCMHello, sorry if this has been asked before but when I search the forums it just takes me to the daz store.
back when g9 first came out I had a go at making my own arm morph and creating a jcm for it. I now no longer want or need that morph but every time I load any g9, including the base g9 it gets applied. I've tried removing it from the property hierarchy in both the bones and parameters but it reappears every time I load any g9. Do I need to save the base g9 again (how would I do that?) or do I need to refreeze the ERC for the morphs? I also tried just deleting the morph but obviously daz still looks for it when I load in a g9.
thanks
Splitting FBMsElor said:
I could be mistaken, but I think with this kind of characters, Rawart explained that providing a way to have only the head or only the body active lead to problems around the area were the cut was made.
It can lead to some wonky-looking transitions between the morphed and unmorphed part. The more extreme the morph, the harder it is to retain a smooth transition for a separate head morph.
Splitting FBMsVIArts said:
Silent Winter said:
Or there's this: https://www.daz3d.com/shape-splitter
Oh., cool! But down in the notes, It says it doesn't support HD morphs. The morph I want is HD...
Ah, sorry, didn't notice that part.
Daz 3D is part of

Connect
DAZ Productions, Inc.
7533 S Center View Ct #4664
West Jordan, UT 84084Licensing Agreement | Terms of Service | Privacy Policy | EULA
© 2026 Daz Productions Inc. All Rights Reserved.