-
Scale a mesh with skeleton setup
Could you first tell me what the 'size morph' was that you loaded to this character ? It came from a product or was made by you? BTW, this character is a G9, correct?
Scale a mesh with skeleton setupcrosswind said:
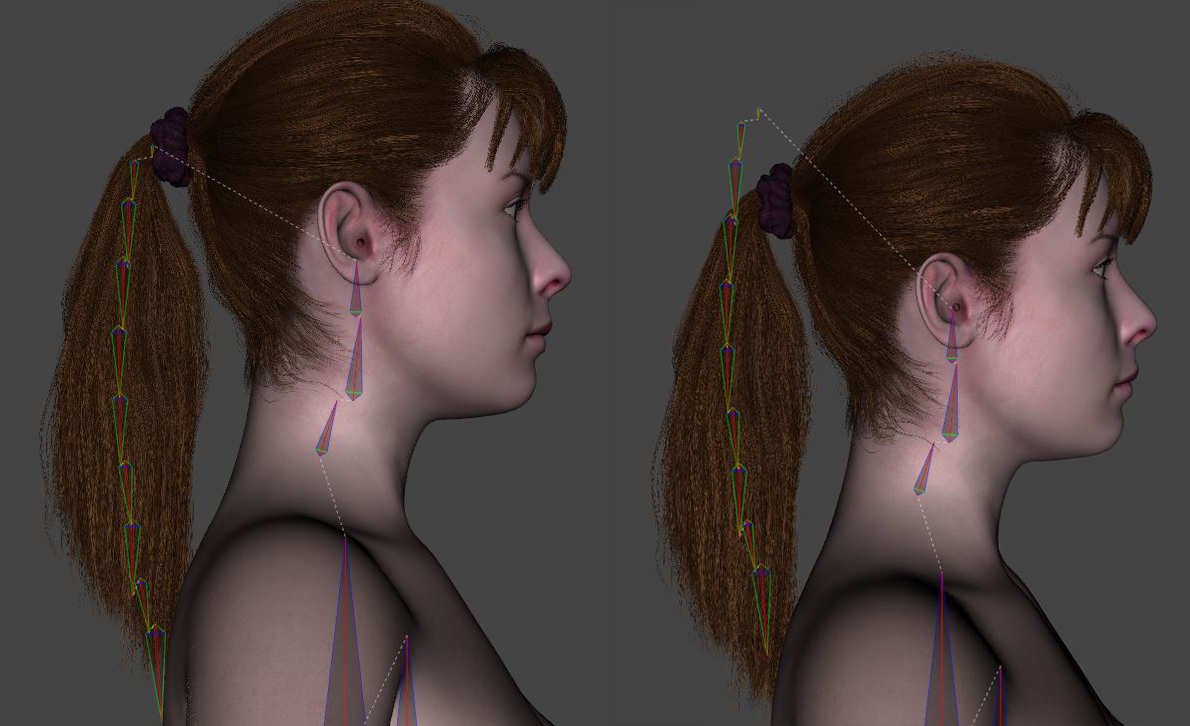
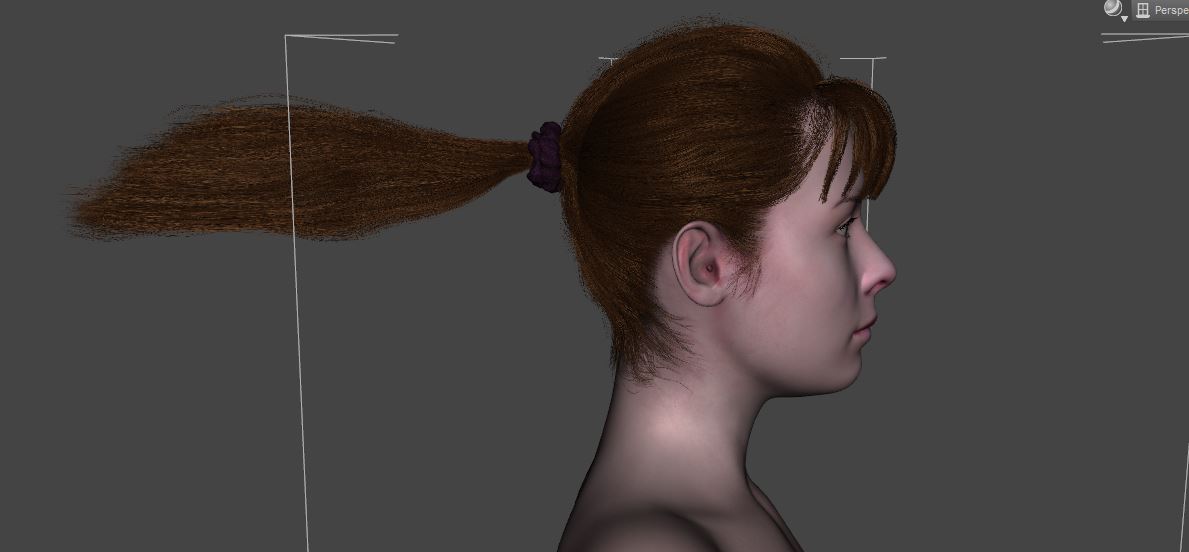
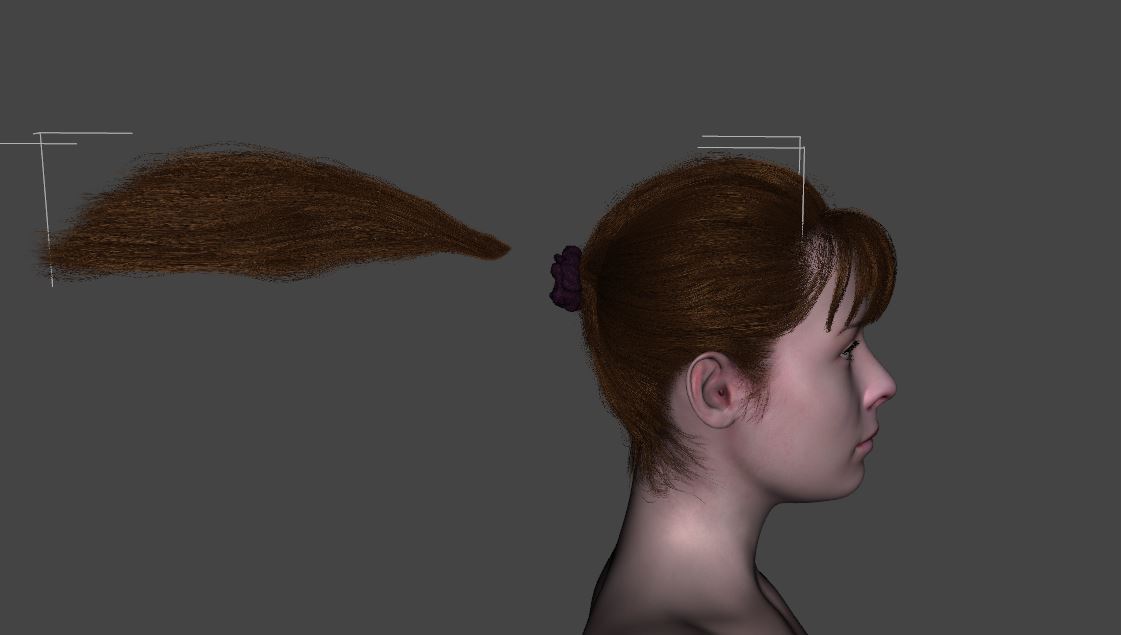
If this 'size morph' is a partial head morph of the character, you need to fix the corresponding 'auto-triggered' morph in the hidden properties of the hair, e.g. rig the bone of the tail to the right position, export to obj, Morph Loader Pro - Import back to the hair to overwrite the hidden 'size morph' as a delta...
When I use the hidden slider to scale, it does not break the hair rig. So I guess this is the root of the issue. I tried what you said and made a morph out of the scaled down and manually fixed hairs. Loading it back to the hairs without scaling but it doesn't solve anything. Not sure if I got you right. I can not use the morph to scale the hair, because the hair is fittet to genesis 8. -Scaling like this will never match the character. Can you be more detailed on the last part and on how to overwrite the 'size morph' delta please?
The size morph of the character is a full body morphLet's appreciate/discuss today's new releases - ongoing threadFace morph is pretty great, though
 Scale a mesh with skeleton setup
If this 'size morph' is a partial head morph of the character, you need to fix the corresponding 'auto-triggered' morph in the hidden properties of the hair, e.g. rig the bone of the tail to the right position, export to obj, Morph Loader Pro - Import back to the hair to overwrite the hidden 'size morph' as a delta...
Getting on the 9 train, or not
I have transferred G8 characters to G9 through quite some steps, although there definitely is some distortion around the eye area. A character converter dealing with such problem is much welcomed. As long as I don't need to mix G8 with G9 characters, or unless I want to use the G9 makeup products, I will just use the original G8 version of my characters because IMVHO G9 is not that advanced in comparison with G8, except the eye texture...Timbales said:I'm looking forward to an eventual fix to G9's UU chest creases, or an easy transfer utility for previous generations body shapes. Unfortunately, I don't think previous generation male shapes are going to be compatible to mix with G9's because of the chest. That comes in handy with male shapes, since male characters are fewer. I enjoy dial spinning and mixing different characters together.Getting on the 9 train, or notI'm looking forward to an eventual fix to G9's UU chest creases, or an easy transfer utility for previous generations body shapes. Unfortunately, I don't think previous generation male shapes are going to be compatible to mix with G9's because of the chest. That comes in handy with male shapes, since male characters are fewer. I enjoy dial spinning and mixing different characters together.absolute vrs relative pathMainly an 'SOP' may be as below: (mostly like a PA usually does..)
0) ... all making and necessary preparation......
1) Save Scene, Figure / Prop assets (DSON User Files) to 'user-face' folders (Environments, People, Props .... etc. + 'Vendor' and 'Product' sub-folders as needed);
2) Save UV / Morph assets (DSON Support Files) to data folder with 'Vendor' and 'Product' names;
3) Save texture maps to \Runtime\Textures\ + 'Vendor' and 'Product' sub-folders......
4) Assign texture maps from 3) to Surfaces ......
5) Save necessary ...Presets files to the folders along with 1) .....
etc.So if following the standard procedure, normally you don't have to worry about 'paths' problem...
Then better set a 'Test Library' for the products you make, copy all Content to this lib or use Content Wizard to build an IM package of your product and use DIM to install it to the lib for testing...Scale a mesh with skeleton setupI have a hair with rigged parts. When I load the "size morph" for my character the hair rig falls apart.
What can I do to tell DAZ to scale the skeleton along? With "bone visibility" I can see that the skeleton is the problem.How can I fix this?
 Getting a partial default morph to a character model?
Thanks for the help.
But it was actually my fault.
I just noticed a separate morph was set to 100% because I had some boots added to the figure. The boots are long gone, but the morph came with the boots and was still active. It's not the best thing that a morph to fit specific clothes stays even after the clothes have been removed.Getting on the 9 train, or notI have used genesis 9 quite a bit more now. I render primarily men and male characters and the monsters.
For men, I find the chest area, the hands, and the brow region to need more morphs . I hope more morphs which add additional details will be forthcoming. For the unisex I find the ears less realistic than genesis 8. I would like to see more variety to their shape.
Hands: need a way to increase details in this area. There are a lot of sizing morphs but veins, knuckles and shapes would be nice. The hands overall seem smaller in this generation on the men, and there are plenty of sizing morphs but I need detail as well as size.
Ears: more shape and variety to the ear folds within the ear. I do have plenty of rotation and size morphs but not enough to adjust for lobe etc and the shape of the ear morph.
Forehead/brow: ways to add more bone structure in the forehead around the eye.
Chest: the chest area is awkward on the male morph with some unnneccessary underwire grooves, and the placement of the nipples. Would like some more pec morphs to make morphing a masculine torso easier.
I do really like some improvements with genesis 9. Particularly like the expressions and the lack of that wooden face some genesis 8 characters have. I think the mouth looks better to me, and there are fewer although still some joker smiles.
From a clothing perspective would like some male underwear and male swim trunk bottoms with more fitting for the male anatomy. The unisex female bikini style bottoms don't always work and the waists of female bottoms tend to be higher than what men typically wear.
Getting a partial default morph to a character model?dream-weaver said:
I am using two different figure morphs (100% + 70%) on the standard female Gen 8 model. Everything looks good so far, the face is heavily edited by me.
So after a while I just noticed, that the feet are kind of a mess. Especially the toes are somewhat out of proportion and almost deformed. Unfortunately I didn't noticed that earlier.
Is there any way to get the default Gen 8 feet morph onto the figure? I've tried saving the default Gen 8 feet as a morph. But applying this morph to my figure didn't change anything.
Applying a morph that is the same shape as the standard base shape will naturally do nothing. All morphs are saved so that they will move the base shape, though naturally they will look different when multiple morphs are applied.
You need to find out which morph is deforming the feet, and then unapply that one. Just look at the feet and go through the likely morphs you have applied (ie leg morphs or full body morphs) setting each to zero to see if it corrects the problem.
Once you find the problem morph, you should keep that off, but if it is is a full body morph and you want it all except the feet, you could try using this product to split the morph into two:
eGPU as a second Desktop GPUYes, in my opinion it is a problem. I know there might be others here who are more technical than me that can say DS really only needs to send the information once for render (or maybe not, I'm watering it down), because when I asked the same question this is what I was told.
I went eGPU and threw a titan card in there, and I was sorry I did. THe thing was NOT stable at all, and would constantly fail at render time. I don't know if it was the data transfer that was the bottleneck or something else, but I have to think it being external was a component to that.I put the same components into a bigger case and pulled the GPU into the chassis and it was a night and day difference for me.
Just take this anecdotally, of course, my experience could be isolated, but I wish I had been warned up front. There's just not that many credible reviews or experiences out there using eGPU with DS, from what I found (which is probably for good reason IMO).
Geometry Editor - hiding/deleting edge strands?As far as I can see they are edges, not polygons. If you use Polygon select in DS, they will not select, only if you use Edge select you can select them. And Edges can't be hidden or deleted in Geometry Editor.
Same in Hexagon, they will only select if you choose Edge selection, not if you use Polygon or any other type of selection...
Yes, certainly you can select it by using Polygon Selection as long as you make it 'close' enough... like this:
https://mega.nz/file/XXYTXSiJ#Gn9bQFt5sU25WFHPmcc8nbHz3jwu8pn93b3HAdCspWg
But it'll be cumbersome by selecting polygons bit by bit, so using Marguee or Lasso will be easier...Like I said above, the strand/edge group is not connected to any other part of the mesh either as far as I can see. If you move it, it doesn't affect any part of the mesh, in Hexagon. If I select some other random edges and move them you can clearly see how they are connected to other parts of the mesh. It's only in DS, when applying the morph so the strand group moves, it affects other parts of the mesh. So I wonder what's going on here.
In your video, while using Polygon Selection, actually the 'strand' has already been selected. You need to zoom in to take a look. The highlights of Polygon and Edge are different, the latter looks much apparent (highlighted in orange color)... Acutally you can first use Edge selection to select the 'strand' then convert it to Polygon Selection, then hide or delete the selected... (RMB Menu : Geometry Selection - Convert Selection - Convert to Polygon Selection...)
Still, I have no idea about Hexagon but it looks like the strand is really 'separated'... but in Ds and blender it is 'not' if it was partially selected ... I just roughly made this 'fixing morph' in blender:
https://mega.nz/file/ffxkmIhQ#gp3FlTMZ7x6IxLwNbHMZHjl1SIBBSOY8184jgD774R0
I have Mesh Grabber but find it rather clumsy to work with, partly because it doesn't respect "Not selectable" nodes and that you can't lock node selection on the scene tab (DS problem). So my experience with it is very limited. Looks like you're using the Rotation's add-on here?
Yes, I ever bought the whole bundle of Mesh Graber but in this case, I did not rotate it since I found 'pushing' was just fine. And, that's right... Mesh Grabber has no 'mask' or 'respect Topology' function, so it's not easy to manipulate complex cases with it...Getting a partial default morph to a character model?I am using two different figure morphs (100% + 70%) on the standard female Gen 8 model. Everything looks good so far, the face is heavily edited by me.
So after a while I just noticed, that the feet are kind of a mess. Especially the toes are somewhat out of proportion and almost deformed. Unfortunately I didn't noticed that earlier.
Is there any way to get the default Gen 8 feet morph onto the figure? I've tried saving the default Gen 8 feet as a morph. But applying this morph to my figure didn't change anything.
Geometry Editor - hiding/deleting edge strands?crosswind said:
Taoz said:
crosswind said:
Which part? mouth cavity or sth? I never use Hexagon but only ZB and blender, not sure how it works...
I'm using the Hexagon bridge which can send objects from DS to Hexagon for editing, and then back again.
See video here: https://www.screencast.com/t/rQ9InlUQUME4
I'm trying to get rid of the strands sticking out from the left side of the hair so I'm creating a morph for the purpose, but as you can see it deforms other parts of the mesh also when applying it.
Understood ! You wanna ' get rid of ' these fine hairs... But if you make a morph in Hexagon by dragging the 'strand' into the hair, the connected polygons will be also moved, then it'll be 'deformed'. You could've partialy shrunk or bent it in there...or used a mask before dragging..
But as far as I can see these strands are not connected to anything else in the mesh.
Or in Ds, you just hide them by using Geometry Editor... You may take a look at the closeup, these fine hairs are still formed by polygons. You may use marquee selection to select part of it then presse Ctrl + +, then hide or delete them.
As far as I can see they are edges, not polygons. If you use Polygon select in DS, they will not select, only if you use Edge select you can select them. And Edges can't be hidden or deleted in Geometry Editor.
Same in Hexagon, they will only select if you choose Edge selection, not if you use Polygon or any other type of selection.
Like I said above, the strand/edge group is not connected to any other part of the mesh either as far as I can see. If you move it, it doesn't affect any part of the mesh, in Hexagon. If I select some other random edges and move them you can clearly see how they are connected to other parts of the mesh. It's only in DS, when applying the morph so the strand group moves, it affects other parts of the mesh. So I wonder what's going on here.
See video here which demonstrates it all: https://www.screencast.com/t/0JzqrB5j2f
Or if you know Mesh Grabber, you may press Alt Shift + E after selecting the part of this 'strand' and carefully 'push' and 'rotate' them into the hair. Then create a morph for it. In this way, you also can 'show' or 'hide' it by dialing the morph...like what I roughly did in the screenshots...
I have Mesh Grabber but find it rather clumsy to work with, partly because it doesn't respect "Not selectable" nodes and that you can't lock node selection on the scene tab (DS problem). So my experience with it is very limited. Looks like you're using the Rotation's add-on here?
Getting on the 9 train, or notlou_harper said:
PerttiA said:
lou_harper said:
One thing I love about G9 is that the lack of pointy nipples. I'm sure it upsets those who like making smexy pictures, but a godsend to me. On G8F they are a nightmare. Even when they are not poking through the shirt they deform it to create a perky bra-less look. Not what I'm generally aiming for. It got to the point that when I use a Mousso figure I find the Mousso nipples in parameters, turn off its limits and dial it to -50.
If they are pointy and poking through clothing, you have some morph applied, maybe with 100% default value which is quite common problem.
The only morph is whatever figure it is. Like Albany, as opposed to G8 base.
The nipples on default G8/G8.1 are not pointy/pokey so, either it comes from the figure or you have some other morph activated at 100% default value.
When a morph has a default value of 100%, it doesn't show up in "Currently Used" as the value doesn't deviate from the default one = As far as DS is concerned it is not "used"
SereneNight’s Sci-Fi Fun Thread 3G9 Owen looks fantastic, Serene Night!
None of the G9 products that I own have any adjustments for crow's feet/eye wrinkles/folds/creases/etc.
PedtroFurtadoArts has a new morph set "The Age for Genesis 9" that includes a Youthful head and body morphs. The Youthful head smooths out the face a bit, but may reshape the face some. I can't tell if it smooths out the outer corners of the eyes or not. He also has Elderly and Mature morphs that might work using negative values, though I suspect ithey change the head shape too much. Youthful tends to preserve the original character more than the others.
On another thought, do any of your normal maps have crow's feet. Maybe the DAZ default one? Dialing those down might help if they do. I'm just guessing here as I'm about to run out for a bit. Otherwise I'd look to see. :)
From an admirer of your work point of view, I instantly recognized Owen in your render above and didn't know he was G9. He's very, very well done.
Lee
crushed breastIn general it is a bad idea to bake out a single morph combining the effects of others - aside from the fact that you cannot sell or distribute the result, which may well not be a concern, you lose any links to other corrective morphs (e.g. making the eyes or lips close cleanly with a morph that affects their shape) or joint adjustments (e.g. making sure the bends are in the right place used with a morph that stretches the arms). What you can do is make a new controllers property that will then, with a single slider, apply all the modifications you have made. With the character shape applied, but the figure otherwise zeroed:
- right-click on the parameters pane and put it in Edit mode, if it isn't
- right-click in the group you want to contain your slider and select Create New Property - give it a name and label (the label is what appears on th slider, presuambly you would sue the character name), make any other chnages 9e.g. you might want to set the lower limit to 0%), and click Accept.
- set the new property to 100%.
- right-click on the new property and select ERC Freeze. In the dialogue run your eye down the list of Sub-components to make sure there is nothing there that you don't want (e.g. a pose you forgot to zero), uncheck anything not needed, and click Accept.
- test the result, assuming all is well zero it then File>Save As>Support Assets>Morph Asset, select your morph, and enter the desired names for Author and product (these are used as folder names). At the top of the dialogue box you can choose which content directory to use - I suggest using oen that you include in your regular backups.
That should give you a master slider avaialble on all instnaces of that figure (if you don't want it avaialble on all figures skip step 5 other than testing and just save a scene or character preset (and in the latter case use it to load the figure when you want the morph).
crushed breastThank you for your answer. I found the problem. In practice, I don't know why, on the final character which is the result of the combination of other characters, the software had reset this combination without me doing anything. So the final result was a different hybrid from the one I built. To avoid doing the same thing with other parameters in the future, I ask you if the character, once built, can be saved as an independent morph no longer tied to its modifiers?
Thank you for always being available to solve my difficultiesMissing Morphs for purchased characterUnfortunately, I have not been around long enough to have been familiar with the history of the Genesis figure. However, the ReadMe for those morph packs state: "2012-08-01 - 1.4 - Updated morph regions for DAZ Studio 4.5." This does sound like perhaps a breaking-change was made, albeit over 10 years ago so perhaps not relevant unless your previous install was from before that time and maybe never received that update?
Certainly the files you listed do not appear to be part of the filelist for the Head or Body - although "Flirting" sounds like it would be from an expression pack rather than a head-shape pack. In addition the "GenePool" files do not seem like they belong to any of the requirement Products. Perhaps you have some values from other products accidentally baked into the Gunner figure?
Daz 3D is part of

Connect
DAZ Productions, Inc.
7533 S Center View Ct #4664
West Jordan, UT 84084Licensing Agreement | Terms of Service | Privacy Policy | EULA
© 2026 Daz Productions Inc. All Rights Reserved.