-
How do I make my products visible in my Smart Content?
To get the most out of Daz Studio you really want to combine the Smart Contents tab and use it in combination with the Content Library tab... for example I have both pinned at the left side of my screen (vertical) to have easy access. Alas... I know this has been explained before but I'm currently working on some renders and I'm fully in "that" mood... DS is one of my all time favorite software environments, right next to stuff as ZBrush, Ableton Live, FL Studio.... and then stuff like this happens ;) Alas... enough offtopic venting, let's dive in!
Add a custom library
Optional, but highly recommended: don't muck around in your main Daz Studio library because that can only become problematic. Adding stuff is easy, but... what about removing? I also strongly suggest that you don't "ab-" use your personal library for it because... why mix re-installable static contents with your own work that you'll want to backup? Waste of backup space!
And this is easy:
- Make a folder somewhere for your custom stuff.
- Start DS, press F2
- Open the 'Content' section, click "Content Directory Manager" at the bottom.
- Decide if you're working with DS contents or Poser contents (maybe both?); add your new folder to the appropriate section(s).
- For now your content folder / library will only be accessible using your content library pane.
Add metadata + categorize
So, the first thing to realize and understand is that the smart contents section is fully virtual: it only exists by the grace of a database, no more and no less. You only need to add / assign so called metadata to your 3D material, and then assign it with its own place within the category section. So how do we 'recognize' the presence of metadata? Easy: by the small rectangluar "icon" in the upper right corner of a product image. For example: expand the 'Figures' category within the smart contents pane, click on "People". Notice the many green (and sometimes blue!) "Actor" icon? That's what I'm talking about.
Now... open the content library pane, browse to a section which contains item(s) that you want to add. In my example I'm focussing on some clothing (a bodysuit) that also came with some material presets.
#1 Categorize
Now, a word of warning: #1 & #2 can be swapped, np. So if you're checking out the "Lost + Found" category for "missing" contents then you should categorize something after you added any metadata (when needed). For obvious reasons: the moment you categorize something within Lost + Found it usually disappears from there. Could be annoying if you still had to add metadata.
Having that out of the way: the reason why I categorize first is to start by thinking what kind of material we're dealing with. In my example a bodysuit, so... right click on the item(s!) you want to add, click "Categorize" and then find a suitable (and logical!) location for your stuff. Also be aware that you can easily make sub-categories (or new ones) if you want to.
I'd add a bodysuit to "Wardrobe => Full-body" and optionally to the "Outfits" section as well (assuming it comes with more accesoiries). SO find the locations and enable the checkbox in front of the one you're going to use. Click ok if you're done, you'll notice that nothing has changed.
#2 Add metadata
Now we're getting to the "cool" part: right click on the folder in the content library pane that contains your item(s) and select: "Edit metadata...". Now this screen can become confusing at first... First: make sure that "Sync product and local database" is enabled (option at top). This is important!
On the top half of the screen you'll see all the physical files. This section will also tell you if metadata is already present (notice the 'file type' and 'type' columns?). Select the file you want to edit. Now you need to select a "Type".... click the small arrow button to open the selection screen. Careful: if you move your mouse too far away it'll auto-close.
Generally speaking...
- Use 'Actor' for older posable figures, use 'Actor => Character' for new(er) ones. When in doubt you'll probably want to stick to 'Character'.
- "Preset" is the most often used section today. Pose? Use "Preset => Pose", clothing? "Preset => wearables".
- Notable exceptions to the point above: Props, Sets, Hair (see 'Follower => Hair') and "unfiltered wardrobes" (when using "Preset => Wearables" you may not see your items appear until you have a compatible figure selected, with "Follower => wardrobe" this won't be a thing (this can be important when you rely on auto-fit to use items for unintended figures)).
When you have selected the right type click "accept", now the main product icon/preview should show the "metadata indicator" as mentioned above.
At this moment you're done and your stuff is added to the smart contents pane.
But wait... there's more!
Compatibilities
The main advantage of 'smart contents' comes from the fact that it can filter your stuff based on what you have selected in the scene tab, and thus only show you assets that are compatible. So let's say our bodysuit is compatible with... Genesis 3 Female, how do we set this up?
And in addition: how do we make the "link" between the bodysuit and its material presets?
In the "Metadata edit" window as mentioned above you'll notice some sections in the lower half of the screen. By default "Categories" is selected, but we also have stuff like "Tags", "Descriptions" and.... "Compatibilities". That's what we're after. Select it, then right click on the entry in the lower half of the screen and click: "Add compatibilities to selected files...".
Now you're taken to a "meta database" as I like to call it, referring to the fact that this is a support section. Scroll around and find "Genesis 3", expand it and you'll see "Female". Select the main entry, click 'Accept' and you should now see this added ("/Genesis 3/Female").
If you click "Accept" again you've now told DS that your new item is compatible with Genesis 3 females and thus whenever you select one in your scene tab it'll show up.
But what about our own stuff? How to tell DS that whenever we select the bodysuit it should show us the compatible materials?
Adding your own compatibilities
Beware! The "meta database" (as I like to call it!) is already in use, so be very careful before you start changing stuff in there. My advice is to add a dedicated node / "root base" for your local stuff add add everything of your own in there. How? Well...
- Add the main item to your scene. So in my example I'd add a Genesis 3 female figure, then I'd add the bodysuit for her to wear.
- Make sure the new item is selected in the scene tab, right click on said scene tab ("Pane") and click on: "Edit => Set default compatibility base(s)....".
- Note that you can select multiple items, for example using control-a or using control-left-mouseclick.
- Click on the "3 dot" button at the end of the entry field.
- You will now see the same screen as when you added compatibilities, but now you can also edit!
- Right click somewhere, use: "Create new root compatibility base". I'd suggest a name like: "Local items" or such (local is easy to find again later).
- Select the newly created root base, click "Accept".
- You're now back to the previous entry screen, but the entry field should have an entry ;)
- Enable "Selected nodes only" at the bottom (otherwise you may interfere with the Genesis 3 node).
- Click "Accept".
What did we do here? We told DS how to identify our 3rd party asset, so all that remains is to "link" this to our material:
Follow the steps I've already explained above to add the material items to your smart contents pane. I'd categorize this under "Materials => Wardrobe", but you're always free to set up your own categories. I'd use the "Preset => materials" type. Now... as soon as you set up the metadata, you need to search for "local" within the "meta database" when you're adding the compatibilities. In case you didn't notice: the entry field on top can be used to search, and "local" isn't an often used word, so it'll be easy to find.
Expand the root base and you should see an entry for whatever you added. Select it in the same way we selected the "Genesis 3/Female" node before and you're good to go.
It sounds more complex than it is ;)
And there you have it!
I've spend hours, no: days adding my own stuff and it made me appreciate Daz Studio all the much more, because with this software we're in full control.
Hope this can be useful for some of you out there!
Chinese Face and Body Shapes for Genesis 3 and 8 Female not workingfrom Log file ...... the shape didn't not change
022-06-19 20:30:54.116 [INFO] :: Prepare asset load (merge): /People/Genesis 8 Female/Shapes/Chinese Shape Presets/LL Chunhua Head.duf
2022-06-19 20:30:54.116 [INFO] :: Locking viewport redraw...
2022-06-19 20:30:54.116 [INFO] :: Viewport redraw locked.
2022-06-19 20:30:54.406 [INFO] :: Native format content directories: 3
2022-06-19 20:30:54.406 [INFO] :: Poser format content directories: 3
2022-06-19 20:30:54.406 [INFO] :: Other import format content directories: 0
2022-06-19 20:30:54.406 [INFO] :: Begin asset load (merge): /People/Genesis 8 Female/Shapes/Chinese Shape Presets/LL Chunhua Head.duf
2022-06-19 20:30:54.407 [INFO] :: Determining missing assets...
2022-06-19 20:30:54.407 [INFO] :: Setting textures...
2022-06-19 20:30:54.408 [INFO] :: Applying animations...
2022-06-19 20:30:54.411 [INFO] :: Finished asset load (merge): 0m 0.5s - /People/Genesis 8 Female/Shapes/Chinese Shape Presets/LL Chunhua Head.duf
2022-06-19 20:30:54.786 [INFO] :: Unlocking viewport redraw...
2022-06-19 20:30:54.786 [INFO] :: Viewport redraw unlocked.
2022-06-19 20:30:58.082 [INFO] :: Prepare asset load (merge): /People/Genesis 8 Female/Shapes/Chinese Shape Presets/LL Chunhua Full.duf
2022-06-19 20:30:58.082 [INFO] :: Locking viewport redraw...
2022-06-19 20:30:58.082 [INFO] :: Viewport redraw locked.
2022-06-19 20:30:58.373 [INFO] :: Native format content directories: 3
2022-06-19 20:30:58.373 [INFO] :: Poser format content directories: 3
2022-06-19 20:30:58.373 [INFO] :: Other import format content directories: 0
2022-06-19 20:30:58.373 [INFO] :: Begin asset load (merge): /People/Genesis 8 Female/Shapes/Chinese Shape Presets/LL Chunhua Full.duf
2022-06-19 20:30:58.374 [INFO] :: Determining missing assets...
2022-06-19 20:30:58.376 [INFO] :: Setting textures...
2022-06-19 20:30:58.376 [INFO] :: Applying animations...
2022-06-19 20:30:58.386 [INFO] :: Finished asset load (merge): 0m 0.12s - /People/Genesis 8 Female/Shapes/Chinese Shape Presets/LL Chunhua Full.duf
2022-06-19 20:30:58.786 [INFO] :: Unlocking viewport redraw...
2022-06-19 20:30:58.786 [INFO] :: Viewport redraw unlocked.OFFICIAL DazToUnreal Bridge (SEPTEMBER UPDATE): What's New and How To Use ItIf you are using the Subdivision Levels option, please download and use the latest hotfix available here: https://github.com/daz3d/DazToUnreal/releases
It fixes problems where the Fbx is corrupted and unable to import into Unreal Engine.
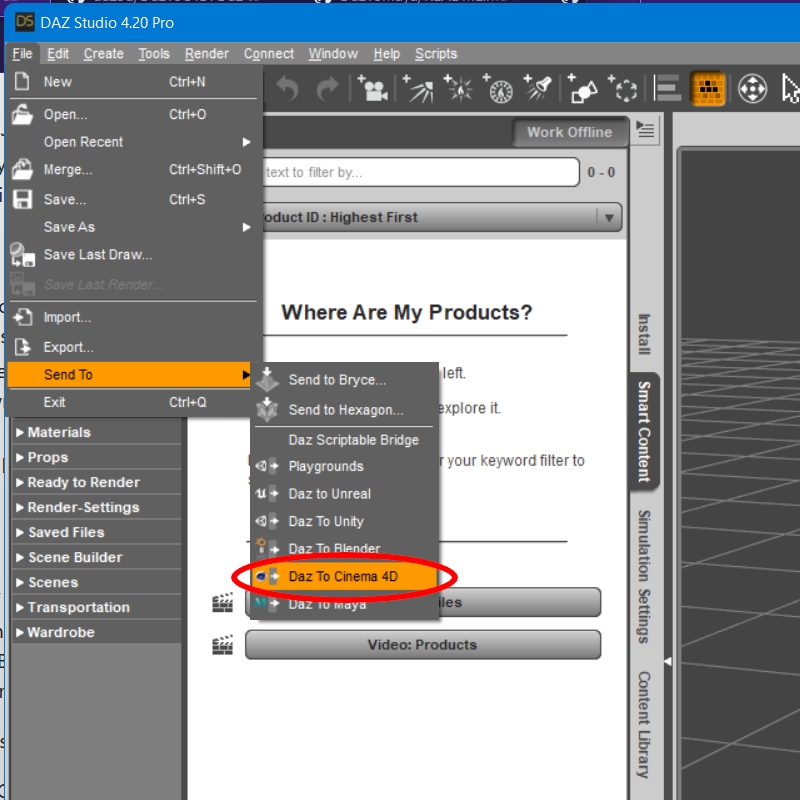
OFFICIAL DazToCinema4D Bridge 2022 (SEPTEMBER UPDATE): What's New and How To Use ItThe September Update for the DazToCinema4D Bridge is now available on Daz Central and Daz Install Manager. It has some changes to the UI which may take users familiar with the old version time to get used to. Here's what's new:
- Fixed several bone-rotation bugs on import
- Now allows option for no bone-rotation changes
- Updated to latest Daz Bridge Library v2.2
- Fixes morph undo bug (distorted face after exporting)
- Geograft material support
- Preliminary steps for Geograft Morph support (exported blendshapes
New Menu Location:
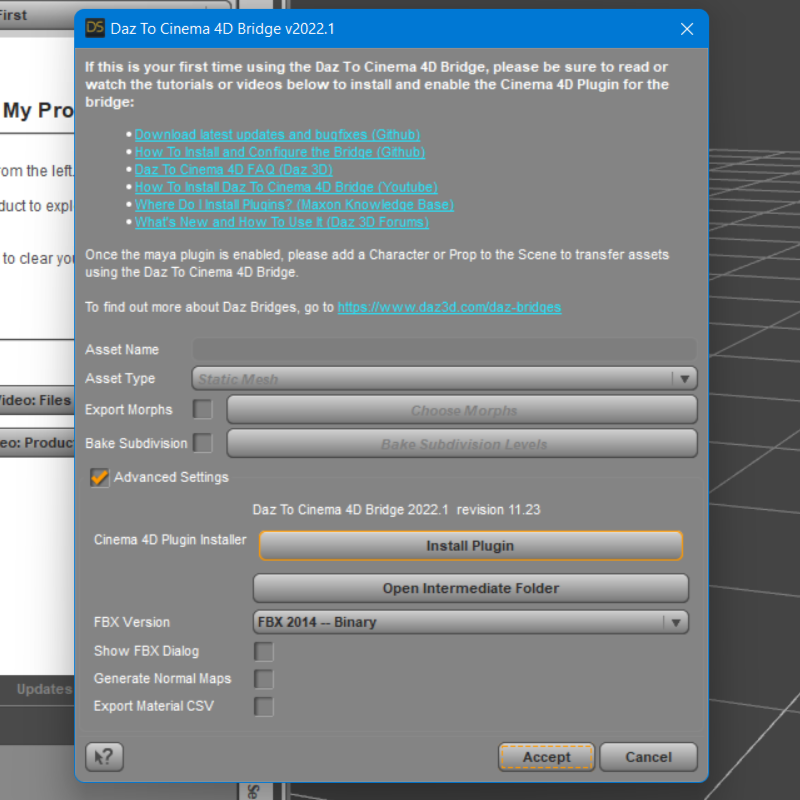
You will need to install the Cinema4D Plugin using the new integrated Cinema4D Plugin Installer. Access this from the Advanced Settings box of the new DazToCinema4D Bridge UI.
How to Install the Cinema 4D Plugin
- Cinema 4D no longer requires a Plugins subfolder in the location where Cinema 4D was installed. Since R20, users should set a plugins path inside the Cinema 4D Preferences window and install plugins to that folder. We recommend creating a "\Documents\Cinema4D\Plugins" folder in your user's home folder and selecting that as the Plugins path in Cinema 4D. Please refer to this link for more information: Where do I install plugins? - Cinema 4D Knowledge Base
- The Daz Studio Plugin comes embedded with an installer for the Cinema 4D plugin. From the Daz To Cinema 4D Bridge Dialog, there is now section in the Advanced Settings section for Installing the Cinema 4D Plugin.
- Click the "Install Plugin" button. You will see a window popup to choose a folder to install the Cinema 4D plugin.
- Navigate to the plugins folder path which you set from the Cinema 4D Preferences window, and click "Select Folder". You will then see a confirmation dialog stating if the plugin installation was successful.
- If Cinema 4D is running, you will need to restart for the Daz To Cinema 4D Bridge plugin to load.
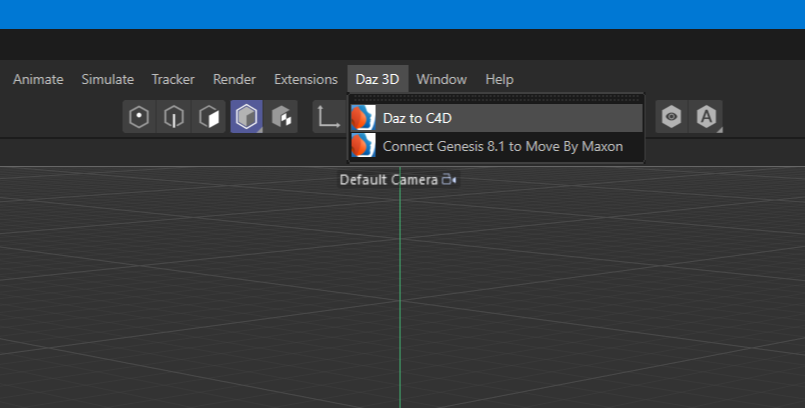
- In Cinema 4D, you should now see "Daz 3D" in the Cinema 4D main menu.
You can find more information about the updated DazToCinema4D Bridge with these resources:
- Download latest updates and bugfixes (Github)
- Daz To Cinema 4D Bridge FAQ (daz3d.com)
- Daz To Cinema 4D Bridge on Github
- How to Install Daz To Cinema 4D (Github Readme)
- Where do I install Plugins for Cinema 4D? (Maxon Knowledge Base)
- How to Use Daz To Cinema 4D (Github Readme)
How to Install and Configure Daz To Cinema4D 2022
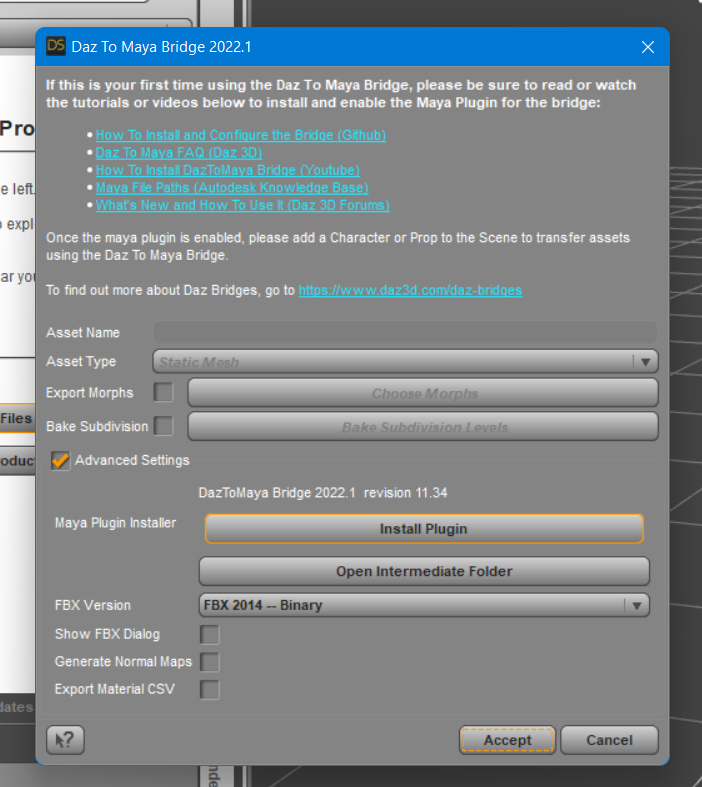
 OFFICIAL DazToMaya Bridge 2022 (SEPTEMBER UPDATE): What's New and How To Use It
The September Update for the DazToMaya Bridge is now available on Daz Central and Daz Install Manager. It has some changes to the UI which may take users familiar with the old version time to get used to. Here's what's new:
- Updated to latest Daz Bridge Library v2.2
- Fixes morph undo bug (distorted faces on export)
- Geograft Material support
- Prelim steps for supporting Geograft morphs (exported blendshapes)
New Menu Location:
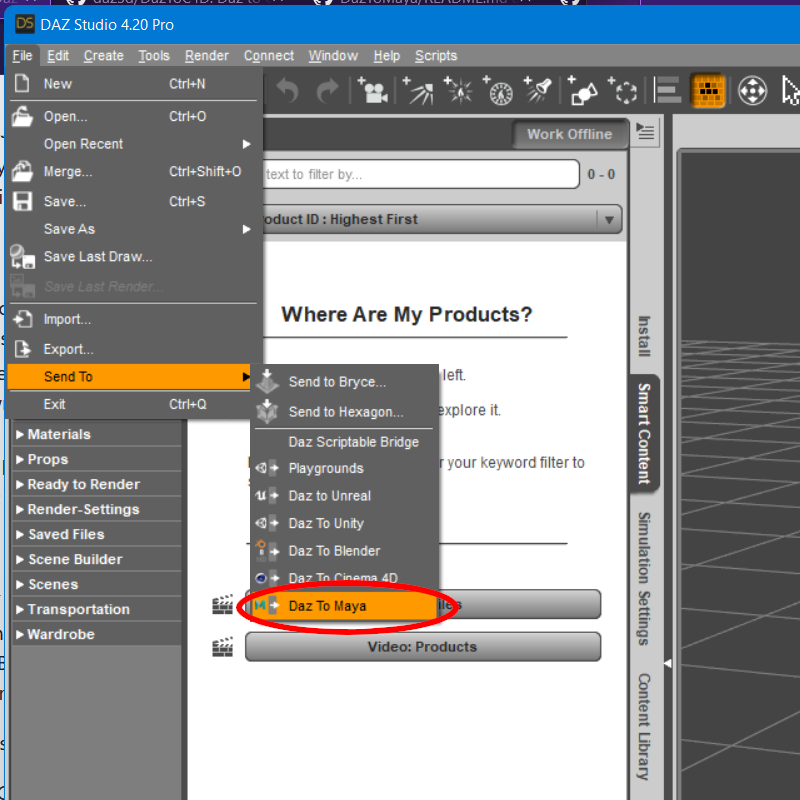
You will need to install the Maya Plugin using the new integrated Maya Plugin Installer. Access this from the Advanced Settings box of the new DazToMaya Bridge UI.
How to Install the Maya Plugin
- The Daz Studio Plugin comes embedded with an installer for the Maya Bridge module. From the Daz To Maya Bridge dialog, there is now section in the Advanced Settings section for Installing the Maya module.
- Click the “Install Plugin” button. You will see a window popup to choose a folder to install the Maya module. The starting folder should be the default location for maya plugins and modules.
- On Windows, the path to install modules should be “Documents\maya\modules”. On Mac, the path should be “/Users//Library/Preferences/Autodesk/maya/modules”.
- For most Maya setups, you should be able to just click “Select Folder”. You will then see a confirmation dialog stating if the plugin installation was successful.
- If Maya is running, you will need to restart for the Daz To Maya Bridge module to load.
- In Maya, you should now see a “DazToMaya” tab in the Maya Shelf toolbar. Click this tab to find the DazToMaya options.
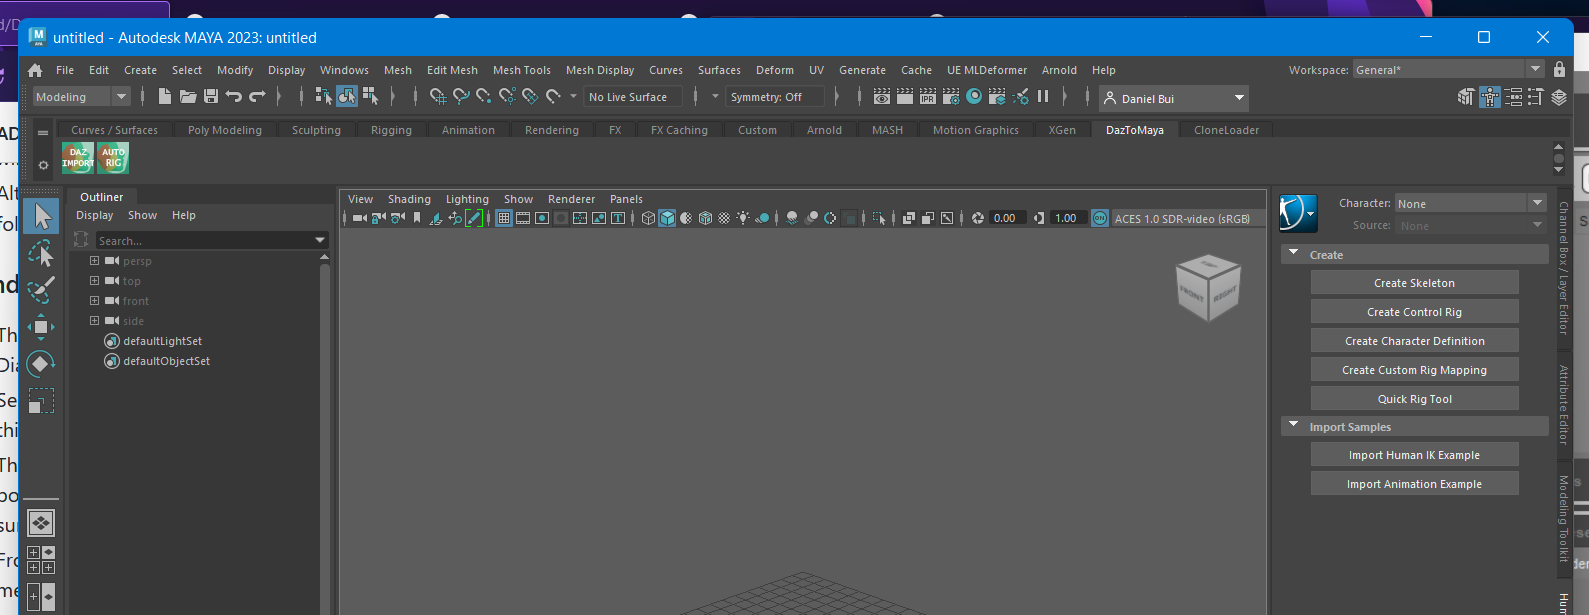
- If you have tabs disabled in the Maya Shelf, you may need to click the “cog” icon and select “Shelf Tabs” to find and select the “DazToMaya” tab.
- From the DazToMaya tab of the Shelf, you should now see an icon for “DAZ IMPORT”. You are done installing Daz To Maya Bridge!
- If you recieve an error when trying to click the "DAZ IMPORT" icon, make sure you have PyMEL installed.
You can find more information about the updated DazToMaya Bridge with these resources:
- DazToMaya Bridge on Github
- Installation Instructions for DazToMaya Bridge (Githhub)
- How to use the DazToMaya Bridge (Github)
- Download the latest updates and bugfixes (Github Release Page)
- DazToMaya FAQ (daz3d.com)
How to Install DazToMaya Bridge v2022
More tutorials coming soon...
How to transfer completed scenes to BlenderFirst, Don't waste time with the Daz to Blender Bridge or diffeomorphic importer. they are totally useless. If you just want to import 1 single character or model to blender, they are fine for that. otherwise, they are trash. & Before anyone says "Nu uh, you can import whole scenes with dem", I spent weeks scouring the internet looking for ANYTHING on how to do it with those tools & it was nowhere to be found. So even if the ability to is techincally there, Where's the directions? Nowhere? or at least nowhere that's clearly articulated? Yeah. Point proven. Like I said. Completely useless.
All Daz content imported via Diffeo
(except the skycar was freebie from sketchfab)
 Exporting From Daz 3D to Unreal Engine 5
Just so you know there are a number of threads on here already that have answered these questions. The Daz to UE bridge is indeed working for 5.0.2, you can get it here. That will take care of your other questions as well, since you don't need to worry about what format to export in if you are using the bridge. However, just to answer that question, we typically use the .fbx format for characters in realtime, since it allows you to import a rigged mesh with an armature which can be used for animation.
I make some animation whats the best way to make the video and how it do it?Ivy said:
Use Hitflim express free version https://fxhome.com/product/hitfilm-express
its a free video editor that you can stich the animations together in the film editor and then resave as a MP4 video for sharing. Best solution is to render in PNG single frames and import them as a folder to the hitfilm video editor timeline and reduce the timeline down to .1 to make the animation run at 29.9 or 30kfps
then save and export as a MP4 video for sharing on YouTube or Facebook, twitter etc.
it will look something like this when yourt done

Thanks! :) I have more few of this editor video but I try this as well , thanks all!
Cannot import in C4ddczc2014 said:
When using plug-ins to import in C4d, the following window will appear. How can I solve it?
Hi, I've posted a bugfix update that may help you if you are using a custom Documents path: https://github.com/daz3d/DazToC4D/releases/tag/2022.1.8
Please let me know if this resolves your problems. Thanks
I make some animation whats the best way to make the video and how it do it?Use Hitflim express free version https://fxhome.com/product/hitfilm-express
its a free video editor that you can stich the animations together in the film editor and then resave as a MP4 video for sharing. Best solution is to render in PNG single frames and import them as a folder to the hitfilm video editor timeline and reduce the timeline down to .1 to make the animation run at 29.9 or 30kfps
then save and export as a MP4 video for sharing on YouTube or Facebook, twitter etc.
it will look something like this when yourt done
Exporting OBJs with materials from Blender into Daz?So when I create an obj in blender, give in mats in the shading tab, UV map it in a UV tab and everything looks great in Blender.Than I export it(selection only) assign materials, assign uv- all checked.But when I import it into Daz the surface looks [jolly poor]. The funny thing is when I get an obj with mats from a source like Turbo squid and import it into Daz, everything looks OK, when I export from Daz into Blender and that Back into Daz surfaces look ok. But when I create my own OBJ in Blender, give it materials I and export it with appropriate options checked I still can't get those textures in Daz. I mean I do transfer surfaces as properties and I see them in Daz Surfaces but the textures of those surfaces nor there even if I mess around with tiles. Any idea what I could be doing wrong?
mcjCylindricalUV: Script exports geometry with Cylindrical-Projected UV mapi think it may have to do with genesis things that dont name their surfaces the way old V3/V4 figures did
i'll announce it in this thread when it's fixed
in this test today, mcjCylindricalUVs only found the pectorals surfaces ( chessboard texture )
note that a workaround that could work goes like this
-pose the figure wearing the skirt
-use mcjHideAllBut script to hide everything except the skirt
- export the scene as an obj with the "Ignore invisible nodes" option ON
- use mcjHideAllBut to make everything visible again
- delete or hide the real skirt
- import the obj that was exported to disk (it will fall exactly where the skirt was)
- use mcjCylindricalUVs on the imported .obj
the second big picture is the result of using t hat method
 Daemonessa help ... SOLVED : Poser Only ...
WendyLuvsCatz said:
they have readmes just that DAZ has no link to them even using DAZ-Deals
I use Everything a lot to search for stuff because it's just all over the place even some recent stuff
No more searching content for me! Spent too much time over the last few years doing that. If the product doesn't pop up on the screen in full splendor or export and import in one easy click then it's bye-bye. If it wasn't for your help, I would have gone on to something else. But I really wanted this witch. I got the hat, hair, cloak and large black pot bubbling with gruesome stuff already lined up. Can't wait to do a scene with her. Thanks again. You're the best!
Carrara Challenge #62 "Clowns and Other Circus Stuff" -WendyLuvsCatz said:
UnifiedBrain said:
WendyLuvsCatz said:
I use image series
Do you mean the "sequenced jpeg" under the windows AVI tab?
And, once I output in that format, my video editor of choice will then know how to use it?
I'm wondering if Phil covered this and I just missed it. It is so crucial to understand.
I use sequenced png and have never seen any of Phil's tutorials, I am sure they are awesome but I just cannot watch video tutes easily
yes, Hitfilm imports image series, Blender video editor image import I select the first one and hit "a" to select them all
I read what is documented in the manual and elswhere or just use trial and error
much error
so much
an error has occured

I have somehow managed to avoid resuming work on the house project.
 Animation was calling.
After much trial and error... it worked! I did a 2 second animation with Mimic, selected render to sequence png, and 48 images appeared. Kind of boggeling. My video editor was able to use them, but only after I found a video tutorial.
I'm not sure how to ask this question. What is the frame rate that Mimic Lite uses for the Pz2 files? I had to do a bunch of gyrations in the video editor to get the video to match the audio.
Sorry, not able to post animations yet.
How do I turn a .obj dress into usable clothing for Daz3d?How do I turn a .obj dress into usable clothing for Daz3d? I've found several tutorials that looked promising, only to find out they are outdated and no longer work. The dress also has a ZPRJ file, which I guess is from Marvelous Designer. I can import the dress, but it's just a prop then, not a wearable item.
Introducing the Daz to Blender Bridge & native Blender File FormatsThe main issue now s that it's onmy the same and old charachter that is imported to Blender. My new characters doesn't import.
If you have your windows Documents folder on a different drive, in OneDrive or in a custom path, then this update may help you: https://github.com/daz3d/DazToBlender/releases
You need to manually install that fix for now, but we will try to get that posted to Daz Central as soon as we can. Thank you for your patience.
How viable is it to switch from DAZ to Blender?Its depend on what kind elements you want to brought in Blender and what you want to do with those elements ( end results )
DAZ actually offering easier features when dealling with material assignment especially if you want working with product./item which have lots of sub materials meanwhile Blender offering much more "hack" and possibilities to use lighter resources ( CPU-GPU) with procedural materials route .
Posing g8 Character in Blender not as easy as in Studio, although the IK setup which provided by DAZ to Blender Bridge or Diffeo should be good enough to start learning about creating pose from scratch in Blender . If you into Stylized type , buy/invest in ready to use Blender Rigged character give you more fun experiences than frustation . And since Blender can import almost any model from another 3D software package , you should not worry about limited option in here . The exception will be if you can not live without ready to use JCM /MCM which the real value why we use DAZ Characters
Cycles can use CPU with less render time although getting IRAY quality (which already setup by product vendor ) need proper knowledge about how shader and lighting in Blender work
EEVEE render is fast and better than any open gl solution from DAZ right now
DAZ complex props cheaper than ready to use Blender props ,although if you ok doing procedural without uV map there are nice products with cheap price in Artstation or another market place
In term of Procedural modelling and Easy rapid scene creation , Blender have more advanced features with their GeoNode - Modifier and gazillion of add on
Unless you make comic, Blender provide chance to get more freelance gigs than DAZ studio
[Released] Turbo Loader Booster Utilities [Commercial]Hi!
Somewhat I am not able to load the scene with Turbo Loader Open File. What am I doing wrong?
Cheers!
2022-06-16 14:55:22.711 [INFO] :: Loading Layout: C:/Users/USER/AppData/Roaming/DAZ 3D/Studio4/layout.dsx
2022-06-16 14:55:22.937 [WARNING] :: ..\..\..\..\..\src\sdksource\cloud\dzcloudtasknotifier.cpp(660): sync completed successfully, 1 items succeeded, 0 items failed.
2022-06-16 14:55:22.937 [INFO] :: Metadata update succeeded.
2022-06-16 14:55:41.731 [DEBUG] :: Turbo Loader Open File START D:/Users/Public/Documents/My DAZ 3D Library/Scripts/RiverSoft Art/Turbo Loader/Turbo Loader Open File.dse
2022-06-16 14:55:41.736 [DEBUG] :: Enabling morphs for asset, W4D2 4 CA 31: D:/Users/USER/Documents/DAZ 3D/Studio/My Library/Scenes/37 CAFE 2/W4D2 4 CA 31.duf
2022-06-16 14:55:41.736 [INFO] :: Loading D:/Users/USER/Documents/DAZ 3D/Studio/My Library/Scenes/37 CAFE 2/W4D2 4 CA 31.duf
2022-06-16 14:55:47.512 [INFO] :: Enabling Morphs...
2022-06-16 14:55:47.513 [INFO] :: Enabling data/sugatak/Yamachan Ramen 1961/YR Hashi 1zen/Morphs/sugatak/Base/On Ramen Donburi.dsf
2022-06-16 14:55:47.513 [INFO] :: data/sugatak/Yamachan Ramen 1961/YR Hashi 1zen/Morphs/sugatak/Base/On Ramen Donburi.tlOff NOT FOUND.
2022-06-16 14:55:47.514 [INFO] :: Loading D:/Users/Public/Documents/My DAZ 3D Library/data/sugatak/Yamachan Ramen 1961/YR Hashi 1zen/Morphs/sugatak/Base/On Ramen Donburi.dsf
2022-06-16 14:55:47.514 [INFO] :: Enabling Morphs...
2022-06-16 14:55:47.514 [INFO] ::
2022-06-16 14:55:47.515 [INFO] :: Enabling data/maclean/Everyday Drinks/glassTall3/Morphs/maclean/Base/tilt.dsf
2022-06-16 14:55:47.515 [INFO] :: data/maclean/Everyday Drinks/glassTall3/Morphs/maclean/Base/tilt.tlOff NOT FOUND.
2022-06-16 14:55:47.515 [INFO] :: Loading D:/Users/Public/Documents/My DAZ 3D Library/data/maclean/Everyday Drinks/glassTall3/Morphs/maclean/Base/tilt.dsf
2022-06-16 14:55:47.516 [INFO] :: Enabling Morphs...
2022-06-16 14:55:47.517 [INFO] ::
2022-06-16 14:55:47.517 [INFO] :: Enabling data/maclean/Everyday Drinks/glassTall3/Morphs/maclean/Base/level.dsf
2022-06-16 14:55:47.518 [INFO] :: data/maclean/Everyday Drinks/glassTall3/Morphs/maclean/Base/level.tlOff NOT FOUND.
2022-06-16 14:55:47.518 [INFO] :: Loading D:/Users/Public/Documents/My DAZ 3D Library/data/maclean/Everyday Drinks/glassTall3/Morphs/maclean/Base/level.dsf
2022-06-16 14:55:47.519 [INFO] :: Enabling Morphs...
2022-06-16 14:55:47.519 [INFO] ::
2022-06-16 14:55:47.519 [INFO] :: Enabling data/maclean/Everyday Drinks/glassTall1/Morphs/maclean/Base/level.dsf
2022-06-16 14:55:47.520 [INFO] :: data/maclean/Everyday Drinks/glassTall1/Morphs/maclean/Base/level.tlOff NOT FOUND.
2022-06-16 14:55:47.520 [INFO] :: Loading D:/Users/Public/Documents/My DAZ 3D Library/data/maclean/Everyday Drinks/glassTall1/Morphs/maclean/Base/level.dsf
2022-06-16 14:55:47.521 [INFO] :: Enabling Morphs...
2022-06-16 14:55:47.521 [INFO] ::
2022-06-16 14:55:47.521 [INFO] :: Enabling data/maclean/Everyday Drinks/glassTall1/Morphs/maclean/Base/tilt.dsf
2022-06-16 14:55:47.522 [INFO] :: data/maclean/Everyday Drinks/glassTall1/Morphs/maclean/Base/tilt.tlOff NOT FOUND.
2022-06-16 14:55:47.522 [INFO] :: Loading D:/Users/Public/Documents/My DAZ 3D Library/data/maclean/Everyday Drinks/glassTall1/Morphs/maclean/Base/tilt.dsf
2022-06-16 14:55:47.522 [INFO] :: Enabling Morphs...
2022-06-16 14:55:47.523 [INFO] ::
2022-06-16 14:55:47.523 [INFO] :: Enabling data/sugatak/Yamachan Ramen 1961/YR Hashi 1zen/Morphs/sugatak/Base/On Ramen Donburi.dsf
2022-06-16 14:55:47.523 [INFO] :: data/sugatak/Yamachan Ramen 1961/YR Hashi 1zen/Morphs/sugatak/Base/On Ramen Donburi.tlOff NOT FOUND.
2022-06-16 14:55:47.524 [INFO] :: Loading D:/Users/Public/Documents/My DAZ 3D Library/data/sugatak/Yamachan Ramen 1961/YR Hashi 1zen/Morphs/sugatak/Base/On Ramen Donburi.dsf
2022-06-16 14:55:47.524 [INFO] :: Enabling Morphs...
2022-06-16 14:55:47.524 [INFO] ::
2022-06-16 14:55:47.524 [INFO] :: Enabling data/maclean/Everyday Drinks/glassTall3/Morphs/maclean/Base/tilt.dsf
2022-06-16 14:55:47.525 [INFO] :: data/maclean/Everyday Drinks/glassTall3/Morphs/maclean/Base/tilt.tlOff NOT FOUND.
2022-06-16 14:55:47.525 [INFO] :: Loading D:/Users/Public/Documents/My DAZ 3D Library/data/maclean/Everyday Drinks/glassTall3/Morphs/maclean/Base/tilt.dsf
2022-06-16 14:55:47.526 [INFO] :: Enabling Morphs...
2022-06-16 14:55:47.526 [INFO] ::
2022-06-16 14:55:47.526 [INFO] :: Enabling data/maclean/Everyday Drinks/glassTall3/Morphs/maclean/Base/level.dsf
2022-06-16 14:55:47.527 [INFO] :: data/maclean/Everyday Drinks/glassTall3/Morphs/maclean/Base/level.tlOff NOT FOUND.
2022-06-16 14:55:47.527 [INFO] :: Loading D:/Users/Public/Documents/My DAZ 3D Library/data/maclean/Everyday Drinks/glassTall3/Morphs/maclean/Base/level.dsf
2022-06-16 14:55:47.528 [INFO] :: Enabling Morphs...
2022-06-16 14:55:47.528 [INFO] ::
2022-06-16 14:55:47.528 [INFO] :: Enabling data/maclean/Everyday Drinks/glassTall1/Morphs/maclean/Base/level.dsf
2022-06-16 14:55:47.529 [INFO] :: data/maclean/Everyday Drinks/glassTall1/Morphs/maclean/Base/level.tlOff NOT FOUND.
2022-06-16 14:55:47.529 [INFO] :: Loading D:/Users/Public/Documents/My DAZ 3D Library/data/maclean/Everyday Drinks/glassTall1/Morphs/maclean/Base/level.dsf
2022-06-16 14:55:47.530 [INFO] :: Enabling Morphs...
2022-06-16 14:55:47.530 [INFO] ::
2022-06-16 14:55:47.530 [INFO] :: Enabling data/maclean/Everyday Drinks/glassTall1/Morphs/maclean/Base/tilt.dsf
2022-06-16 14:55:47.531 [INFO] :: data/maclean/Everyday Drinks/glassTall1/Morphs/maclean/Base/tilt.tlOff NOT FOUND.
2022-06-16 14:55:47.531 [INFO] :: Loading D:/Users/Public/Documents/My DAZ 3D Library/data/maclean/Everyday Drinks/glassTall1/Morphs/maclean/Base/tilt.dsf
2022-06-16 14:55:47.531 [INFO] :: Enabling Morphs...
2022-06-16 14:55:47.531 [INFO] ::
2022-06-16 14:55:47.531 [INFO] :: Enabling data/sugatak/Yamachan Ramen 1961/YR Hashi 1zen/Morphs/sugatak/Base/On Ramen Donburi.dsf
2022-06-16 14:55:47.532 [INFO] :: data/sugatak/Yamachan Ramen 1961/YR Hashi 1zen/Morphs/sugatak/Base/On Ramen Donburi.tlOff NOT FOUND.
2022-06-16 14:55:47.533 [INFO] :: Loading D:/Users/Public/Documents/My DAZ 3D Library/data/sugatak/Yamachan Ramen 1961/YR Hashi 1zen/Morphs/sugatak/Base/On Ramen Donburi.dsf
2022-06-16 14:55:47.533 [INFO] :: Enabling Morphs...
2022-06-16 14:55:47.533 [INFO] ::
2022-06-16 14:55:47.533 [INFO] :: Enabling data/maclean/Everyday Drinks/glassTall3/Morphs/maclean/Base/tilt.dsf
2022-06-16 14:55:47.534 [INFO] :: data/maclean/Everyday Drinks/glassTall3/Morphs/maclean/Base/tilt.tlOff NOT FOUND.
2022-06-16 14:55:47.534 [INFO] :: Loading D:/Users/Public/Documents/My DAZ 3D Library/data/maclean/Everyday Drinks/glassTall3/Morphs/maclean/Base/tilt.dsf
2022-06-16 14:55:47.535 [INFO] :: Enabling Morphs...
2022-06-16 14:55:47.535 [INFO] ::
2022-06-16 14:55:47.535 [INFO] :: Enabling data/maclean/Everyday Drinks/glassTall3/Morphs/maclean/Base/level.dsf
2022-06-16 14:55:47.535 [INFO] :: data/maclean/Everyday Drinks/glassTall3/Morphs/maclean/Base/level.tlOff NOT FOUND.
2022-06-16 14:55:47.536 [INFO] :: Loading D:/Users/Public/Documents/My DAZ 3D Library/data/maclean/Everyday Drinks/glassTall3/Morphs/maclean/Base/level.dsf
2022-06-16 14:55:47.537 [INFO] :: Enabling Morphs...
2022-06-16 14:55:47.537 [INFO] ::
2022-06-16 14:55:47.537 [INFO] :: Enabling data/maclean/Everyday Drinks/glassTall1/Morphs/maclean/Base/level.dsf
2022-06-16 14:55:47.538 [INFO] :: data/maclean/Everyday Drinks/glassTall1/Morphs/maclean/Base/level.tlOff NOT FOUND.
2022-06-16 14:55:47.538 [INFO] :: Loading D:/Users/Public/Documents/My DAZ 3D Library/data/maclean/Everyday Drinks/glassTall1/Morphs/maclean/Base/level.dsf
2022-06-16 14:55:47.539 [INFO] :: Enabling Morphs...
2022-06-16 14:55:47.539 [INFO] ::
2022-06-16 14:55:47.539 [INFO] :: Enabling data/maclean/Everyday Drinks/glassTall1/Morphs/maclean/Base/tilt.dsf
2022-06-16 14:55:47.539 [INFO] :: data/maclean/Everyday Drinks/glassTall1/Morphs/maclean/Base/tilt.tlOff NOT FOUND.
2022-06-16 14:55:47.540 [INFO] :: Loading D:/Users/Public/Documents/My DAZ 3D Library/data/maclean/Everyday Drinks/glassTall1/Morphs/maclean/Base/tilt.dsf
2022-06-16 14:55:47.540 [INFO] :: Enabling Morphs...
2022-06-16 14:55:47.540 [INFO] ::
2022-06-16 14:55:47.540 [INFO] :: Enabling data/DAZ 3D/Genesis 3/Female/Morphs/Lyoness/LY_EveryGirl/FBM_EveryGirl02.dsf
2022-06-16 14:55:47.541 [DEBUG] :: 0 morphs were searched for
0 Enabled (0 failed to enable)
0 Disabled (0 failed to disable)
0 unchanged
0 skipped
in 5 secs 809 msecs
Note: Multiple files may exist for a morph if you use Daz Connect
2022-06-16 14:55:47.542 [WARNING] :: Script Error: Line 407
2022-06-16 14:55:47.542 [WARNING] :: TypeError: Result of expression 'dir.exists' [undefined] is not a function.
2022-06-16 14:55:47.542 [WARNING] :: Stack Trace:
<anonymous>()@D:/Users/Public/Documents/My DAZ 3D Library/data/RiverSoft Art/Common/RSTurboLoaderFunctions.dse:407
How to transfer completed scenes to BlenderHey I've been working at this for a few days, because I have some older machines, (like Sandy bridge i3 to i7 laptops with no GPU at all beyond intel HD graphics.) that are running Linux that crash when I try to render them, but Blender works just fine & can render without issue. The problem is, not many pre-made assets for blender & don't have the time & skill to make all the assets from scratch.
So, since I can load DAZ on those systems & build the scenes, just can't render them, I found a way to use both programs to make a final scene. Now, I won't get into the weeds on how to use Blender, with areas such as setting lighting, the camera & such, There's loads of turtorials out there for that, I will say this, learn the hotkeys. The camera alone was a nightmare until I learned to use the hotkeys.
I'll instead focus on the issues more specific to how to get the scene from DAZ to blender, & how to fix it so it's usable there. First, Don't waste time with the Daz to Blender Bridge or diffeomorphic importer. they are totally useless. If you just want to import 1 single character or model to blender, they are fine for that. otherwise, they are trash. & Before anyone says "Nu uh, you can import whole scenes with dem", I spent weeks scouring the internet looking for ANYTHING on how to do it with those tools & it was nowhere to be found. So even if the ability to is techincally there, Where's the directions? Nowhere? or at least nowhere that's clearly articulated? Yeah. Point proven. Like I said. Completely useless.
So if you're like me, where you want to just take your saved scene & move it to blender to render there, This is what you do.
Step 1, Build the scene in DAZ. Basically get the scene in DAZ all put together exactly how you want it when you're raeady to render. Don't worry about setting lighting though because it doesn't transfer over, so unless you're able to render in DAZ, save the wasted time & energy. Then select EVERYTHING in the scene, (click the item at the top of the list, then scroll to the bottom, shift + click the last item, should select everything in the scene). then go to file, export, save it as an .obj. When you're exporting it, 2 things to be aware of. In DAZ, the Y axis is up, but in Blender, the Z axis is up. So make sure when in the export settings, you set the Z axis as vertical, (you can select this in Blender's import settings too), & make sure you tick the boxes for write surfaces, write material library & quote paths containing spaces. Otherwise, you'll end up with blank, white statues of everything with no textures. Now to see them in blender, there's 4 circle icons in the upper right of blender. The 3rd & 4th ones are going to be the ones where all your textures will be visible, the 4th one being the rendering view.
Step 2: Import the .obj file of the scene into blender, (file, import, route to where the file is in blender), Now if everything went well, you should be seeing a all white, backwards version version of your scene. Like I said, click on the third of the 4 balls in the top right of blender, now it should just look like your scene, only backwards & no eyes.
Step 3. Ok so from here, first to resolve the eyes. You need to select each character one at a time & go under material properties. It looks like a red Globe. on the right hand menu options. That's the one, (At least for blender 3.1, which is what I'm using. you might have to google fu if you're using a different version). once under there, you'll have to select eye moisture, cornea, possibly iris & pupil, & with each one, set alpha to 0, & under viewport display, set blend mode to alpha hashed. Go down the list of those 4 items until their eyes look normal.
Step 4. Ok so the eyes are fixed, but the scene is still backwards. Well, if you're rendering the whole thing in blender, Just build the scene backwards in DAZ, otherwise, in Blender, just hit tab to go into edit mode, then select meshes at the top, mirror & mirror along X axis. Now all the pieces should be where they belong.
Step 5. Now, the next issue is lighting. This part took me 2 days to figure out. As it is, if you try to add in lights, it will be a mess because all the normals are inverted & I couldn't figure out how to correct it. If you put a light in the top left, it will behave like it's coming from bottom right, & it will leave black marks on anything it reflects off of rather than light spots. In short, it will turn your render into a deep fried meme. Here's how to fix that. On the options on the right, there's the Object data properties. It looks like an upside down triangle with dots on the points. You might have to hit tab & go into edit mode to see it. You need to select the first item in your scene, then go under the object data properties & scroll down to the option of clear custom split normals. Then repeat that process for every item in the scene one at a time. I tried doing it for all of them, no luck. So you have to do it individually for every listed item in the scene.
Step 5. Once all that is done, you should be left with essentially a mirror of your DAZ scene, minus camera & lighting. There's tons of turtorials that should work fine now on how to do cameras & lighting in Blender, So I'll leave that to them, I will say this though, get familliar with the hot keys. for example, if you have a floor lamp in the scene like I do, shift & right click on the lampshade to set the 3d curser there, then shift a to get the menu to add a light. Puts it almost right where you want it to go, so you don't have to do a lot of moving. With the camera, when it's selected, G selectis it to move just by moving the mouse curser & left click sets it, g then z adjusts the vert axis, g & then z 2 times ajsusts the linear, etc.. There's also a hotkey for making the camera view the full viewport, somthing with the home button, but I can't remember.
Following these steps though, you should be able to fairly quickly & easily build your scenes in DAZ, then move them to Blender & render them, even on a potato computer. Here's a iray render I did of a scene I made, then the same scene in 2 renders in blender, an eevee engine render & a cycles engine render.
I hope this helps some of you out there. I did the days of suffering, frustration & work & then left this here so that you don't have to go through the same nightmare.
Daz 3D is part of

Connect
DAZ Productions, Inc.
7533 S Center View Ct #4664
West Jordan, UT 84084Licensing Agreement | Terms of Service | Privacy Policy | EULA
© 2026 Daz Productions Inc. All Rights Reserved.