-
Ocean Water System without Animate2
Well you either use the morph sliders to adjust the ocean to look like it looks in that frame or you frame-by-frame advance the aniBlock animation the PA has made until it's at the from you want to render & stop. Then adjust the camera to the left, right, up, down via translation & rotation on the X,Y, & Z axis (you can use the sliders in the Parameter tab or the gizmos in the viewport with the appropriate gizmo icon above the viewport chosen), and then adjust the render settings to be what you want them to be, save the scene & render.
Okay thanks.
Legacy UVs -Victoria 4 is causing gaps when "preparing G3F"I was hoping you wouldn't show up.
You make everything look good.
Now I'm in a fetal position over this experiment.
-----
I got it to work "Close enough" Maybe the morph isn't fully right and that's where the little seams are from.
If I use a skin shader, an idea I thought to use as a crutch, I'd lose the specialized skin most of the older characters have - the freckles and blemishes and some have pores...
Sometimes I don't know what makes a figure a character -
The eyes, the skin or the morphs - the hair also has a HUGE impact.
Don't want to lose the skin though....
I think I got that right enough - I was probably clicking away too much and using the Content Tab to navigate around and I bet it was de-selecting stuff that I didn't notice.
Has ANYONE converted Gen 2 morphs to Gen 3 using Genx?1) can't find manual - probably doesn't exist and READ ME document is a variation of the product info.
2) Can't find tutorial - even the guy in the tutorial is asking if anyone knows how to transfer the G2 morphs to make g3 figures. (sheesh!)
3) Steps for transferring V4 are not the same. (apparently Genesis 2 has no INJ File to drag and drop into the Gen-X tab.
4) I tried save as a shape preset and also dragged every file from every content place imaginable.
5) All the threads get real confusing as there is cross-talk between different versions of this product.
Anyone get this to work?
What are the initial steps and set up before transfer?
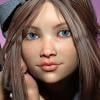
Legacy UVs -Victoria 4 is causing gaps when "preparing G3F"I have this product - and yes it comes from "the other store".
The first thing you're going to want to do is load V4 and apply the skin that you want to transfer. Now make sure you apply any skin shaders and tweak it just the way you want it. Once you have it the way you want it save it as a Materials Preset: File >> Save As >> Material(s) Preset. Name it something you'll remember. Delete or move V4 over to make room for G3F.
Load G3F. Navigate to the Legacy UVs folder. Click "_Prepare G3F". She's going to look funny - but don't panic. lol Navigate to the saved V4 material preset. Double click on it. The skin will load but again it will look funny. Now go back to the Legacy UVs folder and click "Legacy UVs - Apply Victoria 4 UVs".
That should set the skin properly.
I hope that helps. :) I've used this product quite a few times and it's great!
Here's the product letting me use Muriel's textures (with Altern8 adjustments) on G3F:
 Ocean Water System without Animate2
Well you either use the morph sliders to adjust the ocean to look like it looks in that frame or you frame-by-frame advance the aniBlock animation the PA has made until it's at the from you want to render & stop. Then adjust the camera to the left, right, up, down via translation & rotation on the X,Y, & Z axis (you can use the sliders in the Parameter tab or the gizmos in the viewport with the appropriate gizmo icon above the viewport chosen), and then adjust the render settings to be what you want them to be, save the scene & render.
Ocean Water System without Animate2I'm no not sure if you mean more ocean to the right of the frame of the camera or moved the Ocean animation to a frame on the right.
For moving to ocean to the right of the camera from move the camera to the left. It'll be x or z most likely or a combination of those to to do that. If it's the wrong direction that you typed into the X & Y translate for the ocean model then type the numbers in the opposite direction.
For changing the frame the Ocean animation is on click the double arrow pointing right that looks like fast forward to advance 1 frame at a time. You have to click the the animate tab though to load load the ocean model's anBlock and then doubleclick that so you can frame by frame advance. However since those are in essense just applying or de-applying morphs to the ocean model you don't even need to use the animate timeline just go use some of the ocean shaping/morphing presets in your SmartContent or Content Library tab or go to the Parameters tab or the Shaping tab & apply the morphs listed there to the Ocean model. In both cases the ocean model you what to morph has to be selected.
The correct frame I mean. The correct frame (single frame) for a single image rather than an animation.
Ocean Water System without Animate2I'm no not sure if you mean more ocean to the right of the frame of the camera or moved the Ocean animation to a frame on the right.
For moving to ocean to the right of the camera from move the camera to the left. It'll be x or z most likely or a combination of those to to do that. If it's the wrong direction that you typed into the X & Y translate for the ocean model then type the numbers in the opposite direction.
For changing the frame the Ocean animation is on click the double arrow pointing right that looks like fast forward to advance 1 frame at a time. You have to click the the animate tab though to load load the ocean model's anBlock and then doubleclick that so you can frame by frame advance. However since those are in essense just applying or de-applying morphs to the ocean model you don't even need to use the animate timeline just go use some of the ocean shaping/morphing presets in your SmartContent or Content Library tab or go to the Parameters tab or the Shaping tab & apply the morphs listed there to the Ocean model. In both cases the ocean model you what to morph has to be selected.
G8F/M; There and back againHow do I send G8F or G8M to Hexagon and bring them back as a morph? I want to create some custom morphs for Genesis 8 Female and Genesis 8 Male, but trying to figure out how first.
Ocean Water System without Animate2Yes, you can but you will need to position those to make them look plausible.
You need to look at the preset options the PA for the product created and read what the do. If options are missing in the Smart Content tab make sure you have the Ocean model selected and if those options still aren't all there, and they often aren't, the better place to do that is in the Content Library.
Sometimes of the presets are nothing more then scenes if you open them that will replace your current scene so you'll need to merge such a preset into you scene. Otherwise yes, the presets for the will either place the ocean model or will apply a material change to a already added ocean model, or will apply a morph to an ocean model.If you aren't sure what the preset is look down at the bottom of the DS at the 'info' tab with the preset in question selected and read that. But even so it's not always clearly label or described what a preset is doing. If you apply a preset you didn't want to, just undo that action.
Substance Painter Vs. Silo Vs HexagonSo what I did was, start grabbing all these modeled doo-dads. Greebles and Nurnies and and stuff like that.
I have a lot of parts. I want to start making stuff and editing stuff by adding more parts to them....
Where I get stuck is texturing. When I use Texture-jpegs in the Diffuse channel it looks great for mass designs, NOT good for precise work.
Same with Shaders. Shaders are great but they tend to coat things over and I can't get any line work it and smaller details.
AND SO-
I'm looking for something to "painting" or UV (I read up on adding a huge 'coat' to the surface of a 3-D object and painting that instead of directly on your 3-D object) I get it.
So if I want to make some shapes, connect them to other things, like say a chassis or cockpit, what's a great place to start?
I'm reading a few different websites with feedback about the various options.
We are going to skip Maya, 3D Coat, Blender, Lightroom and Zbrush.
Hexagon, we have, but I'm looking at getting something I can use to properly cover the surface of my loose parts.
I want to do precise line work and have some really nice textures covering my objects.
I'd even like to so some rigging and get parts to move, like a gun has an open and close setting- atached to a dial or a ships wings can be rotated - like a morph,
Substance Painter is huge in a conversation below, but peoples keep mentioning Silo as an all-in-one and it costs the same @ $99.00 USD.
-
Should I model and Hexagon and paint in Substance painter and export to Daz - maybe even submit the creations as products and/or
Go with Silo and only have to worry about learning one product (mainly)?
----------------
For my art and music, I end up using, about a Dozen different programs- choosing and using each for their strengths and others to fill gaps.
I pretty much figure this is going to go the same way and I'll probably be getting different ones for different tasks.....sucks......
But for now, what about those two directions......to start from?
Hexagon + Substance Painter - Vs - Silo
Convert Geo Grafting from Genesis to G8The only way I could think to do this would be to send a G8 and the geograft to a modeling program and weld the verts of the geo to G8, then delete all of G8 except that ring around the weld. Then send the new geograft to Daz and do a rigging transfer from the old geo to the new geo. Finally, select the area on G8 and set it as a geograft location.
Beast HD for Genesis 8 Male (Commercial)This custom, hand sculpted, level four HD character morph brings a unique design to Genesis 8 Male.
Complete with high-resolution textures, additional scar and vein morphs, mesh body hair, eyebrows and beard and multiple texture overlays this set brings plenty of variety to your characters and brings a unique, custom character to your renders.
Available now at https://www.daz3d.com/beast-hd-for-genesis-8-male


 * Closed* RRRR - Error 404 Not Found! Render Contest
Here's my pull #1:
53329 - Mitch Hair (an AprilYSH freebie)
64844 - Hobbit Hut (a sharecg freebie OBJ)
64746 - Dark Corner Of The Dungeon (Stonemason's)
9025 - Beach Umbrella (not sure where this came from - beach volleyball perhaps ?)And here's what I came up with...
Behind The 404...
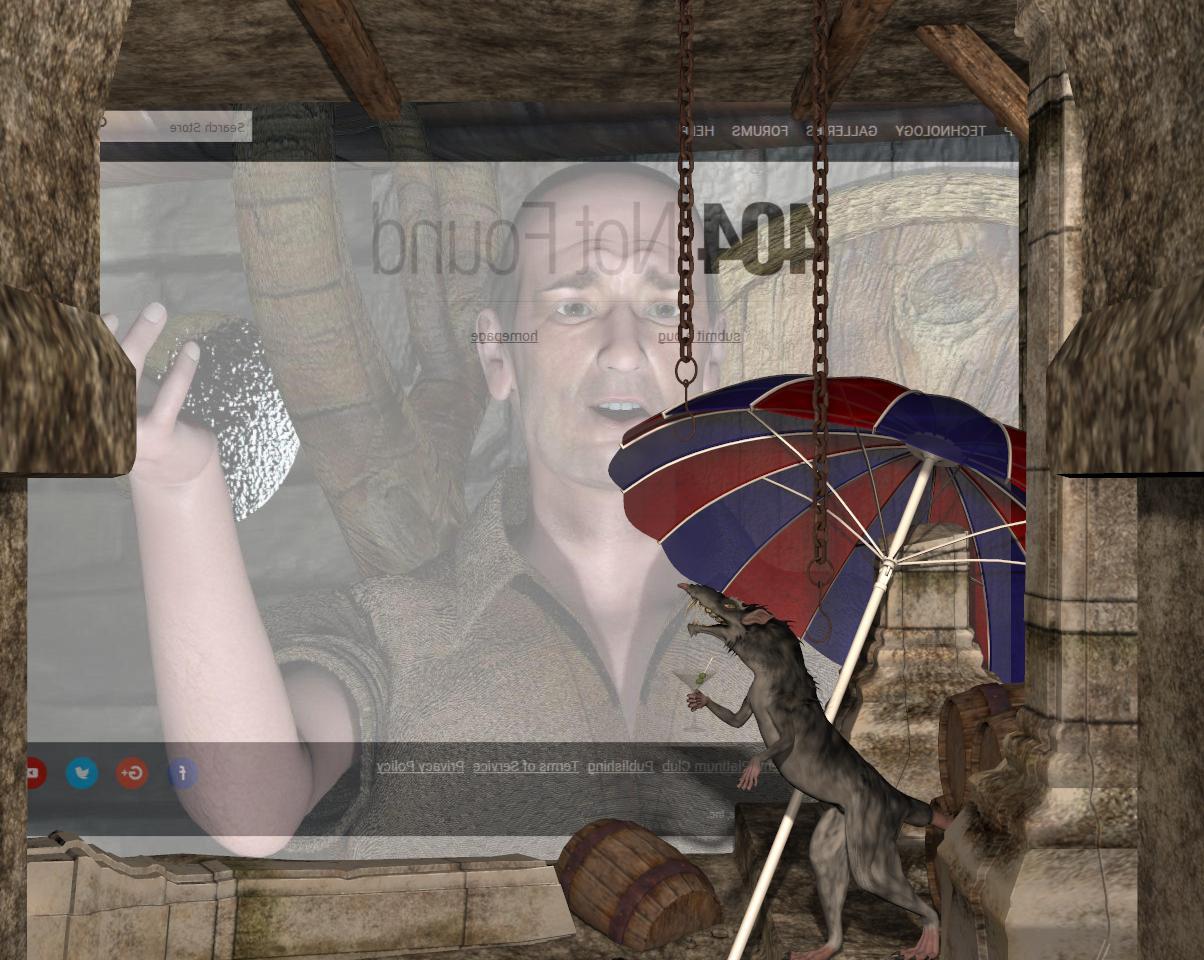
The Mitch Hair pull was the main inspiration here - old guy hair and the 404 theme ? An exasperated Grandad throwing his hands up in despair at a 404 screen the DAZ site just threw at him !
The biggest decision was whether grandad was silver-surfing from the dark corner of the dungeon or from the hobbit hut. With that choice made then the beach umbrella just fitted better in the dungeon (whaddya mean you don't follow the logic of that? Just trust me - it does.) And it's obvious that, well, if you've got a beach umbrella in the dark corner of the dungeon it can only mean monster rats with martinis!
Of course the Mitch Hair needed a few extras to turn it into Grandad: D3 with the old guy morph; Sydd's M3 Adrian MAT; and M3 NightWorld Lone Wolf shirt
(The day after posting this I realized that the dungeon should be filled with all those "no longer available" DAZ products.. the monster rat just smiled at me, raised an eyebrow, and said "But my dear boy, it was!". He then smacked his lips, did that Hannibal Lecter "Fffff...ffff.... fff..." thing, took a sip of his martini, and gave a little decadent artsy-fartsy chuckle...)
For my own reference - entry posted https://www.daz3d.com/forums/discussion/comment/3755406/#Comment_3755406
How to make a breast bridging sliderWhile I no longer use the Genesis figure, Jabba made the Pin-Up Pack that includes two Sweater Girl morphs for the effect you are after. It is possible to transfer some older morphs to new figures but not those.
WEIGHT ... THE CLOTH! SOLVED!So you say that the procedure I'm following about two jCM for legs and one to correct both is the normal approach. Good. Now the question is, where I link the third one? For instance, after load the JCM for each leg transform,. which name I give to correcting jCM for both legs transformed in the Morph Loader Pro? And, how to link it?
That's what we were discussing above - use the Property Hierarchy to link one JCM as a regular controller, and the other as a multiplier - that way the morph to correct for both legs bent will kick in only to the extent that both legs are bent (and so triggering the JCMs).
WEIGHT ... THE CLOTH! SOLVED!So you say that the procedure I'm following about two jCM for legs and one to correct both is the normal approach. Good. Now the question is, where I link the third one? For instance, after load the JCM for each leg transform,. which name I give to correcting jCM for both legs transformed in the Morph Loader Pro? And, how to link it?
About the Smoothing Modifier no worries about. I don't understand me too. Anyway is a fault of DS not a wrong way to rig. I'm using the same standard approach that using any other vendors to make my outfits, and just out of curiosity I tried to load some of the bodysuit from other vendors and I got same result! Exploding the Smoothing Modifier in some particular complex pose at the crotch area and sometimes to the legs.
Anyway the main thing to solve is the crotch are rigging. I'm going to follow your ads and using the weight paint tool also.
I keep you update.
[Released] Misumi HD & Signature Smile HD Expression for Genesis 8 FemalePerhaps Bluejaunte can assist. The following file (below) is missing, after I downloaded and installed the Misumi product update. Not a big deal, but thought I'd mention it. I had applied the signature smile morph on a different G8F character, which I saved. However, when I reloaded the character, after the update, I got a missing file message, saying the following file, below, was missing. All had been fine prior to the update. I checked and did a manual download, and the file is indeed missing from the last update. Thought I'd mention it.
PS: love all your characters and purchased them all!
- data/daz 3d/genesis 8/female/morphs/bluejaunte/misumi/alias_head_ectrlmisumisignaturesmilehd.dsf
Iconic shapes questionNope, clothes only, I'm afraid. If you want to transfer character morphs, you need something like the GenX products.
Small dogs matter too.Give us pug dogs

I'm not joking, I will make a summoning circle for a Pug morph for Dog 8.
Side note: a general morph pack would be pretty amazing, as that way you can make mixed breeds (mutts) or tweak features to be more distinct: my Rocky has a more pronounced snout for a pug, while my Teeny (a rescue Pug from a breeder mill) is tinier than most.
oh, the possibilities!
Kind of like the 'Creature Creator' packs, but for dogs....not creature dogs, just regular dogs.
 Ice Dragon Art A Glimpse Into My World
I'm going to copy and paste from the album as its too long to type out. Let me just say, if you are into creatures, you will love these. Creech has been out since last year I believe but this render included Creech, the Seasectoid, saddle and bridle, and poses. This was super fun to work with and I will be using both creatures in my world building project
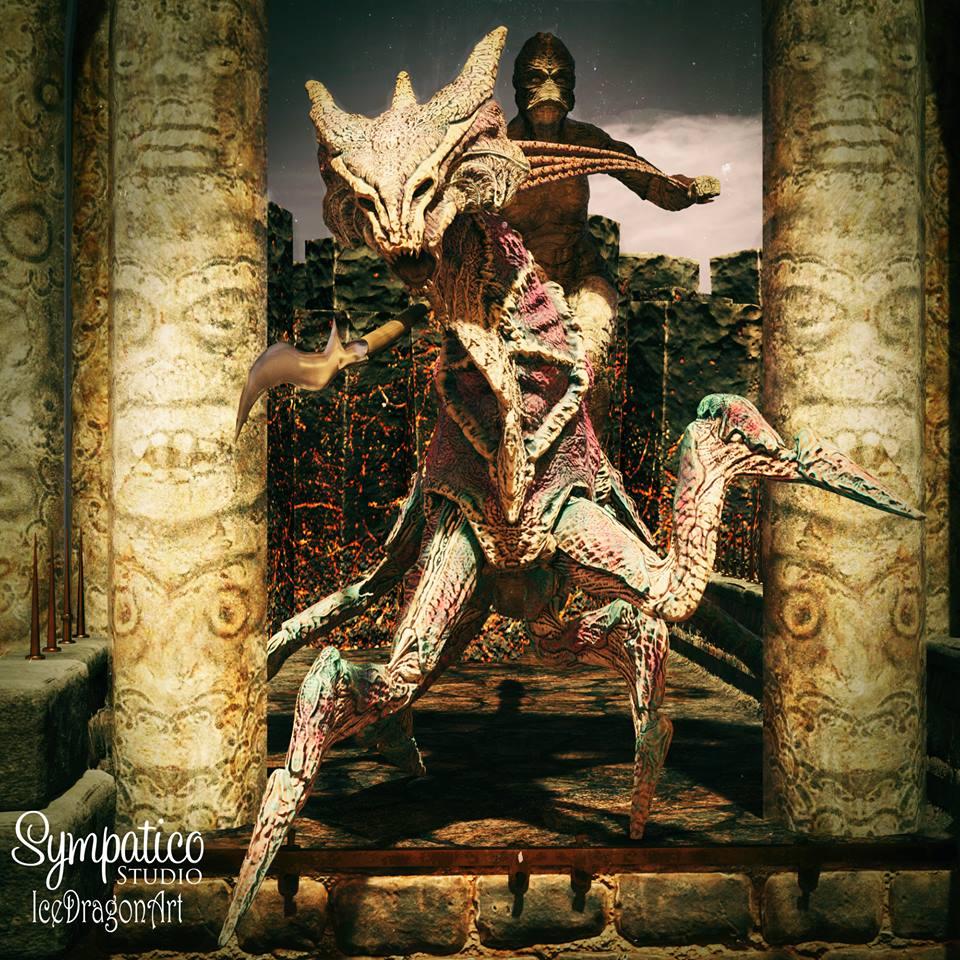
Details A highly detailed concept for an aquatic or amphibious insectoid, dragonesque mount with bonus head tentacles and saddlery, as well as creature poses and rider poses for Genesis 8 Male and Genesis 8 Female figures. Seasectoid is an original concept exploring a more modern, aggressive and imaginative take on ideas of the “seahorse”; as a kind of mythological steed, then building that idea into a form as fitting for high fantasy as it could be for a variety of science fiction or even horror scenarios.
This creature kit features an expert crafted topology and uv's allowing for amazing levels of detail in both the creature's sculpt and textures, rigging as detailed as the creature itself for maximum posability, poses for out of the box usefulness, an innovative setup for the highly detailed yet fully optional head tentacles, and uniquely designed saddle to compliment the creature's design and offer an infinite number of options for the creature as a mount.
In that same thought, also included are bonus poses for the Genesis 8 Male and Genesis 8 Female figures, allowing virtually any of your G8 based characters or creatures to take their place as the rider, with only modest adjustments needed in the more extreme cases. https://www.daz3d.com/seasectoid-creature Details Creech Evolution, high resolution, HD creature morph character set for Genesis 3 Female.
What's Included and Features Creech Evolution for Genesis 3 Female: (.DUF) Creech Evolution Full Creech Evolution Character Creech Evolution Additive Creech Evolution Fins Creech Evolution Apply/Remove Creech Evolution Body Apply/Remove Creech Evolution Feet Apply/Remove Creech Evolution Hands Apply/Remove Material Options: Creech Evolution Fins Green Creech Evolution Fins Neutral Creech Evolution Green Creech Evolution Neutral Creech Evolution Calves Fins Hide Creech Evolution Calves Fins Show Creech Evolution Finger Membranes Hide Creech Evolution Finger Membranes Show Creech Evolution Lateral Fins Lower Hide Creech Evolution Lateral Fins Lower Show Creech Evolution Lateral Fins Mid Lower Hide Creech Evolution Lateral Fins Mid Lower Show Creech Evolution Lateral Fins Mid Upper Hide Creech Evolution Lateral Fins Mid Upper Show Creech Evolution Lateral Fins Upper Hide Creech Evolution Lateral Fins Upper Show Creech Evolution Spine Fin Hide Creech Evolution Spine Fin Show Creech Evolution Toes Membranes Hide Creech Evolution Toes Membranes Show Textures Include: 33 Texture, Displacement, Normal, and Specular Maps (2048 x 2048 to 4096 x 4096) This product uses the Genesis 3 Female Base Female UV Maps Daz Studio Iray Material Presets (.DUF) https://www.daz3d.com/creech-evolution-for-genesis-3-female
Daz 3D is part of

Connect
DAZ Productions, Inc.
7533 S Center View Ct #4664
West Jordan, UT 84084Licensing Agreement | Terms of Service | Privacy Policy | EULA
© 2026 Daz Productions Inc. All Rights Reserved.