-
Daz3D model export into substance properly
I have exported my morph to Substance However, I need to make ID maps and have my figure properly make maps without turning black. Could someone explain how to fix this problem?
Update Custom morphs?Hi stitlown,
I'm following this thread since a while and it seems you have found a way to edit the references in the DUF DSF files yourself with a text edior and the serach and replace method.
I've written some descriptions about saving Morph Assets and Figure/Prop Assets and leaned a few things while working with those inside of Daz Studio.
Daz Studio can trick you easiely with this behaviour how it handles the Morph and Figure/Prop Assets in a scene. While I have some experience with adding Properties like custom moprhs to props and figures I had discovered simmilar issues.
This post took some time to write and the help comes a bit late but maybe you and other readers can benefit from the descriptions.
Property Name and Label
The first thing to notice is that all Properties of a Figure/Prop like a Moprh that holds a shape got an internal Name and a user facing Label. The Label is what shows up in the Parameters pane and the internal Name can only be seen and edited by the Parameters Settings dialog that pops up by clicking on the gear icon on the Property slider in the Parameters pane. It seems that there is a loose naming convention that the real Property Name must not contain spaces while the Label can have them for easy reading. If you inspect the DUF DSF files content in a text editor (it's plain ASCII text but the DSF can be saved as a compressed zip archive with DSF file extension) you will see the spaces in filenames and paths gets converted into "%20" for the Daz Studio script interpreter to read them.
If you are using Morph Loader Pro to load new shape morphs onto the figure/object in the scene the Property Name and Label by default gets the same in the Morph Loader Pro options dialog. But you can also change that later with the Parameters Settings dialog. Its a good advice to bring up the Parameters Settings dialog anyway on newly added Properties to change things like Limits, Property Group, Auto Follow and so on.
Saving Morph Assets
The new Properties added to the figure/object first only exists in memory, if you save the Daz Studio scene now by default those additional Properties gets saved "embedded" in the DUF scene file and are only available in this and any further saved scene file. This is not just true for single properties but as soon as you edit some other aspects of the original "Figure/Prop Asset" in the scene with for example the Geometry Editor or the Node Weight Maps Brush tool it becomes an independend Figure/Prop Asset and all changes gets saved "embedded" along with the Scene DUF file.
[Edit]: Once something got edited the asset gets tagged as "modified" and is no longer handled as the the original asset from the Content Library but as an altered version and will get saved "embedded" in any Scene, Scene Subset, Character Preset, Werable Preset that you save. I you keep that in mind and you simply use those saved scene and preset files from the library to load your modified assets you can get away without ever saving Morph Assets or Figure/Prop Assets.
If you want to finaly save your modified or new created morph assets to the content library to have them available by default when loading the Figure/Prop Asset to a new scene you have to use File>Save As>Support Asset(s)>Morph Asset(s). In the Save Morph Asset options dialog you have to choose the Content / Asset Directory, the Vendor and the Product name.
The Asset Directory for the morph files can differ from the original Content Directory that the original Figure/Prop Asset is saved to. For example you can have more than one Daz Studio Format "native" Content Directories paths setup in the Content Directories Manager to keep the commercial products seperate from your own content creations and product addons. While the original Genesis figure asset is saved in the main Content Directory / library your additional morphs can be saved in the My Library. This can also help you finding the files on disc lateron.
The Vendor and the Product name gets added as sub folders in the Content Directory path where the Morph Asset(s) gets saved to .../data/.../Morphs resulting in this path construction:
Asset Directory:
[Content Directory] / [data] / [Vendor] / [Product] / [Item] / [Morphs] / [Vendor] / [Product] / [Property Name] .DSF
While the first Vendor and Product Name is the original creator of the Item (Figure/Prop Asset) the second Vendor and Product is the name you provide. Sometimes it seems a bit too complicated but everything in Daz Studio is handled as a part of a product that is how the database works.
Also notice that while Daz Studio saves the Morph Asset(s) it picks the Property Name not the Label to generate the "FileName.dsf" this can be the cause of another pitfall. You may have already changed the Label, saved the Morph Asset(s) and wonder why the DSF files named after the OBJ files you have loaded with Morph Loader Pro.
I higly recommed you to open up your file browser and navigate to the right Morphs folder before saving any additional morphs to your "Product" folder. To remember where I saved my morphs before or to prevent typos I tend to copy-paste the Product folder name from the file browser to the Save Morph Asset dialog.
You should be careful what you do while saving morphs because it can get cluttering real soon.
File>Save As>Support Asset(s)>Save Modified Assets
Deleting Properties
As you may have noticed already if you have set the Parameters pane with the right-click menu to Edit-Mode the menu will also include Delete Selected Property so you can choose a selection of morphs to delete them. But the original Morph Asset DUF DSF files remain on disk and by reloading the scene of figure the deleted morphs gets loaded agian from the Content Directory if you don't delete them manualy.
Consolidate Properties
Another conflict that can happen with saving Properties as Morph Assets are naming conflicts if two or more Morph Assets that share the same Property Label. If the internal Property Names are different and the Morph Assets are saved maybe in another product folder with another DUF DSF File name Daz Studio will not show an error message and instead by default combine those Properties to a single slider with the caption "(2): My Morph Name". You can open up the Parameters pane Option Menu (the lined button on the top) and uncheck Consolidate Properties. This will show independend silders for all Properties with the same Label so you can open up the Parameters Settings dialog to see the internal Property Name, that is by default the same as the Morph Asset DUF DSF file saved on disk. With this method you can search and delete the conflicting files from disk with a file browser or otherwise solve conflicts with Labels by renaming.
Conflicts with Duplicate Formulars found
Every now and then I see this "Duplicate Formulars Found" message while I load my Scene SubSets or Scene files wher I've added new properties to my genesis figures or clothings.
My advice to avoid all issues is a workflow that goes like this: start with a "Asset Setup Scene" where you first load the original Figure/Prop Assets from the library. There should be not much else in the scene if for example you want to use the ERC-Freeze command to save current Property slider values to new Controler Properties.
Then you can add and edit your new the Properties with loading morphs from OBJs with Morph Loader Pro. Next I would create Control Properties for the the morphs therefore I choose Create New Property from the Parameters pane Edit-Mode right-click menu. The New Property is empty and does nothing until you right-click it again and choose ERC-Freeze to save the various other morph silders to be controlled by this New Control Property.
Once every Property is setup and working its time to save the Morph Assets:
File>Save As>Support Asset(s)>Morph Asset(s)
or if you are working on a new figure/prop:
File>Save As>Support Asset(s)>Figure/Prop Asset
After executing these commands I higly recommend you to delete the current figure/prop... clothing, hair whatever you are working on from the scene and load it again from the library or start with a new scene. Never ever continue to work on the "property setup scene" project file because all the new Property Assets you've added there, even the Figure/Prop assets you may have changed are still saved "embedded" in this scene file. Also don't save Scene SubSets out of these "property setup scenes" because they also can contain "embedded" assets.
[Edit]:
- Morph Assets saved in the "data" folder have the DSF not DUF file extension
- Asset Directory is a path including the Content Directory
Mesh not binding to Bone after Bone SplitIn case you need help with the Transfer Utility settings here I've made a short explanation of the various options.
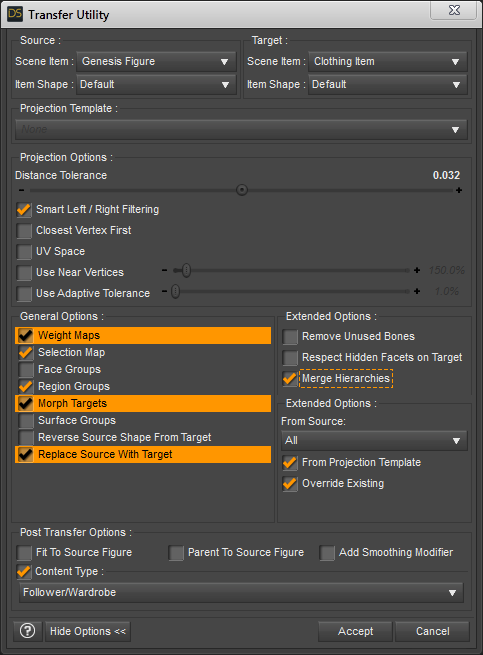
1. Weight Maps: have this checked - Merge Hierarchies - you don't need to have that checked since the new mesh object set as Target has no rigging so there is nothing to be merged
2. Selection Map: have it checked - not shure what it is good for the Joint Editor got Selection Group settings and the Geometry Editor got Selection Sets maybe it has something to do with those
3. Face Groups: uncheck this - if your updated geometry object you've imported still got the Face Groups or updated Face Groups - I haven't had good results with the Face Group projection of nearly identical meshes
4. Morph Targets: you defenatly need to have this checked - it is important to switch the From Source: None to All in the extended options to have all morphs from the Source transfered over to the Target
5. Region Groups: I don't know exactly what this is for - the Geometry Editor shows some body area Region Groups but if you mouse over a body part the Face Groups are actualy used to select the bone
6. Surface Groups: uncheck this - it's the same like with the Face Groups the Surface Groups also refered to as Material Zones gets imported by the OBJ anyway and don't have to be projected/transfered
7. Reverse Source Shape From Target: let it unchecked - if your geometry mesh is unmorphed and represents the default base shape
8. Replace Source With Target: this is the most important setting to make shure all property sliders (not just morphs) from the Source gets transfered - Post Transfer Options gets greyed out with this
Mesh not binding to Bone after Bone SplitHi, I see by the explanation that you know what you are doing.
As far as I can tell there is only one way to have the XTtrans, YTrans and ZTrans working like intended on bone chains and that is to set the Figure Setup to Legacy Rigging, select all bones and set Weld to Parent from the right-click menu that is for some reason only available in Legacy Rigging. Lateron you can convert the rigging to TriAx or General but the "weld to parent" behaviour still remains.
My suggestion:
Export the current figure with al the alternations to shape and FaceGroups to an OBJ file. Import it to the Figure Setup and like I saied earlier set it to Legacy Rigging, setup the Hierarchy (those can be saved as a presets in the Oprions Menu) and set set Weld to Parent. Then create the figure and convert the rigging Edit>Figure>Rigging>Convert Figure to Weight Mapping. Choose TriAx or General depending on wat you need.
Now if you are still working in the "developmental scene" you can use the Transfer Utility to copy over the WeightMaps and Morphs you have already on your previous figure. Maybe select "Replace Source with Target" at the bottom of the Transfer Utility dialog options this will make shure all Properties and Morphs will get transfered.
In this video I notice the translations are not working like I want to at minute 8:40. At least if you don't want to animate the figures like in disneys "The Incredibles" lol. To fix this I used the Figure Setup like described above.
DazStudio Twi'lek for G8F 01 Editing ZarconDeeGrissom's Version
See the full video series here:
- DazStudio Twi'lek for G3F ReDone 01 Face Groups
- DazStudio Twi'lek for G3F ReDone 02 Figure Setup
- DazStudio Twi'lek for G3F ReDone 03 Weight Map
- DazStudio Twi'lek for G8F 01 Editing ZarconDeeGrissom's Version
- DazStudio Twi'lek for G8F 02 Opacity Map
- DazStudio Twi'lek for G8F 03 Transfer Utility Failed
How to make wearables attach to the right points after scale changes in zbrush.Save the morph on the figure as a morph asset and it will then project into fitted items, if the morph is embedded in the scene file then on reloading it won't project at all, at least for some users. Daz is, I believe, aware of the issue but I'm not sure of its status.
How to make wearables attach to the right points after scale changes in zbrush.Ah, it's after saving. This seems to be an issue with morphs embedded in the scene file, you may find it works if you use File>Save As>Support Assets>Morph Asset.
Well that would work with any wearables I happened to have on the asset while creating it, but what about any new wearables? How do you set it up for example as a product in the store so that it works for any clothing people might want to put on it? I feel like I'm missing a key part of the process where you set it up so that products attach to roughly the right place. I know you need to create morphs for the clothing itself so it fits perfectly, but for the hair for example, theres no way it should be attaching that far from the right place.
How to make wearables attach to the right points after scale changes in zbrush.Ah, it's after saving. This seems to be an issue with morphs embedded in the scene file, you may find it works if you use File>Save As>Support Assets>Morph Asset.
AIUTO...CHI CONOSCE L’ITALIANO? PARTE UNDICINuovi free items!!!
Bieco tentativo di indorare la pillola sull'apparizione della signora: https://www.daz3d.com/mrs-chow-8
A quanto stiamo? 57 figure per Genesis8? Gente, state sicuri che è sabbia e sale stavolta...
Ma almeno abbiamo dei regali!
Infatti, avevo capito come funzionavano, ma sono geograffati oppure no? Credo di no a questo punto.
Dipende dal prodotto, di solito sono proprio come gli abiti, stanno sopra la pelle e seguono i morph relativi.
How to make wearables attach to the right points after scale changes in zbrush.So basically I made many of the changes in Daz, such as scaled to a certain size, adjusted a bunch of the morphs, then sent the mesh to zbrush and refined the shapes there, zeroed everything out in daz and then sent it back in through GoZ so that all the changes were in a clean single morph. And generally all the hair/eyelashes etc stayed fitted, but once you save the scene an re-open it you lose all the fitting. I could save individual fbm morphs for some of the attachemnts to match, but the hair for example wouldn't work that way for some reason.
I'm not clear what the workflow is supposed to be for creating FBMs and having wearable attach to the correct place.
The only erc data in the list is from the "adjust rigging to shape" process.
 Auto Shape Enhancer [Commercial]
Sorry, my bad. Here is the correct one.
Can you add this morph to your next update?
BTW, I love your characters! I own all but two.
How to make wearables attach to the right points after scale changes in zbrush.And they are actually fitted? Please post a screen shot of the Parameter Settings dialogue for your morph.
Krystal v1.3 (Starfox Adventures)Will be good that someone create something like a Kristal morph for Genensis, who is compatible with older SFKrystal items and dress.
Yeah, it would be nice if someone did a morph for the Genesis figure series of Krystal. Instead of the body hack method that most people won't get (including myself). As for the clothes, I'll like to see it compatible as well.
Teen Josie 8 Chipped ToothOkay, Vanishot, here's what I would suggest. Forget about Smart Content for the search for the missing teeth morph. Load a plain vanilla copy of Genesis 8 Female into a new scene in DAZ Studio. Make sure that G8F is selected and open the Parameters tab (we could use the Shaping tab, but we want to make certain we don't overlook something). Any morphs or poses that you have for G8F, including any morphs associated with characters, such as Teen Josie 8, should have loaded along with G8F when the figure was loaded and therefore appear somewhere in the Parameters. There could be exceptions, but we'll deal with that later, if necessary. For now, with Genesis 8 Female selected at the top left in the Parameters tab, type "teeth" (without the quotes) in the search bar at the upper right and click on the little magnifying glass. That should reveal all the sliders loaded that have that keyword in their name. Do you see anything there that might be the culprit? You can test, if in doubt, by trying any suspects on your loaded G8F (best to have her with an open smile or something so you can see her upper teeth).
If the above has failed to reveal what you are looking for, try replacing the teeth search term with "tooth", to ensure what you are looking for isn't hiding in plain site.
If you still have no joy, report back and we can explore some other possibilities.
Hi thanks for this great explanation! There does not appear to be a slider for the tooth. If I recall it was an "off" "on" button somewhere. Thanks for your help!!!
How to make wearables attach to the right points after scale changes in zbrush.Yes i'm scaling/adjusting the figure in zbrush, so the scale in daz is 100%. The morph is set to auto follow. You can see the hair and eyelashes are still at the default position instead of matching the new character height. I guess I'm still unclear on what the right workflow should be when creating custom characters in zbrush and bringing them in. If you make these same changes in daz, the wearables fit correctly, but how do you do it when the changes are made in zbrush?

 How to make wearables attach to the right points after scale changes in zbrush.
So you are scaling the base figure? Is the morph set to AutoFollow - click the gear icon on its slider and from the menu open Parameter Settings.
Krystal v1.3 (Starfox Adventures)Will be good that someone create something like a Kristal morph for Genensis, who is compatible with older SFKrystal items and dress.
How to make wearables attach to the right points after scale changes in zbrush.I made big changes to scale etc in zbrush and brought it into daz as a new character morph and ran the adjust rigging to fit tool. At that point though, when I try to apply genitals/hair/etc, the wearables come in at the wrong points on the model. How do I make the wearables snap to the right points?
Practical Female Modernish/Future Military/Sci-Fi Armor For G8FThe Tactical Assault outfit was actually done by myself and I have been at work on building a new foundation for many new tactical products, mainly in making it more optimized and user friendly. I even want to do an exoskeleton suit.
As far as lacking content... I believe most clothing artists uses software like marvelous designer (and other clothing generators) to create clothes which I could see why bulky armor sets have not hit the store much. I build all my products from scratch inside zbrush so anything is possible for me to create but in the end you you run into one of the main problems...
Unless there is a way to force a clothing item to restrict movement in the joints, bulky armor looks gross when the daz figure is bent in extreme ways which becomes a problem in getting a product pushed through quality control. On top of that, when you slap some armor on to the breast area, it has to look good when 90% of its users are going to double the size of them. Rather you plan to or not, it still has to look good when being used in those ways and the artist themself must be happy with the product they're pushing forward as well. I think that's why most armored outfits you find are either very organic and tight fitting or very bulky and treated as an attachment.
I have had a product in pass for a few weeks now and I think it can be improved further so I will most likely be pulling it before making it to the store. It has had a few problems with JCM's but I'm quickly gaining experience on what works and looks good and what doesn't.
I very much encourage other artists to build similiar products as the library is lacking but I don't blame them as it becomes a real headache. Hard surfaces + morphs = hell.
I am working hard at developing a new outfit like this and hopefully you'll see something new from me that will fit what you're looking for.
My apologies for the mix up, and I gotta say, Tactical assault is by far my favorate military option around. It's utterly amazing, and I'd suggest it to anyone.
This one is also looking incredible.
As how to handle the boob deformation issue, I do have a suggestion. How about a bound chest preset that largely flattens the chest and puts it under a slightly feminine breastplate designed in a way to look like the armor they sell that is tailored for females? Would help make it clear "huge chest and body armor, not the best or most natural mix".
The idea of a tactical exo makes me salivate.I will not lie.
The Genesis figures already come with several dials to reduce the chestsize.
Even more if you turn off limits.
Then, there are a few dozen products to completely flatten the chest, I've even seen some free ones, though, the ones I'd mostly advise would be Genesis 8 Female Mixed Morph Kit by Handspan and the pretty much standard Genesis 8 Female Body Morphs.Ofcourse, part of the fun is also to combine things, like chest armor from one outfit, using a catsuit for underlayer from another outfit, and throw in some materials from a more dedicated materials and shaders product, in an attempt to create something that other artists don't have or didn't come up with, while your customers won't instantly recognize it as "oh, that's outfit X by designer Y from Daz! That's an easy way to make art?!"
I have to do this mixing up (or low-grade kitbashing) all the time, since, contrary to public opinion, most sci-fi outfits sadly don't come with high heels.Converting a G3 character to G8I've been saving the G3 characters, wearables etc.into a file then launching a basic G8 male and loading my G3 Shaping presets etc. onto that G8 base. Not sure if that is supposed to be the way to do it but it almost works!!
yeah, that is why it's not working. While both generations share some of the same types of morphs, in reality there is not easy way to transfer shapes from G3 to G8 yet.
there are some tutorials with invloved ways of kinda making it work, but it's not easy. this thread may help https://www.daz3d.com/forums/discussion/176271/morphs-from-g3-to-g8/p1
Transforming a normal G8 male character to a babyNo, best you can do is about 5 years old. I guess as some 3 year olds look 'older', you could say 3 year old or toddler but definately past the infant stage.
You need to search on the internent for proportions for toddlers - 6 years old and then use the morphs in these products do get as close to those proportions as you can:
https://www.daz3d.com/genesis-8-male-head-morphs
https://www.daz3d.com/genesis-8-male-body-morphs
https://www.daz3d.com/genesis-8-male-expressions
https://www.daz3d.com/genesis-8-female-head-morphs
https://www.daz3d.com/genesis-8-female-body-morphs
https://www.daz3d.com/genesis-8-female-expressions
And you'll probably want this product if you're not that good at eyeballing when you create art:
https://www.daz3d.com/measure-metrics-for-daz-studio
Don't forget, you'll probably want to dial in a bit of chubbiness / portliness from the body morphs. The head morphs don't have a chubby morph unfortunately but roundness & yuthful works somewhat. And too many people make the mistake of giving toddlers an infant face but they do tend to look more like they are going to look as grow ups then most people think so don't let that throw you.
Unfortunately when you install those DAZ Originals morphs products the entries in the Shaping tab are not prefaced with a abbrevation or something to let you easily find just those particular morphs, eg, DAZ Head or DAZ Body or DAZ Exp. You know you have the right ones though if they are off-red on the left fading to grey on the right. Most of the head morphs are located on the face although a few are on the head.
Daz 3D is part of

Connect
DAZ Productions, Inc.
7533 S Center View Ct #4664
West Jordan, UT 84084Licensing Agreement | Terms of Service | Privacy Policy | EULA
© 2026 Daz Productions Inc. All Rights Reserved.