-
What's the best way to reset a figure so that another can be loaded?
Heya!
So I've figured out that you want to keep using the same file / scene / figures so that you can retain your favorite paramaters and access them quickly...
Is there a way to easily reset:
-pose
-paramaters such as scale, morph dials
-wearables (remove all) such as hair, clothing, jewelery
-materials including anything layered
-locked nodes/pins/joints
Right now I'm reseting them all one at a time and... manually removing all wearables. This is a pain because some of them are difficult to find and access through the scene menu.
Any advice is appreciated!
First attempt at a Beagle for Daz Dog 8I just spent an hour or so building a Beagle out of the Dachsund for Daz Dog 8 with the morph dials and referring to https://www.dummies.com/pets/dogs/beagles-the-akc-breed-standard/. What do you think? What's working? What still needs work?
P.S. I used the skin from Bully. Obviously, I'd like to do something custom.
Morphs from G3 to G8Were M5 based morphs tested on the previous GitHub iteration? Every M5 morph I've attempted looks like it's missing something, and dialing in the separate M5 shape almost gets it there but still not there.
Attached file is SAV Alpha Male M5, Conversion to G8M, and Conversion to G8M with M5 added. Non-Daz, I know.
Poses take long to apply/transitionHas anyone else seen this? When I apply a pose from a PA, the figure translates fairly quickly. However, my own custom poses can take anywhere between 25-45 seconds to transition (talking Genesis 8 Female mostly, but I've had similar issues in the past with Genesis 3 Female). Genesis 8 Male isn't as bad, but it's not instant either (unlike the days of Genesis and Genesis 2, which were both instant)!
I just want to know why it's taking so long for my custom poses to apply/transition (I suspect morph amount is the issue, as like I said, I saw a similar problem with Genesis 3 and Genesis 8 wasn't like this when it first released) and how come PA (or purchased/downloaded) poses happen so much quicker?
Note: To clear up confusion, I don't mean slow posing when creating the pose (as can happen when Interactive Update is selected on a figure/prop), I mean the pose itself taking long after it has been saved and why purchased/downloaded poses don't have quite the issue).
Algovincian Non-Photorealistic Rendering (NPR) 2019/2020It's looking amazing, Algovincian Greg — that pipeline you've been developing for NPR processing must be pretty complex at this point!
I've been experimenting with many 'off-the-shelf' apps and filters for post-processing 3d renders, photos, and videos... but nothing quite comes close to what you're creating. Many of the latest AI technologies for style-transfer and image processing algorithms for non-photorealistic render output are interesting, but suffer from undesirable artifacts — much of the visual appeal can get lost in convolutional neural networks and image processing algorithms that rely too heavily on edge detection and 2d smearing, without using depth information to create lines that follow the 3D contours of a form.
It's so cool how you've been algorithmically 'teaching' your computer to draw, adding a level of simplification and abstraction to your work that remains both aesthetically pleasing and natural looking. These works feel less like they've been processed by a computer, and more like interpretations by a human artist... they retain much of the same visual mechanics that a traditional artist would use. Keep up the good work!Very insightful comments, @Kaleb242 - both about the style transfer AI, as well as the big picture goals of non-photorealistic rendering. I've been at this for a long time, and having some mature & flexible tools has really freed me to focus on exactly these types of concepts.
Thanks for taking the time to comment. It's always nice to hear that the output is enjoyed, but maybe even more satisfying when others recognize and appreciate some of the more technical aspects. I absolutely love talking shop about this stuff and getting into the weeds!
- Greg
BTW, do you have a thread here going for your work?
Moph says noThank you!! so the problem is how im exporting from zbrush?
It may be, yes - try exporting, in base resolution if you smoothed in ZBrush, to an OBJ named to match the name you want for your morph.
Daz Studio Pro 4.11 - Highlights4.11.0.335 (April 17, 2019)
- NVIDIA Iray
- Integrated Iray 2018.1.3 (312200.3564); see this thread for more detail
- REQUIRES NVIDIA Driver 418.81 (or newer); see NVIDIA Driver Downloads
- Windows 8/8.1 Users:
- Until a new driver that addresses the issue is released by NVIDIA (potentially early May), rendering with a GPU based on the Kepler microarchitecture is likely to fail and fall back to CPU: (cards with a code name that starts with GK#)
- Color and alpha are now (simultaneously) rendered to separate canvases and composited
- Addresses issues with alpha in rendered images when the post-denoiser is enabled and the environment dome is not drawn
- Added a "Post Denoiser Denoise Alpha" property
- Controls whether or not the post-denoiser is performed on the alpha for an image
- Default off/disabled
- Added an "Auto" option to the "Instancing Optimization" property
- Content Navigation
- Fixed an issue where presets assigned "AnySurface" did not display in the Smart Content pane when an object with no compatibility base was selected in the scene
- Content Loading
- Added additional information to logging of duplicate IDs when loading native files
- Fixed an issue that caused pressing/holding the [Shift] modifier, without also pressing/holding the [Ctrl/Cmd] modifier, when loading a native asset to not apply the preferred options as stated on the Preferences page of the Load Options dialog
- Fixed an issue with loading projection morphs from the same file as an embedded morph
- e.g., Scene files that embed morphs (set as auto-follow) that have not been saved as support assets
- Inline Help
- Added support for hyperlinks (e.g., "More Info...") in "What's This?" popups
- ...
- Scripting API
- Made many additions in various areas; see the Change Log for more detail
- Fixed bugs and/or made improvements in various areas; see the Change Log for details
Where are the genesis 3 head morphsHey richard, one more thing.
I'm switching from gen 2 to gen 3 probably. And I noticed a hand grab morph that doesn't seem to get exported to cinema 4d with the head morphs. All I got in fact are head morphs. Could you give me the code to put in the fbx export dialogue box that exports all the morphs. Or just the hands since that's really all I need.
By the way, are you pretty familiar with the differences between gen 2, 3, and 8. I know about the face rigs a little. And there's those twist bones which don't seem to do anything special. The feet on gen 3 have extra joints and metatarsils and an independantly moving heel. The hands have four bones instead of two before the fingers. That'll be nice in motionbuilder. The mesh is smaller. I think it's 17000 vs 24000. The shoulders aren't ugly on gen 3 when you raise the hands.
I know gen 3 loads up in Cinema and Motionbuilder way faster than Gen 2. And the UV maps are laid out way better. And that's my knowledge on the subject in its entirety.
I'm using gen 3 instead of gen 8 though I want the bulging biceps. But I'm not sure Facegen Pro will work well with Gen 8. There's a backwards compat capability supposedly, so I'm going to try to use the tranfer utility like someone said to do on this site. But is gen 8 way way better? Is it worth the extra time?
Do you for example mix and mash head rig with morphs? Have you tried them in Maya or Motionbuilder?
Maybe I'm asking too many questions. I'm kind of giddy making this huge switch. But I got the rigged Angel Boris model in on time thanks to you so I'm also happy.
How to prevent part of a geograft following figure morphs?Maybe it is not the best idea to create a geograft 'armoured helmet'. How do you want a solid-metal helmet adapt to a character shape? I would parent the helmet to the head and then scale it until the head fits inside. OK I guess its some creature head shape that the helmet isn't inteded to fit to. In this case you could also use a 3D sculpting app to create a fitting morph.
Otherwise to fix the issue you have, I would have a second look at the Rigidity Groups Editor settings and also at the morph that makes the figure taller. I don't know maybe you need to unfit the geograft once before the altered Rigidity Groups Editor settings gets applied. There may be an issue with the taller morph itself that it dosn't adjust the head bone - hint Joint Editor: Adjust Rigging to Shape.
Unfit the helmet and in the Parameters pane find the generated "autofollow" morph that makes the figure taller and turn it up manualy to see if there are distortions. And don't forget you have to Clear Generated Morphs everytime you've adjusted the settings. I also had situations where the Clear Generated Morphs for some reason didn't work and I had to delete the generated morphs manualy.
Maybe also have a second look at the Geometry Editor - Rigidity Group: References. For the References in this case I would select maybe only two vertices somewhere on the forehead area of the helmet and see if your "face-plate" Rigidity Group follows that. With the vertices marked as References you basicly pin the Participans in the Rigidity Group to follow the shape of the "host" figure in this case the forehead of the genesis figure. It could be practical to add almost all the rest of the helmet to the Participansnot just the face-plate. Otherwise I have no idea why this shouldn't work.
Algovincian Non-Photorealistic Rendering (NPR) 2019/2020It's looking amazing, Algovincian Greg — that pipeline you've been developing for NPR processing must be pretty complex at this point!
I've been experimenting with many 'off-the-shelf' apps and filters for post-processing 3d renders, photos, and videos... but nothing quite comes close to what you're creating. Many of the latest AI technologies for style-transfer and image processing algorithms for non-photorealistic render output are interesting, but suffer from undesirable artifacts — much of the visual appeal can get lost in convolutional neural networks and image processing algorithms that rely too heavily on edge detection and 2d smearing, without using depth information to create lines that follow the 3D contours of a form.
It's so cool how you've been algorithmically 'teaching' your computer to draw, adding a level of simplification and abstraction to your work that remains both aesthetically pleasing and natural looking. These works feel less like they've been processed by a computer, and more like interpretations by a human artist... they retain much of the same visual mechanics that a traditional artist would use. Keep up the good work!Look at my Hair (LAMH) Official Thread: update 1.6.0.2 releasedI was playing around with DAZ's new strand based hair and was wondering if there a way to export the density maps from LAMH?
The maps are stored, at least temporarily, in one of the folders where the exported geometry goes, or perhaps in one of the other temp folders. I know I have done it, but I just can't remember how.
Sounds like I might need to download a Beta version, as well, and find out what this new feature is...
Thanks for the tip. I couldn't seem to find it in the temp folder with the geometry. I'll have to keep looking.
I love the new strand based hair option (even though we won't be able to create dynamic strand based hair ourselves), but AM's LAMH animals are so magnificent that nothing I have tried to create with it compares to their quality and craftsmanship. I was hoping that by using existing density maps I could figure out how AM gets such great results. ;)
About Crashing LMAH .. I tried a lot now .. and it seems LMAH don´t like any other objects inside DAZ only the one you work with also it should not be stored inside a Group or something .. The First Time I worked 2 Hours without a Crash and Exportet to Fiber Hair .. For better Grooming I imported the Fiber Mesh into ZBRUSH and made a Morph could be a cool resolution but I wonder to use the Strains inside DAZ don´t know how that works but this is a solution for me I can work with a bit .. Maybe someone helps
Yeah, LAMH can be pretty finicky. Grouping it crashes my machine every time.
I really didn't start doing a lot of animals until the release of "LAMH 2 Iray Catalyzer". It works so much smoother because you just have to hit Catalyzer's render button to render as many LAMH animals as you want in a scene without having to do the manual conversion. Unfortunately it only works with AM's animals, hopefully, it will eventually work with the OLD LAMH presets. But from what I hear that s a major problem converting them to work with it.
That said, the reason I do so many experiments with LAMH and IRAY since I am still looking for a smoother process. Here are some tips I have learned.
1) NEVER SAVE THE DAZ STUDIO FILE WITH THE CONVERTED OBJ (it takes forever and sometimes corrupts on me)
2) Build your whole scene first, SAVE then right before you render convert the LAMH to and OBJ. After you render delete the OBJ
3) Play around with lowering the hair quality, most of the time the preset number is way too high so it takes forever to convert to an OBJ. I like to keep things at a max 500000. If this isn't enough increase the root and tip thickness.
4) I always change the material for the OBJ by applying "!Iray Uber Base", then set it to "PBR specular/glossiness" and set the "glossiness" to 0. This gets rid of the "fireflies" in the hair and makes everything render faster.There are a few more items I have learned for my experiments but these are the things I do every time I use the old LAMH and IRAY.
The new strand based system looks amazing so far and the people on the official forum discussion are doing some amazing stuff with it [ https://www.daz3d.com/forums/discussion/326996/dforce-hair-as-well-as-strand-based-hair-and-the-strand-based-hair-editor-in-public-beta ]. Plus they are really friendly about sharing their tips and tricks
How to prevent part of a geograft following figure morphs?Ok - now I have a related problem:
I have a geograft 'armoured helmet' (is best I can describe it) - It's attached to the head and has solid-metal with eye-slits over the face (obviously I need that to not deform much). I can do the rigidity group as above, but then that part seems to stick in place - if I add a morph to the figure that makes it taller, the top of the helmet (not in the rigidy group) goes up but the face-plate stays where it is (stretching the mesh).
Any ideas? It's fitted to and parented to the head. The follow-group can reference the head bone or not with no change.
OBJ files save the morphs used?You are not supposed to merge the whole dialed in custom character shape to a single morph. Shure its possible and you made it work with Adjust Rigging to Shape, but it seems as you fit the hair to your new "merged" character shape morph Daz Studio fails to generate a new "fitting morph" for the hair. Usualy you turn up the base character (model) and other morphs independently this will also allow the hair to adapt to the shapes independently and works far better most times.
Since this is the technical help forum I will talk about all the complicated technical stuff next that is associated with the issue you have. I tried to explain this as easy as possible but also tried to cover everything and by doing so my post got quiet long sorry for that I just couldn't stop writing. Feel free to correct me if I'm wrong with some explanations but I hope it all makes sense and it is helpful to you.
Conforming Figures, Autogenerated Morphs
The hair is a "conforming" figure and which ever morphs are dialed up on the genesis figure the hair tries to follow the shape. It works like this: morphs on the genesis figure that are set to "autfollow" gets projected to the hair. BTW you can turn off autofollow on most expressions so for example the hair bangs don't follow the brows movement anymore. Those projected morphs are called "autgenerated" morphs and every morph dialed up on the gensis figure gets its counterpart with the same name on the fitted hair or other "conforming" items like clothes. If a "autofollow" morph with the same name already exists on the conforming figure those don't get updated. It is possible to manualy replace "autgenerated" morphs with adjusted ones for example imported with OBJ if you give them the same name like the morph set to "autfollow" on the genesis figure.
Sometimes if you get issues with those "autgenerated" morphs you can unfit the conforming hair or clothes select it and use Edit>Figure>Clear Generated Morphs to delete them. Next time you fit the conforming hair or clothes new "fitting" morph will get generated. This is useful if you have updated some morph on the genesis figure but you also want to update the generated morphs on the conforming item.
The big advantage of autogenerated morphs is that the user don't have to care about this most of the time, the conforming items automaticly fit to the figure shape. Also the conforming item dosn't need to provide the "fitting" morph, its all generated on the fly so the product artists don't need to necessarily prepare any "fitting" morphs and those don't have to get saved as morph assets. Ofcourse you can provide "fitting" morphs if you like for example for the base characteres shapes that you have currently available for the genesis figure if you think the autogenerated ones are not that good.
If you manualy replaced "autgenerated" morphs to fix issues with distortions or anything don't forget to save those with File>Save As>Support Asset>Morph Asset this will make shure the morphs will be available everywhere not just for the current scene. Well for example you could also save the hair as Wearable preset to have all the morphs available, but only if you load this Wearable preset, because before you save the Morph Asset the morphs get saved embedded in the Scene, Subset or Wearable/Character Preset file.
Transfer Utility
Instead of having the "fitting" morphs generated on the fly you can also use the Transfer Utility. Mark your morphs as Favourits on the genesis figure, then open the Transfer Utility elect the genesis figure as Source, the hair as Target, select only Morph Targets in the dialog and in the options select only to to transfer "Favourits and Sub-Components". The varoise sliders and checkmarks in the Projection Options on top of the Transfer Utility dialog like Projection Tolerance gives you options how the morphs will get projected. I guess with the right settings its possible to get better "fitting" morph results compared to the autogenerated ones. Then I would save those Morph Asset so next time you load the conforming item from the content library it will include the better fitting morphs.
Transfer Utility dialog: The screenshot shows the Morph Tagets extended options menu From Source: "Favourits and Sub-Components" - ignore the other settings showen

ZBrush Morph, Reverse Deformations
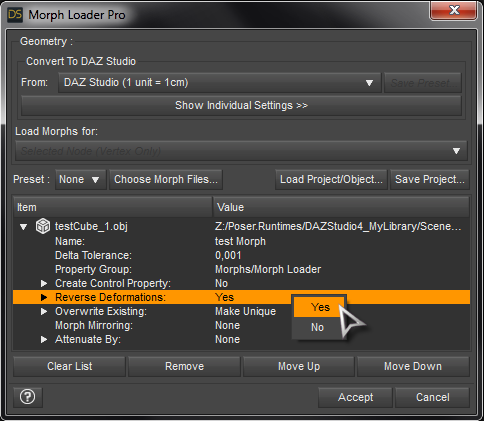
If you export your dialed character shape with an OBJ to ZBrush to make adjustments and bring it back to Daz Studio I highly recommend you to use the option in the Morph Loader Pro called Reverse Deformations. With this you don't have to zero your current character shape. The ZBrush morph imported with Reverse Deformation will only add the shape adjustements you made on top of your current character shape in the scene.
Then you can save the new ZBrush morph with File>Save As>Support Asset>Morph Asset to the content library so it will load everytime with the genesis figure and not just with the figure in your saved scene.
You can also save a Character or Shape preset to the Content Library to load your custom character into other scenes, but to avoid issues with embedded morphs I would save the Morph Asset first.
 Fit Control equivalent for V4?
There's a free "Breast Spandex" morph for V4 here: https://www.renderosity.com/mod/freestuff/?item_id=58436
It's not like Fit Control, or other similar products, but helps even out cleavage cling on some tops. It was made for second skins usage, but adding a smoothing modifier to the V4 top should fix poke through. Probably wouldn't work well with things like bikini tops because it basically pushes out the V4 mesh between the breasts.
Hello!
I have found Fit Control to be indispensable. Would anyone happen to know if there is a functional equivalent for V4? It would be excellent to have that functionality, since I still use that platform a fair bit. Any related suggestions would be welcome.
Thank you!
Make hair upside downIf memory serves me right https://www.daz3d.com/free-spirit-hair-for-genesis-3-female-s or it's morph packs has some morphs that could be used for upside down look.
Your Most Preferred 3-Finger + Thumb Daz-Compatible Products?The M4,V4 and Genesis(1) Creature Creator Morph sets had three finger two finger+thumb morphs (and two toe) but not four finger three finger+thumb.
Several of RawArts characters have 4 finger three finger+thumb hands but they're full body morphs so would need arcane rituals or maybe just CGI3DMs Shape Splitter product to use on other figures.
Also the old Brute X and extensions had 4 fingers three finger+thumb but that's a stand-alone so not very useful with any Genesis models.
Edited to differentiate thumbs and fingers in digit tallies
can i export a high subdivision level?What if I want to create a new morph from a High-res model? There is no way to import the OBJ back right?
Shape transfer eye distortionWhat I forgot to mention is that you propably also need to adjust the rigging for the morph if this wasn't already done by the script you've used.
Try an expression or just open the mouth to see if the rigging is working. I guess because the face is further to the front all the face rigging bones are no longer aligned with the head shape.
To fix that have the morph dialed up, then select the Joint Editor, right-click the Viewport and choose Edit>Adjust Rigging to Shape, go to the Parameters pane select your morph, right-click ERC-Freeze to save the rigging adjustments to the morph and repeat File>Save As>Support Asset>Morph Asset with all the same settings to update the original morph asset.
How would I tell whether the rigging is working? The mouth does open with or without that adjustment, but I do see the bones change. ...I'll do it just to be sure.
OBJ files save the morphs used?Hello good peoples,
So I am an hobbyist trying to figure things out. It is actually hard to explain because I don't have the technical vocabulary for the problem I get. So I start my figure with a model and then I add some existing morphs from sliders alright. Then it's not exactly like I want it so I export the figure OBJ and load it in zbrush lets say. Go back to Daz, zero my figure and apply the morph (rig figure to shape to get the bones right, ERC freeze the thing and save as a morph asset. I thought OBJ files were only the polygons. But, atm I have a problem with some hair product that gets distorted when I apply my custom morph to the figure. The said hair was on the figure I made the morph for. Even in a new scene, I apply the morph to a new figure, load the Hair in question and it gets distorted still. So the morph knows that the hair was fitted to the figure before I export the OBJ of the model.
So, How do I bypass this when creating the morph? Can I save the said morph I made?
Am I understandable here?
thanks in advance
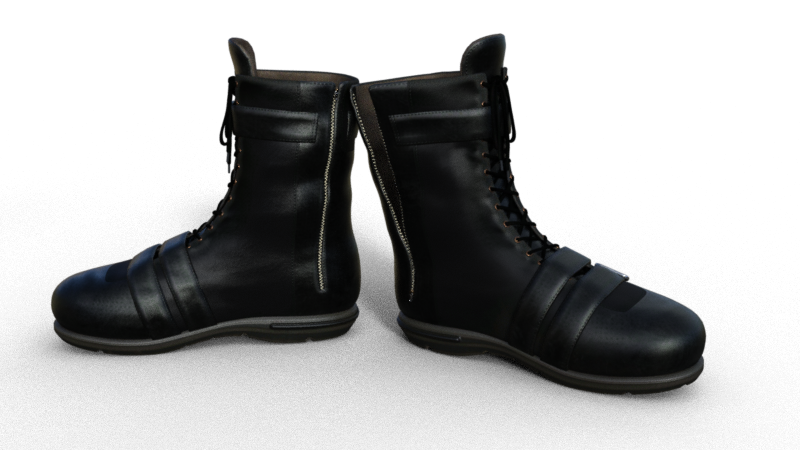
Anyone knows boots for G8F that can actually pull the zipper down?Hey guys! I am wondering if there are any boots that can pull the zipper down?
I watched some videoes about editing the models and create morph, but still wondering if there are any products like that :D
There's Zoro_d's www.renderosity.com/mod/bcs/chameleon-rose-biker-outfit-for-chameleon-rose-g8f/126601 currently on sale. The boots just have a morph for open and closed states.
Daz 3D is part of

Connect
DAZ Productions, Inc.
7533 S Center View Ct #4664
West Jordan, UT 84084Licensing Agreement | Terms of Service | Privacy Policy | EULA
© 2026 Daz Productions Inc. All Rights Reserved.