-
What is some of your favourite content for male characters?
M3 is really old and limited in many ways, but with some effort -- and careful posing -- he can still get the job done. :)
More older content, this time for M4. ElorOnceDark made several great outfits for M4, with tons of details and extras and adjustment morphs, etc. Just amazing attention to detail. He doesn't appear to be active any longer, which is too bad, but his outfits convert pretty well to newer generations. I've used them on Genesis, Genesis 2, and Genesis 3 (I don't yet have any conversion utitilies for G8; in fact, only bought my first G8 male outfit yesterday lol! I'm still catching up on Genesis 3 stuff...)
Anyway, I think Immortal Ronin, WoodGod, and Cyberpunk / Cyberpunk Expansion / Post Apocalyptic textures are still fantastic and worth picking up.

Mixed Immortal Ronin with the cyberarm from Cyberpunk. Elite Lee M4 texure; I use the elite textures a lot on newer generations too.
Dial morph made with Morphs ++, Elite Ethnic set, and Morphus. The elite ethnic morphs for V4 and M4 were great, it's really too bad they were never made for any Genesis figuers. Also too bad the Morphus set is no longer in the store, boo!!. :(
Used M4 Displacement maps as well and Colin Hair for G3M (not that you can see it.)

Tea Time for tough guys! Bounty Hunter M4 texture -- which has some great body scars, though not visible here -- and SAV's Spartacos Short Hair (Renderosity.) I use that hair a lot.

M4 on the left, Gianni 7 on the right. The only issue I run into with converting WoodGod is that the vest is double-sided and can be a little tricky in regards to poke-through with some poses. I did use a tiny bit of push modifier on Gianni.
An old render I did with WoodGod on Hiro 5, with Hitomi...some rudely behaving barbarian fawn kids:

Both wearing the Pabu V4 texture. It's cute!
Feet HD Detail (Or Lack Thereof)Well it's not perfect but I've released a morph to fix the issues, you can purchase it from my deviantart account:
https://www.deviantart.com/necdaz91/art/Daz3D-Genesis-8-Requested-Foot-Morph-Release-805030301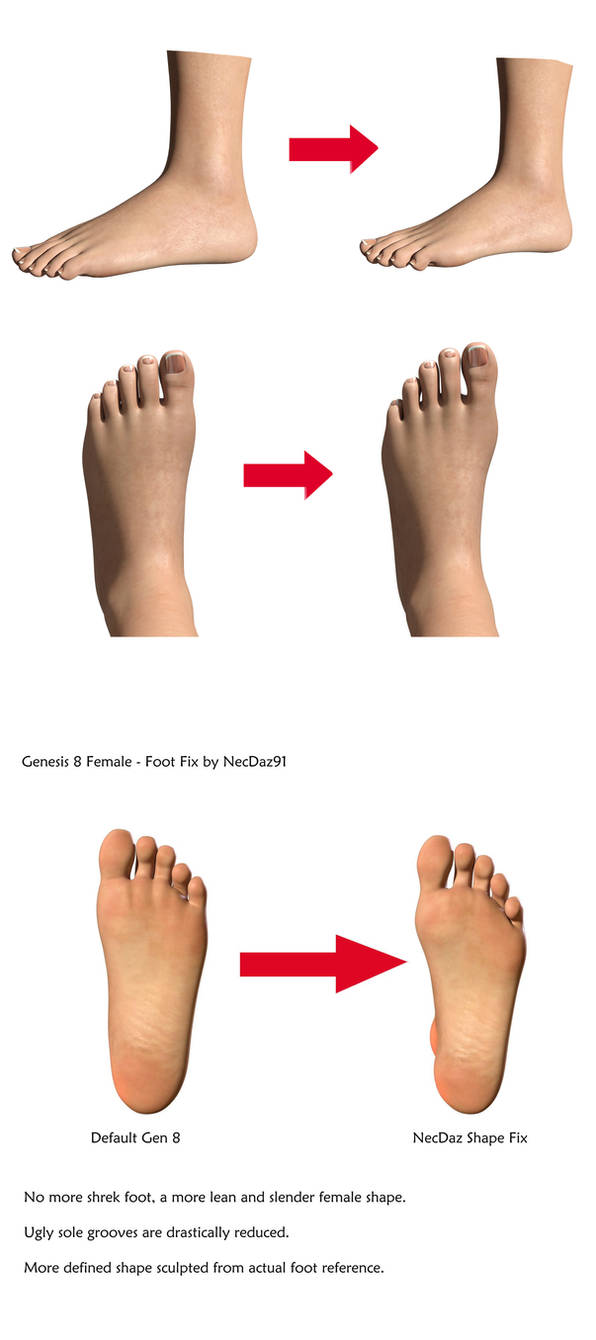 [Released] Clothing Converter from Genesis 3 Male to Genesis 8 Male [Commercial]
ihkang Bomber Jacket set
Did your base character model get accidently modified with a changed scale factor or some morph always dialed in? Some products are being sold lately with morphs that apply to everything, not just the character the morph is supposed to affect.
Not that I can tell. I have loaded the model various ways. But I will double check
More Non-photorealisitic Renders (NPR II)You are absolutely right. I should have taken the extra time to finish the image before posting. To that end, I decided to go back and try adjusting the expression and then I added some blue beneath her to give it the depth and sense of completion that it needs. I was just tired and since I was really focusing on the folds of the fabric I just wanted to walk away from it. Here's my updated image. Any thoughts?

I have not looked at that morph pack you mentioned, but I will now.
I am going to start a new project soon and I'm toying with the idea of using La Femme as the figure for the lead female character. But, before I can do that I have to be certain that she can use V4 poses and expressions. So far when I've tried to use poses strange things happen to the hands. Likewise, expressions have not been really successful. But I haven't done enough testing yet to make a determination. (BTW: The project is the one that the M4 "Arton" character appears in.) We'll see how it goes after I make a few more La Femme images and have time to determine her compatability with the poses/expressions/props in my content library and if she is as easy to work with as V4.
That's the ticket I think.
I have to say, she's a very different animal from V4 - and as for expressions, I would recommend doing those yourself. It's been designed with a view to making expressions easy... but easy with practice. The best way to get an expression on her is not to spin the dials but to work directly on the face.
I agree – this figure has some definite differences from the old V4. And that may be the issue in and of itself. I'm about to start a comic that will have the character appear in 150-200 panels of the story. Do I want to start doing something this new in a project of this scope? Are there enough resources to support the figure? Particularly poses and expressions to use as a starting point? So far I'm not even sure if there is a "zero expression" pose that will not change the shape of the character's face. Ditto for a solid "zero pose" that doesn't change morphs or character settings. The image you see above is the only thing I've done with her, and it was all a learning experience. I definitely didn't get into the details.
I think one of the next things is to see if I can find a suitable outfit, hair and weapon for the character (as well as the elf ears – she's elven) and then dial in the body and face so I can try a few test shots to see if I think she would be easy enough to work with.
But I probably won't be ready to try that experiment for at least a month or two.
Can I use SFM models in DazStudio?You can import SFM models into Blender and then export them to Daz Studio as OBJ files.
There's a tutorial on how to import SFM models to Blender but I can't post the URL here, Google is your friend.
I played around with turning the OBJ file from Blender into a Daz morph using Wrap but I could never figure out how to sort the eyes and mouth out. Another issue is the textures, a lot of SFM models are based on the Daz figure which is fine for the torso, arms & legs etc but the head will still be using the game texture so the UV will not not match the Daz head.
Steve.
Black Is Beautiful II^ both are on my wishlist, they look really pretty!
Here's something that I threw together a few days ago. Note that her face is a freebie!

Freebie credits:
Morph by bu_es: https://www.renderosity.com/mod/freestuff/aminata-for-g8f-monique-8/79842
Circlet by squarepog3d: https://www.renderosity.com/mod/freestuff/fantasy-amazon-bundle-for-g8f---100-free/79046
Shawl by anjeli93: https://www.renderosity.com/mod/freestuff/shawl-for-a93-dforce-salwar-kameez-also-standalone-/80789
Petals by Sannzi: http://sanzisannzi.web.fc2.com/sub3.html
Pose converter by Agent Unawares: https://www.deviantart.com/agentunawares/art/G3F-to-G8F-World-s-Greatest-Pose-Converter-709591348Default genesis load corrupted?I've quickly made a test with my Genesis 8 Female and created a character shape controller called CTRL_Aiko8_ElfCharacter that was saved as Morphs Asset intentonaly with a default value of 100%.
Then I've loaded my default base genesis 8 female figure from the Content Library and the Elf Character shape was applied by default. The next thing I did was making screenshots how I found the CTRL_Aiko8_ElfCharacter with the Parameter Settings and the Parameters pane even though it is not showing up in the Currently Used list.
In the first screenshot I was selecting the figure and the "Currently Used" property group where I found the morphs that are now applied by default if I load the default genesis figure from the library. Next I was clicking the gear icon on the Ears Elf Long morph to show the Parameter Settings and I found the CTRL_Aiko8_ElfCharacter in the Controllers tab.
In the second screenshot you see I've selected the "All" property group and entered "elfchar" into the search filter box at top of the Parameters pane and the CTRL_Aiko8_ElfCharacter was showing up. Then I clicked the gear icon on this morph and in the Parameter Settings I saw that this morph is set to 100% at default.
[Edit]: To add information on how to ged rid of the corrupted morph.
To delete the corrupted morph you have to open up your file browser navigate to your Content Directory and search for the CTRL_Aiko8_ElfCharacter file. My morph with the fielname "CTRL_Aiko8_ElfCharacter.dsf" was saved into this path: My Library\data\DAZ 3D\Genesis 8\Female\Morphs\Syrus_Dante\Test Morphs
I've deleted the CTRL_Aiko8_ElfCharacter.dsf file closed the scene and loaded my default genesis 8 female figure from the Content Library again into the scene and as suspected the figure loaded with the default base shape again.
Default genesis load corrupted?Yeah, I combed through all my dials to try work out where this randomness came from and no odd new controllers @Richard.
I have recently downloaded some free morphs, @Bejaymac. One was a bunch of freebie morphs from Sickleyard and the other was actually an anime-esque and elf morph but they were meant for a different Genesis generation. 3 and 8 I think? Would this explain my sudden unruly Genesis base? I will delete if so.
@Syrus I checked "Controllers" under parametre for Aiko 5 since she's the most obvious with the defaults changed. I couldn't find anything that was controlling the auto-dial upon new loads.
How to get rid of properties for goodFirst you should be realy careful with permanetly saving changes you made to the morphs. You can save modified existing morphs, recently created properties or imported morphs along with the scene file to continue editing them between DS sessions. But you have to keep in mind that those morphs and modifications will only be available by loading the scene file because those modified assets will get saved embedded. You may have loaded the default genesis figure asset from the Content Library and this will be the unmodified version.
Also make shure that the morphs you want to save are set to a default value of zero in the Parameter Settings.
To save morphs go to File>Save As>Support Asset>Morph Asset and if you want to "update" your modified existing morphs by overwriting the morph file on disc you have to be super careful to select the same Content Library, Vendor and Product Name in the save dialog like the original morph is saved to. To check where the original morph asset is saved first open up the Parameter Settings and copy the morph Name. Then open up your file browser like the MS-Explorer and navigate to your content directory and open this path "Content Library\data\DAZ 3D\Genesis 8\Female\Morphs\DAZ 3D\Aiko 8" the file name is "eJCMAiko8SmileFullFace.dsf".
Asset Directory: select your main Content Directory where you have installed Genesis 8 Female
Vendor: DAZ 3D
Product Name: Aiko 8
Then you have to select which morph you actualy want to save in the bottom Properties list you have to navigate to the Hidden/People/Aiko 8/eJCMs property group and click to checkmark the eJCMAiko8SmileFullFace.
Next press accept to save the morph asset. Then you also have to delete the current genesis figure from the scene or start a new scene and load the default figure asset from Content Library to get the saved morph assets loaded from the Content Directory and not embedded from the scen file.
This post is just a short introduction to saving moprh assets if you want to know more about this subject read my post in this thread: Update Custom morphs?
I use to shop here.DAZ could bundle the dforce hair toolset and the HD morph toolset into an advanced tools product and market it for $100 a pop. Then a year later after alot of folks have bought it, they could turn around and offer it free to everybody...... naaaa.... just kidding.... they would never do that.
Do I really need to buy teen Josie 7 to use another character?I would like to purchase the Tamara Character, but when I click on add to cart, it shows that Teen Josie 7 is a required product. Does anyone know why it is required or if I can use it without Teen Josie 7?
It allows me to buy it without Teen Josie, but are there any benefits to buying Tamara and Josie or any reason why it would be better to buy both?
I appreiciate any information or help you are able to give me.
To expand on what Chohole said, characters that show a Daz Named figure as a requirement are using that figure's shape morph to some extent. The product page won't say how much.
Which product are you looking at? If I have her, I'll do a quick render of her without TJ7 dialed in.
More Non-photorealisitic Renders (NPR II)Today I decided to spend a little time playing around with the new La Femme figure to see if she could be fitted into my current workflow. I still need to run some more tests to see how well she adapts to Victoria 4 poses. To be honest, I should have worked on her expression a little more, but overall I like some of the new features the figure has to offer. The fabric draping was simulated in the Cloth Room.
As usual, this was created with Poser Pro 11 and Clip Studio Paint.
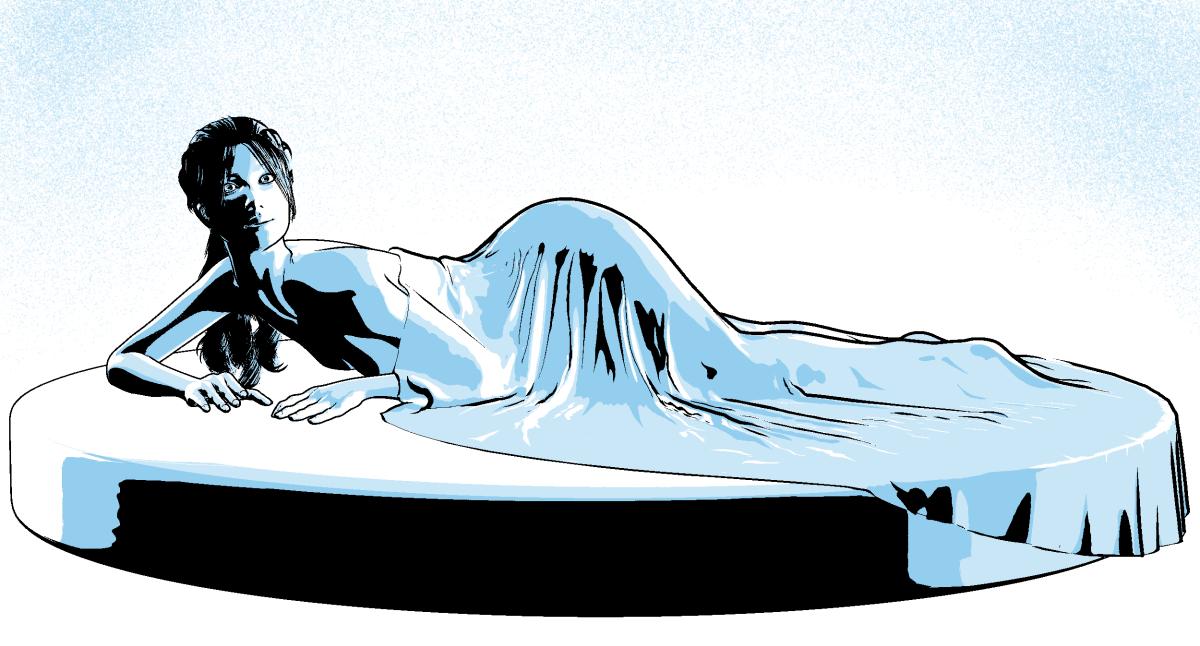
The shading on this is just amazing, The blues are a great choice but I would add a little of that blue beneath her and just under her hands. I've had a go with the new figure and it will take a little getting used but there's some serious potential there - especially with Black Hearted's morph pack - I would have purchased that with the figure just for the legs. If I need to render something with a focus on legs, this is a go to option.
You are absolutely right. I should have taken the extra time to finish the image before posting. To that end, I decided to go back and try adjusting the expression and then I added some blue beneath her to give it the depth and sense of completion that it needs. I was just tired and since I was really focusing on the folds of the fabric I just wanted to walk away from it. Here's my updated image. Any thoughts?
I have not looked at that morph pack you mentioned, but I will now.
I am going to start a new project soon and I'm toying with the idea of using La Femme as the figure for the lead female character. But, before I can do that I have to be certain that she can use V4 poses and expressions. So far when I've tried to use poses strange things happen to the hands. Likewise, expressions have not been really successful. But I haven't done enough testing yet to make a determination. (BTW: The project is the one that the M4 "Arton" character appears in.) We'll see how it goes after I make a few more La Femme images and have time to determine her compatability with the poses/expressions/props in my content library and if she is as easy to work with as V4.
That's the ticket I think.
I have to say, she's a very different animal from V4 - and as for expressions, I would recommend doing those yourself. It's been designed with a view to making expressions easy... but easy with practice. The best way to get an expression on her is not to spin the dials but to work directly on the face.
I use to shop here.A lot of people are annoyed at Daz for locking the dforce tool for strand based hair to PA's only. Fair enough but I understand the business decision.
They locked the HD morph feature to certain PA's as well - people found a way around it. People will work a way around dforcing strand hair as well.
The obvious fix if it annoys you so much is to get a product published, voila you are a PA and have access to the dforce tool.
As far as I am concerned I am genertically incapable of producing anything like that (yes I have tried, I am clueless) wso will make do with what I can do. I render daily, but assets that fill a need for something I want to do and happily pay my money to daz and the PA's for giving me access to software and assets that give me enjoyment. They do the work, I pay them for that work. Sounds fair to me.
David
More Non-photorealisitic Renders (NPR II)Today I decided to spend a little time playing around with the new La Femme figure to see if she could be fitted into my current workflow. I still need to run some more tests to see how well she adapts to Victoria 4 poses. To be honest, I should have worked on her expression a little more, but overall I like some of the new features the figure has to offer. The fabric draping was simulated in the Cloth Room.
As usual, this was created with Poser Pro 11 and Clip Studio Paint.
The shading on this is just amazing, The blues are a great choice but I would add a little of that blue beneath her and just under her hands. I've had a go with the new figure and it will take a little getting used but there's some serious potential there - especially with Black Hearted's morph pack - I would have purchased that with the figure just for the legs. If I need to render something with a focus on legs, this is a go to option.
You are absolutely right. I should have taken the extra time to finish the image before posting. To that end, I decided to go back and try adjusting the expression and then I added some blue beneath her to give it the depth and sense of completion that it needs. I was just tired and since I was really focusing on the folds of the fabric I just wanted to walk away from it. Here's my updated image. Any thoughts?
I have not looked at that morph pack you mentioned, but I will now.
I am going to start a new project soon and I'm toying with the idea of using La Femme as the figure for the lead female character. But, before I can do that I have to be certain that she can use V4 poses and expressions. So far when I've tried to use poses strange things happen to the hands. Likewise, expressions have not been really successful. But I haven't done enough testing yet to make a determination. (BTW: The project is the one that the M4 "Arton" character appears in.) We'll see how it goes after I make a few more La Femme images and have time to determine her compatability with the poses/expressions/props in my content library and if she is as easy to work with as V4.
[Released] Clothing Converter from Genesis 3 Male to Genesis 8 Male [Commercial]Did your base character model get accidently modified with a changed scale factor or some morph always dialed in? Some products are being sold lately with morphs that apply to everything, not just the character the morph is supposed to affect.
Dark ElfI'll look into those. I also heard back from Quanto, turns out it is a custom morph that he does not intend to share.....
[Released] Medieval Fantasy Bedroom [Commercial]For the candles, the pose controls @Strangefate set up for the candle flames work quite well as far as getting the flame to dance goes:
http://algovincian.com/temp/candle.mp4
I'm sure it could be improved, but the flame motion took literally less than 60 seconds to key by randomly setting some keys for the 4 twist controls.
As far as the smoke goes, I think the most resource efficient way to do it would be to create a new MDL shader that supported 2 opacity maps each with their own UVs - a smoke pattern and an envelope. The envelope could just be a static gradient (causing the smoke to fade as it rose). The smoke pattern could be seamless (vertically) and animated by keying it's vertical UV offset. The keying would have to be done via script using signals on frame changes since mats in DS aren't animatable. Layering these two using an overlay blend and sending the output to the cutout opacity should work.
Of course, simply recording some smoke footage and making it seamless in time would probably look better and be easier, though use more resources. You'd still have to key the individual frames via script as above. And, you'd also have to make the smoke starting point follow the tip of the flame as it dances
Would actually be a fun side project - wish I had more free time to mess with it lol.
- Greg
ETA: I think a similar approach could be used for the fireplace.
yes they certainly are animatable and could be instanced
my main problem is all the multiple planes in the fire, one posibility would be export the lot as an obj and alter single parameters export those and load the objs on the original export as morph targets
then one could puppeteer an animated pose preset
the smoke scaling, transforming and rotating would probably suffice
More Non-photorealisitic Renders (NPR II)Today I decided to spend a little time playing around with the new La Femme figure to see if she could be fitted into my current workflow. I still need to run some more tests to see how well she adapts to Victoria 4 poses. To be honest, I should have worked on her expression a little more, but overall I like some of the new features the figure has to offer. The fabric draping was simulated in the Cloth Room.
As usual, this was created with Poser Pro 11 and Clip Studio Paint.
The shading on this is just amazing, The blues are a great choice but I would add a little of that blue beneath her and just under her hands. I've had a go with the new figure and it will take a little getting used but there's some serious potential there - especially with Black Hearted's morph pack - I would have purchased that with the figure just for the legs. If I need to render something with a focus on legs, this is a go to option.
Is there a way to morph a single body part from one character to another, in this case teeth?With your figure selected have a look in the Parameters pane "Currently Used" section. Maybe the full character morph utilizes a seperate teeth morph that you can turn off. Otherwise the teeths could also possibly be part of the characters full head/body morph.
How to get rid of properties for goodI see people often get confused by this ERC-Linking subject and it seems this includes even PAs that release those mophs. But once you have understood the ERC-Linking dpendencies is isn't that complicated.
I saw a similar issue with my Genesis 3 Female and Mika7 "eCTLMika7EyesClose". If I closed the eyes the eCTRL for Mika7 was always activated even with the genesis base shape. This should make shure that the eye lids exactly match if the eyes are fully closed and the Mika7 shape is applied.
I did fix this issue by myself in the Hierarchy Editor by adding a Controller: ERC [Multiply] FHMMika7 to the eCTLMika7EyesClose morph.
You can set the Parameters pane to Edit Mode in the right-click menu where you can also find Show in Hierarchy Editor if you right-click on the moph slider. This will open up the Hierarchy Editor pane and will select the property there, then you can drag and drop morphs from the Parameters pane to the Hierarchy pane into the Controller or Sub-Components and set a linking type like ERC [DeltaAdd] and ERC [Multiply] under the section Attibutes.
In case of the Aiko8 I think the eJCM dependency chain should look like this:
[Edit]: I was writing nonsense here.
Expression: Smile Full Face HD Sub-Component: ERC [DeltaAdd] eJCMAiko8SimileFullFace - this will establish a 1 to 1 relationship between the expression and the correction morph slider
Morph: FHMAiko8 Controller: ERC [Multiply] eJCMAiko8SimileFullFace - this will establish a dependency that the correction morph will be linked to the value of the Full Head Morph "Aiko 8 Head"
The first ERC Link will make shure that the Expression Joint Correction Morph for Aiko will get dialed up if you use the Smile Full Face HD expression.
The second ERC Link will make shure that the Expression Joint Correction Morph will only get dialed up by the amount you dial up the Full Head Morph Aiko8. If the full head morph is set to zero there will be no correction morph applied by the smile expression.
I've attached another example of how the expression correction eCTRLAiko7Angy is ERC-linked in the PropertyHierarchy. I hope this will clear up some of the confusion.
Daz 3D is part of

Connect
DAZ Productions, Inc.
7533 S Center View Ct #4664
West Jordan, UT 84084Licensing Agreement | Terms of Service | Privacy Policy | EULA
© 2026 Daz Productions Inc. All Rights Reserved.